Elegant Console Logger For Python Command Line Apps

Project description
Signale.py
Elegant Console Logger For Python Command-Line Apps
Installation
Signale.py can be installed using pip.
[sudo] pip install signalepy
Usage
Package consists of a class Signale, it is the main constructor class. The object created has all the logger functions in it.
Using Loggers
Each logger function takes four arguments:-
textprefix( Optional )suffix( Optional )level( Optional )
They all are available in the logger object. To create one do this:-
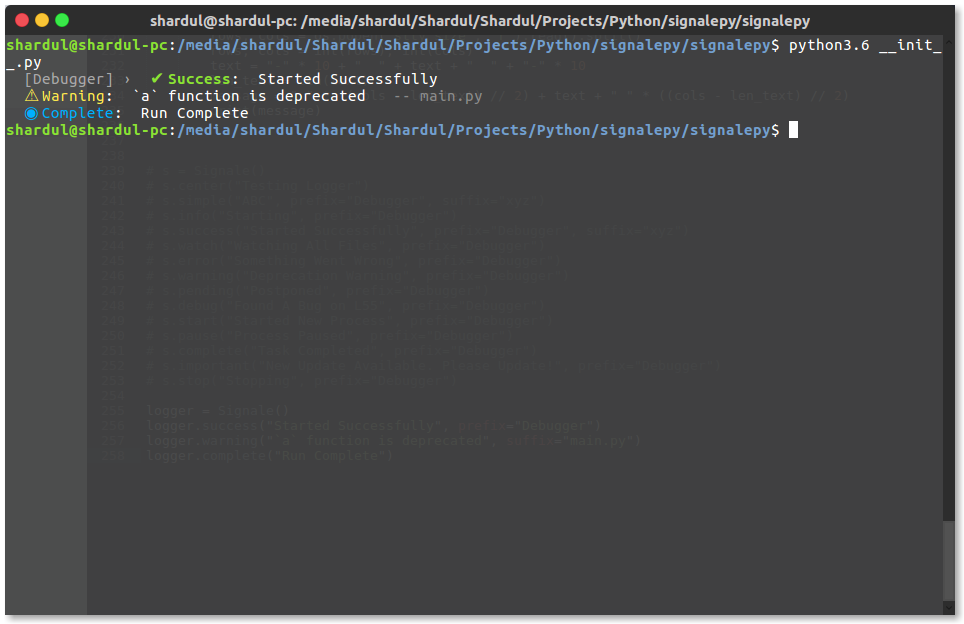
from signalepy import Signale

logger = Signale()
Now you can use the default loggers using this object like:-
...

logger.success("Started Successfully", prefix="Debugger")
logger.warning("`a` function is deprecated", suffix="main.py")
logger.complete("Run Complete")

...
This will produce the following result:-
View All Available Loggers
simplesuccesserrorexception(same aserror, but also prints a formatted stack backtrace)warning(=warn)startstopwatchimportantpendingcompletedebugxdebugpauseinfolikecenterboldunderlinereversedcoloured(=colored)
Scoped Loggers
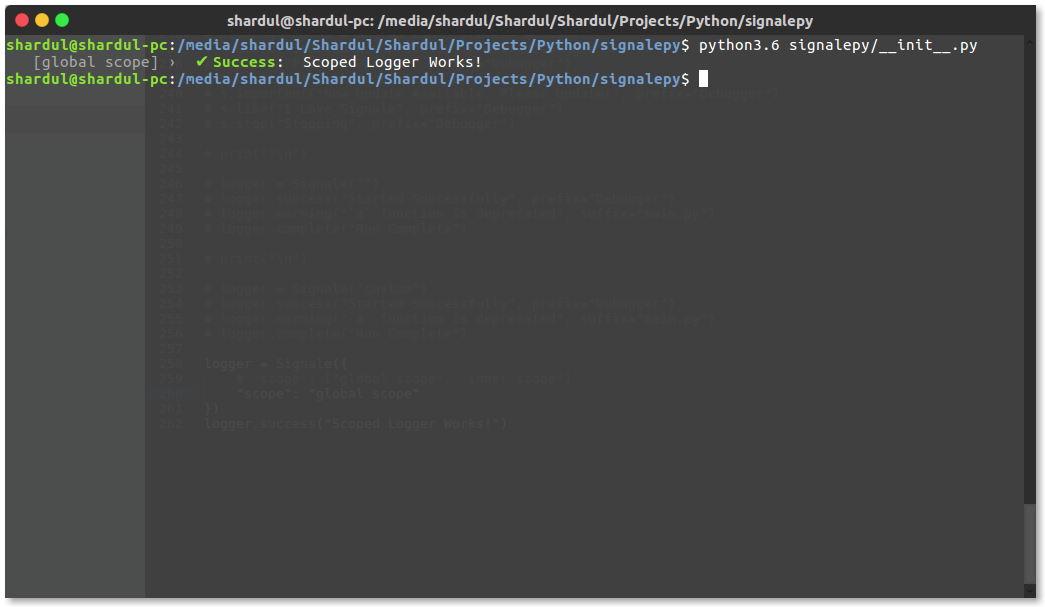
To create scoped loggers, define the scope field in the options argument of constructor like:-
from signalepy import Signale

logger = Signale({
	"scope": "global scope"
})
logger.success("Scoped Logger Works!")
This will produce the following result:-
You also create multiple scopes by setting the scope field to a list of strings like:-
from signalepy import Signale

logger = Signale({
	"scope": ["global scope", "inner scope"]
})
logger.success("Scoped Logger Works!")
This will produce the following result:-

You can also create scoped a logger which is just clone of other by using by using the scoped function like this:-
from signalepy import Signale

logger = Signale({
	"scope": "global scope"
})

logger2 = logger.scoped("inner")
logger2.like("I love Signale.py", prefix="Shardul Nalegave", suffix="Creator")
This will produce the following result:-
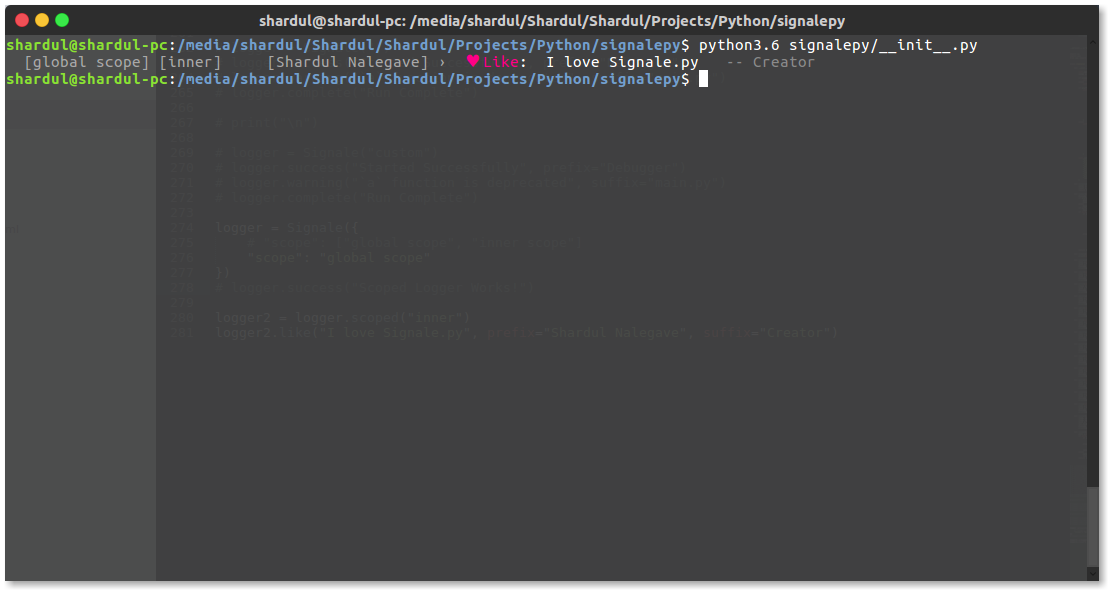
Note:- All the configuration will be copied to the new logger just the scope will be extended.
Filtering With Levels
All logging output can be filtered based on levels and thresholds. All logging
methods have an optional level argument, pre-filled with one of XDEBUG,
DEBUG, INFO, WARNING, ERROR, or CRITICAL. For most, the default
should be obvious, the others use INFO.
By default, all levels are visible. The threshold of visibility can be raised
with the set_threshold(scope, level) module function globally, where scope
is the name of a scope, or None (aka GLOBAL_SCOPE). The levels can also
be specified as an uppercase string.
Any of the named scopes associated with a logger with a defined threshold will
have to be surpassed by the level. If there is no explicit threshold for any
named scopes, the GLOBAL_SCOPE will be used.
This means that the threshold of any named scopes can be raised or lowered independent of the global scope's threshold. However, for named scopes with a specified threshold, the lowest threshold of them will be used; i.e., it is not possible to raise the threshold for a sub-scope.
Aligning labels
The module supports a function set_align(left, right), which allows for the
alignment of scopes and labels. Default are strings " " and ": " for left
and right, which will be put before/after the scope and labels. These strings
can be set to different strings. Alternatively, they can be changed to numbers,
to specify the width of the respective fields. Care should be taken that the
numbers are chosen large enough to make things aligned.
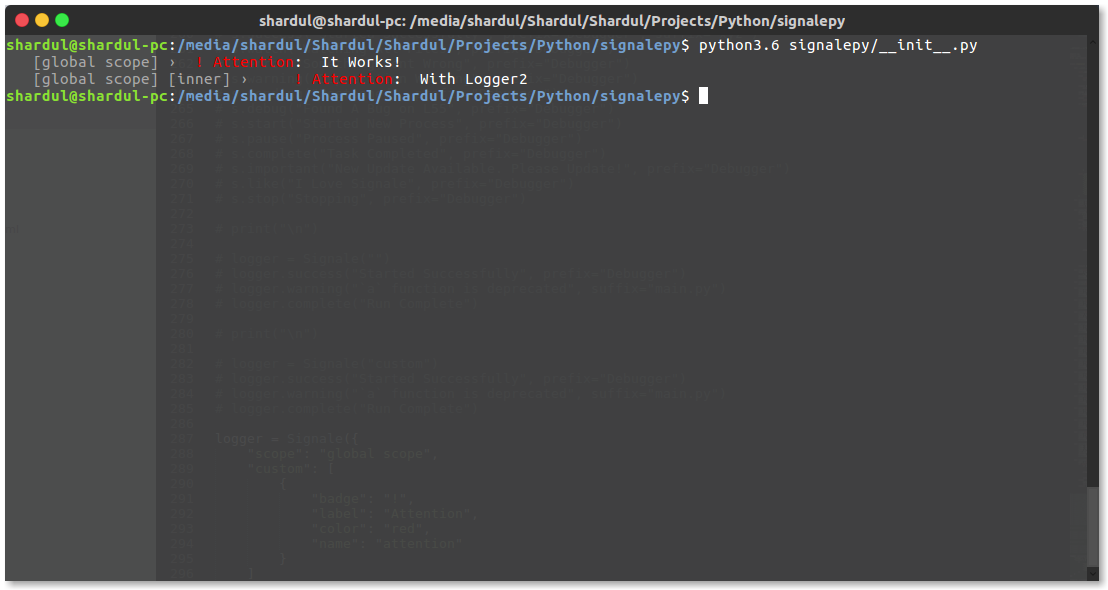
Custom Loggers
Custom loggers can be created by passing a array of custom logger configuration to the field custom in the options passed to the constructor. Even clone loggers inherit the parent's custom loggers. For example:-
from signalepy import Signale

logger = Signale({
	"scope": "global scope",
	"custom": [
		{
			"badge": "!",
			"label": "Attention",
			"color": "red",
			"name": "attention"
		}
	]
})

logger2 = logger.scoped("inner")

logger.attention("It Works!")
logger2.attention("With Logger2")
This will produce the following result:-
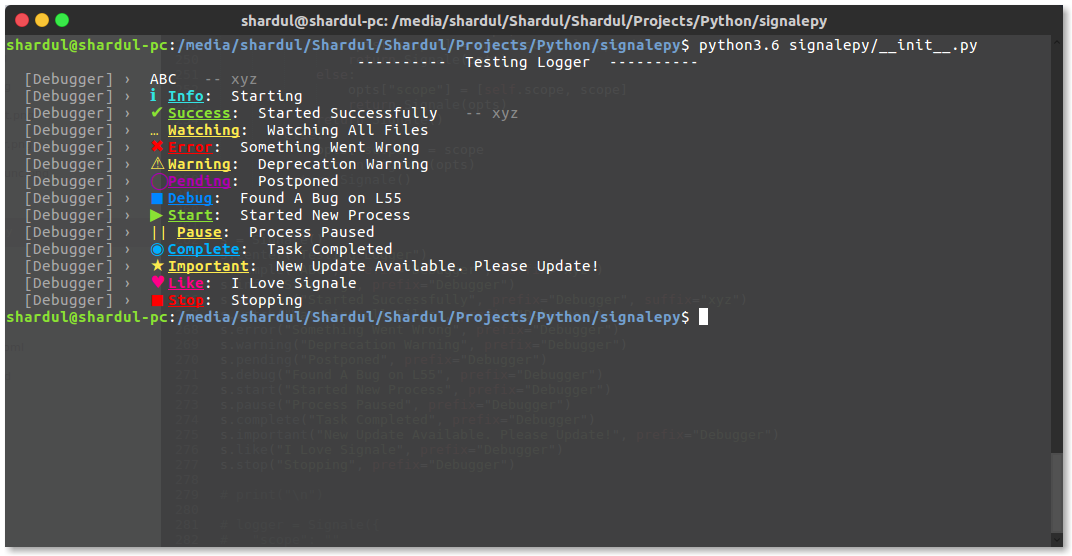
Underlined Labels
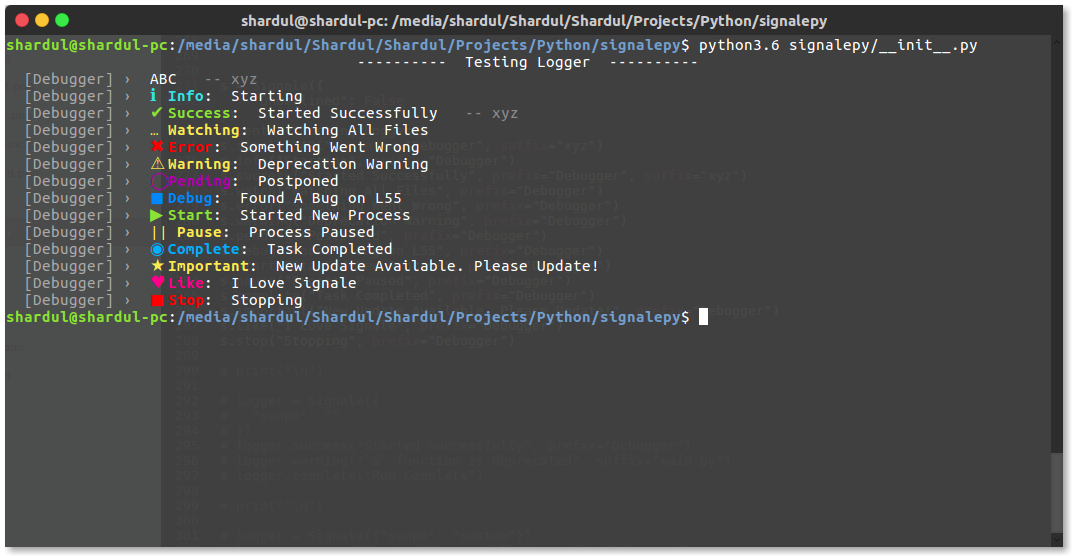
You can set labels to be underlined by setting the underlined field to True in the options passed to the constructor. For example:-
from signalepy import Signale

s = Signale({
	"underlined": True
})
s.center("Testing Logger")
s.simple("ABC", prefix="Debugger", suffix="xyz")
s.info("Starting", prefix="Debugger")
s.success("Started Successfully", prefix="Debugger", suffix="xyz")
s.watch("Watching All Files", prefix="Debugger")
s.error("Something Went Wrong", prefix="Debugger")
s.warning("Deprecation Warning", prefix="Debugger")
s.pending("Postponed", prefix="Debugger")
s.debug("Found A Bug on L55", prefix="Debugger")
s.start("Started New Process", prefix="Debugger")
s.pause("Process Paused", prefix="Debugger")
s.complete("Task Completed", prefix="Debugger")
s.important("New Update Available. Please Update!", prefix="Debugger")
s.like("I Love Signale", prefix="Debugger")
s.stop("Stopping", prefix="Debugger")
This will produce the following result:-
Options
Options taken by constructor
-
scope
- Type:
strorlist
Signale Logger Scope
- Type:
-
underlined
- Type:
bool
Labels Should Be Underlined Or Not
- Type:
-
ansi
- Type:
boolorNone
Whether To Use ANSI Sequences.
Nonewill autodetect whetherstdoutis a TTY and only use color there. - Type:
-
custom
- Type:
list
List of custom logger configuration.
-
Configuration Type:
dictCustom Logger Configuration Dictionary
-
Keys
-
name- Type:
str
Name of the logger
- Type:
-
label- Type:
str
Label displayed beside the icon ( colored text )
- Type:
-
badge- Type:
str
Icon
- Type:
-
color- Type:
str
Color of the icon and label. Should be from:-
reddarkbluepinkgreengreypurpleyellowcyanreset(color reset code)
- Type:
-
-
- Type:
API
-
logger =
Signale(<options>)
Signale- Type:
class
Signale class imported from
signalepymodule
options- Type:
dict
Options Dictionary for logger.
- Returns: Signale Logger Object
Logger object which can be used for logging
- Type:
-
logger.
<logger>(message="", prefix="", suffix="")
logger- Type:
function
Can be any default logger
message- Type:
str
Message to be displayed
prefix- Type:
str - Required: False
Prefix text
suffix- Type:
str - Required: False
Suffix text
- Returns:
None
- Type:
-
logger2 =
logger.scoped(<new scope>)
logger- Type: Signale Logger Object
Parent Logger
new scope- Type:
str
New Scope Name
- Returns: Signale Logger Object
Clone Logger object with extended scope


Download files
Download the file for your platform. If you're not sure which to choose, learn more about installing packages.
Source Distribution
Built Distribution
Filter files by name, interpreter, ABI, and platform.
If you're not sure about the file name format, learn more about wheel file names.
Copy a direct link to the current filters
File details
Details for the file signale-logging-0.5.4.tar.gz.
File metadata
- Download URL: signale-logging-0.5.4.tar.gz
- Upload date:
- Size: 12.1 kB
- Tags: Source
- Uploaded using Trusted Publishing? No
- Uploaded via: twine/3.3.0 pkginfo/1.4.2 requests/2.25.1 setuptools/52.0.0 requests-toolbelt/0.9.1 tqdm/4.57.0 CPython/3.9.5
File hashes
| Algorithm | Hash digest | |
|---|---|---|
| SHA256 |
8e4027ae31d573771d589c48097fec654affd8a57d7df03e36cdfacc0495786b
|
|
| MD5 |
6b1874969297b617ad2cb71e558af537
|
|
| BLAKE2b-256 |
d64346c8f6c1ea436bb55fb4904e27a734b2e9892bd25c01e2b7afabcbbaea9c
|
File details
Details for the file signale_logging-0.5.4-py3-none-any.whl.
File metadata
- Download URL: signale_logging-0.5.4-py3-none-any.whl
- Upload date:
- Size: 8.5 kB
- Tags: Python 3
- Uploaded using Trusted Publishing? No
- Uploaded via: twine/3.3.0 pkginfo/1.4.2 requests/2.25.1 setuptools/52.0.0 requests-toolbelt/0.9.1 tqdm/4.57.0 CPython/3.9.5
File hashes
| Algorithm | Hash digest | |
|---|---|---|
| SHA256 |
10f4c287a82fca2b5abc1da61f7c0a525c37813c3843ed89086f8b5b4ae6acb9
|
|
| MD5 |
a3d9c5c4f0a65c1ace046bf0102bfcee
|
|
| BLAKE2b-256 |
63212a7aa25d978ef0347f11e4f3f9b2a3ba93d87d2cc6a9c81a54dde5223ca3
|


