

| Package |       |
| Skforecast |    |
| Meta |   |
| Testing |   |
| Donation |     |
| Community |    |
skforecast-ai is an AI forecasting assistant that pairs a deterministic engine, powered by skforecast, with an LLM reasoning layer. Simply provide a time series, and the assistant automatically profiles the data, selects a model using established best practices, and evaluates its performance. It returns both the final forecast and the runnable skforecast script that produced it.
Table of contents
- Why skforecast-ai?
- Installation
- Quickstart (Python)
- Quickstart (CLI)
- How it works
- Documentation
- Contributing
- Citation
- License
✨ Why skforecast-ai?
- 🎯 Deterministic by design: built as a strict rule-based engine to guarantee absolute consistency, same input always means the same output.
- 🔍 Code you can inspect: the script you see is the code that ran. Inspect it, version it, or run it standalone with plain skforecast.
- ⚡ From data to forecast in one call: automatic data profiling, model and estimator selection, lag/feature engineering, and backtest evaluation.
- 💻 Python or terminal: drive the full pipeline from a few lines of Python or from the command line.
- 💬 LLM reasoning layer: explains the engine's decisions in plain language, helps you improve the configuration, and lets you ask for advice. This layer is entirely optional; the core forecasting pipeline can run fully offline.
- 🏗️ Built on skforecast: recursive & direct forecasters, multi-series, statistical, and foundation models (Chronos-2, TimesFM, Moirai, and more).
📦 Installation
Requires Python ≥ 3.10.
pip install skforecast-ai
To enable the optional LLM reasoning layer:
pip install "skforecast-ai[llm]"
Install from source (for development)
git clone https://github.com/skforecast/skforecast-ai.git
cd skforecast-ai
pip install -e ".[dev]"
🚀 Quickstart (Python)
From raw data to a validated forecast, and the code behind it, in a few lines:
from skforecast_ai import ForecastingAssistant
from skforecast.datasets import load_demo_dataset

data = load_demo_dataset(verbose=False)
assistant = ForecastingAssistant()
result = assistant.forecast(data=data, target="y", steps=12, test_size=12)

print(result.predictions)   # predictions for the 12 held-out observations
print(result.metrics)       # evaluation metrics: MAE, MSE, MASE, MAPE
print(result.code)          # the exact skforecast script that produced this result
That single forecast() call profiled the data, chose a forecaster and estimator, generated a skforecast script, and executed it on a train/test split. result.code is the script that ran. Drop test_size to train on all the data and forecast the next 12 steps (then result.metrics is None, since there is nothing to score against).
The returned ForecastResult exposes everything the pipeline produced:
| Attribute | What it holds |
|---|---|
result.predictions |
Forecast for the requested horizon (includes interval columns when interval is requested) |
result.metrics |
Evaluation metrics on the held-out test set (MAE, MSE, MASE, MAPE); None in prediction mode |
result.code |
The runnable skforecast script that produced the result |
result.profile |
What profiling detected about your data |
result.plan |
The forecaster, estimator, lags, and metrics that were chosen |
👉 New here? Walk through it step by step in Your first forecast.
💻 Quickstart (CLI)
The same pipeline runs from the terminal. Point it at a CSV file or URL:
# End-to-end forecast (profile → plan → code → forecast)
skforecast-ai forecast data.csv --target y --date-column datetime --steps 12

# Just inspect the data
skforecast-ai profile data.csv --target y --date-column datetime

# Generate a standalone, runnable script without executing it
skforecast-ai forecast-code data.csv --target y --date-column datetime --steps 12 --output forecast.py
Run skforecast-ai --help or skforecast-ai <command> --help for inline documentation on any command.
👉 Full command reference in CLI usage.
🧠 How it works
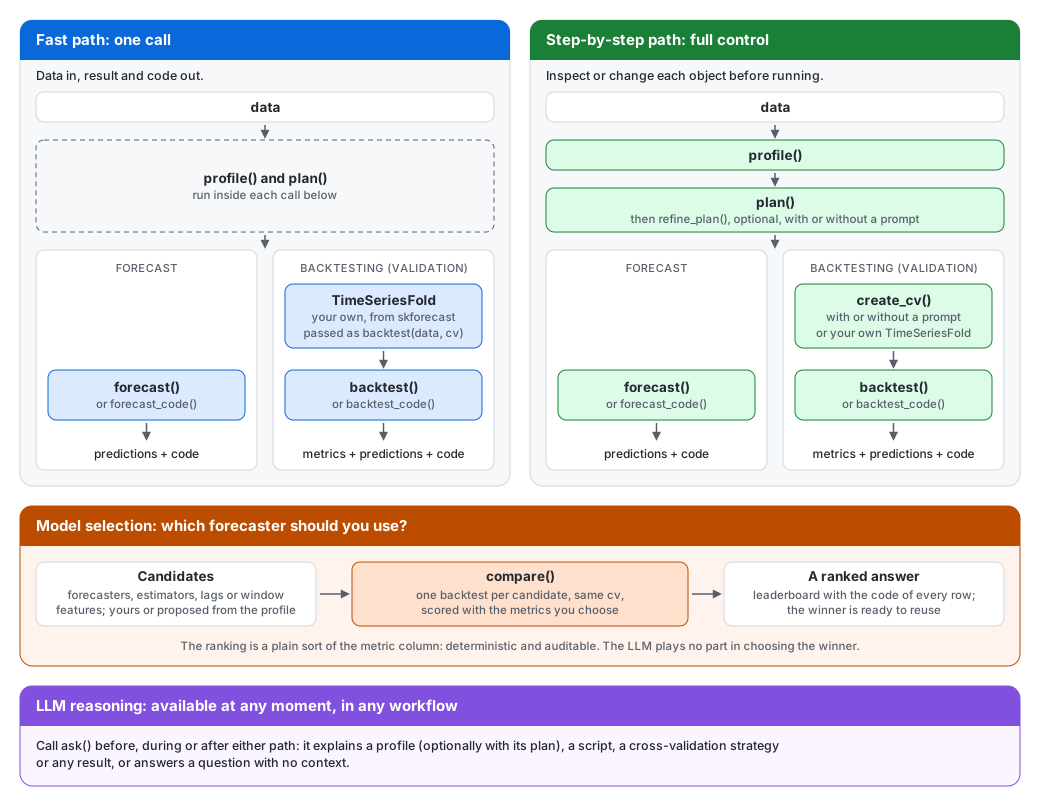
skforecast-ai supports two distinct workflows using the same underlying forecasting engine:
-
The Fast Path: Use this when you want a forecast or backtest result in a single call. The assistant profiles the data, builds the modeling plan, executes the workflow, and returns the results alongside the reproducible
skforecastcode. -
The Step-by-Step Path: Use this when you want granular control to inspect or adjust intermediate decisions. You can manually create a profile, build a plan, optionally refine it with the LLM, define a validation strategy, evaluate the model, and then generate the forecast.
A useful mental model is that forecasting and validation are separate branches. Once you have a profile and a plan, you can use forecast() to produce future predictions directly, or backtest() to evaluate the model's performance on historical data. You can also use compare() to evaluate several candidate configurations under the same cross-validation strategy and obtain a ranked leaderboard, so the best configuration is chosen from measured performance rather than intuition.
The ask() method is available in both workflows. Pass it the object to explain as context (a profile, optionally with a plan, a generated script, a cross-validation strategy, a forecast, backtest or comparison result) or nothing to ask a general forecasting question. It never executes the workflow or modifies your parameters.
Read more in Introduction to agentic forecasting.
📚 Documentation
Explore the full capabilities of skforecast-ai with our comprehensive documentation:
| Documentation | |
|---|---|
| 🚀 Quick start | Install skforecast-ai and run your first forecast |
| 📖 Introduction to agentic forecasting | End-to-end walkthrough: profile, plan, forecast, backtest, compare and ask |
| 📚 API Reference | Reference for the ForecastingAssistant, its schemas and the CLI |
| 📝 Releases | Keep track of major updates and changes |
| 🔍 More | Discover more about skforecast-ai and its creators |
🤝 Contributing
Contributions are welcome, whether it's a bug report, a feature idea, or a pull request. Please see the Contributing Guide and our Code of Conduct to get started.
📖 Citation
If you use skforecast-ai in your work, please cite it as follows:
Zenodo
Amat Rodrigo, Joaquin, & Escobar Ortiz, Javier. (2026). skforecast-ai (Version 0.3.1). Zenodo. https://doi.org/10.5281/zenodo.21338159
APA
Amat Rodrigo, J., & Escobar Ortiz, J. (2026). skforecast-ai (Version 0.3.1) [Computer software]. https://doi.org/10.5281/zenodo.21338159
BibTeX
@software{skforecast-ai,
  author  = {Amat Rodrigo, Joaquin and Escobar Ortiz, Javier},
  title   = {skforecast-ai},
  version = {0.3.1},
  month   = {9},
  year    = {2026},
  license = {Apache-2.0},
  url     = {https://ai.skforecast.org/},
  doi     = {10.5281/zenodo.21338159}
}
View the citation file.
📄 License
Licensed under the Apache License 2.0 (see LICENSE for details).
Built with ❤️ on top of skforecast.
2 maintainers


Metadata
2 maintainers
Release files for skforecast-ai 0.3.1
For a detailed explanation of source distributions (sdists) and built distributions (wheels), please see the package formats documentation.
Source distribution (sdist)
| File | Size | Uploaded | |
|---|---|---|---|
| skforecast_ai-0.3.1.tar.gz | 2.1 MB | Details |
Built distribution (wheel)
| File | Interpreter | ABI | Platform | Reset |
|---|---|---|---|---|
| skforecast_ai-0.3.1-py3-none-any.whl | Python 3 | none | any | Details |
Total release size: 2.4 MB
Release files / skforecast_ai-0.3.1.tar.gz
| Download URL | skforecast_ai-0.3.1.tar.gz |
|---|---|
| Size | 2.1 MB |
| Tags | Source |
|
SHA-256 checksum How to use checksums |
e9c4fb713eec9c8e21b4c09657f5d38140a8a66e66cfe2cc5e5295f9f9cc3286
|
|
BLAKE2b-256 checksum How to use checksums |
85193b123eff78785cb345f3e51efc9b2d17bf531e2f769d46abb41aea93c9b9
|
| Upload date | |
|
Uploaded using Trusted Publishing? What is trusted publishing? |
No |
| Uploaded via |
twine/7.0.0 CPython/3.13.13
|
Release files / skforecast_ai-0.3.1-py3-none-any.whl
| Download URL | skforecast_ai-0.3.1-py3-none-any.whl |
|---|---|
| Size | 296.7 kB |
| Tags | Python 3 |
|
SHA-256 checksum How to use checksums |
cac14e867aa61270f348acf173033d70a5245a000c53fd5bbde8546fe2b6b13c
|
|
BLAKE2b-256 checksum How to use checksums |
c0181c13419549b5baa4e581edf3c0f87d1b0eb62934e5b72304babbaa67cec0
|
| Upload date | |
|
Uploaded using Trusted Publishing? What is trusted publishing? |
No |
| Uploaded via |
twine/7.0.0 CPython/3.13.13
|














