
pvlib/solarfactors: a fork of SunPower/pvfactors
This repository is a fork of SunPower/pvfactors, a 2-D view factor model for simulating front- and rear-side irradiance for bifacial PV systems.
This fork exists so that the pvfactors model can continue to be used with pvlib python even though the original repository is no longer maintained. The objective is to provide a working dependency for the existing pvfactors functionality currently in pvlib python.
Documentation for this fork can be found at Read the Docs.
The project can be installed from PyPI using pip install solarfactors. Note that the package is still used from python under the pvfactors name, i.e. with from pvfactors.geometry import OrderedPVArray.
pvfactors: irradiance modeling made simple




pvfactors is a tool used by PV professionals to calculate the irradiance incident on surfaces of a photovoltaic array. It relies on the use of 2D geometries and view factors integrated mathematically into systems of equations to account for reflections between all of the surfaces.
pvfactors was originally ported from the SunPower developed ‘vf_model’ package, which was introduced at the IEEE PV Specialist Conference 44 2017 (see [1] and link to paper).
This fork, pvlib/solarfactors is maintained by the pvlib project with contributions from the pvlib community.
Documentation
The documentation of this fork can be found here. It includes a lot of tutorials that describe the different ways of using solarfactors.
Quick Start
Given some timeseries inputs:
# Import external libraries
from datetime import datetime
import pandas as pd

# Create input data
df_inputs = pd.DataFrame(
    {'solar_zenith': [20., 50.],
     'solar_azimuth': [110., 250.],
     'surface_tilt': [10., 20.],
     'surface_azimuth': [90., 270.],
     'dni': [1000., 900.],
     'dhi': [50., 100.],
     'albedo': [0.2, 0.2]},
    index=[datetime(2017, 8, 31, 11), datetime(2017, 8, 31, 15)])
df_inputs
solar_zenith |
solar_azimuth |
surface_tilt |
surface_azimuth |
dni |
dhi |
albedo |
|
|---|---|---|---|---|---|---|---|
2017-08-31 11:00:00 |
20.0 |
110.0 |
10.0 |
90.0 |
1000.0 |
50.0 |
0.2 |
2017-08-31 15:00:00 |
50.0 |
250.0 |
20.0 |
270.0 |
900.0 |
100.0 |
0.2 |
And some PV array parameters
pvarray_parameters = {
    'n_pvrows': 3,            # number of pv rows
    'pvrow_height': 1,        # height of pvrows (measured at center / torque tube)
    'pvrow_width': 1,         # width of pvrows
    'axis_azimuth': 0.,       # azimuth angle of rotation axis
    'gcr': 0.4,               # ground coverage ratio
}
The user can quickly create a PV array with pvfactors, and manipulate it with the engine
from pvfactors.geometry import OrderedPVArray
# Create PV array
pvarray = OrderedPVArray.init_from_dict(pvarray_parameters)
from pvfactors.engine import PVEngine
# Create engine
engine = PVEngine(pvarray)
# Fit engine to data
engine.fit(df_inputs.index, df_inputs.dni, df_inputs.dhi,
df_inputs.solar_zenith, df_inputs.solar_azimuth,
df_inputs.surface_tilt, df_inputs.surface_azimuth,
df_inputs.albedo)The user can then plot the PV array geometry at any given time of the simulation:
# Plot pvarray shapely geometries
f, ax = plt.subplots(figsize=(10, 5))
pvarray.plot_at_idx(1, ax)
plt.show()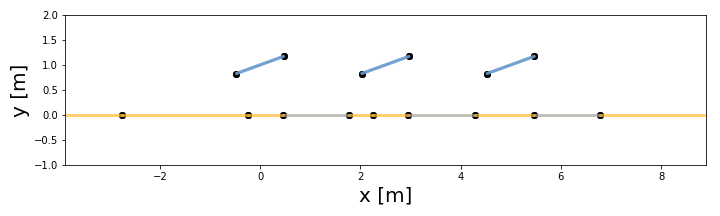
It is then very easy to run simulations using the defined engine:
pvarray = engine.run_full_mode(fn_build_report=lambda pvarray: pvarray)And inspect the results thanks to the simple geometry API
print("Incident irradiance on front surface of middle pv row: {} W/m2"
      .format(pvarray.ts_pvrows[1].front.get_param_weighted('qinc')))
print("Reflected irradiance on back surface of left pv row: {} W/m2"
      .format(pvarray.ts_pvrows[0].back.get_param_weighted('reflection')))
print("Isotropic irradiance on back surface of right pv row: {} W/m2"
      .format(pvarray.ts_pvrows[2].back.get_param_weighted('isotropic')))
Incident irradiance on front surface of middle pv row: [1034.968 886.377] W/m2 Reflected irradiance on back surface of left pv row: [112.139 86.404] W/m2 Isotropic irradiance on back surface of right pv row: [0.116 1.849] W/m2
The users can also create a “report” while running the simulations that will rely on the simple API shown above, and which will look like whatever the users want.
# Create a function that will build a report
def fn_report(pvarray): return {'total_incident_back': pvarray.ts_pvrows[1].back.get_param_weighted('qinc'),
                                'total_absorbed_back': pvarray.ts_pvrows[1].back.get_param_weighted('qabs')}

# Run full mode simulation
report = engine.run_full_mode(fn_build_report=fn_report)

# Print results (report is defined by report function passed by user)
df_report = pd.DataFrame(report, index=df_inputs.index)
df_report
total_incident_back |
total_absorbed_back |
|
|---|---|---|
2017-08-31 11:00:00 |
106.627832 |
103.428997 |
2017-08-31 15:00:00 |
79.668878 |
77.278812 |
Installation
solarfactors is currently compatible and tested with Python 3.11 and Shapely 2.0.6, and is available in PyPI. The easiest way to install solarfactors is to use pip as follows:
$ pip install solarfactorsThe package wheel files are also available in the release section of the Github repository.
Requirements
Requirements are automatically installed when running pip install solarfactors. Here is a list of important dependencies:
shapely (version >= 2.0)
Citing pvfactors
If you use solarfactors in a published work, cite the following paper:
Anoma, M., Jacob, D., Bourne, B.C., Scholl, J.A., Riley, D.M. and Hansen, C.W., 2017. View Factor Model and Validation for Bifacial PV and Diffuse Shade on Single-Axis Trackers. In 44th IEEE Photovoltaic Specialist Conference.
Contributing
Contributions are needed in order to improve solarfactors.
If you wish to contribute, you can start by forking and cloning the repository, and then installing solarfactors using pip in the root folder of the package:
$ pip install .To install the package in editable mode, you can use:
$ pip install -e .Testing
Install test dependencies using the test extra:
$ pip install .[test]Then run the tests using:
$ python -m pytestYou will need to close manually the plots that are generated during the tests, unless you define the CI environment variable, which will disable the tests that generate plots.
Releasing
When releasing pvfactors, you will need to run a couple of build commands. First make sure to activate your virtual environment if any, then:
create a tag on the latest master branch commit using git tag -a vX.X.X, and write a tag message. You can then push that tag to Github so that it will appear there.
build the documentation by running make build-docs. When done running, you should be able to open build/sphinx/html/index.html, and confirm that the version displayed is the same as the one from the git tag. You can deploy by copying the content of of the build/sphinx/html/ folder into the gh-pages branch of the repo (make sure to keep the .nojekyll file that’s already present).
build the release files by running make build-package. When done running, you should be able to open dist/ and see both a whl file and and tar file. Make sure that their names include the correct git tag you created. Please confirm that the whl file was built correctly by installing it locally and testing the newly released updates. You can deploy by 1) making a Github release from the tag you created and pushed, and including the files in dist/ in the release. 2) The last step is to publish a release in PyPI, for which you can use twine and the command twine upload dist/*
References
Release files for solarfactors 1.6.1
For a detailed explanation of source distributions (sdists) and built distributions (wheels), please see the package formats documentation.
Source distribution (sdist)
| File | Size | Uploaded | |
|---|---|---|---|
| solarfactors-1.6.1.tar.gz | 2.5 MB | Details |
Built distribution (wheel)
| File | Interpreter | ABI | Platform | Reset |
|---|---|---|---|---|
| solarfactors-1.6.1-py3-none-any.whl | Python 3 | none | any | Details |
Total release size:2.5 MB
Release files / solarfactors-1.6.1.tar.gz
| Download URL | solarfactors-1.6.1.tar.gz |
|---|---|
| Size | 2.5 MB |
| Tags | Source |
|
SHA-256 checksum How to use checksums |
2808708a2e6190722f7b5bf5221b5d1d43d7d75547699898e17d36efb40e32d8
|
|
BLAKE2b-256 checksum How to use checksums |
5c248e200406e46a190102e4f4388bff82a2816a527d127c69a2a2bc58e0ea7a
|
| Upload date | |
|
Uploaded using Trusted Publishing? What is trusted publishing? |
Yes |
| Uploaded via |
twine/6.1.0 CPython/3.13.7
|
Provenance
Provenance describes where a file came from. On PyPI, provenance is shared via attestations, which provide a verifiable record of the build or publishing details. View details, limitations and caveats.


PyPI Publish Attestation
PyPI verified that this artifact, at this checksum, originated from the publisher listed below.
Signed by GitHub Actions, verified by PyPI on Jan 15, 2026.
Transparency logRelease files / solarfactors-1.6.1-py3-none-any.whl
| Download URL | solarfactors-1.6.1-py3-none-any.whl |
|---|---|
| Size | 73.4 kB |
| Tags | Python 3 |
|
SHA-256 checksum How to use checksums |
6c4624d74635154244e11e81a2b007bf50561ca6801530e1f83d3d42eb3e4317
|
|
BLAKE2b-256 checksum How to use checksums |
5b60140518f26ef801a06e814d71849f9c49d84a5989ff10263bd55fdb5d94a9
|
| Upload date | |
|
Uploaded using Trusted Publishing? What is trusted publishing? |
Yes |
| Uploaded via |
twine/6.1.0 CPython/3.13.7
|
Provenance
Provenance describes where a file came from. On PyPI, provenance is shared via attestations, which provide a verifiable record of the build or publishing details. View details, limitations and caveats.
PyPI Publish Attestation
PyPI verified that this artifact, at this checksum, originated from the publisher listed below.
Signed by GitHub Actions, verified by PyPI on Jan 15, 2026.
Transparency log













