A GUI for controlling the SoundBlaster X G6

Project description
SoundBlaster X G6 GUI
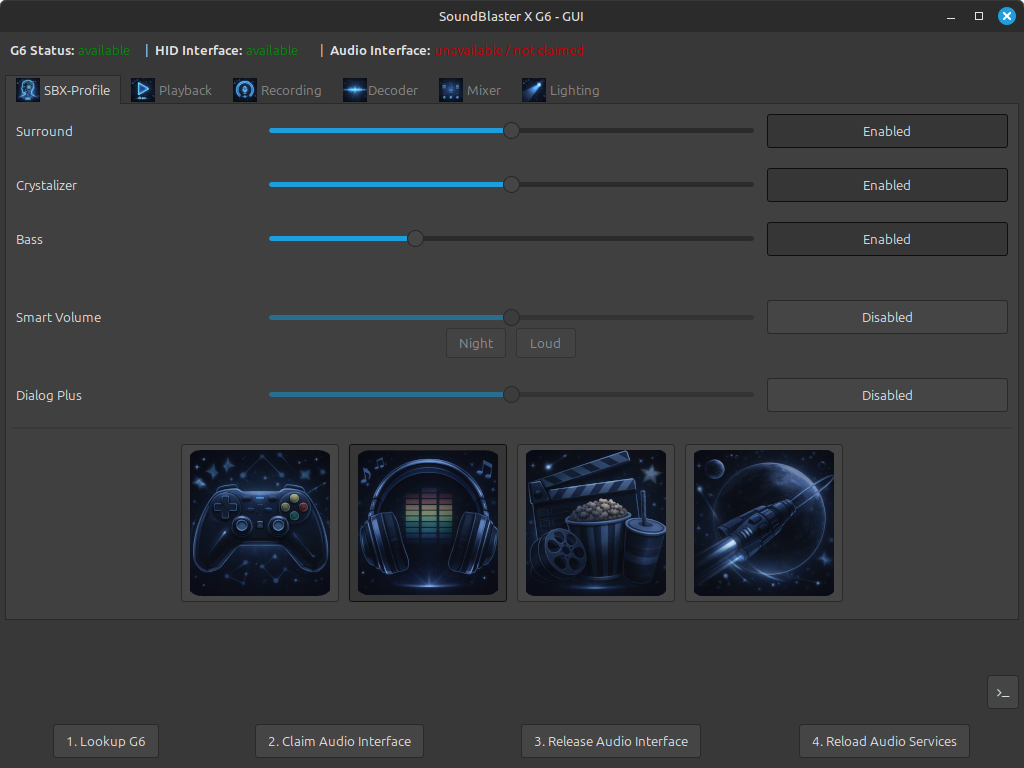
This project provides a Graphical User Interface (GUI) built with wxPython to control the SoundBlaster X G6 device from Linux. It uses the hidapi library and libusb to communicate with the device.
Features
- Playback Control: Toggle between Speakers and Headphones, set Direct Mode, and configure playback filters.
- Audio Settings: Adjust volume and mute status for playback and various mixer inputs (Line-In, External Mic, SPDIF-In).
- SBX Effects: Enable and configure Surround, Crystalizer, Bass, Smart Volume, and Dialog Plus effects.
- Recording Settings: Manage microphone boost, voice clarity features (Noise Reduction, AEC, Smart Volume), and Mic EQ.
- Lighting Control: Customize the RGB lighting or disable it entirely.
- Decoder Settings: Switch between Normal, Full, and Night decoder modes.
Important Disclaimer
I developed this GUI to the best of my belief, and I use it myself to control my G6, and it works fine for me. I read pretty often that you are able to damage or brick a USB device if you send faulty data to it.
That's why I want to point out, that you USE THIS GUI AT YOUR OWN RISK! I am not responsible for any damage to your system or your device!
Firmware version
This software is tested with a G6 having the Firmware version: 2.1.250903.1324.
Make sure that you have the same version, since I do not know whether the USB specification may differ between the versions. You are able to update your Firmware with SoundBlaster Command in Windows by using a QEMU/KVM VM and the USB Redirection feature.
System requirements
Linux: Create udev-rule
In /etc/udev/rules.d/ create a rule file as root (e.q. with name 50-soundblaster-x-g6.rules) having the
following content:
SUBSYSTEM=="usb", ATTRS{idVendor}=="041e", ATTRS{idProduct}=="3256", TAG+="uaccess"
# Add udev rule:
sudo cat > /etc/udev/rules.d/50-soundblaster-x-g6.rules << EOF
SUBSYSTEM=="usb", ATTRS{idVendor}=="041e", ATTRS{idProduct}=="3256", TAG+="uaccess"
EOF
This allows you (and the application) to access the USB device directly and is mandatory for the application to be
able to send data to the device.
Apply the udev rules by issuing:
# Reload udev rules:
sudo udevadm trigger
Configure /etc/asound.conf
Configure /etc/asound.conf to let ALSA reliably detect the G6 device on reload:
# Force ALSA to always use the Sound BlasterX G6 by its card name (not index)
# The name "G6" is fixed by the driver and never changes even if the kernel
# reassigns card numbers because of other USB devices.

pcm.!default {
    type hw
    card G6
}

ctl.!default {
    type hw
    card G6
}
Install libusb1
The following libusb packages are required:
libusb-1.0-0-dev/jammy-updates,now 2:1.0.25-1ubuntu2 amd64 [installed]
libusb-1.0-0/jammy-updates,now 2:1.0.25-1ubuntu2 amd64 [installed]
sudo apt-get -y install libusb-1.0-0-dev libusb-1.0-0
Installation
Via pipx package (recommended)
To install the GUI tool using pipx, run:
pipx install soundblaster-x-g6-gui
The soundblaster-x-g6-gui package is installed in ~/.local/share/pipx/venvs/soundblaster-x-g6-gui/.
The command soundblaster-x-g6-gui should now be available in your shell, otherwise you may have to add the
directory ~/.local/share/pipx/venvs/soundblaster-x-g6-gui/bin/ to your $PATH variable.
Note that you still need to create the udev rule and create a sudoers entry as described above!
Conclusion
The installation is complete, and you can start the GUI by running:
soundblaster-x-g6-gui
Manual installation (from source)
This section describes how to use the program from source. It contains the following steps:
- clone the repository
- install Python 3.12
- install wxPython
- create a venv and download dependencies using pip
Clone repository:
Select a directory of your choice and clone the repository into it:
(cd $HOME; git clone git@github.com:nils-skowasch/soundblaster-x-g6-gui.git)
This should create the directory ~/soundblaster-x-g6-gui, containing all files.
Install Python 3.12:
Install Python3.12. The application has been tested with Python3.12 (LinuxMint 22.1).
sudo apt-get install Python3.12
Install wxPython
# install wxPython dependencies
sudo apt install libgtk-3-dev libpython3.12-dev
# install wxPython via pip
source ~/development/workspaces/soundblaster-x-g6-gui/venv/bin/activate
## On work laptop, execute:
~/development/workspaces/soundblaster-x-g6-gui/venv/bin/python ~/development/pycharm-2024.3.5/plugins/python-ce/helpers/packaging_tool.py install wxPython
## On home laptop, execute:
~/development/git/soundblaster-x-g6-gui/venv/bin/python ~/development/jetbrains/pycharm-community-2024.1.2/plugins/python-ce/helpers/packaging_tool.py install wxPython
Create a virtual environment and download dependencies
Create a virtual environment and download the dependencies using pip:
# create virtual environment 'venv'
cd ~/soundblaster-x-g6-gui/
python -m venv venv

# install virtualenv package (if required) and activate 'venv'
pip install virtualenv
virtualenv venv
source venv/bin/activate

# install dependencies into 'venv'
pip install -r requirements.txt
Conclusion
The installation is complete, and you can start the GUI by running:
venv/bin/python src/g6_gui.py
GUI usage
usage: soundblaster-x-g6-gui [-h] [--dry-run] [--debug] [--no-persist] [--version]

SoundBlaster X G6 GUI

options:
  -h, --help  show this help message and exit

General options:
  --dry-run   Used to verify the available hex_line files, without making any
              calls against the G6 device.
  --debug     Print communication data with the G6 device to the console.
  --no-persist  Disables reading and writing of the current G6 state in file
              '~/.soundblaster-x-g6/g6.json'.
  --version   show program's version number and exit
Development
Before continuing this section, see the section System requirements and install the required system dependencies.
Building the application
To build the application, run the following commands:
# builds the application into the dist/ directory
python -m build

# verifies the build
python -m twine check dist/*
Deploying the application
Create a .pypirc file in your home directory with the following content:
[testpypi]
  username = __token__
  password = <api-token>
Deploy the application on testpypi.org:
python -m twine upload --repository testpypi dist/*
Download the application from testpypi.org and test it:
pipx install --pip-args="--index-url https://test.pypi.org/simple --extra-index-url https://pypi.org/simple" soundblaster-x-g6-gui
Release history Release notifications | RSS feed


Download files
Download the file for your platform. If you're not sure which to choose, learn more about installing packages.
Source Distribution
Built Distribution
Filter files by name, interpreter, ABI, and platform.
If you're not sure about the file name format, learn more about wheel file names.
Copy a direct link to the current filters
File details
Details for the file soundblaster_x_g6_gui-1.1.0.tar.gz.
File metadata
- Download URL: soundblaster_x_g6_gui-1.1.0.tar.gz
- Upload date:
- Size: 3.0 MB
- Tags: Source
- Uploaded using Trusted Publishing? No
- Uploaded via: twine/6.2.0 CPython/3.12.3
File hashes
| Algorithm | Hash digest | |
|---|---|---|
| SHA256 |
52da9bf13bbbfbda53177b4e6719fbdea2a87a9e96a6f86ad2d7414c6273539c
|
|
| MD5 |
19df6b363d19be0a5d83a29350861f7a
|
|
| BLAKE2b-256 |
e6c7bb8b1031b33b7158eda308e3341f0ea847ba26d9d4b553456337c75c6983
|
File details
Details for the file soundblaster_x_g6_gui-1.1.0-py3-none-any.whl.
File metadata
- Download URL: soundblaster_x_g6_gui-1.1.0-py3-none-any.whl
- Upload date:
- Size: 3.0 MB
- Tags: Python 3
- Uploaded using Trusted Publishing? No
- Uploaded via: twine/6.2.0 CPython/3.12.3
File hashes
| Algorithm | Hash digest | |
|---|---|---|
| SHA256 |
f4cd0620876ac739470695d7c75bd07a5b4a8cb98f8128290d82c61c65f21b4e
|
|
| MD5 |
d5cf2d42f5c9f7dabfec8602ba50a9b8
|
|
| BLAKE2b-256 |
249c3de2a2191803945eb3e4799413a3fe26d720fc682ebbebc0a8a64e90f7ea
|


