
Spec Kitty, a tool for Specification Driven Development (SDD) agentic projects, with kanban and git worktree isolation.

Project description

Spec Kitty
Spec Kitty is for people using LLM agents to write code (eg. Claude Code, Codex, Cursor). It enforces spec-first development with a live kanban dashboard, letting you coordinate multiple AI agents on complex features while maintaining quality.
Try it now: pip install spec-kitty-cli && spec-kitty init myproject --ai claude
Quick Start • Claude Code Guide • Live Dashboard • 12 AI Agents • Full Docs






Note: Spec Kitty is a fork of GitHub's Spec Kit. We retain the original attribution per the Spec Kit license while evolving the toolkit under the Spec Kitty banner.
🎉 Version 0.10.9 Released - Template Bundling Fix Fixed critical issue where wrong templates were bundled in PyPI packages (#62, #63, #64). All 12 AI agents now receive correct Python CLI slash commands. Existing projects: Run
spec-kitty upgradeto apply repair migration. See CHANGELOG for full details.
🔄 Why Fork Spec Kit?
GitHub Spec Kit pioneered spec-driven development but stopped at spec creation. We forked to add production-grade features teams actually need:
| Feature | Spec Kit | Spec Kitty |
|---|---|---|
| Real-time kanban dashboard | ❌ No visibility | ✅ Live dashboard with agent tracking |
| Multi-agent init | ⚠️ Single agent at init | ✅ Multiple agents at once (claude + codex) |
| Collaborative planning | ❌ No guided discovery | ✅ LLM asks clarifying questions (plan & spec) |
| Mission system | ❌ One workflow | ✅ Software-dev + research missions |
| Parallel features | ❌ Branch switching | ✅ Git worktrees for isolation |
| Quality gates | ❌ Manual merge | ✅ Automated accept/merge workflow |
| Task management | ⚠️ Manual lane tracking | ✅ Automatic kanban + history |
| Python CLI | ❌ Bash scripts only | ✅ Cross-platform Python |
Use Spec Kit if: You want minimal tooling and single-agent workflows Use Spec Kitty if: You need visibility, multi-agent coordination (e.g., Claude implements + Codex reviews), or production quality gates
Spec Kitty started as a fork to add the live dashboard. Once we saw teams coordinating 3-10 AI agents on complex features, we evolved it into a complete multi-agent orchestration platform.
🎯 Core Features
- 📊 Live Kanban Dashboard - Real-time visibility into AI agent progress (run
spec-kitty dashboard) - 👥 12 AI Agents Supported - Claude Code, Cursor, Windsurf, Gemini, Copilot, and more
- 🔄 Systematic Workflow - Spec → Plan → Tasks → Implement → Review → Merge
- 📦 Git Worktrees - Parallel feature isolation without branch switching
- ✅ Quality Gates - Constitution framework + automated acceptance checks
- 🐍 Python CLI - Cross-platform automation (v0.10.0+, no bash scripts)
📊 Real-Time Dashboard
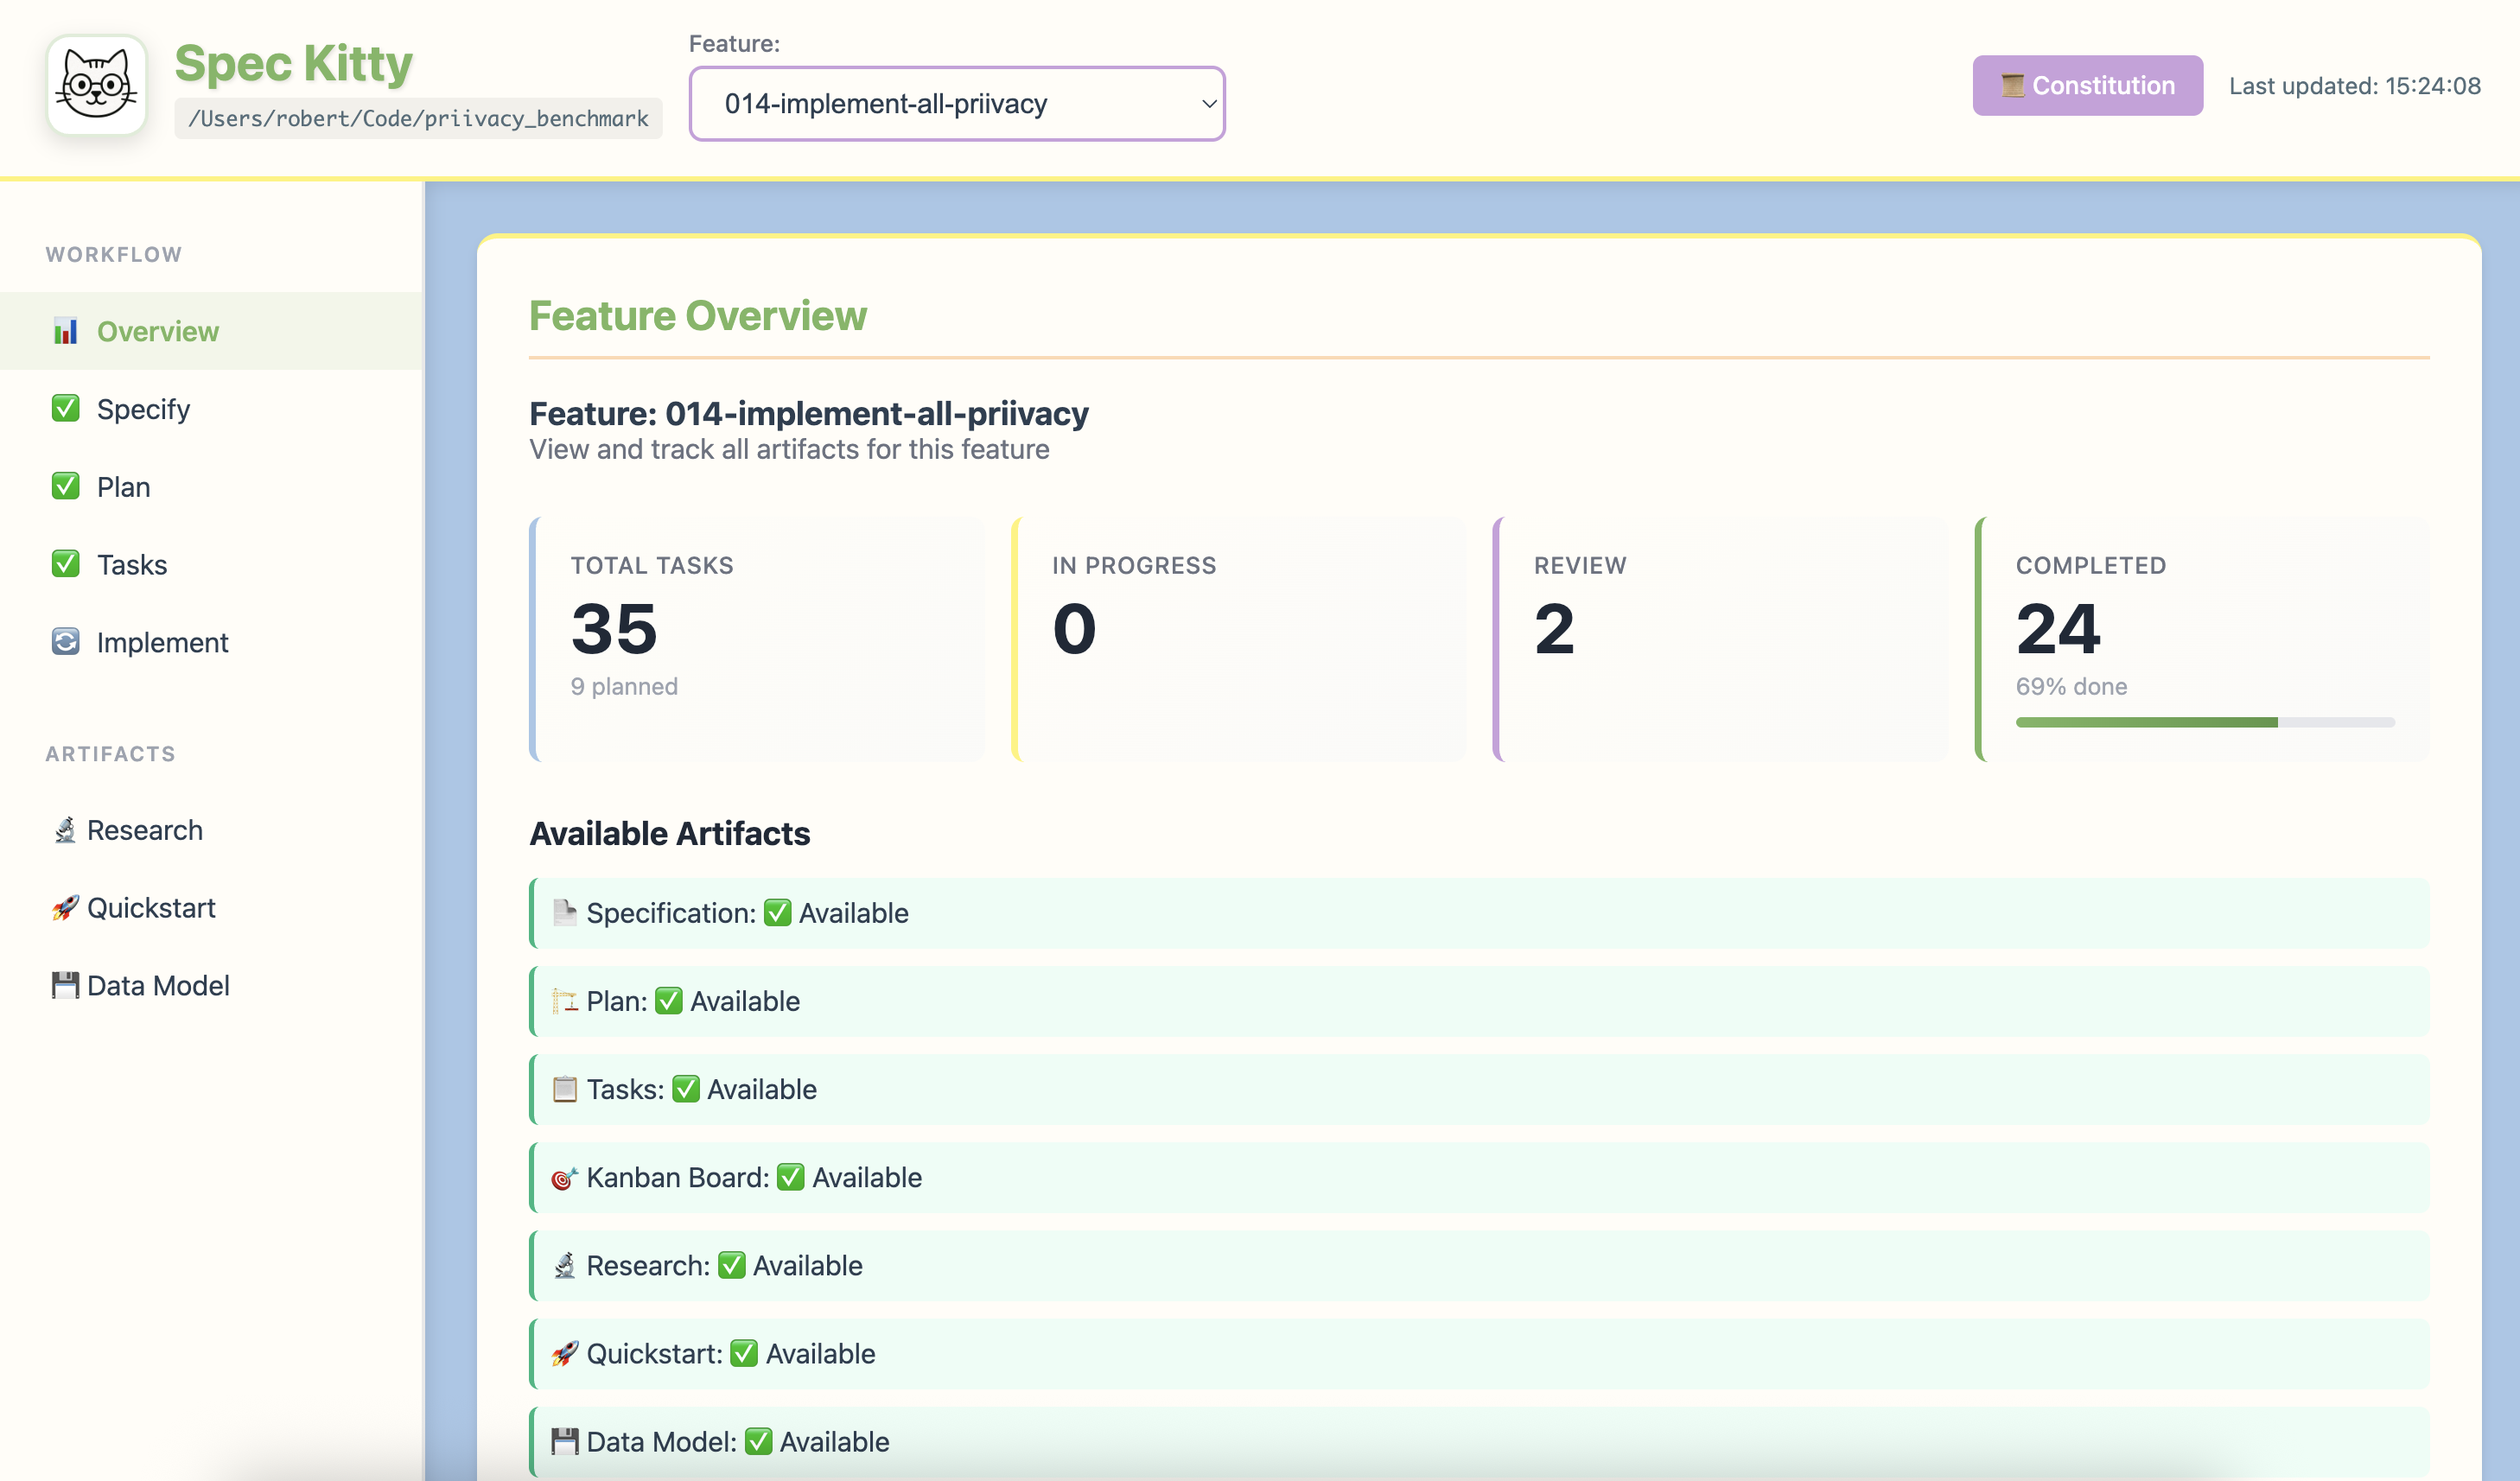
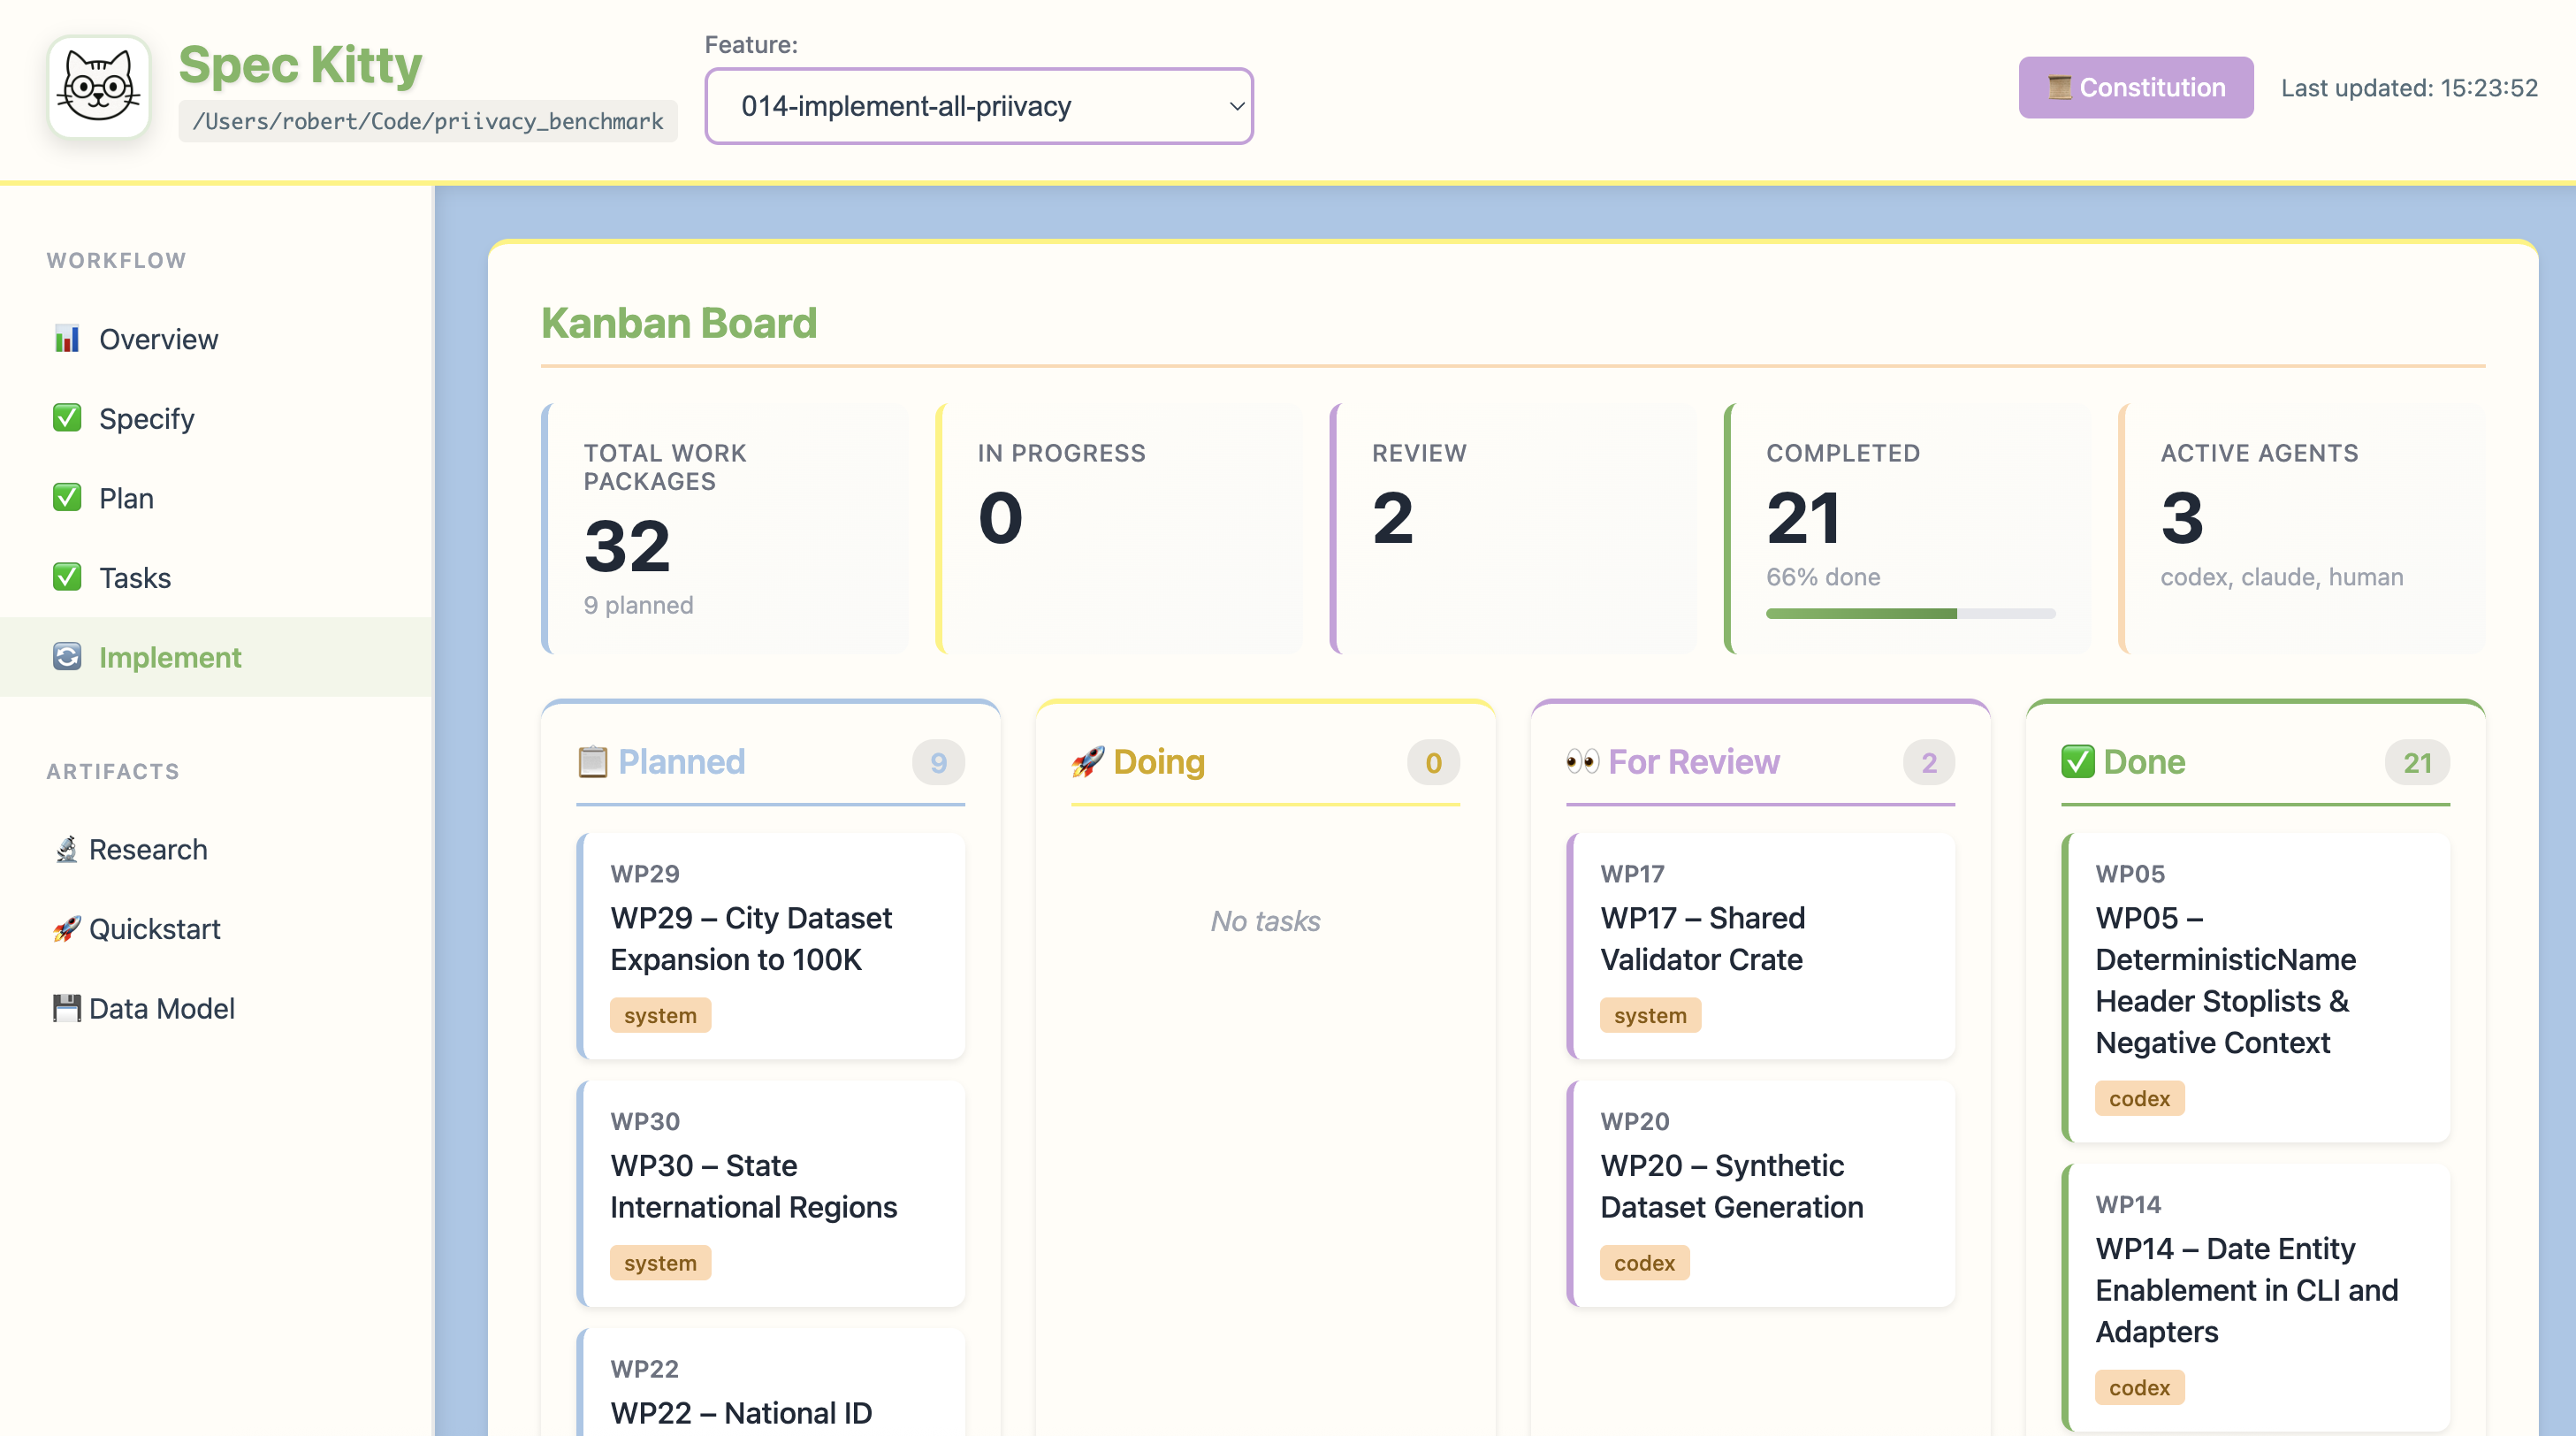
Spec Kitty includes a live dashboard that automatically tracks your feature development progress. View your kanban board, monitor work package status, and see which agents are working on what—all updating in real-time as you work.
Kanban board showing work packages across all lanes with agent assignments
Feature overview with completion metrics and available artifacts
The dashboard starts automatically when you run spec-kitty init and runs in the background. Access it anytime with the /spec-kitty.dashboard command or spec-kitty dashboard—the CLI will start the correct project dashboard automatically if it isn’t already running, let you request a specific port with --port, or stop it cleanly with --kill.
Key Features:
- 📋 Kanban Board: Visual workflow across planned → doing → for review → done lanes
- 📈 Progress Tracking: Real-time completion percentages and task counts
- 👥 Multi-Agent Support: See which AI agents are working on which tasks
- 📦 Artifact Status: Track specification, plan, tasks, and other deliverables
- 🔄 Live Updates: Dashboard refreshes automatically as you work
🚀 Getting Started: Complete Workflow
New to Spec Kitty? Here's the complete lifecycle from zero to shipping features:
Phase 1: Install & Initialize (Terminal)
# 1. Install the CLI
pip install spec-kitty-cli
# or
uv tool install spec-kitty-cli

# 2. Initialize your project
spec-kitty init my-project --ai claude
# This creates project structure, installs slash commands, starts dashboard

# 3. Verify setup (optional)
cd my-project
spec-kitty verify-setup  # Checks that everything is configured correctly

# 4. View your dashboard
spec-kitty dashboard  # Opens http://localhost:3000-5000
What just happened:
- ✅ Created
.claude/commands/(or.gemini/,.cursor/, etc.) with 13 slash commands - ✅ Created
.kittify/directory with scripts, templates, and mission configuration - ✅ Started real-time kanban dashboard (runs in background)
- ✅ Initialized git repository with proper
.gitignore
🔄 Upgrading Existing Projects
Important: If you've upgraded
spec-kitty-clivia pip/uv, runspec-kitty upgradein each of your projects to apply structural migrations.
Quick Upgrade
cd your-project
spec-kitty upgrade              # Upgrade to current version
What Gets Upgraded
The upgrade command automatically migrates your project structure across versions:
| Version | Migration |
|---|---|
| 0.10.9 | Repair broken templates with bash script references (#62, #63, #64) |
| 0.10.8 | Move memory/ and AGENTS.md to .kittify/ |
| 0.10.6 | Simplify implement/review templates to use workflow commands |
| 0.10.2 | Update slash commands to Python CLI and flat structure |
| 0.10.0 | Remove bash scripts, migrate to Python CLI |
| 0.9.1 | Complete lane migration + normalize frontmatter |
| 0.9.0 | Flatten task lanes to frontmatter-only (no directory-based lanes) |
| 0.8.0 | Remove active-mission (missions now per-feature) |
| 0.7.3 | Update scripts for worktree feature numbering |
| 0.6.7 | Ensure software-dev and research missions present |
| 0.6.5 | Rename commands/ → command-templates/ |
| 0.5.0 | Install encoding validation git hooks |
| 0.4.8 | Add all 12 AI agent directories to .gitignore |
| 0.2.0 | Rename .specify/ → .kittify/ and /specs/ → /kitty-specs/ |
Run
spec-kitty upgrade --verboseto see which migrations apply to your project.
Upgrade Options
# Preview changes without applying
spec-kitty upgrade --dry-run

# Show detailed migration information
spec-kitty upgrade --verbose

# Upgrade to specific version
spec-kitty upgrade --target 0.6.5

# Skip worktree upgrades (main project only)
spec-kitty upgrade --no-worktrees

# JSON output for CI/CD integration
spec-kitty upgrade --json
When to Upgrade
Run spec-kitty upgrade after:
- Installing a new version of
spec-kitty-cli - Cloning a project that was created with an older version
- Seeing "Unknown mission" or missing slash commands
The upgrade command is idempotent - safe to run multiple times. It automatically detects your project's version and applies only the necessary migrations.
Phase 2: Start Your AI Agent (Terminal)
# Launch your chosen AI coding agent
claude   # For Claude Code
# or
gemini   # For Gemini CLI
# or
code     # For GitHub Copilot / Cursor
Verify slash commands loaded:
Type /spec-kitty and you should see autocomplete with all 13 commands.
Phase 3: Establish Project Principles (In Agent)
Still in main repo - Start with your project's governing principles:
/spec-kitty.constitution

Create principles focused on code quality, testing standards,
user experience consistency, and performance requirements.
What this creates:
.kittify/memory/constitution.md- Your project's architectural DNA- These principles will guide all subsequent development
Phase 4: Create Your First Feature (In Agent)
Now begin the feature development cycle:
4a. Define WHAT to Build
/spec-kitty.specify

Build a user authentication system with email/password login,
password reset, and session management. Users should be able to
register, login, logout, and recover forgotten passwords.
What this does:
- Creates feature branch:
001-auth-system - Creates feature worktree:
.worktrees/001-auth-system/ - Creates
kitty-specs/001-auth-system/spec.mdwith user stories - Enters discovery interview - Answer questions before continuing!
⚠️ Important: After /spec-kitty.specify completes:
cd .worktrees/001-auth-system
claude  # Restart your agent in the feature worktree
4b. Define HOW to Build (In Feature Worktree)
/spec-kitty.plan

Use Python FastAPI for backend, PostgreSQL for database,
JWT tokens for sessions, bcrypt for password hashing,
SendGrid for email delivery.
What this creates:
kitty-specs/001-auth-system/plan.md- Technical architecturekitty-specs/001-auth-system/data-model.md- Database schemakitty-specs/001-auth-system/contracts/- API specifications- Enters planning interview - Answer architecture questions!
4c. Optional: Research Phase
/spec-kitty.research

Investigate best practices for password reset token expiration,
JWT refresh token rotation, and rate limiting for auth endpoints.
What this creates:
kitty-specs/001-auth-system/research.md- Research findings- Evidence logs for decisions made
4d. Break Down Into Tasks
/spec-kitty.tasks
What this creates:
kitty-specs/001-auth-system/tasks.md- Kanban checklistkitty-specs/001-auth-system/tasks/WP01.md- Work package prompts (flat structure)- Up to 10 work packages ready for implementation
Check your dashboard: You'll now see tasks in the "Planned" lane!
Phase 5: Implement Features (In Feature Worktree)
5a. Execute Implementation
/spec-kitty.implement
What this does:
- Auto-detects first WP with
lane: "planned"(or specify WP ID) - Automatically moves to
lane: "doing"and displays the prompt - Shows clear "WHEN YOU'RE DONE" instructions
- Agent implements, then runs command to move to
lane: "for_review"
Repeat until all work packages are done!
5b. Review Completed Work
/spec-kitty.review
What this does:
- Auto-detects first WP with
lane: "for_review"(or specify WP ID) - Automatically moves to
lane: "doing"and displays the prompt - Agent reviews code and provides feedback or approval
- Shows commands to move to
lane: "done"(passed) orlane: "planned"(changes needed)
Phase 6: Accept & Merge (In Feature Worktree)
6a. Validate Feature Complete
/spec-kitty.accept
What this does:
- Verifies all WPs have
lane: "done" - Checks metadata and activity logs
- Confirms no
NEEDS CLARIFICATIONmarkers remain - Records acceptance timestamp
6b. Merge to Main
/spec-kitty.merge --push
What this does:
- Switches to main branch
- Merges feature branch
- Pushes to remote (if
--pushspecified) - Cleans up worktree
- Deletes feature branch
🎉 Feature complete! Return to main repo and start your next feature with /spec-kitty.specify
📋 Quick Reference: Command Order
Required Workflow (Once per project)
1️⃣ /spec-kitty.constitution → In main repo (sets project principles)
Required Workflow (Each feature)
2️⃣  /spec-kitty.specify          → Creates feature branch + worktree
    cd .worktrees/XXX-feature    → Switch to feature worktree
3️⃣  /spec-kitty.plan             → Define technical approach
4️⃣  /spec-kitty.tasks            → Generate work packages
5️⃣  /spec-kitty.implement        → Build the feature (repeat for each task)
6️⃣  /spec-kitty.review           → Review completed work
7️⃣  /spec-kitty.accept           → Validate feature ready
8️⃣  /spec-kitty.merge            → Merge to main + cleanup
Optional Enhancement Commands
/spec-kitty.clarify    → Before /plan: Ask structured questions about spec
/spec-kitty.research   → After /plan: Investigate technical decisions
/spec-kitty.analyze    → After /tasks: Cross-artifact consistency check
/spec-kitty.checklist  → Anytime: Generate custom quality checklists
/spec-kitty.dashboard  → Anytime: Open/restart the kanban dashboard
🔒 Agent Directory Best Practices
Important: Agent directories (.claude/, .codex/, .gemini/, etc.) should NEVER be committed to git.
Why?
These directories may contain:
- Authentication tokens and API keys
- User-specific credentials (auth.json)
- Session data and conversation history
Automatic Protection
Spec Kitty automatically protects you with multiple layers:
During spec-kitty init:
- ✅ Adds all 12 agent directories to
.gitignore - ✅ Installs pre-commit hooks that block commits containing agent files
- ✅ Creates
.claudeignoreto optimize AI scanning (excludes.kittify/templates)
Pre-commit Hook Protection:
The installed pre-commit hook will block any commit that includes files from:
.claude/, .codex/, .gemini/, .cursor/, .qwen/, .opencode/,
.windsurf/, .kilocode/, .augment/, .roo/, .amazonq/, .github/copilot/
If you need to bypass the hook (not recommended): git commit --no-verify
Worktree Constitution Sharing: When creating feature worktrees, Spec Kitty uses symlinks to share the constitution:
.worktrees/001-feature/.kittify/memory -> ../../../.kittify/memory
This ensures all features follow the same project principles.
What Gets Committed?
✅ DO commit:
.kittify/templates/- Command templates (source).kittify/missions/- Mission workflows.kittify/memory/constitution.md- Project principles.gitignore- Protection rules
❌ NEVER commit:
.claude/,.gemini/,.cursor/, etc. - Agent runtime directories- Any
auth.jsonor credentials files
See AGENTS.md for complete guidelines.
📚 Terminology
Spec Kitty differentiates between the project that holds your entire codebase, the features you build within that project, and the mission that defines your workflow. Use these definitions whenever you write docs, prompts, or help text.
Project
Definition: The entire codebase (one Git repository) that contains all missions, features, and .kittify/ automation.
Examples:
- "spec-kitty project" (this repository)
- "priivacy_rust project"
- "my-agency-portal project"
Usage: Projects are initialized once with spec-kitty init. A project contains:
- One active mission at a time
- Multiple features (each with its own spec/plan/tasks)
- Shared automation under
.kittify/
Commands: Initialize with spec-kitty init my-project (or spec-kitty init --here for the current directory).
Feature
Definition: A single unit of work tracked by Spec Kitty. Every feature has its own spec, plan, tasks, and implementation worktree.
Examples:
- "001-auth-system feature"
- "005-refactor-mission-system feature" (this document)
- "042-dashboard-refresh feature"
Structure:
- Specification:
/kitty-specs/###-feature-name/spec.md - Plan:
/kitty-specs/###-feature-name/plan.md - Tasks:
/kitty-specs/###-feature-name/tasks.md - Implementation:
.worktrees/###-feature-name/
Lifecycle:
/spec-kitty.specify– Create the feature and its branch/spec-kitty.plan– Document the technical design/spec-kitty.tasks– Break work into packages/spec-kitty.implement– Build the feature inside its worktree/spec-kitty.review– Peer review/spec-kitty.accept– Validate according to gates/spec-kitty.merge– Merge and clean up
Commands: Always create features with /spec-kitty.specify.
Mission
Definition: A domain adapter that configures Spec Kitty (workflows, templates, validation). Missions are project-wide; all features in a project share the same active mission.
Examples:
- "software-dev mission" (ship software with TDD)
- "research mission" (conduct systematic investigations)
- "writing mission" (future workflow)
What missions define:
- Workflow phases (e.g., design → implement vs. question → gather findings)
- Templates (spec, plan, tasks, prompts)
- Validation rules (tests pass vs. citations documented)
- Path conventions (e.g.,
src/vs.research/)
Scope: Entire project. Switch missions before starting a new feature if you need a different workflow.
Commands:
- Select at init:
spec-kitty init my-project --mission research - Switch later:
spec-kitty mission switch research - Inspect:
spec-kitty mission current/spec-kitty mission list
Quick Reference
| Term | Scope | Example | Key Command |
|---|---|---|---|
| Project | Entire codebase | "spec-kitty project" | spec-kitty init my-project |
| Feature | Unit of work | "001-auth-system feature" | /spec-kitty.specify "auth system" |
| Mission | Workflow adapter | "research mission" | spec-kitty mission switch research |
Common Questions
Q: What's the difference between a project and a feature?
A project is your entire git repository. A feature is one unit of work inside that project with its own spec/plan/tasks.
Q: Can I have multiple missions in one project?
Only one mission is active at a time, but you can switch missions between features with spec-kitty mission switch.
Q: Should I create a new project for every feature?
No. Initialize a project once, then create as many features as you need with /spec-kitty.specify.
Q: What's a task?
Tasks (T001, T002, etc.) are subtasks within a feature's work packages. They are not separate features or projects.
Table of Contents
- 🚀 Getting Started: Complete Workflow
- 🔄 Upgrading Existing Projects
- 📋 Quick Reference: Command Order
- 📚 Terminology
- 🎯 Why Spec-Kitty?
- 📊 Real-Time Dashboard
- 🔍 Spec-Kitty vs. Other Spec-Driven Tools
- 📦 Examples
- 🤔 What is Spec-Driven Development?
- ⚡ Get started
- 🤖 Supported AI Agents
- 🔧 Spec Kitty CLI Reference
- 🌳 Worktree Strategy
- ✅ Feature Acceptance & Merge Workflow
- 🔧 Prerequisites
- 📖 Learn more
- 📋 Detailed process
- 🔍 Troubleshooting
- 👥 Maintainers
- 💬 Support
- 🙏 Acknowledgements
- 📄 License
🤔 What is Spec-Driven Development?
Spec-Driven Development flips the script on traditional software development. For decades, code has been king — specifications were just scaffolding we built and discarded once the "real work" of coding began. Spec-Driven Development changes this: specifications become executable, directly generating working implementations rather than just guiding them.
⚡ Get started
📖 New to Spec Kitty? See the complete workflow guide above for step-by-step instructions from installation to feature completion.
🔍 Spec-Kitty vs. Other Spec-Driven Tools
| Capability | Spec Kitty | Other SDD Toolkits |
|---|---|---|
| Real-time kanban dashboard with agent telemetry | ✅ Built-in dashboard with lane automation | ⚠️ Often requires third-party integrations |
AI discovery interview gates (WAITING_FOR_*_INPUT) |
✅ Mandatory across spec, plan, tasks | ⚠️ Frequently optional or absent |
| Worktree-aware prompt generation | ✅ Prompts align with git worktrees and task lanes | ❌ Typically manual setup |
| Multi-agent orchestration playbooks | ✅ Bundled docs + scripts for coordination | ⚠️ Sparse or ad-hoc guidance |
| Agent-specific command scaffolding (Claude, Gemini, Cursor, etc.) | ✅ Generated during spec-kitty init |
⚠️ Usually limited to one assistant |
| Specification, plan, tasks, and merge automation | ✅ End-to-end command suite | ⚠️ Partial coverage |
| Cross-agent coordination guides | ✅ Built-in examples & playbooks | ⚠️ Typically community-sourced |
| Live progress visibility | ✅ Real-time dashboard | ❌ Manual status checks |
| Parallel feature development | ✅ Worktree isolation + dashboard | ⚠️ Branch-based, limited visibility |
| Quality gate automation | ✅ Accept/merge commands | ⚠️ Manual verification |
📦 Examples
Learn from real-world workflows used by teams building production software with AI agents. Each playbook demonstrates specific coordination patterns and best practices:
Featured Workflows
-
Multi-Agent Feature Development Orchestrate 3-5 AI agents on a single large feature with parallel work packages
-
Parallel Implementation Tracking Monitor multiple teams/agents delivering features simultaneously with dashboard metrics
-
Dashboard-Driven Development Product trio workflow: PM + Designer + Engineers using live kanban visibility
-
Claude + Cursor Collaboration Blend different AI agents within a single spec-driven workflow
More Examples
Browse our examples directory for additional workflows including:
- Agency client transparency workflows
- Solo developer productivity patterns
- Enterprise parallel development
- Research mission templates
🤖 Supported AI Agents
| Agent | Support | Notes |
|---|---|---|
| Claude Code | ✅ | |
| GitHub Copilot | ✅ | |
| Gemini CLI | ✅ | |
| Cursor | ✅ | |
| Qwen Code | ✅ | |
| opencode | ✅ | |
| Windsurf | ✅ | |
| Kilo Code | ✅ | |
| Auggie CLI | ✅ | |
| Roo Code | ✅ | |
| Codex CLI | ✅ | |
| Amazon Q Developer CLI | ⚠️ | Amazon Q Developer CLI does not support custom arguments for slash commands. |
🔧 Spec Kitty CLI Reference
The spec-kitty command supports the following options. Every run begins with a discovery interview, so be prepared to answer follow-up questions before files are touched.
Commands
| Command | Description |
|---|---|
init |
Initialize a new Spec Kitty project from templates |
upgrade |
Upgrade project structure to current version (run after updating spec-kitty-cli) |
repair |
Repair broken template installations (fixes bash script references from v0.10.0-0.10.8) |
accept |
Validate feature readiness before merging to main |
check |
Check that required tooling is available |
dashboard |
Open or stop the Spec Kitty dashboard |
diagnostics |
Show project health and diagnostics information |
merge |
Merge a completed feature branch into main and clean up resources |
research |
Execute Phase 0 research workflow to scaffold artifacts |
verify-setup |
Verify that the current environment matches Spec Kitty expectations |
spec-kitty init Arguments & Options
| Argument/Option | Type | Description |
|---|---|---|
<project-name> |
Argument | Name for your new project directory (optional if using --here, or use . for current directory) |
--ai |
Option | AI assistant to use: claude, gemini, copilot, cursor, qwen, opencode, codex, windsurf, kilocode, auggie, roo, or q |
--script |
Option | (Deprecated in v0.10.0) Script variant - all commands now use Python CLI |
--mission |
Option | Mission key to seed templates (software-dev, research, ...) |
--template-root |
Option | Override template location (useful for development mode or custom sources) |
--ignore-agent-tools |
Flag | Skip checks for AI agent tools like Claude Code |
--no-git |
Flag | Skip git repository initialization |
--here |
Flag | Initialize project in the current directory instead of creating a new one |
--force |
Flag | Force merge/overwrite when initializing in current directory (skip confirmation) |
--skip-tls |
Flag | Skip SSL/TLS verification (not recommended) |
--debug |
Flag | Enable detailed debug output for troubleshooting |
--github-token |
Option | GitHub token for API requests (or set GH_TOKEN/GITHUB_TOKEN env variable) |
If you omit --mission, the CLI will prompt you to pick one during spec-kitty init.
Examples
# Basic project initialization
spec-kitty init my-project

# Initialize with specific AI assistant
spec-kitty init my-project --ai claude

# Initialize with the Deep Research mission
spec-kitty init my-project --mission research

# Initialize with Cursor support
spec-kitty init my-project --ai cursor

# Initialize with Windsurf support
spec-kitty init my-project --ai windsurf

# Initialize with PowerShell scripts (Windows/cross-platform)
spec-kitty init my-project --ai copilot --script ps

# Initialize in current directory
spec-kitty init . --ai copilot
# or use the --here flag
spec-kitty init --here --ai copilot

# Force merge into current (non-empty) directory without confirmation
spec-kitty init . --force --ai copilot
# or
spec-kitty init --here --force --ai copilot

# Skip git initialization
spec-kitty init my-project --ai gemini --no-git

# Enable debug output for troubleshooting
spec-kitty init my-project --ai claude --debug

# Use GitHub token for API requests (helpful for corporate environments)
spec-kitty init my-project --ai claude --github-token ghp_your_token_here

# Use custom template location (development mode)
spec-kitty init my-project --ai claude --template-root=/path/to/local/spec-kitty

# Check system requirements
spec-kitty check
spec-kitty upgrade Options
| Option | Description |
|---|---|
--dry-run |
Preview changes without applying them |
--force |
Skip confirmation prompts |
--target <version> |
Target version to upgrade to (defaults to current CLI version) |
--json |
Output results as JSON (for CI/CD integration) |
--verbose, -v |
Show detailed migration information |
--no-worktrees |
Skip upgrading worktrees (main project only) |
Examples:
# Upgrade to current version
spec-kitty upgrade

# Preview what would be changed
spec-kitty upgrade --dry-run

# Upgrade with detailed output
spec-kitty upgrade --verbose

# Upgrade to specific version
spec-kitty upgrade --target 0.6.5

# JSON output for scripting
spec-kitty upgrade --json

# Skip worktree upgrades
spec-kitty upgrade --no-worktrees
spec-kitty agent Commands
The spec-kitty agent namespace provides programmatic access to all workflow automation commands. All commands support --json output for agent consumption.
Feature Management:
spec-kitty agent feature create-feature <name>– Create new feature with worktreespec-kitty agent feature check-prerequisites– Validate project setup and feature contextspec-kitty agent feature setup-plan– Initialize plan template for featurespec-kitty agent context update– Update agent context filesspec-kitty agent feature accept– Run acceptance workflowspec-kitty agent feature merge– Merge feature branch and cleanup
Task Workflow:
spec-kitty agent tasks move-task <id> --to <lane>– Move task between kanban lanes (updates frontmatter)spec-kitty agent tasks list-tasks– List all tasks grouped by lanespec-kitty agent tasks mark-status <id> --status <status>– Mark task statusspec-kitty agent tasks add-history <id> --note <message>– Add activity log entryspec-kitty agent tasks validate-workflow <id>– Validate task metadata
Workflow Commands:
spec-kitty agent workflow implement [WP_ID]– Display WP prompt and auto-move to "doing" lanespec-kitty agent workflow review [WP_ID]– Display WP prompt for review and auto-move to "doing" lane
Example Usage:
# Create feature (agent-friendly)
spec-kitty agent feature create-feature "Payment Flow" --json

# Display WP prompt and auto-move to doing
spec-kitty agent workflow implement WP01

# Move task to for_review lane
spec-kitty agent tasks move-task WP01 --to for_review --note "Ready for review"

# Validate workflow
spec-kitty agent tasks validate-workflow WP01 --json

# Accept feature
spec-kitty agent feature accept --json
spec-kitty dashboard Options
| Option | Description |
|---|---|
--port <number> |
Preferred port for the dashboard (falls back to first available port) |
--kill |
Stop the running dashboard for this project and clear its metadata |
Examples:
# Open dashboard (auto-detects port)
spec-kitty dashboard

# Open on specific port
spec-kitty dashboard --port 4000

# Stop dashboard
spec-kitty dashboard --kill
spec-kitty accept Options
| Option | Description |
|---|---|
--feature <slug> |
Feature slug to accept (auto-detected by default) |
--mode <mode> |
Acceptance mode: auto, pr, local, or checklist (default: auto) |
--actor <name> |
Name to record as the acceptance actor |
--test <command> |
Validation command to execute (repeatable) |
--json |
Emit JSON instead of formatted text |
--lenient |
Skip strict metadata validation |
--no-commit |
Skip auto-commit; report only |
--allow-fail |
Return checklist even when issues remain |
Examples:
# Validate feature (auto-detect)
spec-kitty accept

# Validate specific feature
spec-kitty accept --feature 001-auth-system

# Get checklist only (no commit)
spec-kitty accept --mode checklist

# Accept with custom test validation
spec-kitty accept --test "pytest tests/" --test "npm run lint"

# JSON output for CI integration
spec-kitty accept --json
spec-kitty merge Options
| Option | Description |
|---|---|
--strategy <type> |
Merge strategy: merge, squash, or rebase (default: merge) |
--delete-branch / --keep-branch |
Delete or keep feature branch after merge (default: delete) |
--remove-worktree / --keep-worktree |
Remove or keep feature worktree after merge (default: remove) |
--push |
Push to origin after merge |
--target <branch> |
Target branch to merge into (default: main) |
--dry-run |
Show what would be done without executing |
Examples:
# Standard merge and push
spec-kitty merge --push

# Squash commits into one
spec-kitty merge --strategy squash --push

# Keep branch for reference
spec-kitty merge --keep-branch --push

# Preview merge without executing
spec-kitty merge --dry-run

# Merge to different target
spec-kitty merge --target develop --push
spec-kitty verify-setup
Verifies that the current environment matches Spec Kitty expectations:
- Checks for
.kittify/directory structure - Validates agent command files exist
- Confirms dashboard can start
- Reports any configuration issues
Example:
cd my-project
spec-kitty verify-setup
spec-kitty diagnostics
Shows project health and diagnostics information:
- Active mission
- Available features
- Dashboard status
- Git configuration
- Agent command availability
Example:
spec-kitty diagnostics
Available Slash Commands
After running spec-kitty init, your AI coding agent will have access to these slash commands for structured development.
📋 Quick Reference: See the command order flowchart above for a visual workflow guide.
Core Commands (In Recommended Order)
Workflow sequence for spec-driven development:
| # | Command | Description |
|---|---|---|
| 1 | /spec-kitty.constitution |
(First in main repo) Create or update project governing principles and development guidelines |
| 2 | /spec-kitty.specify |
Define what you want to build (requirements and user stories; creates worktree) |
| 3 | /spec-kitty.plan |
Create technical implementation plans with your chosen tech stack |
| 4 | /spec-kitty.research |
Run Phase 0 research scaffolding to populate research.md, data-model.md, and evidence logs |
| 5 | /spec-kitty.tasks |
Generate actionable task lists and work package prompts in flat tasks/ directory |
| 6 | /spec-kitty.implement |
Display WP prompt, auto-move to "doing" lane, show completion instructions |
| 7 | /spec-kitty.review |
Display WP prompt for review, auto-move to "doing" lane, show next steps |
| 8 | /spec-kitty.accept |
Run final acceptance checks, record metadata, and verify feature complete |
| 9 | /spec-kitty.merge |
Merge feature into main branch and clean up worktree |
Quality Gates & Development Tools
Optional commands for enhanced quality and development:
| Command | When to Use |
|---|---|
/spec-kitty.clarify |
Optional, before /spec-kitty.plan: Clarify underspecified areas in your specification to reduce downstream rework |
/spec-kitty.analyze |
Optional, after /spec-kitty.tasks, before /spec-kitty.implement: Cross-artifact consistency & coverage analysis |
/spec-kitty.checklist |
Optional, anytime after /spec-kitty.plan: Generate custom quality checklists that validate requirements completeness, clarity, and consistency |
/spec-kitty.dashboard |
Anytime (runs in background): Open the real-time kanban dashboard in your browser. Automatically starts with spec-kitty init and updates as you work. |
🌳 Worktree Strategy
📖 Quick Start: See the Getting Started guide for practical examples of worktree usage in context.
Spec Kitty uses an opinionated worktree approach for parallel feature development:
The Pattern
my-project/                    # Main repo (main branch)
├── .worktrees/
│   ├── 001-auth-system/      # Feature 1 worktree (isolated sandbox)
│   ├── 002-dashboard/        # Feature 2 worktree (work in parallel)
│   └── 003-notifications/    # Feature 3 worktree (no branch switching)
├── .kittify/
├── kitty-specs/
└── ... (main branch files)
The Rules
- Main branch stays in the primary repo root
- Feature branches live in
.worktrees/<feature-slug>/ - Work on features happens in their worktrees (complete isolation)
- No branch switching in main repo - just
cdbetween worktrees - Automatic cleanup - worktrees removed after merge
The Complete Workflow
# ========== IN MAIN REPO ==========
/spec-kitty.constitution     # Step 1: Establish project governance (one time per project)

# ========== CREATE FEATURE BRANCH & WORKTREE ==========
/spec-kitty.specify          # Step 2: Creates feature branch + isolated worktree
cd .worktrees/001-my-feature # Enter isolated sandbox for feature development

# ========== IN FEATURE WORKTREE ==========
/spec-kitty.clarify          # Step 3 (optional): Clarify requirements before planning
/spec-kitty.plan             # Step 4: Design technical implementation
/spec-kitty.research         # Step 5 (as needed): Research technologies, patterns, etc.
/spec-kitty.tasks            # Step 6: Break plan into actionable tasks
/spec-kitty.analyze          # Step 7 (optional): Check cross-artifact consistency
/spec-kitty.implement        # Step 8: Execute implementation tasks
/spec-kitty.review           # Step 9: Review and refine completed work
/spec-kitty.accept           # Step 10: Acceptance checks & final metadata
/spec-kitty.merge --push     # Step 11: Merge to main + cleanup worktree

# ========== BACK IN MAIN REPO ==========
# Ready for next feature!
✅ Feature Acceptance & Merge Workflow
📖 Quick Start: See Phase 6 in the Getting Started guide for a simplified version of this workflow.
Step 1: Accept
Once every work package has lane: "done" in its frontmatter, verify the feature is ready:
/spec-kitty.accept
The accept command:
- Verifies all WPs have
lane: "done", checks frontmatter metadata, activity logs,tasks.md, and required spec artifacts - Records acceptance metadata in
kitty-specs/<feature>/meta.json - Creates an acceptance commit
- Confirms the feature is ready to merge
Step 2: Merge
After acceptance checks pass, integrate the feature:
/spec-kitty.merge --push
The merge command:
- Switches to main branch
- Pulls latest changes
- Merges your feature (creates merge commit by default)
- Pushes to origin (if
--pushspecified) - Removes the feature worktree
- Deletes the feature branch
Merge strategies:
# Default: merge commit (preserves history)
/spec-kitty.merge --push

# Squash: single commit (cleaner history)
/spec-kitty.merge --strategy squash --push

# Keep branch for reference
/spec-kitty.merge --keep-branch --push

# Dry run to see what will happen
/spec-kitty.merge --dry-run
Task Workflow Automation
All task workflow commands are available through the spec-kitty agent CLI:
spec-kitty agent tasks move-task WP01 --to doing– moves a work-package between lanes, updates frontmatter (lane, agent, shell PID), appends an Activity Log entryspec-kitty agent tasks validate-workflow WP01– validates that the work-package has correct metadataspec-kitty agent tasks list-tasks– lists all tasks grouped by lanespec-kitty agent tasks mark-status WP01 --status done– marks a task with a specific statusspec-kitty agent workflow implement [WP01]– displays WP prompt and auto-moves to "doing" lanespec-kitty agent workflow review [WP01]– displays WP prompt for review and auto-moves to "doing" lane
Work-package IDs follow the pattern WPxx and reference bundled subtasks (Txxx) listed in tasks.md. All WP files live in flat tasks/ directory with lane tracked in frontmatter (no subdirectories).
For programmatic access with JSON output, add the --json flag to any command.
🧭 Mission System
Spec Kitty supports missions: curated bundles of templates, commands, and guardrails for different domains. Two missions ship out of the box:
- Software Dev Kitty – the original Spec-Driven Development workflow for shipping application features (default).
- Deep Research Kitty – a methodology-focused workflow for evidence gathering, analysis, and synthesis.
Each mission lives under .kittify/missions/<mission-key>/ and provides:
- Mission-specific templates (
spec-template.md,plan-template.md,tasks-template.md, etc.) - Command guidance tuned to the domain (
specify,plan,tasks,implement,review,accept) - Optional constitutions to bias the agent toward best practices
Selecting a Mission
Choose your mission during initialization:
# Select mission interactively
spec-kitty init my-project --ai claude

# Or specify mission directly
spec-kitty init my-project --ai claude --mission software-dev
spec-kitty init research-project --ai claude --mission research
Mission Configuration
After initialization, the active mission is configured via symlink:
# View active mission
ls -l .kittify/active-mission
# → .kittify/active-mission -> missions/software-dev/

# Mission configuration
cat .kittify/active-mission/mission.yaml
Note: Mission switching commands (spec-kitty mission switch, etc.) are planned for a future release. Currently, missions are selected during spec-kitty init and remain active for the project lifecycle.
Environment Variables
| Variable | Description |
|---|---|
SPECIFY_FEATURE |
Override feature detection for non-Git repositories. Set to the feature directory name (e.g., 001-photo-albums) to work on a specific feature when not using Git branches.**Must be set in the context of the agent you're working with prior to using /spec-kitty.plan or follow-up commands. |
SPEC_KITTY_TEMPLATE_ROOT |
Optional. Point to a local checkout whose templates/, scripts/, and memory/ directories should seed new projects (handy while developing Spec Kitty itself). |
SPECIFY_TEMPLATE_REPO |
Optional. Override the GitHub repository slug (owner/name) to fetch templates from when you explicitly want a remote source. |
CODEX_HOME |
Required when using the Codex CLI so it loads project-specific prompts. Point it to your project’s .codex/ directory—set it manually with export CODEX_HOME=\"$(pwd)/.codex\" or automate it via direnv on Linux/macOS/WSL. |
🔧 Prerequisites
- Linux/macOS (or WSL2 on Windows)
- AI coding agent: Claude Code, GitHub Copilot, Gemini CLI, Cursor, Qwen CLI, opencode, Codex CLI, Windsurf, or Amazon Q Developer CLI
- uv for package management
- Python 3.11+
- Git
If you encounter issues with an agent, please open an issue so we can refine the integration.
🚀 Releasing to PyPI
Spec Kitty CLI uses an automated release workflow to publish to PyPI. Releases are triggered by pushing semantic version tags and include automated validation, testing, and quality checks.
For Users
Install or upgrade from PyPI:
pip install --upgrade spec-kitty-cli
Check your version:
spec-kitty --version
For Maintainers
Follow these steps to publish a new release:
1. Prepare Release Branch
# Create feature branch
git checkout -b release/v0.2.4

# Bump version in pyproject.toml
vim pyproject.toml  # Update version = "0.2.4"

# Add changelog entry
# Update CHANGELOG.md with ## [0.2.4] - YYYY-MM-DD section with release notes
2. Validate Locally
# Run validator in branch mode
python scripts/release/validate_release.py --mode branch

# Run tests
python -m pytest

# Test package build
python -m build
twine check dist/*

# Clean up
rm -rf dist/ build/
3. Open Pull Request
# Commit changes
git add pyproject.toml CHANGELOG.md
git commit -m "Prepare release 0.2.4"
git push origin release/v0.2.4

# Open PR targeting main
# Ensure all CI checks pass (tests + release-readiness workflow)
4. Merge & Tag
# After PR approval, merge to main
# Then pull latest main
git checkout main
git pull origin main

# Create annotated tag
git tag v0.2.4 -m "Release 0.2.4"

# Push tag (triggers release workflow)
git push origin v0.2.4
5. Monitor Release
- Go to Actions tab in GitHub
- Watch "Publish Release" workflow
- Workflow will:
- ✅ Run full test suite
- ✅ Validate version/changelog alignment
- ✅ Build distributions (wheel + sdist)
- ✅ Run twine check
- ✅ Generate checksums
- ✅ Create GitHub Release with changelog
- ✅ Publish to PyPI (via trusted publishing)
Note: The release workflow uses PyPI Trusted Publishing via GitHub Actions OIDC. This means the workflow obtains a short-lived token automatically without needing stored API keys. However,
PYPI_API_TOKENis still required as a fallback. The workflow will show "This environment is not supported for trusted publishing" if running outside of GitHub Actions or if trusted publishing isn't configured for the package.
6. Verify Release
# Wait a few minutes for PyPI to update
pip install --upgrade spec-kitty-cli==0.2.4

# Verify version
spec-kitty --version  # Should show 0.2.4

# Quick smoke test
spec-kitty --help
Secret Management
The release workflow requires PYPI_API_TOKEN to be configured as a GitHub repository secret.
To create/rotate the token:
- Log in to https://pypi.org
- Go to Account Settings > API tokens
- Click "Add API token"
- Name: "spec-kitty-cli GitHub Actions"
- Scope: "Project: spec-kitty-cli"
- Copy the token (starts with
pypi-) - Add to GitHub:
- Go to repository Settings > Secrets and variables > Actions
- Click "New repository secret"
- Name:
PYPI_API_TOKEN - Value: Paste the PyPI token
- Click "Add secret"
Rotation schedule: Every 6 months or after any security incident
Update the rotation date in docs/releases/readiness-checklist.md when rotating.
Branch Protection
Enable branch protection rules for main:
- Go to Settings > Branches
- Add rule for
mainbranch - Enable:
- ✅ "Require pull request reviews before merging"
- ✅ "Require status checks to pass before merging"
- ✅ Select required check:
release-readiness / check-readiness
- This prevents direct pushes and ensures all changes go through PR review
Automated Guardrails
Three workflows protect release quality:
-
release-readiness.yml - Runs on PRs targeting
main- Validates version bump, changelog, tests
- Blocks merge if validation fails
- Provides actionable job summary
-
protect-main.yml - Runs on pushes to
main- Detects direct pushes (blocks)
- Allows PR merges (passes)
- Provides remediation guidance
-
release.yml - Runs on
v*.*.*tags- Full release pipeline
- Publishes to PyPI
- Creates GitHub Release
Troubleshooting
Validation fails: "Version does not advance beyond latest tag"
- Check latest tag:
git tag --list 'v*' --sort=-version:refname | head -1 - Bump version in
pyproject.tomlto be higher
Validation fails: "CHANGELOG.md lacks a populated section"
- Add entry with format
## [X.Y.Z]and release notes below
Workflow fails: "PYPI_API_TOKEN secret is not configured"
- Add token to repository secrets (see Secret Management above)
Tag already exists:
# Delete and recreate tag
git tag -d v0.2.4
git push origin :refs/tags/v0.2.4
git tag v0.2.4 -m "Release 0.2.4"
git push origin v0.2.4
Documentation
- 📋 Release Readiness Checklist - Complete step-by-step guide
- 🔧 Release Scripts Documentation - Validator and helper scripts
- 📦 Feature Specification - Design decisions
- 🔄 GitHub Workflows - Automation implementation
📖 Learn more
- Complete Spec-Driven Development Methodology - Deep dive into the full process
- Getting Started Guide - Step-by-step walkthrough from installation to feature completion
🛠️ Development Setup
If you're contributing to Spec Kitty or working with the source code directly, you'll need to install it in development mode:
From Local Checkout
# Clone the repository
git clone https://github.com/Priivacy-ai/spec-kitty.git
cd spec-kitty

# Install in editable mode with development dependencies
pip install -e ".[test]"

# When running spec-kitty init, set the template root to your local checkout:
export SPEC_KITTY_TEMPLATE_ROOT=$(pwd)
spec-kitty init <PROJECT_NAME> --ai=claude

# Or use the --template-root flag directly (no env var needed):
spec-kitty init <PROJECT_NAME> --ai=claude --template-root=/path/to/spec-kitty
Template Discovery Priority
The CLI searches for templates in this order:
- Command-line override:
--template-rootflag (highest priority) - Environment variable:
SPEC_KITTY_TEMPLATE_ROOT(local checkout) - Packaged resources: Built-in templates from PyPI installation
- Remote repository:
SPECIFY_TEMPLATE_REPOenvironment variable
This means development installs automatically find templates when running from the cloned repository, but you may need to set SPEC_KITTY_TEMPLATE_ROOT if you move the directory.
📋 Legacy: Detailed Taskify Example
Click to expand a detailed legacy example (Taskify platform)
Note: This is a legacy example preserved for reference. For current workflow guidance, see the Getting Started section above.
You can use the Spec Kitty CLI to bootstrap your project, which will bring in the required artifacts in your environment. Run:
spec-kitty init <project_name>
Or initialize in the current directory:
spec-kitty init .
# or use the --here flag
spec-kitty init --here
# Skip confirmation when the directory already has files
spec-kitty init . --force
# or
spec-kitty init --here --force
You will be prompted to select the AI agent you are using. You can also proactively specify it directly in the terminal:
spec-kitty init <project_name> --ai claude
spec-kitty init <project_name> --ai gemini
spec-kitty init <project_name> --ai copilot
spec-kitty init <project_name> --ai claude,codex

# Or in current directory:
spec-kitty init . --ai claude
spec-kitty init . --ai codex

# or use --here flag
spec-kitty init --here --ai claude
spec-kitty init --here --ai codex

# Force merge into a non-empty current directory
spec-kitty init . --force --ai claude

# or
spec-kitty init --here --force --ai claude
The CLI will check if you have Claude Code, Gemini CLI, Cursor CLI, Qwen CLI, opencode, Codex CLI, or Amazon Q Developer CLI installed. If you do not, or you prefer to get the templates without checking for the right tools, use --ignore-agent-tools with your command:
spec-kitty init <project_name> --ai claude --ignore-agent-tools
You can pass multiple assistants at once by comma-separating the values (e.g., --ai claude,codex). The generator pulls in the combined commands on a single run so both agents share the same workspace.
STEP 1: Establish project principles
Go to the project folder and run your AI agent. In our example, we're using claude.
You will know that things are configured correctly if you see the /spec-kitty.dashboard, /spec-kitty.constitution, /spec-kitty.specify, /spec-kitty.plan, /spec-kitty.tasks, /spec-kitty.implement, and /spec-kitty.review commands available.
The first step should be establishing your project's governing principles using the /spec-kitty.constitution command. This helps ensure consistent decision-making throughout all subsequent development phases:
/spec-kitty.constitution Create principles focused on code quality, testing standards, user experience consistency, and performance requirements. Include governance for how these principles should guide technical decisions and implementation choices.
This step creates or updates the .kittify/memory/constitution.md file with your project's foundational guidelines that the AI agent will reference during specification, planning, and implementation phases.
STEP 2: Create feature specifications
With your project principles established, you can now create the functional specifications for a single feature. Use the /spec-kitty.specify command and then provide the concrete requirements for the feature you want to develop inside the project.
[!IMPORTANT] Be as explicit as possible about what you are trying to build and why. Do not focus on the tech stack at this point.
An example prompt:
Develop Taskify, a team productivity platform. It should allow users to create projects, add team members,
assign tasks, comment and move tasks between boards in Kanban style. In this initial phase for this feature,
let's call it "Create Taskify," let's have multiple users but the users will be declared ahead of time, predefined.
I want five users in two different categories, one product manager and four engineers. Let's create three
different sample projects. Let's have the standard Kanban columns for the status of each task, such as "To Do,"
"In Progress," "In Review," and "Done." There will be no login for this application as this is just the very
first testing thing to ensure that our basic features are set up. For each task in the UI for a task card,
you should be able to change the current status of the task between the different columns in the Kanban work board.
You should be able to leave an unlimited number of comments for a particular card. You should be able to, from that task
card, assign one of the valid users. When you first launch Taskify, it's going to give you a list of the five users to pick
from. There will be no password required. When you click on a user, you go into the main view, which displays the list of
projects. When you click on a project, you open the Kanban board for that project. You're going to see the columns.
You'll be able to drag and drop cards back and forth between different columns. You will see any cards that are
assigned to you, the currently logged in user, in a different color from all the other ones, so you can quickly
see yours. You can edit any comments that you make, but you can't edit comments that other people made. You can
delete any comments that you made, but you can't delete comments anybody else made.
After this prompt is entered, you should see Claude Code kick off the planning and spec drafting process. Claude Code will also trigger some of the built-in scripts to set up the repository.
Once this step is completed, you should have a new branch created (e.g., 001-create-taskify), as well as a new specification in the kitty-specs/001-create-taskify directory.
The produced specification should contain a set of user stories and functional requirements, as defined in the template.
At this stage, your project folder contents should resemble the following:
.
├── .kittify
│   ├── memory
│   │   └── constitution.md
│   ├── templates
│   │   ├── command-templates/
│   │   ├── git-hooks/
│   │   ├── plan-template.md
│   │   ├── spec-template.md
│   │   └── tasks-template.md
│   └── missions
│       ├── software-dev/
│       └── research/
└── kitty-specs
    └── 001-create-taskify
        └── spec.md
Note: Automation uses Python CLI commands (
spec-kitty agent) not bash scripts. See v0.10.0 migration.
STEP 3: Functional specification clarification (required before planning)
With the baseline specification created, you can go ahead and clarify any of the requirements that were not captured properly within the first shot attempt.
You should run the structured clarification workflow before creating a technical plan to reduce rework downstream.
Preferred order:
- Use
/spec-kitty.clarify(structured) – sequential, coverage-based questioning that records answers in a Clarifications section. - Optionally follow up with ad-hoc free-form refinement if something still feels vague.
If you intentionally want to skip clarification (e.g., spike or exploratory prototype), explicitly state that so the agent doesn't block on missing clarifications.
Example free-form refinement prompt (after /spec-kitty.clarify if still needed):
For each sample project or project that you create there should be a variable number of tasks between 5 and 15
tasks for each one randomly distributed into different states of completion. Make sure that there's at least
one task in each stage of completion.
You should also ask Claude Code to validate the Review & Acceptance Checklist, checking off the things that are validated/pass the requirements, and leave the ones that are not unchecked. The following prompt can be used:
Read the review and acceptance checklist, and check off each item in the checklist if the feature spec meets the criteria. Leave it empty if it does not.
It's important to use the interaction with Claude Code as an opportunity to clarify and ask questions around the specification - do not treat its first attempt as final.
STEP 4: Generate a plan
You can now be specific about the tech stack and other technical requirements. You can use the /spec-kitty.plan command that is built into the project template with a prompt like this:
We are going to generate this using .NET Aspire, using Postgres as the database. The frontend should use
Blazor server with drag-and-drop task boards, real-time updates. There should be a REST API created with a projects API,
tasks API, and a notifications API.
The output of this step will include a number of implementation detail documents, with your directory tree resembling this:
.
├── CLAUDE.md
├── .kittify
│   ├── memory
│   │   └── constitution.md
│   ├── templates/
│   └── missions/
├── kitty-specs
│	 └── 001-create-taskify
│	     ├── contracts
│	     │	 ├── api-spec.json
│	     │	 └── signalr-spec.md
│	     ├── data-model.md
│	     ├── plan.md
│	     ├── quickstart.md
│	     ├── research.md
│	     └── spec.md
└── templates
    ├── CLAUDE-template.md
    ├── plan-template.md
    ├── spec-template.md
    └── tasks-template.md
Check the research.md document to ensure that the right tech stack is used, based on your instructions. You can ask Claude Code to refine it if any of the components stand out, or even have it check the locally-installed version of the platform/framework you want to use (e.g., .NET).
Additionally, you might want to ask Claude Code to research details about the chosen tech stack if it's something that is rapidly changing (e.g., .NET Aspire, JS frameworks), with a prompt like this:
I want you to go through the implementation plan and implementation details, looking for areas that could
benefit from additional research as .NET Aspire is a rapidly changing library. For those areas that you identify that
require further research, I want you to update the research document with additional details about the specific
versions that we are going to be using in this Taskify application and spawn parallel research tasks to clarify
any details using research from the web.
During this process, you might find that Claude Code gets stuck researching the wrong thing - you can help nudge it in the right direction with a prompt like this:
I think we need to break this down into a series of steps. First, identify a list of tasks
that you would need to do during implementation that you're not sure of or would benefit
from further research. Write down a list of those tasks. And then for each one of these tasks,
I want you to spin up a separate research task so that the net results is we are researching
all of those very specific tasks in parallel. What I saw you doing was it looks like you were
researching .NET Aspire in general and I don't think that's gonna do much for us in this case.
That's way too untargeted research. The research needs to help you solve a specific targeted question.
[!NOTE] Claude Code might be over-eager and add components that you did not ask for. Ask it to clarify the rationale and the source of the change.
STEP 5: Have Claude Code validate the plan
With the plan in place, you should have Claude Code run through it to make sure that there are no missing pieces. You can use a prompt like this:
Now I want you to go and audit the implementation plan and the implementation detail files.
Read through it with an eye on determining whether or not there is a sequence of tasks that you need
to be doing that are obvious from reading this. Because I don't know if there's enough here. For example,
when I look at the core implementation, it would be useful to reference the appropriate places in the implementation
details where it can find the information as it walks through each step in the core implementation or in the refinement.
This helps refine the implementation plan and helps you avoid potential blind spots that Claude Code missed in its planning cycle. Once the initial refinement pass is complete, ask Claude Code to go through the checklist once more before you can get to the implementation.
You can also ask Claude Code (if you have the GitHub CLI installed) to go ahead and create a pull request from your current branch to main with a detailed description, to make sure that the effort is properly tracked.
[!NOTE] Before you have the agent implement it, it's also worth prompting Claude Code to cross-check the details to see if there are any over-engineered pieces (remember - it can be over-eager). If over-engineered components or decisions exist, you can ask Claude Code to resolve them. Ensure that Claude Code follows the constitution as the foundational piece that it must adhere to when establishing the plan.
STEP 6: Implementation
Once ready, use the /spec-kitty.implement command to execute your implementation plan:
/spec-kitty.implement
The /spec-kitty.implement command will:
- Validate that all prerequisites are in place (constitution, spec, plan, and tasks)
- Parse the task breakdown from
tasks.md - Execute tasks in the correct order, respecting dependencies and parallel execution markers
- Follow the TDD approach defined in your task plan
- Provide progress updates and handle errors appropriately
[!IMPORTANT] The AI agent will execute local CLI commands (such as
dotnet,npm, etc.) - make sure you have the required tools installed on your machine.
Once the implementation is complete, test the application and resolve any runtime errors that may not be visible in CLI logs (e.g., browser console errors). You can copy and paste such errors back to your AI agent for resolution.
🔍 Troubleshooting
Template Discovery Issues
Error: "Templates could not be found in any of the expected locations"
This error occurs when spec-kitty init cannot locate the template files. Here's how to diagnose and fix it:
For PyPI installations:
# Reinstall the package
pip install --upgrade spec-kitty-cli

# Verify templates are bundled
python -c "from importlib.resources import files; print(files('specify_cli').joinpath('templates'))"
For development installations:
# Make sure you installed in editable mode from the repo root
cd /path/to/spec-kitty
pip install -e .

# Option 1: Use environment variable
export SPEC_KITTY_TEMPLATE_ROOT=$(pwd)
spec-kitty init my-project --ai=claude

# Option 2: Use --template-root flag (no env var needed)
spec-kitty init my-project --ai=claude --template-root=$(pwd)

# Option 3: Verify the path exists
ls -la ./templates/commands
For moved repositories: If you cloned the spec-kitty repo and moved the directory, update the environment variable:
export SPEC_KITTY_TEMPLATE_ROOT=/new/path/to/spec-kitty
spec-kitty init my-project --ai=claude
Debugging with verbose output:
# Use --debug flag to see which paths were checked
spec-kitty init my-project --ai=claude --debug --template-root=/path/to/spec-kitty
Git Credential Manager on Linux
If you're having issues with Git authentication on Linux, you can install Git Credential Manager:
#!/usr/bin/env bash
set -e
echo "Downloading Git Credential Manager v2.6.1..."
wget https://github.com/git-ecosystem/git-credential-manager/releases/download/v2.6.1/gcm-linux_amd64.2.6.1.deb
echo "Installing Git Credential Manager..."
sudo dpkg -i gcm-linux_amd64.2.6.1.deb
echo "Configuring Git to use GCM..."
git config --global credential.helper manager
echo "Cleaning up..."
rm gcm-linux_amd64.2.6.1.deb
👥 Maintainers
- Robert Douglass (@robertDouglass)
💬 Support
For support, please open a GitHub issue. We welcome bug reports, feature requests, and questions about using Spec-Driven Development.
🙏 Acknowledgements
This project is heavily influenced by and based on the work and research of John Lam.
📄 License
This project is licensed under the terms of the MIT open source license. Please refer to the LICENSE file for the full terms.


Download files
Download the file for your platform. If you're not sure which to choose, learn more about installing packages.
Source Distribution
Built Distribution
Filter files by name, interpreter, ABI, and platform.
If you're not sure about the file name format, learn more about wheel file names.
Copy a direct link to the current filters
File details
Details for the file spec_kitty_cli_jl-0.10.13.tar.gz.
File metadata
- Download URL: spec_kitty_cli_jl-0.10.13.tar.gz
- Upload date:
- Size: 1.8 MB
- Tags: Source
- Uploaded using Trusted Publishing? No
- Uploaded via: twine/6.2.0 CPython/3.13.9
File hashes
| Algorithm | Hash digest | |
|---|---|---|
| SHA256 |
1c8b99532235506eb4f8bcfb4ed08e24e6b2266737c4d331d35fc22f2962c224
|
|
| MD5 |
312d3d107995d9f7971a322617aa8812
|
|
| BLAKE2b-256 |
f4aa17cabe3ba7e4a630e9295e8d7222da7686fee72a990b0b07bca63f2677e1
|
File details
Details for the file spec_kitty_cli_jl-0.10.13-py3-none-any.whl.
File metadata
- Download URL: spec_kitty_cli_jl-0.10.13-py3-none-any.whl
- Upload date:
- Size: 1.9 MB
- Tags: Python 3
- Uploaded using Trusted Publishing? No
- Uploaded via: twine/6.2.0 CPython/3.13.9
File hashes
| Algorithm | Hash digest | |
|---|---|---|
| SHA256 |
a5d54d36bb223f50cc6bfddfa44aa7f8f5fb11a9d0d458223075a688da3179e6
|
|
| MD5 |
7ab94289498ff5d251c042f987aa9312
|
|
| BLAKE2b-256 |
c3b6efb9215c0575e526c3fc878a40a1c393990aee8de58f3259c658c7f79bd4
|






