A software to handle a StreamDeck from Elgato, via the file system.

Project description


Sections: StreamDeckFS • Examples • Why • Installation • Starting • Configuration (Images • Drawings • Texts • Events) • Pages • References • Variables • API • Example configurations • Web renderer and virtual decks
StreamDeckFS
StreamDeckFS is a tool, written in Python (3.9+), to configure a StreamDeck (by Elgato) for Linux (and maybe soon, I need help for this!) Darwin (mac) and Windows)
It's not a graphical interface, but if you can use a file system and create directories and files (no content needed, see later), you'll have all the necessary power.
It provides numerous features:
- page management, with overlays
- image composition, with layers, drawings, and texts, with, for all of them, many configuration options
- advanced key management (on press, release, long press, repeat, delay, and more)
- references (explained later, but see this as a way to have templates, or to repeat keys on pages, or have many times the same key with a few differences)
- variables with (small) logic and cascading
- api
- web access
- virtual decks (create a deck the size you want and access it via your browser)
streamdeckfs will look at the directory passed on the command line and read all the configuration from directories and files.
And while running, it will catch any changes to them to update in real-time the StreamDeck
Examples
Here are a few examples of what is possible with streamdeckfs. Remember that streamdeckfs only display (and compose) images and call programs by providing a powerful configuration system to let your imagination do the rest.
Example 1: first page
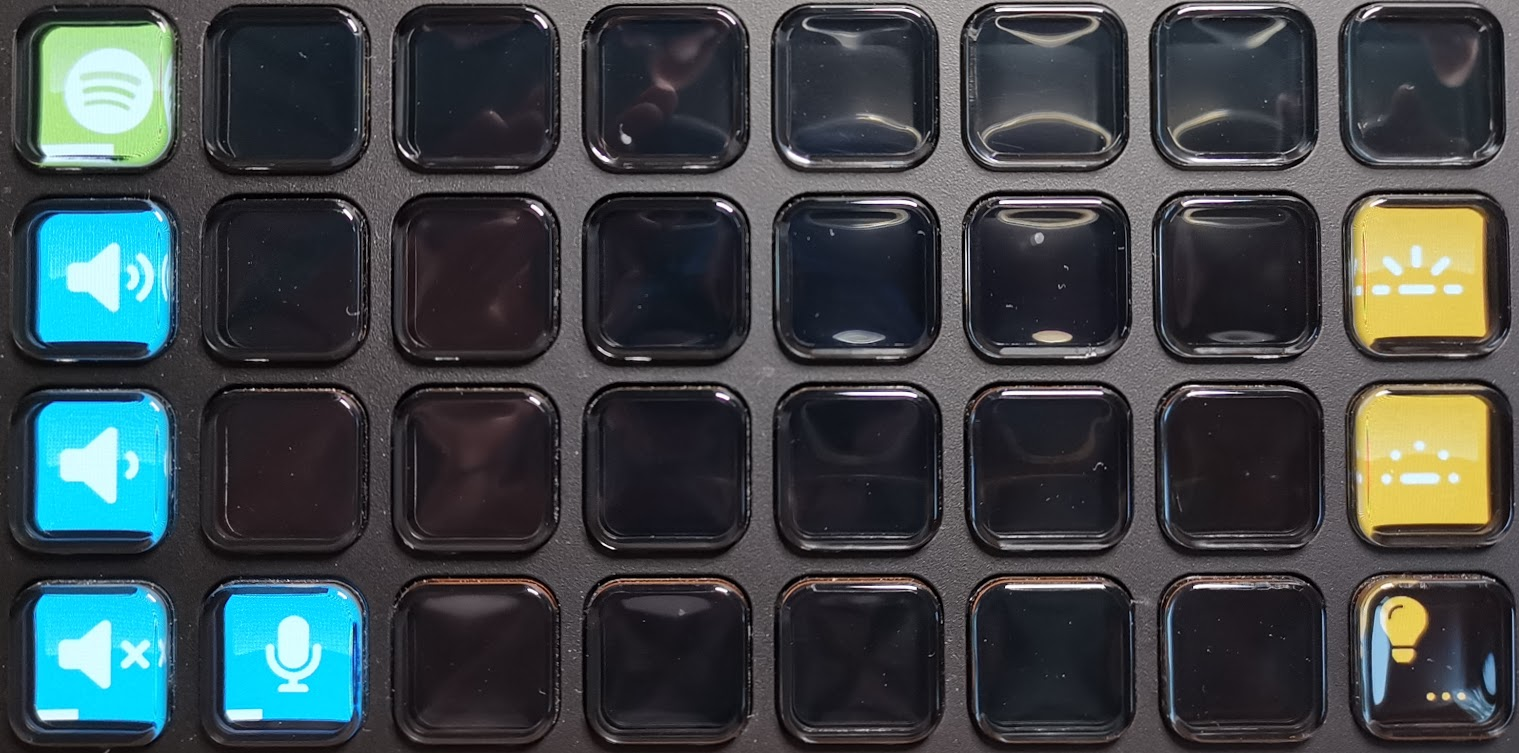
- First key of first row: toggle play/pause on Spotify on press, and on long press, open a page on the StreamDeck dedicated to Spotify (see example 3). Displays the progress bar of the current playing song, or a "pause" icon on top of the Spotify logo if Spotify is not playing at the moment.
- First keys of second and third rows: increase/decrease volume on press, and can be pressed longer to increase/decrease more.
- First key of last row: toggle mute the sound. Displays the current volume, and becomes red when the sound is muted
- Second key of last row: toggle mute the microphone on press, and open an overlay to increase/decrease the microphone sensitivity (see example 2). Displays the current sensitivity, and becomes red when the microphone is muted
- Last keys of second and third rows: increase/decrease the StreamDeck brightness on press, and can be pressed longer to increase/decrease more.
- Last key of last row: open a page dedicated to controlling lights (example not shown)
Example 2: Spotify page
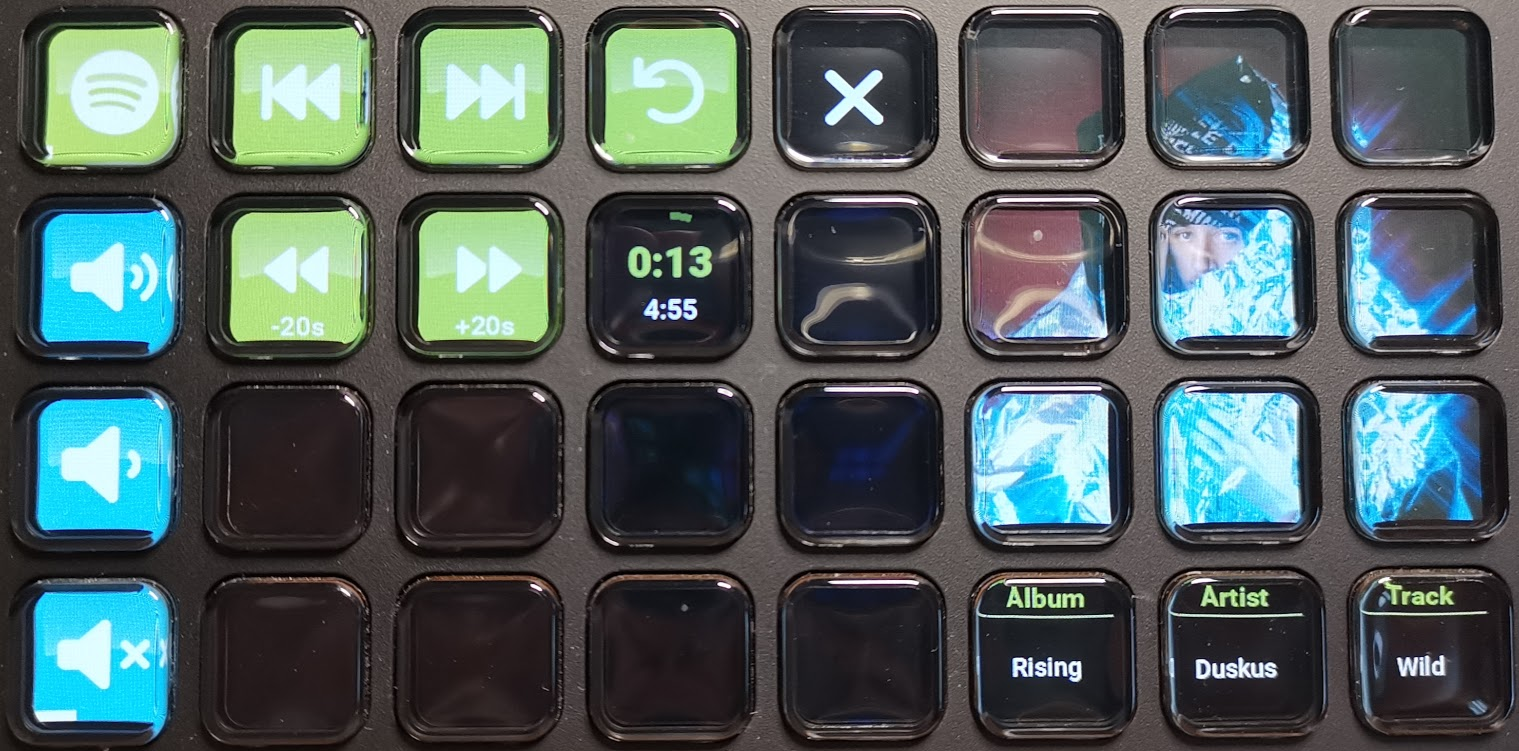
- First key of first row: same as in first page. Toggle play/pause on press, and go back to previous page on long press.
- Other green keys: previous/next track, restart track, go backward/forward in the track
- First keys of second, third and last row: same as in first page, to control the volume
- Fifth key of first row: close the Spotify page (go back to previous page)
- Fourth key of second row: progress and duration of the current song
- 3x3 square of keys in the top right corner: cover of currently playing album
- Last three keys of last row: some information about the current playing track
Example 3: Microphone overlay
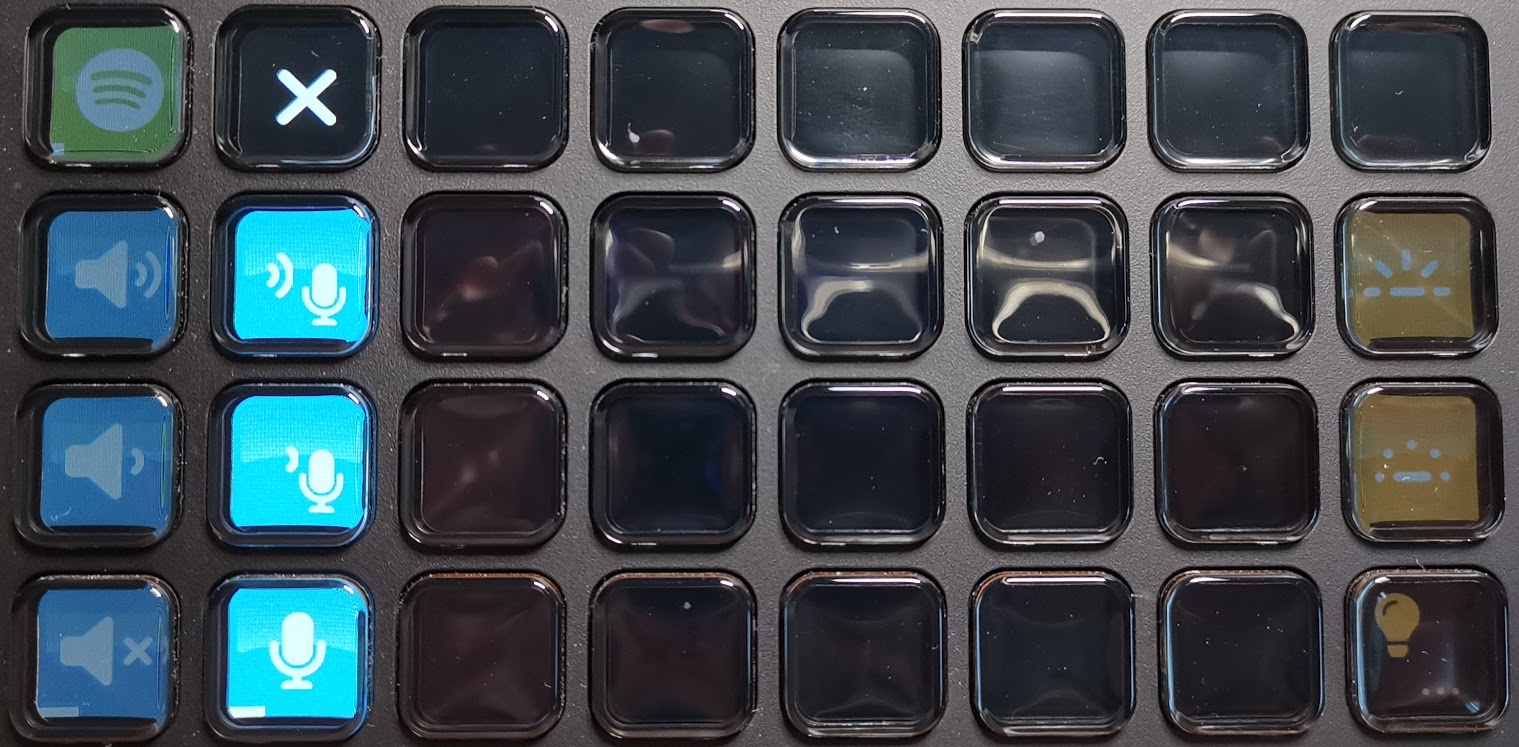
Here only the "bright" keys are active. Think of an overlay as a modal window.
- Second key of first row: close the microphone overlay (go back to previous page)
- Second keys of second and third rows: increase/decrease sensitivity on press, and can be pressed longer to increase/decrease more.
- Second key of last row: same as in the first page. Toggle the microphone on press, and close the overlay on long press.
Why?
As a linux user I couldn't use the official application and I quickly felt very limited by the one available on linux, streamdeck-ui, because I had many things in my head that couldn't be done. And I'm not a Linux GUI developer so I preferred to do my own tool. I, however, yse the same underlying Python library to interface the Stream Deck. And SnakeDeck was written, by an extreme coincidence, at the same time as StreamDeckFS, without either of us knowing it.
Installation
Prerequisites
- Linux (compatibility with Darwin(mac) and Windows in a near future, I just don't have those OS at my disposal)
- Python 3.9
System
You need to make your system ready to communicate with HID devices.
You first need to install the HID api library
For Ubuntu/Debian:
sudo apt install -y libhidapi-libusb0
For Fedora:
sudo dnf install hidapi
Then you need to make your OS recognise the StreamDeck devices:
sudo tee /etc/udev/rules.d/70-streamdeck.rules << EOF
SUBSYSTEM=="usb", ATTRS{idVendor}=="0fd9", ATTRS{idProduct}=="0060", TAG+="uaccess"
SUBSYSTEM=="usb", ATTRS{idVendor}=="0fd9", ATTRS{idProduct}=="0063", TAG+="uaccess"
SUBSYSTEM=="usb", ATTRS{idVendor}=="0fd9", ATTRS{idProduct}=="006c", TAG+="uaccess"
SUBSYSTEM=="usb", ATTRS{idVendor}=="0fd9", ATTRS{idProduct}=="006d", TAG+="uaccess"
EOF
sudo udevadm control --reload-rules
And finally you need to unplug then plug back your StreamDeck devices to ensure they adopt the new permissions.
StreamDeckFS
To install streamdeckfs, you can use pip, either in a virtual environment, or in your system python (reminder: you need python 3.9 minimum). use pip install streamdeckfs or pip install --user streamdeckfs depending on your case.
For the rest of this README, we assume that the package is correctly installed, and that a streamdeckfs executable should now be available.
If you don't know how to install a python package, I redirect you to your favorite search engine where you'll find a lot more complete and accurate explanation on how to do it.
Note: in addition to streamdeckfs, a shorter version, sdfs, is available.
Starting
Knowing your StreamDeck(s)
The first thing to do is to discover your StreamDeck devices.
For this, use the inspect command:
streamdeckfs inspect
It will output some information about the connected decks (no other program must be connected to them as only one connection to the decks is possible).
The main useful thing is the serial number, as it will be the name of the directory containing its configuration (you'll place it where you want)
Preparing the configuration directory
You can create the directories by hand (we'll explain how later), but we provide a command to create the tree for you, make-dirs:
streamdeckfs make-dirs SERIAL BASE_DIRECTORY
SERIAL is the serial number you got from the inspect command. Note that if you have only one connected StreamDeck, you can ignore this argument as streamdeckfs will automatically find it for you.
BASE_DIRECTORY is the directory that will contain the configuration directory of this StreamDeck. So it will create (if it does not exist yet) a directory named YOUR_SERIAL_NUMBER in BASE_DIRECTORY.
Before creating (or updating) the tree, you'll be asked to confirm (unless you pass --yes on the command line).
No pages will be created unless you pass --page XX, XX being the number of pages to create.
Once confirmed, streamdeckfs will create all missing directories.
The resulting tree will look like this, for example for a deck with 3 rows of 5 keys:
BASE_DIRECTORY/YOUR_SERIAL_NUMBER
├── PAGE_1
│   ├── KEY_ROW_1_COL_1
│   ├── KEY_ROW_1_COL_2
│   ├── KEY_ROW_1_COL_3
│   ├── KEY_ROW_1_COL_4
│   ├── KEY_ROW_1_COL_5
│   ├── KEY_ROW_2_COL_1
│   ├── KEY_ROW_2_COL_2
│   ├── KEY_ROW_2_COL_3
│   ├── KEY_ROW_2_COL_4
│   ├── KEY_ROW_2_COL_5
│   ├── KEY_ROW_3_COL_1
│   ├── KEY_ROW_3_COL_2
│   ├── KEY_ROW_3_COL_3
│   ├── KEY_ROW_3_COL_4
│   ├── KEY_ROW_3_COL_5
├── PAGE_2
...
Now you are ready to configure the keys. Here is the most straightforward configuration:
- copy an image file (or make a symbolic link) into a
KEY...directory (in thePAGE_1directory, as the first displayed page is the one with the lowest number) and name itIMAGE. It's the image that will be displayed for the key. - copy a script/program (or make a symbolic link) into the same
KEY...directory and name itON_PRESS. It's the script/program that will be executed when the key will be pressed.
That's it; you now know how to configure your StreamDeck in the simplest way possible. We'll see later the numerous configuration options.
PS: you can have IMAGE without ON_PRESS or ON_PRESS without IMAGE.
Running streamdeckfs
Now that you have your configuration directory, run:
streamdeckfs run SERIAL CONFIG_DIRECTORY
And voila!
Note that, like for make-dirs, the SERIAL argument is optional if you have only one connected StreamDeck.
And CONFIG_DIRECTORY can be either the exact directory, i.e., BASE_DIRECTORY/YOUR_SERIAL_NUMBER, or the directory used in make-dirs i.e., BASE_DIRECTORY (streamdeckfs will then complete it. It's helpful if you have only one deck connected and don't want to have to remember the serial number, so in this case, the command can be only streamdeckfs run BASE_DIRECTORY)
Now that you have your StreamDeck running, try adding an image for another key (on the first page). You'll see that the deck automatically updates. And maybe you're starting to see the infinite possibilities.
If you have many StreamDecks, each with its config directory (for example if 2 decks BASE_DIRECTORY/YOUR_SERIAL_NUMBER_1 and BASE_DIRECTORY/YOUR_SERIAL_NUMBER_2, you have many options:
- run without passing any serials and passing
BASE_DIRECTORY: it will run for all decks that have a config directory inBASE_DIRECTORY - run with passing one or many serials and passing
BASE_DIRECTORY: it will run for all wanted decks that have a config directory inBASE_DIRECTORY - run without passing any serials and passing the serial config directory
BASE_DIRECTORY/YOUR_SERIAL_NUMBER_1: it will run for this deck only
You can also run many instances of the program, one for each deck (so you can easily stop one). There is two ways to do this:
- for each deck, run without passing any serials and passing the serial config directory
BASE_DIRECTORY/YOUR_SERIAL_NUMBER_1 - for each deck, run with passing its serial and passing the global or the serial config directory, i.e.,
BASE_DIRECTORYorBASE_DIRECTORY/YOUR_SERIAL_NUMBER_1
Note that streamdeckfs can be launched before the StreamDecks being plugged or their configuration directory being ready. It will patiently wait for everything to be ok for a StreamDeck to be rendered. And if theses directory become unavailable later, or if the StreamDecks are unplugged, it will stop rendering them and wait for them to be ready again.
Images
There are two things you can configure on your StreamDeck: "appearance", i.e., what is displayed on the keys, and "events" that happen when you "act" with them.
But first, let's talk a bit about the way configuration works.
Configuration format
Everything is done in the name of the file. Say you want to configure the IMAGE with the option foo taking the value bar, then you have to rename the file from IMAGE to IMAGE;foo=bar.
And if you want to add a name (explained later) of my-key, the file's name will be IMAGE;foo=bar;name=my-key.
So the three things to know are:
- if the image (or event, or text) has some configuration options, the "normal" name (like
IMAGE,ON_PRESS...) is separated from the configuration with a semi-colon:IMAGE;here=is;the=config - key/value configuration pairs are grouped with a
=between the key and the value:key=value - different configuration pairs are separated by a semi-colon:
key1=value1;key2=value2
Note that the order of the configuration options is not essential.
About the limitations, there are a few things to consider:
- some characters are not allowed in a file name (only
/on Linux) - the length of a file name is limited (generally 256 characters on Linux)
Common configuration options
Two configuration options are common to every directory or file:
name
It's the name of the page, key, image, event, or text. It can be whatever you want and can be used to "reference" other pages, keys, images, events, and texts. For example, if you have a page dedicated to displaying keys for Spotify, you can have the page directory named PAGE_50;name=spotify, so when you'll want to have a key to go to this page, you'll be able to use the page number or the name. Using the name allows reordering the pages as you want. We'll see later how to make keys display a different page when pressed.
disabled
To make streamdeckfs ignore a page, image, text, event..., you can use the disabled option, which is a flag, meaning that simply adding ;disabled is enough to have it disabled, but you can also set a boolean value ;disabled=true or ;disabled=false.
enabled
It's the exact opposite of disabled. Used as a flag enabled only or via enabled=true (equivalent to disabled=false) or enabled=false (equivalent to disabled=true)
Useful when using variables. Only one of enabled or disabled can be used.
Configuring appearance (images, drawings, texts)
First, let's talk about the image formats that are supported. You can use every image format supported by the pillow python library. For example, jpeg, png, gif (we don't handle animated gif yet). The transparency level ("alpha layer") is respected.
The image will be resized to fit in the key: a 72 or 96 pixel square, depending on which StreamDeck you have (the inspect command gives us this information). The ratio of the original image is kept, with transparent bands of the top/bottom or left/right depending on the ratio.
Images layers
The simplest thing to do to display something on a key is to drop (or link) an image on the corresponding KEY... directory and name it IMAGE.
But you can make an advanced composition with layers, for example a background, an icon, and an overlay.
Option "layer"
To make an image a layer, set the layer configuration option to a number: IMAGE;layer=1, IMAGE;layer=2... Layers will be drawn on top of each other in numerical order. Also, note that when there is at least one image with the layer number defined, the default image (i.e., IMAGE without the layer configuration) is ignored.
If two images have the same layer number, the most recent one will be displayed, the other(s) will be ignored.
So ok, we can have many layers that will be rendered on top of each other. But in this case, we'll only be able to see the last layer, right? Not exactly. There are many configuration options that you can apply on each layer, as you can see below.
The list below presents the configuration options in the same order as they are applied on a layer (the order in the file name is not essential).
Note that the following options are also valid when you have a single image without a defined layer.
Option "crop"
The crop option allows displaying only a specific part of the image. Coordinates can be defined in pixels from the source image or in percents.
It must be defined like this: crop=LEFT,TOP,RIGHT,BOTTOM, representing the two points (x,y) of the image to be used to "cut" a rectangle, based on the (0,0) coordinate being in the top left corner of the image: the top-left corner and the bottom-right corner. Values are:
LEFT: the distance, in pixels or percents (of the original width) from the leftTOP: the distance, in pixels or percents (of the original height) from the topRIGHT: the distance, in pixels or percents (of the original width) from the leftBOTTOM: the distance, in pixels or percents (of the original height) from the top
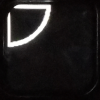
Examples: In all image examples we'll use the Elgato logo (made white on transparent) that looks like this by default (and examples are photos from a real device):

IMAGE;crop=10,10,90,90applied on a 100x100 pixels image, will remove a border of 10 pixels on all sides:

IMAGE;crop=0,0,33.33%,33.33%will only keep the top left third of the image (It can be used to display an image on a 9-keys square, each key containing the same image but with a different crop configuration):

Once cropped, the part that is kept will be the source image for the other configuration options.
In addition to crop, it's also possible to override the individual parts. For example crop=10,10 10,10;crop.1=20 will be equal to crop=10,20,10,10. For this to work, crop must have been defined. And indexes (the 1 in crop.1 starts at 0: 4 parts (from 0 to 3) can be overridden. It may not seems useful for now, but we'll see later that it can be powerful.
To be more readable, instead of crop.0, crop.1, crop.2 and crop.3 you can use crop.left, crop.top, crop.right and crop.bottom.
Option "rotate"
The rotate option takes the source image (or the one already updated by previous options) and rotates it the number given of degrees clockwise.
It must be defined like this: rotate=ANGLE, with:
ANGLE: the angle, in degrees, from 0 to 360, or in percents (100%=360 degrees) (it can be negative or more than 360/100%, in which case it will work as you expect)
Examples:
IMAGE;rotate=180will make the image upside down:

IMAGE;rotate=50%same but expressed in percents
Once rotated, the updated image will be the source image for the other configuration options.
Option "margin"
The margin option allows placing the source image (or the one already updated by the previous options) in a key area by defining margin on all sides. The way it works is to remove the margins from the original key size and fit the image in the remaining area, keeping the aspect ratio.
Values can be defined in pixels from the key or in percents (Using percents allow to have the same rendering whatever the key size is)
It must be defined like this: margin=TOP,RIGHT,BOTTOM,LEFT, with:
TOP: the height of the top margin, in pixels or percents (of the key height)RIGHT: the width of the right margin, in pixels or percents (of the key width)BOTTOM: the height of the bottom margin, in pixels or percents (of the key height)LEFT: the width of the left margin, in pixels or percents (of the key width)
Examples:
IMAGE;margin=10,10,10,10makes a margin of 10 pixels on all size:

IMAGE;margin=0,33.33%,0,33.33%will fit the image if the middle third of the key (margin of 33.33% on left and right, so 33.33% are available in the middle):

In addition to margin, it's also possible to override the individual parts. For example margin=10,10 10,10;margin.1=20 will be equal to margin=10,20,10,10. For this to work, margin must have been defined. And indexes (the 1 in margin.1 starts at 0: 4 parts (from 0 to 3) can be overridden. It may not seems useful for now, but we'll see later that it can be powerful.
To be more readable, instead of margin.0, margin.1, margin.2 and margin.3 you can use margin.top, margin.right, margin.bottom and margin.left.
Option "colorize"
The colorize option takes a color and will replace every color of the image with this one, keeping the alpha layer (opacity) intact. Useful, for example, if you want to display an icon, given in black with transparency, in a specific color.
It must be defined like this: colorize=COLOR with:
COLOR: the color to use. It can be a common HTML color name (red, green, blue, etc.) or a hexadecimal RGB value, like#ff0000(here, pure red). Color names or hexadecimal values are case-insensitive.
Examples:
IMAGE;colorize=redcolorizes the image in red:

IMAGE;colorize=#00FFFFcolorizes the image in cyan:

Option "opacity"
The opacity option allows defining how transparent the image will be, i.e., how the layers below will be visible.
It must be defined like this: opacity=NUMBER with:
NUMBER: the level of opacity, from 0 to 100, 0 being the less opaque (fully transparent, the layer won't be visible at all), and 100 being the most opaque (not transparent at all, except the parts already transparent)
For parts of the image already partially transparent, they will become more transparent with the opacity decreasing.
Examples:
IMAGE;opacity=100does not change the transparency at allIMAGE;opacity=50makes the image 50% transparent (here with a red background):

Option "file"
If you don't want do copy or link the image to the IMAGE... file in the KEY... directory, you can use the file configuration option to define the path where to find the image to render.
You have to respect the known limitations of the file name (max length and no slash /) and avoid semi-colons ; as it is interpreted as the end of the path (because it's the configuration options separator) . For the slash, you can replace it with any suite of characters defined in the slash option (default to \\). For the semi-colon, you can replace it with any suite of caracters defined in the semicolon option (default to ^).
Note that the IMAGE... file can be empty when this option is set, as its content will be ignored. And you cannot set both file and draw options (see Drawings for this last one).
It must be defined like this: file=PATH with:
PATH: the path of the image file to render. It can starts with~.
Examples:
IMAGE;file=|home|myself|Images|logo.png;slash=|will use the image at/home/myself/Images/logo.png. Note that the/are replaced by|as defined by theslashconfiguration option.IMAGE;file=\\home\\myself\\Images\\logo.pngsame but using the default value of theslashconfiguration option when not passed.
The key will be updated when the referenced image changes.
If you don't want to deal with special characters, you can use file=__inside__ and write the path of the image in the first line of the file.
Option "slash"
When using the file option, it's impossible to use slashes in the filename, so you can replace it with any character or suite of characters you defined with the slash option. If not defined, the default value of \\ is used.
It must be defined like this: slash=REPLACEMENT with:
REPLACEMENT: a character or suite of characters to use as a replacement in thecommandconfiguration option for the/character
Examples:
IMAGE;file=|home|myself|Images|logo.png;slash=|will use the image at/home/myself/Images/logo.png. Note that the/are replaced by|as defined by theslashconfiguration option.IMAGE;file=XXXhomeXXXmyselfXXXImagesXXXlogo.png;slash=XXXsame but usingXXXinstead of|IMAGE;file=\\home\\myself\\Images\\logo.pngsame but using the default value of theslashconfiguration option when not passed.
Option "semicolon"
When using the file option, it's impossible to use semi-colons in the filename, so you can replace it with any character or suite of characters you defined with the semicolon option. If not defined, the default value of ^ is used/
It must be defined like this: semicolon=REPLACEMENT with:
REPLACEMENT: a character or suite of characters to use as a replacement in thecommandconfiguration option for the;character
Examples:
IMAGE;file=\\home\\myself\\Images\\logo^version2.pngwill use the image at/home/myself/Images/logo;version2.pngusing default value for/(\\) and for;(^)IMAGE;file=|home|myself|Images|logo,version2.png;slash=|;semicolon=,same but using|for slashes and,for semicolons
Drawings
In addition to image files, layers can be simple drawings: points, lines, rectangles/polygons, circles/ellipses, arch, chords, and pie slices.
Drawings can be used to add a progress bar (horizontal, circular), a separation line between a text title and a text content, etc.
A drawing layer is named like an image (i.e., with the name starting with IMAGE;) but can be an empty file (or any file you want, the content will be ignored) and is defined with draw=KIND and other configuration options depending on the drawing kind.
As said above, drawings are image layers, defined like it, so all configuration options described above for images also apply for drawing. The drawing is like the source of the image, so all configuration options for images seen above can be used.
Common things to know about drawings configuration options:
- coordinates are based on the size of the key, based on the (0,0) coordinate being in the top left corner of the image
- coordinates can be given in pixels or percents. If percents they will be from the width or the height of the key size
- coordinates can be negative
- coordinates are given as a suite of
X,Ypairs, separated by commas, likeX1,Y1,X2,Y2for two points - default line ("outline") color if not defined is
white - width if the width of the line, in pixels, and if it is more than 1, it will spread equally around the "center" of the line
- default line width, if not defined, is 1
- default "fill" is not set, i.e., by default, when not defining any color/width, you'll have a thin white line
- colors ("outline" and "fill") can be set as a name, a simple hexadecimal value (#RRGGBB), or a hexadecimal value with opacity (#RRGGBBAA)
- angles can be expressed in degrees (from 0 to 360, but can be negative or more than 360, 0 is at midnight) or in percents (100%=360 degrees)
For coords and angles (both described below), in addition to the full configuration option, it's also possible to override the individual parts. For example angles=0,90;angles.1=180 will be equal to angles=0,180. For this to work, the full configuration option must have been defined. And indexes (the 1 in angles.1 starts at 0: for angles, 2 parts ( 0 and 1) can be overridden, and for coords, it must be an index present in the original coords. It may not seems useful for now, but we'll see later that it can be powerful.
Kind "points"
Many points (pixels) can be drawn at once with the same color.
It must be defined like this: draw=points;coords=COORDS;outline=COLOR, with:
COORDS: a suite ofX,Ypairs, each one representing a point to drawCOLOR: the color of the points. Optional
It is impossible to define the "size" of a point: it's always a single pixel.
Examples:
IMAGE;draw=points;coords=50%,50%will draw a single white point at the center of the key:

IMAGE;draw=points;coords=10,10,20,20,30,30;outline=yellowwill draw 3 yellow points, at coordinates (10,10), (20,20), and (30,30):
Kind "line"
The line is drawn between the different given points (at least two).
It must be defined like this: draw=line;coords=COORDS;outline=COLOR;width=WIDTH, with:
COORDS: a suite ofX,Ypairs, each one representing the start of a line, and, if not the first, the end of the previous oneCOLOR: the color of the line. OptionalWIDTH: the width of the line. Optional
Examples:
IMAGE;draw=line;coords=0,0,100%,100%will draw a white diagonal from the top left corner to the bottom right corner:

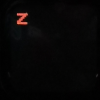
IMAGE;draw=line;coords=10,10,20,10,10,20,20,20;outline=red;width=2will draw a red "Z" with a thickness of 2 pixels near the top left corner:
Kind "rectangle"
The rectangle is represented by two points: the top-left and bottom-right corners.
It must be defined like this: draw=rectangle;coords=X1,Y1,X2,Y2;outline=LINE_COLOR;width=WIDTH;fill=FILL_COLOR;radius=RADIUS, with:
X1,Y1: the coordinates of the top left cornerX2,Y2: the coordinates of the bottom right cornerLINE_COLOR: the color of the line. OptionalWIDTH: the width of the line. OptionalFILL_COLOR: the color to fill the inside of the rectangle. OptionalRADIUS: radius, in pixels of the circle used to have a rounded rectangle. Optional
Examples:
IMAGE;draw=rectangle;coords=0,0,100%,100%;fill=red;width=0will fill the whole key area with red (note that you can usedraw=fillas described below to achieve the same effect):

IMAGE;draw=rectangle;coords=10,10,40,40;outline=blue;width=5;fill=#0000FF80will draw a thick blue rectangle in the top left area, with the inner filled in semi (via the ending80) transparent blue:

IMAGE;draw=rectangle;coords=10%,10%,90%,90%;radius=20will draw a rounded rectangle with rounded angles:

Kind "fill"
The fill kind is a shortcut to a rectangle covering the full key without outline.
So IMAGE;draw=fill;fill=red is the same as IMAGE;draw=rectangle;coords=0,0,100%,100%;width=0;fill=red. Only the fill configuration option needs to be specified (see kind rectangle above).
Kind "polygon"
The polygon is like the line, plus a line between the last and first points, and can be filled with a color. There is one drawback: due to a limitation of the used library, it's not possible to define the width of the line (for this, it's possible to add a draw=line layer with the same coords but with adding the first X,Y at the end to close the line)
It must be defined like this: draw=polygon;coords=COORDS;outline=LINE_COLOR;fill=FILL_COLOR, with:
COORDS: a suite ofX,Ypairs, each one "corner" of the polygonLINE_COLOR: the color of the line. OptionalFILL_COLOR: the color to fill the inside of the polygon. Optional
Example:
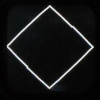
IMAGE;draw=polygon;coords=50%,0,100%,50%,50%,100%,0,50%;color=yellowwill draw a yellow diamond touching the middle of the four sides:
Kind "ellipse"
The ellipse is defined by its bounding box, represented by two points: the top-left and bottom-right corners of the box. If the width and height of the bounding box are equal, we have a circle.
It must be defined like this: draw=ellipse;coords=X1,Y1,X2,Y2;outline=LINE_COLOR;width=WIDTH;fill=FILL_COLOR, with:
X1,Y1: the coordinates of the top left corner of the bounding boxX2,Y2: the coordinates of the bottom right corner of the bounding boxLINE_COLOR: the color of the line. OptionalWIDTH: the width of the line. OptionalFILL_COLOR: the color to fill the inside of the ellipse. Optional
Examples:
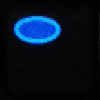
IMAGE;draw=ellipse;coords=0,0,100%,100%will draw a circle touching the middle of the four sides:
IMAGE;draw=ellipse;coords=10,10,60,40;outline=blue;width=5;fill=#0000FF80will draw a thick flat blue ellipse in the top area, with the inner filled in semi (via the ending80) transparent blue:
Kind "arc"
An arc is a portion of an ellipse outline. It is defined by the bounding box of the ellipse (see ellipse above) and two angles (start and end)
It must be defined like this: draw=arch;coords=X1,Y1,X2,Y2;angles=START,END;outline=LINE_COLOR;width=WIDTH, with:
X1,Y1: the coordinates of the top left corner of the bounding boxX2,Y2: the coordinates of the bottom right corner of the bounding boxSTART: the start angle of the arc.END: the end angle of the arc. The arc is drawn clockwise.LINE_COLOR: the color of the line. OptionalWIDTH: the width of the line. Optional
Examples:
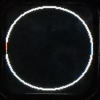
IMAGE;draw=arc;coords=10%,10%,90%,90%;angles=0,270;width=5;outline=redwill draw a thick red arc representing a circular progress bar of 75% starting at midnight and ending a 9 o'clock:

IMAGE;draw=arc;coords=10%,10%,90%,90%;angles=0,75%;width=5;outline=redsame but end angle expressed as percents
Kind "chord"
A chord is like an arc, plus a line between its two ends, and can be filled with a color.
It must be defined like this: draw=chord;coords=X1,Y1,X2,Y2;angles=START,END;outline=LINE_COLOR;width=WIDTH;fill=FILL_COLOR, with:
X1,Y1: the coordinates of the top left corner of the bounding boxX2,Y2: the coordinates of the bottom right corner of the bounding boxSTART: the start angle of the arc.END: the end angle of the arc. The arc is drawn clockwise.LINE_COLOR: the color of the line. OptionalWIDTH: the width of the line. OptionalFILL_COLOR: the color to fill the inside of the chord. Optional
Examples:
IMAGE;draw=chord;coords=20%,20%,80%,80%;angles=270,90will draw a closed semi circle on the top half:
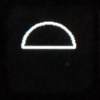
IMAGE;draw=chord;coords=20%,20%,80%,80%;angles=-25%,25%same but angles expressed as percents
Kind "pieslice"
A chord is like an arc, plus a line between each end and the center of the bounding box. It can be filled with a color.
It must be defined like this: draw=pieslice;coords=X1,Y1,X2,Y2;angles=START,END;outline=LINE_COLOR;width=WIDTH;fill=FILL_COLOR, with:
X1,Y1: the coordinates of the top left corner of the bounding boxX2,Y2: the coordinates of the bottom right corner of the bounding boxSTART: the start angle of the arc.END: the end angle of the arc. The arc is drawn clockwise.LINE_COLOR: the color of the line. OptionalWIDTH: the width of the line. OptionalFILL_COLOR: the color to fill the inside of the pie slice. Optional
Examples:
IMAGE;draw=pieslice;coords=20%,20%,80%,80%;angles=0,90will draw a quarter circle on the top right quarter "pointing" towards the middle:
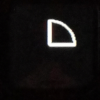
IMAGE;draw=pieslice;coords=-50%,-50%,50%,50%;angles=90,180;width=4will draw a quarter circle on the top left quarter "pointing" towards the top left corner:
Texts
Images are great to have keys with meaning, but having a way to display text can be helpful, to add a visible title on the key or present some information.
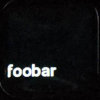
Texts are not defined like image layers and drawings but on their own. The most basic text is TEXT;text=foo. It will write "foo" above all image layers (if any) in white color in the top left corner. Or it can simlpy be TEXT without the text configuration option, in which case the text will be read from the file content
Like layers, you can either have one text line or many, using the line=XX configuration option (same as the layer=XX configuration option of images/drawings).
"Lines" of texts can have different configuration options and will be written on top of each other in their numerical order. Note that all IMAGE layers will be drawn BEFORE the text lines.
All text will be written in the same font (Roboto), which has many "styles" (combination of weight and italic). Emojis are rendered via the Noto Color Emoji font (you can use emojis directly, like ❤️, or emojis codes, like :heart:). Both fonts are provided with the streamdeckfs package.
Text is not wrapped by default and will be truncated to fit on a line. See the wrap and scroll options below to change this behavior.
All consecutive white space will be merged on a single space. And ^ and \\ will be replaced by ; and / (can be changed via the slash and semicolon configuration options).
The configuration options for the texts are:
Option "line"
It's the number of the line to write. It is only needed if many lines are defined. And like layers, if many lines are present, if one has no line= configuration option, it will be ignored.
Option "text"
If defined, it's the text to write instead of reading if from the file content. New lines are replaced by spaces (except when wrapping is enabled.
When setting the text using text in the file name, don't forget to consider the rules regarding the file names limitation: no / and length not longer than the max authorized on the operating system (256 characters on Linux). Plus, a last rule: the text cannot contain semi-colon as it is interpreted as the end of the text (because it's the configuration options separator)
If you need to bypass these rules, see the file configuration option below.
The text must be defined like this: text=foo with space | or whatever (really).
Option "size"
The size of the font.
It must be defined like this: size=SIZE with:
SIZE: the size in pixels of the text to write, or in percents of the key height (will be converted to pixels). The default is20%.
Examples:
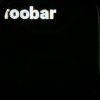
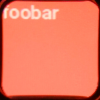
TEXT;text=foobar;size=10will draw a very small text:
TEXT;text=foobar;size=40will draw a very big text:

Option "fit"
This configuration option can replace the size one when you want the size to be calculated to have the text occupy the maximum available space.
It is compatible with wrap, ie if wrapping is not activated, it will find a font size to make the whole text fit in one line.
The default values for valign and align are different if fit is activated: middle (instead of top) for valign, and center (instead of left) for align.
This configuration option is especially useful to display a single emoji at the maximum size possible.
It must be defined like this:
fitorfit=trueto fit the textfit=falseto not fit the text (it's the same as not defining the fit option at all)
Examples:
TEXT;text=😂;fitorTEXT;text=😂;fit=truewill make the emoji as big as possible:

TEXT;text=😂;fit=falseorTEXT;text=😂will use the default size
Option "weight"
It's the font-weight to use.
It must be defined like this: weight=WEIGHT with:
WEIGHT: one of the available weights:thin,light,regular,medium,bold,black(here in the thinner to the largest order)
Default is medium.
Examples:
TEXT;text=foobar;weight=thinwill draw a very thin text:

TEXT;text=foobar;weight=blackwill draw a very thick text:
Option "italic"
A flag to tell if the text must be written in italic.
It must be defined like this:
italicoritalic=trueto use italicitalic=falseto not use italic (it's the same as not defining the italic option at all)
Examples:
TEXT;text=foobar;italicorTEXT;text=foobar;italic=truewill draw a text in italic:

TEXT;text=foobar;italic=falseorTEXT;text=foobarwill draw a regular text (not in italic)
Option "align"
Horizontal alignment of the text.
It must be defined like this: align=ALIGN with:
ALIGN: the horizontal alignment to use betweenleft,center, andright. Default if not set isleft.
Example:
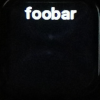
TEXT;text=foobar;align=centerwill center the text horizontally in the key:
Option "valign"
Vertical alignment of the text.
It must be defined like this: valign=ALIGN with:
ALIGN: the horizontal alignment to use betweentop,middle, andbottom. Default if not set istop.
Example:
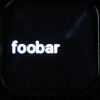
TEXT;text=foobar;valign=middlewill center the text vertically in the key:
Option "color"
The color of the text to write.
It must be defined like this: color=COLOR with:
COLOR: the color to use. It can be a common HTML color name (red, green, blue, etc...) or a hexadecimal RGB value, like#ff0000(here, pure red). Color names or hexadecimal values are case-insensitive.
Example:
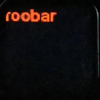
TEXT;text=foobar;color=redwill write text in red:
Option "opacity"
The opacity option allows defining how transparent the text will be, i.e., how the layers below will be visible.
It must be defined like this: opacity=NUMBER with:
NUMBER: the level of opacity, from 0 to 100, 0 being the less opaque (fully transparent, the text won't be visible at all), and 100 being the most opaque (not transparent at all)
Examples:
TEXT;text=foobar;opacity=100does not change the transparency at allTEXT;text=foobar;opacity=50makes the text 50% transparent (here with a red background):
Option "wrap"
It's a flag defining if the text must be wrapped if it does not fit in one line. If not set (the default), the text will be truncated to stay on one line.
In wrap mode, the text will be split on words, and if a word is too long to fit in one line, it will be divided into at least two parts.
It must be defined like this:
wraporwrap=trueto wrap the text on my lineswrap=falseto not wrap the text (it's the same as not defining the wrap option at all)
Examples:
TEXT;text=foobar baz qux;wraporTEXT;text=foobar baz qux;wrap=truewill wrap the text if too long:
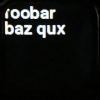
TEXT;text=foobar baz qux;wrap=falseorTEXT;text=foobar baz quxwill not wrap the text
Option "margin"
The margin option allows placing the text in a key area by defining margin on all sides. The way it works is to remove the margins from the original key size and fit the text in the remaining area.
The align and valign options will then be applied in the area limited by the margins (same for the wrap option: text will be displayed on many lines but only in this area).
Values can be defined in pixels from the key or in percents (Using percents allow to have the same rendering whatever the key size is)
It must be defined like this: margin=TOP,RIGHT,BOTTOM,LEFT, with:
TOP: the height of the top margin, in pixels or percents (of the key height)RIGHT: the width of the right margin, in pixels or percents (of the key width)BOTTOM: the height of the bottom margin, in pixels or percents (of the key height)LEFT: the width of the left margin, in pixels or percents (of the key width)
Examples:
TEXT;text=foobar;margin=70%,0,0,0will display the text only in the bottom 70%:
Option "scroll"
The scroll option is useful when the text is not fully visible. It allows scrolling text horizontally if the wrap option is not set or vertically if not.
It must be defined like this: scroll=SIZE, with:
SIZE: the number of pixels to scroll per second. Ccan be negative, and can be percents (percents of key height ifwrapis activated or key width if not)
There will be no scroll if the text is small enough to fit in its defined area (the whole key or the area left inside the margins).
Note about the alignment, if the text needs to scroll because it doesn't fit:
-
if
wrapis not activated, thealignoption will be ignored, and the text will be:- if scroll is positive: left-aligned (and will move from right to left)
- if scroll is negative: right-aligned (and will move from left to right)
-
if
wrapis activated, thevalignoption will be ignored, and the text will be:- if scroll is positive: aligned to the top (and will move from the bottom to the top)
- if scroll is negaive: aligned to the bottom (and will move from the top to the bottom)
Examples:
TEXT;text=this is a long text for a single line;wrap=false;scroll=20will keep the text on one line but will scroll at a speed of 20 pixels per second
https://user-images.githubusercontent.com/193474/120557135-c38ef400-c3fd-11eb-8f2a-9cf45d4e3f79.mp4
TEXT;text=this is a very long text that even when wrapped, will not fit;wrap;scroll=20will wrap the text and scroll it at a speed of 20 pixels per second
https://user-images.githubusercontent.com/193474/120557406-26808b00-c3fe-11eb-8477-b551bb2937c6.mp4
Option "file"
If you don't want do copy or link the text to the TEXT... file in the KEY... directory, you can use the file configuration option to define the path where to find the text to render. The file will then be read to get the text.
You have to respect the known limitations of the file name (max length and no slash /) and avoid semi-colons ; as it is interpreted as the end of the path (because it's the configuration options separator) . For the slash, you can replace it with any suite of characters defined in the slash option (default to \\). For the semi-colon, you can replace it with any suite of caracters defined in the semicolon option (default to ^).
Note that the TEXT... file can be empty when this option is set, as its content will be ignored. And you cannot set both file and text options.
It must be defined like this: file=PATH with:
PATH: the path of the text file to read. It can starts with~.
Examples:
TEXT;file=|home|myself|texts|intro.txt;slash=|will use the text in the file at/home/myself/texts/intro.txt. Note that the/are replaced by|as defined by theslashconfiguration option.TEXT;file=\\home\\myself\\texts\\intro.txtsame but using the default value of theslashconfiguration option when not passed.
The key will be updated when the referenced image changes.
If you don't want to deal with special characters, you can use file=__inside__ and write the path of the text file in the first line of the file.
Option "slash"
When using the file option, it's impossible to use slashes in the filename, so you can replace it with any character or suite of characters you defined with the slash option. If not defined, the default value of \\ is used.
It must be defined like this: slash=REPLACEMENT with:
REPLACEMENT: a character or suite of characters to use as a replacement in thecommandconfiguration option for the/character
Examples:
TEXT;file=|home|myself|texts|intro.txt;slash=|will use text in the file at/home/myself/texts/intro.txt. Note that the/are replaced by|as defined by theslashconfiguration option.TEXT;file=XXXhomeXXXmyselfXXXtextsXXXintro.txt;slash=XXXsame but usingXXXinstead of|TEXT;file=\\home\\myself\\texts\\intro.txtsame but using the default value of theslashconfiguration option when not passed.
Option "semicolon"
When using the file option, it's impossible to use semi-colons in the filename, so you can replace it with any character or suite of characters you defined with the semicolon option. If not defined, the default value of ^ is used/
It must be defined like this: semicolon=REPLACEMENT with:
REPLACEMENT: a character or suite of characters to use as a replacement in thecommandconfiguration option for the;character
Examples:
TEXT;file=\\home\\myself\\texts\\intro^version2.txtwill use the text in the file at/home/myself/texts/intro;version2.txtusing default value for/(\\) and for;(^)TEXT;file=|home|myself|texts|intro,version2.txt;slash=|;semicolon=,same but using|for slashes and,for semicolons
Option "emojis"
This configuration option, active by default, allow to disable emojis when setting it to false. The main reason is to allow text within : to not be converted to emojis.
It must be defined like this:
emojisoremojis=trueto enable emojis (the default)emojis=falseto not display emojis
Examples:
-
TEXT;text=:joy:,TEXT;text=:joy:;emojis, orTEXT;text=:joy:;emojis=truewill convert:joy:to the 😂 emoji -
TEXT;text=:joy:;emojis=falsewill display:joy:without converting it to the 😂 emoji
Configuring key events (press, long-press, release, start, end)
streamdeckfs handles five different events from your StreamDeck that are listed below. But first, let see how events are defined.
An event for a key is a file in a KEY... directory that starts with ON_, followed by the event's name uppercased: ON_PRESS, ON_RELEASE, ON_LONGPRESS, ON_START, ON_END.
And it is configured the same way as images, texts, with configurations options, like this: ON_PRESS;conf1=value1;conf2=value2
An event is an action that is triggered when the key is pressed, released, etc., and, like images, it will use the file itself as the script the run. So to run a script/program for a specific action, copy the script/program (or make a link to it) in the KEY... directory and rename it ON__.... It can be any executable the OS knows to execute or a script with the correct shebang.
There can be only one of each event for each key. If the same ON_XXX is defined many times, the most recent will be used and the others ignored.
If you want many actions to be done when a key is, for example, pressed, the file can be a bash script with many commands, periods of sleep, etc.
Two other kinds of actions can be triggered on an event instead of running a script/program: changing page (see later the page configuration option) or adjusting the brightness of the StreamDeck (see later the brightness configuration option)
Note that when the commands are executed, the working directory is set to the deck/page/event triggering the command.
Environment variables
Each command is executed with the environment variables received by streamdeckfs when it started, plus some others:
SDFS_EXECUTABLE: executable to runstreamdeckfs(the same used to run the current instance ofstreamdeckfs)SDFS_DEVICE_TYPE: type of StreamDeck modelSDFS_DEVICE_SERIAL: serial number of the current StreamDeckSDFS_DEVICE_DIRECTORY: configuration directory for the current StreamDeckSDFS_DEVICE_NB_ROWS: number of rows of the current StreamDeckSDFS_DEVICE_NB_COLS: number of cols of the current StreamDeckSDFS_DEVICE_NB_KEYS: number of keys of the current StreamDeckSDFS_DEVICE_KEY_WIDTH: width, in pixels, of a key on the current StreamdeckSDFS_DEVICE_KEY_HEIGHT: height, in pixels, of a key on the current StreamdeckSDFS_DEVICE_BRIGHTNESS: the brightness (integer from 0 to 100) of the current StreamDeckSDFS_VERBOSITY: the verbosity level (one ofCRITICAL,ERROR,WARNING,INFOorDEBUG)SDFS_PAGE: number of the page from which the event was triggeredSDFS_PAGE_NAME: name, if defined, of the page from which the event was triggeredSDFS_PAGE_DIRECTORY: directory configuration of the page from which the event was triggeredSDFS_KEY: key from which the event was triggered (formatrow,col)SDFS_KEY_ROW: row of the key from which the event was triggeredSDFS_KEY_COL: column of the key from which the event was triggeredSDFS_KEY_NAME: name, if defined, of the key from which the event was triggeredSDFS_KEY_DIRECTORY: directory configuration of the key from which the event was triggeredSDFS_EVENT: the kind of the triggered event (one ofstart,end, press,longpress,release`)SDFS_EVENT_NAME: name, if defined, of the triggered eventSDFS_EVENT_FILE: file configuration of the triggered eventSDFS_QUIET: set toTrueif thequietconfiguration option of the event was set, else set to an empty stringSDFS_PRESSED_AT: for key press related events (ie notON_STARTorON_END), the moment the key was pressed, as a timestamp (with decimals)SDFS_PRESS_DURATION: for key press related events (ie notON_STARTorON_END), the duration, in milliseconds (with decimals), elapsed between the press of the key and the execution of the command
Note that all variables will also be passed as environment variables.
Now let see the different events, then how they can be configured:
The available events
Event "ON_START"
When a key is displayed, the ON_START command is executed. And if it still runs when the key stops to be displayed (when streamdeckfs ends or when you change page), the command will be terminated. It can be used, for example, to start a script that will periodically fetch some information and update a key, like the temperature of your CPU, the title of the current Spotify song, etc.
If the command must still run when the key stops to be displayed, it can be "detached" (and in this case, it will not even be stopped when streamdeckfs ends)
Note that if the key is hidden by an overlay, the ON_START command, if still running, won't be stopped. And when the overlay is closed, it won't be launched again.
Event "ON_END"
When a key is hidden (by the page being closed, or with an other page being displayed, but not an overlay), the ON_END command is executed.
Note that if the key is hidden by an overlay, the ON_END command won't be launched.
Event "ON_PRESS"
When a key is pressed (note that we have a different event for "press" and "release"), the ON_PRESS command is executed. Among the configuration options, it's possible to run the command only if the key is pressed more, or less, than a specific period; it can be repeated if pressed long enough, etc.
Same as for the ON_START event, the command, if it still runs when the key stops being displayed, will be terminated, except if the detach option is set.
Event "ON_RELEASE"
The ON_RELEASE event works like ON_PRESS, but the action is triggered when the key was pressed but is now released.
Event "ON_LONGPRESS"
The ON_LONGPRESS event is an event that is triggered when the key is pressed for more than a specific period, which is, by default, 300 milliseconds (0.3 seconds) but can be configured.
It's possible to have both the ON_PRESS and ON_LONGPRESS events defined on the same key, for example to have a specific action when pressed, and to display a page with more options when long-pressed (play/pause Spotify on simple press and display a page specific to Spotify on long press).
It's best to define the duration-max configuration option of the ON_PRESS event to be at max the duration-min of the ON_LONGPRESS event if you don't want the ON_PRESS event triggered when you do a long press.
The events configuration options
Except when said so, all options are available for all events.
Common things to know about events configuration options:
- all durations are expressed in milliseconds. For example,
300(it's 0.3 seconds)
Option "wait"
The wait option is the delay between the event happening and the action executed. For the ON_PRESS event, it will happen even if the key is released.
It must be defined like this: delay=DURATION with:
DURATION: duration in milliseconds
Examples:
ON_START;delay=5000starts the action defined by theON_STARTfile 5 seconds after the key is displayedON_PRESS;delay=300starts the action defined by theON_PRESSfile 0.3 seconds after the key being pressed
Option "every"
The every option allows repeating the action every XXX milliseconds.
Only works for ON_PRESS and ON_START events. For ON_PRESS, the repeat stops when the key is released. For ON_START, it's when the key stops being displayed.
It must be defined like this: every=DURATION with:
DURATION: delay between two executions of the action, in milliseconds
Examples:
ON_START;every=5000will run the action defined by theON_STARTfile every 5 seconds as long as the key is displayedON_PRESS;every=500will run the action defined by theON_PRESSfile every 0.5 seconds as long as the key is not released
To limit the number of times the action is repeated, see the max-runs option.
Option "max-runs"
The max-runs option works with the every option and allows setting a maximum of times the action must be repeated.
It must be defined like this: max-runs=COUNT with:
COUNT: maximum number of times the action can be repeated
Examples:
ON_START;every=5000;max-runs=3will run the action every 5 seconds until the key is released, but a maximum of 3 timesON_PRESS;every=500;max-runs=10will run the action every 0.5 seconds until the key is released, but a maximum of 10 times
Option "duration-min"
The duration-min option specifies the minimum duration for which the key must have been pressed before running the ON_RELEASE or ON_LONGPRESS action, the only events for which this option is available.
If must be defined like this: duration-min=DURATION with:
DURATION: the minimum duration, in milliseconds, for the key to having been pressed to trigger the event. For theON_RELEASEevent, there is no default, so no minimum duration by default, but for theON_LONGPRESSevent, there is a default value of 300 (milliseconds).
The main difference between ON_RELEASE and ON_LONGPRESS here is that for ON_LONGPRESS, the action will be executed as soon as the duration is reached, but for ON_RELEASE, when releasing the key only if the duration was reached, but it may be much more than this delay.
Examples:
ON_RELEASE;duration-min=2000: run the action when releasing the key only if the key was pressed at least 2 secondsON_LONGPRESS;duration-min=1000: run after 1 second of the key being pressed, if the key is not yet released, but does not wait for the key to be released
Option "duration-max"
The duration-max option is only for the ON_PRESS event and is created specifically to handle the event ON_PRESS OR ON_LONGPRESS to be executed.
If not set on the ON_PRESS event, the ON_PRESS event will be executed even if the ON_LONGPRESS is configured. To avoid that, you must configure the duration-max of the ON_PRESS key to be at max the duration-min (which is 300 by default) of the ON_LONGPRESS key.
It must be defined like this: duration-max=DURATION with:
DURATION: the maximum duration, in milliseconds, for the key to having been pressed to trigger the event.
When using this configuration option, the action will not be triggered directly when the key is pressed but after this delay (or when the key is released if it is released before this delay).
Example:
ON_PRESS;duration-max=300will only run the action if the key is pressed at max 300 milliseconds. After this delay, if the key is not released, the action won't be triggered.
Option "detach"
By default, all commands executed by a StreamDeck event are "tied" to the streamdeckfs process. And they are stopped, if still running, when the key stops being displayed for ON_START events, or, for others, when streamdeckfs ends.
It's common to want to run an external program that should stay open even if the streamdeckfs ends. The detach flag is here for that.
It must be defined like this:
detachordetach=trueto detach the program from thestreamdeckfsprocessdetach=falseto not detach the program (when key stops being displayed or whenstreamdeckfsends)
Examples:
ON_PRESS;detachorON_PRESS;detach=truewill detach the programON_PRESS;detach=falseorON_PRESSwill not detach the program
Option "unique"
The unique flag avoids running a command when its previous execution (from the same event) is not yet finished. It's useful with the every option to wait for the previous iteration to be done before running the next one. Or for multiple presses.
It must be defined like this:
uniqueorunique=trueto deny the execution of a program if it's still running from the same event. It's the default for eventsON_STARTandON_ENDunique=falsewon't check if the program is already running, and it's the default for events other thanON_STARTandON_END
Examples:
ON_PRESS;every=100;detachorON_PRESS;every=100;detach=truewill run the program every 100 milliseconds but will skip an iteration if the execution from the previous one is not finished yet, so if the program takes 140ms, it will run at 0ms, 200ms, 400ms... instead of 0ms, 100ms, 200ms...ON_PRESS;every=100;detach=falseorON_PRESS;every=100will not detach the program, so it will run at 0ms, 100ms, 200ms, and many occurrences of the same program may be running at the same time
Option "quiet"
The quiet flag avoids displaying in the streamdeckfs output the start (with PID) and stop (with return code) of the command. Useful when every configuration option is used.
It must be defined like this:
quietorquiet=trueto not display the start and stop of the commandquiet=falseto display the start and stop of the command. It's the default.
Examples:
ON_PRESS;every=100;quietorON_PRESS;every=100;quiet=truewill run the program every 100 milliseconds but will not display alls starts and stopsON_PRESS;every=100;quiet=falseorON_PRESS;every=100will display all starts and stops
Option "command"
By default, the action executed by an event is the script/program of the file itself (or the one it links to), but it may not be convenient. Imagine if you want to run the gnome calculator on a press, you'd have to find the path of the gnome-calculator binary and link it to your ON_PRESS file, or make your ON_PRESS file a bash script that would call gnome-calculator.
And another example could be to open a specific page in your default browser. As there is an argument (the page to open), you cannot make a link and need to make this bash script (it's not complicated, but maybe you want to stick to the whole configuration in file names)
The command configuration option allows you to define the full command to execute, and it will be run as-is. You still have to respect the known limitations of the file name (max length and no slash /) and avoid semi-colons ; as it is interpreted as the end of the command (because it's the configuration options separator) . For the slash, which is common if you have a path in the command, you can replace it with any suite of characters defined in the slash option (default to \\). For the semi-colon, you can replace it with any suite of caracters defined in the semicolon option (default to ^).
The command configuration option can include |, >, etc., as you would do in a console.
Note that the KEY... file can be empty when this option is set, as its content will be ignored.
It must be defined like this: command=COMMAND with:
COMMAND: the command to execute
Examples:
ON_PRESS;command=gnome-calculatorwill run the gnome calculatorON_PRESS;command=browse https:||elgato.com;slash=|will open your default browser on thehttps://elgato.comweb page. Note that the/inhttps://are replaced by|as defined by theslashconfiguration option.ON_PRESS;command=browse https:\\\\elgato.comsame but using the default value of theslashconfiguration option when not passed.
If you don't want to deal with special characters, you can use command=__inside__ and write the command inside the event file. The whole content of the file will be passed as a command to execute.
Option "slash"
When using the command option, it's impossible to use slashes in the filename, so you can replace it with any character or suite of characters you defined with the slash option. If not defined, the default value of \\ is used.
It must be defined like this: slash=REPLACEMENT with:
REPLACEMENT: a character or suite of characters to use as a replacement in thecommandconfiguration option for the/character
Examples:
ON_PRESS;command=@path@to@myscript | grep foobar > @path@to@log;slash=@will run the command/path/to/myscript | grep foobar > /path/to/logON_PRESS;command=XXXpathXXXtoXXXmyscript;slash=XXXwill run the command/path/to/myscriptON_PRESS;command=\\path\\to\\myscriptwill run the command/path/to/myscriptusing the default value ofslash,\\
Option "semicolon"
When using the command option, it's impossible to use semi-colons in the filename, so you can replace it with any character or suite of characters you defined with the semicolon option. If not defined, the default value of ^ is used/
It must be defined like this: semicolon=REPLACEMENT with:
REPLACEMENT: a character or suite of characters to use as a replacement in thecommandconfiguration option for the;character
Examples:
ON_PRESS;command=browse https:\\\\elgato.com^browse https:\\\\github.comwill do two actions: open your default browser on thehttps://elgato.comweb page and then on thehttps://github.comone, using default replacement values forslashandsemicolonON_PRESS;command=browse https:XXelgato.com AND browse https:XXgithub.com;slash=X;semicolon= ANDsame but usingXfor theslashandANDfor thesemicolon
Option "brightness"
Another possible action when pressing a key is, instead of running a command, simply change the brightness of the connected StreamDeck.
It must be defined like this: brightness=BRIGHTNESS with:
-
BRIGHTNESS: A value between 0 and 100 (both included), or a delta, like+10or-20... The final value will be capped to fit in the accepted range. -
ON_PRESS;brightness=+10Increase the brightness from the actual value to the actual value plus 10 -
ON_PRESS;brightness=100Set the brightness at the maximum
Option "page"
Another possible action when pressing a key is to go to a different page. See the Pages section below to have more details about this feature.
It must be defined like this: page=PAGE with:
-
PAGE: the number or name (it will use the name in the page directory name:PAGE_NUMBER;name=NAME) of the page to display or one of these specific values:__first__will go to the first page number available__previous__will go to the previous page number (i.e., the actual page number minus 1)__next__will go to the following page number (i.e., the actual page number plus 1)__back__will go to the previous page that was displayed before the current one
See the Pages section below to know more about how pages work.
Note that this configuration option is not available for ON_START and ON_END events.
Configuring page events
Like keys, pages can have start and end events, defined by ON_START and ON_END files placed in the page directory.
When a page is displayed, the ON_START action is executed. And when the page is removed (by opening a new page (but not an overlay), going back to the previous one, or when streamdeckfs is terminated), the ON_END action is executed.
All configuration options defined above for key events that are available for start and end events are also available for page events, except for page and brightness.
It's not possible to set variables on page events.
Configuring deck events
Like pages, decks can have start and end events, defined by ON_START and ON_END files placed in the deck directory.
When a deck is started, the ON_START action is executed. And when it is stopped, the ON_END action is executed.
All configuration options defined above for key events that are available for start and end events are also available for deck events, except for page and brightness.
It's not possible to set variables on deck events.
Pages
Pages are a way to extend the number of keys available on your StreamDeck and regroup some actions together.
Some examples:
-
a key on your first page with a simple press that will toggle your microphone, and, on a long press, display an overlay with keys to decrease/increase the microphone sensitivity (and a key to close the overlay)
-
a key on your first page that will open a page dedicated to Spotify controls
Each page is a directory with at least a page number: PAGE_NUMBER with NUMBER being a positive number. If two pages have the same number, the most recent directory will be used.
A page can also have a name: PAGE_NUMBER;name=NAME, and then this name is available for the page configuration of key events. So if you have a page directory named PAGE_50;name=spotify, you can say "go to page 50" or "go to page spotify".
In a page directory, you only need to define the key you need, not all, in the format KEY_ROW_XX_COL_YY. If a key directory exists but has no images/texts/events (or only disabled ones), it will be ignored.
Page navigation history is kept so you can easily go back to the previous page seen. It's helpful, for example, for overlays. Let's take the first example about the "microphone overlay". Let's say you have a directory PAGE_60;name=microphone;overlay; you would have a key with the long press event to display this overlay defined like this: ON_LONGPRESS;page=microphone, and in this PAGE_60;name=microphone;overlay directory, you would have a key to close this overlay (i.e., go back to the previous page), like this: ON_PRESS;page=__back__. Until you press this key, as this page is opened as an overlay, you would see the keys of this new page as regular keys and the others from the page below, still visible but darker and without any effect when pressing them.
Pages are numbered, but it's not at all mandatory to have consecutive numbers unless you want to, for example to use the page=__next__ and page=__previous__ configuration options for your key event because they only work for consecutive pages.
For example, say you have three pages of classic actions and want to navigate between them easily, you can number them 1, 2, and 3. But you can also have pages triggered by some keys that should not be accessed this way, so the number can be higher. For example PAGE_50;name=spotify and PAGE_60;name=microphone.
Using names is very useful when you configure your page actions: having page=spotify is a lot more meaningful than page=50 (and it allows reorganizing your pages as you want)
The run command will start with the first page, using page numbers. You can change that by passing the page argument: --page PAGE (or -p PAGE) with PAGE being the number or name of an available page.
Option "overlay"
The overlay flag allows opening the page as an overlay over the current one. The keys defined on the new page will be displayed, and for the others, the keys from the current page will be displayed with a black overlay and all events deactivated. It's like a "modal" on a website.
It must be defined like this:
overlayoroverlay=trueto have the page displayed as an overlayoverlay=falseto have the new page hiding the current one, including non defined keys that will then be black
Examples:
PAGE_50;overlayorPAGE=50;overlay=truewill make the page number 50 open as an overlayPAGE_50;overlay=falseorPAGE_50will make the page number 50 open without any key of the current page being visible
References
References are a way for a key, event, image, and text to inherit from another.
Say you have a page dedicated to Spotify, and some of your keys are Spotify controls and should have the same background.
You can, on each key, have a file named IMAGE;layer=0;name=background;draw=rectangle;coords=0,0,100%,100%;width=0;fill=#8cc63f
OR, you can have it only defined on the first key using it, say it's KEY_ROW_1_COL_1;name=toggle and in other keys, add a file named IMAGE;ref=:toggle:background. This will take the image named "background" in the key named "toggle" of the current page (nothing before the first : in the ref configuration option means "current page")
So you can easily change how this background should look in one place, affecting all keys referencing this background. All configuration options are inherited. In this example the image defined by IMAGE;ref=:toggle:background will inherit the name, layer, draw, coords, width and fill. But these can be overridden. If you want to change the color but still have a rectangle, you can use IMAGE;ref=toggle:background;fill=red, and you'll have a red rectangle as the background.
Last important thing about references: you can have references of references (of references, etc.). Just be careful to avoid cyclic references, as it's not checked, and streamdeckfs may crash.
References configuration
References can be defined for image layers, text lines, events, and keys. They are defined like this:
Images
An image layer can reference another image layer like this: ref=PAGE:KEY:LAYER, with:
PAGEis the name or number of the page where the reference image is, and not setting the page (ref=:KEY:LAYER) means looking on the same page as the image defining therefKEYis the name or coordinates (ROW,COL) of the key where the reference image isLAYERis the name or layer number of the reference image, and not setting the layer (ref=PAGE:KEY:) means referencing the text on theKEYthat has no layer defined
As with all configuration options, name and layer are inherited too (if defined on the reference) if not specified on the image having the ref option.
Texts
A text line can reference another text line like this: ref=PAGE:KEY:LINE, with:
PAGEis the name or number of the page where the reference text is, and not setting a page (ref=:KEY:LINE) means looking on the same page as the image defining therefKEYis the name or coordinates (ROW,COL) of the key where the reference text isLINEis the name or line number of the reference text, and not setting the line (ref=PAGE:KEY:) means referencing the text on theKEYthat has no line defined
As with all configuration options, name and line are inherited too (if defined on the reference) if not specified on the text having the ref option.
Key events
A key event can reference another key event like this: ref=PAGE:KEY:EVENT, with:
PAGEis the name or number of the page where the reference event is, and not setting a page (ref=:KEY:EVENT) means looking on the same page as the event defining therefKEYis the name or coordinates (ROW,COL) of the key where the reference event isEVENTis the name or kind (press,longpress,release,start,end) of the reference event, and not setting the event (ref=PAGE:KEY:) means referencing the event for theKEYwith the same kind (ON_PRESS;ref=PAGE:KEY:= looking for apressevent in the keyKEYof the pagePAGE)
Page events
A page event can reference another page event like this: ref=PAGE:EVENT, with:
PAGEis the name or number of the page where the reference event is, and not setting a page (ref=:EVENT) means looking on the same page as the event defining therefEVENTis the name or kind (start,end) of the reference event, and not setting the event (ref=PAGE:) means referencing the event for thePAGEwith the same kind (ON_START;ref=PAGE:= looking for astartevent in the pagePAGE)
Keys
A key can reference another key like this: ref=PAGE:KEY, with:
PAGEis the name or number of the page where the reference key is, and not setting a page (ref=:KEY) means looking on the same page as the event defining therefKEYis the name or coordinates (ROW,COL) of the reference key, and not setting the key (ref=PAGE:) means referencing the key on thePAGEwith the same coordinates
Keys references are particular because a key can contain text, images, events, etc. The way it works is simple: by default, everything that is available in the reference key is "imported" in the key referencing it, but in the directory key referencing it, you can add texts, images, events... that will "replace" the ones in the reference key. So you can add layers, texts, and if you want to change one configuration of, say, an image, you can reference it and only add the configuration to update. See below when using the "close" reference.
Partial configuration updates
When describing margin, crop, coords and angles in the previous sections we saw that it was possible to define for example margin.1, but it seemed useless at the time. Now, with references and overriding the power of this feature is visible: you can define the full option on the reference, and update just the part you need on the object defining the reference.
Say you have many keys that need a "progress bar", with a different length. You can define your reference layer like this: IMAGE;name=progress;draw=line;coords=0,92,0,92;outline=white;width=7. You can see that the third of the coords configuration option is 0. It's the X2 coordinate of the line, ie where it ends. When you need to reference it, you only have to set the coords.2 (2 for the third part as indexes starts at 0): IMAGE;ref=page:key:progress;coords.2=50%. Now you have a line that spreads 50% of the key width.
For crop and margin you can use .left, .right, .top and .bottom instead of position.
Usage example: references page
Among many things that are possible with references, one way of using them is to have a "references" page where you put things that are common among your configuration.
Here is an example of such a page:
└── PAGE_999;name=ref
    ├── KEY_ROW_1_COL_1;name=img
    │   └── IMAGE;layer=999;name=overlay -> /home/twidi/dev/streamdeck-scripts/assets/overlay.png
    ├── KEY_ROW_1_COL_2;name=draw
    │   ├── IMAGE;layer=0;name=background;draw=fill;fill=
    │   └── IMAGE;name=progress;draw=line;coords=0%,92,32%,92;outline=white;width=7
    ├── KEY_ROW_2_COL_1;name=close
    │   ├── IMAGE;layer=1;colorize=white;margin=20,10,10,10;name=icon -> /home/twidi/dev/streamdeck-scripts/assets/close.png
    │   ├── IMAGE;ref=:images:overlay
    │   └── ON_PRESS;page=__back__
    └── KEY_ROW_2_COL_2;name=titled-text
        ├── IMAGE;layer=1;name=separator;draw=line;coords=0,25,100%,25;outline=
        ├── TEXT;line=1;name=title;text=Title;weight=bold;align=center;valign=top;color=
        └── TEXT;line=2;name=content;text=Some content that will scroll if too long;size=18;align=center;valign=middle;margin=28,0,0,0;scroll=20;wrap
Here you can see a page, number 999 (could have been any number) with the name ref.
On this page, many keys are defined:
KEY_ROW_1_COL_1;name=img
This key contains an image with a layer number of 999, named "overlay". The goal is to have an overlay over each defined key with a specific style (like a "glass" rendering). As the layer number is 999, it's almost certain that it will be the top layer. To use it, add an empty file in your KEY... directories named IMAGE;ref=ref:img:overlay.
KEY_ROW_2_COL_2;name=draw
This key contains two drawings:
One named background (where only the fill color is missing), which can be referenced like this: IMAGE;ref=ref:draw:background;fill=ref
One named progress which draws a progress bar on the bottom of the key (where the X2 coordinate must be updated to the proper progress value (here at 32%)), which can be referenced like this: IMAGE;layer=3;ref=ref:draw:progress;coords.2=50% (here we change the progress to 50% and set the layer number to 3 as the reference does not have it defined because each key using it may want to place the progress at a different layer)
KEY_ROW_2_COL_1;name=close
This key represents a complete "close" key that can be used to close an overlay on press. To use it, add in your page a directory named KEY_ROW_X_COL_Y;ref=ref:close (set your row and col according to your needs): and voila, you have a close key that will work as expected.
And if you want to change the color of the close key, you add in your directory an image that will reference the icon: IMAGE;ref=ref:close:icon;colorize=red. It will have, by inheritance, the same layer number as the image in the reference key, and it will be used instead of that one.
KEY_ROW_2_COL_2;name=titled-text
This key represents a key rendered with a title on top, a small line as a separator, and a text in the central area that is wrapped and will scroll if it does not fit. The key itself is not meant to be used as a reference because each part must be configured, so you define your key directory as usual, and inside, you add three empty files IMAGE;ref=ref:titled-text:separator;outline=COLOR (with COLOR being the color you want for the separator), TEXT;ref=ref:titled-text:title;text=TITLE (with TITLE being the text you want for the title) and TEXT;ref=ref:titled-text:content;text=TEXT (with TEXT being the text you want in the central area, or you can set file=__self__ instead of text=... and put the text in the file itself)
Variables
streamdeckfs can be used as a store for the commands launched by its events. For this it uses files that can be in decks, pages or keys directories, that are named VAR_NAME with NAME a name of your choice (it must only contains capital letters from A to Z, digits from 0 to 9 and the character _).
As for other kinds of objects, it can be disabled by adding ;disabled (or ;disabled=true, see above, or ;enabled=false)
The value of the variable will be read from the file itself, of from the value configuration option in the file name. For example the file VAR_FOO;value=bar defines a variable FOO having bar as value. When read from the value configuration option, if you want semicolon ; or slash / you must use ^ or \\ (or specify the characters to use via the semicolon and slash configuration options (like for paths in texts/images file and events command options).
Note that to read the value from another file, the file configuration option as defined for the TEXT* files can also be used.
When getting the value of a variable, we use "cascading": if the variable is not defined in the asked directory, it will be looked for in the parent directory (page, then deck, for a key variable, or deck for a page variable). It allows to have a "default value" at a upper level, that is overridden at a lower one.
Variables can be used in filenames for pages, keys, images, texts... and vars themselves, and will be remplaced when needed.
Say you have a key directory containing an empty file named VAR_FOO;value=bar, or a file named VAR_FOO containing bar. You can then have a text file TEXT;text=$VAR_FOO and the text bar will be displayed. Cascading is respected: if the VAR file is not found in the key directory, it will be looked for in the page directory or the deck directory.
Variables can be created, updated or deleted while streamdeckfs is running and these updates will be reflected as expected (in the previous example, if you rename VAR_FOO;value=bar to VAR_FOO;value=BAR, the key will be automatically updated to display BAR)
If a file name contains a variable that cannot be found, this file will be ignored until the variable file is available.
When a command is triggered following an event (for example a key press), all variables available to this event will be passed as environment variable (previxed by SDFS_, so in our example we'll have SDFS_VAR_FOO, containing the value BAR)
Placements
A variable can be used:
-
in the file/directory name , and it's not limited to the value of an option configuration, as the configuration parsing will be done after replacing the variables. So
TEXT;$VAR_TEXT_STYLEis possible, with for exampleVAR_TEXT_STYLE;value=color=red^fit^wrap(here the default semicolon replacement is used, but if the value was in the content of theVAR_TEXT_STYLEfile, the real;characters could have been used) -
in a variable
valueconfiguration option, because a variable can depend on another variable (as long as their is no circular dependency) -
in the content of a
TEXTorVARfile -
in the paths defined in the content of
TEXT,IMAGE, orVARfiles when configured withfile=__inside__, orON_(events) files when configured withcommand=__inside__ -
in the right side of the "equality" rule (the part between the
")
Note that a variable can be composed with other variables: text=$VAR_$VAR_DISPLAY will work, because the first $VAR_ is not a valid variable, but $VAR_DISPLAY is, so, $VAR_DISPLAY will be converted, for example to LASTNAME if we have VAR_DISPLAY;value=LASTNAME, so we'll have text=$VAR_LASTNAME, then the VAR_LASTNAME variable will be read to have the final text. Likewise, in text=$VAR_TEXT$VAR_INDEX, if VAR_TEXT is not an existing variable, then on the first pass $VAR_INDEX will be converted, for example to 1, then we have $VAR_TEXT1 which is an existing variable, so its' converted
Lines indexing
If the VAR_ has its value defined by its content (i.e., not using value=) and its content is on multiple lines, it's possible to access a specific line by using $VAR_FOO[INDEX], with INDEX being the line to access, starting at 0. It's also possible to use reverse indexing (-1 is the last line, -2 the line before the last line...).
And to get the number of lines, you can use [#].
For example if the file VAR_FOO contains:
foo
bar
baz
You'll have:
$VAR_FOO[0]=>foo$VAR_FOO[1]=>bar$VAR_FOO[2]=>baz$VAR_FOO[-1]=>baz$VAR_FOO[-2]=>bar$VAR_FOO[-3]=>foo$VAR_FOO[#]=>3
Using environment variables
It's possible to use the environment variables defined by streamdeckfs as variables, like $VAR_SDFS_PAGE to get the value of the SDFS_PAGE environment variable, ie the current page number. Consequently, it's not possible to create a variable starting with $VAR_SDFS_.
Note that environment variables related to events (SDFS_EVENT* and SDFS_PRESS*) cannot be used.
Conditionals
When defining a varialbe (not when using it), it's possible to use if/then/else to set it's value.
All are configuration options to set in the file name, like VAR_FOO;if=CONDITION;then=VALUE_IF;else=?VALUE_ELSE;, with
CONDITION: the condition to check. Must betrueorfalse(case not sensitive), and can be composed with variables (because it does not make a lot of sense to setif=truedirectly). For exampleif=$VAR_FOO="bar"VALUE_IF: it's the value that will be used if theCONDITIONistrueVALUE_ELSE: it's the value that will be used if theCONDITIONisfalse
In addition you can also use additional elif + else groups, like VAR_FOO;if=CONDITION1;then=VALUE_IF1;elif=CONDITION2;then=VALUE_IF2;elif=CONDITION3;then=VALUE_IF3;else=VALUE_ELSE;
See in the examples below how it can be used.
Expressions
It's possible to have for value the result of some expressions. For example {100/3}% will give 33.3333%.
Expressions are surrounded by { and }, and everything that is possible via the py-expression-eval library is possible (we included a forked, slightly modified version of this library into the streamdeckfs package).
Some examples:
-
disabled={"$VAR_FOO" == "foo"}will set disable totrueifVAR_FOOasfoofor value. This example shows that variables containing string must be surrounded by double-quotes, because all variables are replaced first by their exact content, and after that the expressions will be evaluated. -
VAR_NEXT_INDEX;if={$VAR_INDEX==$VAR_TEXTS[#]-1};then=0;else={$VAR_INDEX+1}will set in$VAR_NEXT_INDEXthe next line to use in aVAR_TEXTsfile containing many lines, except where we are at the last line (if={$VAR_INDEX==$VAR_TEXTS[#]-1}) in which case we go back to 0
Check the py-expression-eval library page to see what is possible. The version we use has two differences with the original one:
- you must use
|instead of/for divisions, because/cannot be used in a filename - we added the floor division, using
||(//is available if not used in filename) - we added the
int()andfloat()functions - we added the
str()function - we removed the
concat()function (||is used for floor division, and+can be used, in addition tostr(), to emulateconcat()) - we added the
TrueandFalsevalues - we added the
format()function:format(value, "FORMAT")withFORMATbeing the part after the:when using the normalformatfunction (without the{and}). For example,format(7, "02")will output07.
The expressions are evaluated from the filename, but also in the content of variable files.
They are evaluated after all the contained variables are replaced, and updated each time a variable is updated.
Key event to set variables
In addition to actions on key events that were previously described), ie page, brightness and command, it's also possible to set the value of one or many variable (while still running the other actions)
To make an event set a variable, it must be defined like this: VAR_NAME=VALUE, with:
VAR_NAME: the variable to set (starting withVAR_)VALUE: the new value for this variable (can be a fixed value, another variable (using$VAR_...) or an expression)
Repeat for each variable you want to set.
If the variable file does not exist, it will be created, else it will be updated (and, if present, its disabled or enabled attribute will be removed)
By default, the variable will be created/updated in the directory of the key. But it's possible to put it at another place:
:VAR_NAMEto put it in the the directory of the page holding the key::VAR_NAMEto put it in the directory of the deck:KEY:VAR_NAMEto put it in the directory of another key (defined by name of by coordinate in therow,colformat) of the page holding the current key::PAGE:KEY:VAR_NAMEto put it in the directory of aanother key in another page (defined by name or number)::PAGE:VAR_NAMEto put it in the directory of another page
The value will be set on the name (on the value configuration option) of the variable VAR_NAME;value=VALUE.
But it can be set as the content of the file, by suffixing the name of the var by <: VAR_NAME<=VALUE. In this case the file name of the variable will be VAR_NAME and its content will be VALUE. You can remember this by seeing the <= operator as an arrow saying that we put the VALUE into VAR_NAME.
Example setting a variable named FOO to the value bar in the page named mypage on press of a key would be:
ON_PRESS;::mypage:VAR_FOO<=bar
Examples
Example 1
The first example below shows how this can be used to display different texts depending on a state. This example will also show how to use "expressions" (surrounded by { and }, and, via VAR_STATE=value=state_$VAR_STATE_VALUE that a variable value can use a variable itself, and that a variable does not need to be the full value of a configuration option:
TEXT;text=1;fit;enabled={"$VAR_STATE" == "state_one"}
TEXT;text=2;fit;enabled={"$VAR_STATE" == "state_two"}
TEXT;text=3;fit;enabled={"$VAR_STATE" == "state_three"}
VAR_STATE;value=state_$VAR_STATE_VALUE
VAR_STATE_VALUE;value=one
This example will display 1, with the current value of VAR_STATE_VALUE (one).
Example 2
The second example below shows how a variable can be used for many configurations options at once (VAR_TEXT_STYLE), and that how variables can be set in the content of files.
The files are:
TEXT;$VAR_TEXT_STYLE
VAR_FULLNAME
VAR_FIRSTNAME
VAR_LASTNAME
VAR_TEXT_STYLE
And their content:
TEXT;$VAR_TEXT_STYLE:
Hello
$VAR_FULLNAME!
VAR_FULLNAME
$VAR_FIRSTNAME $VAR_LASTNAME
VAR_FIRSTNAME
Foo
VAR_LASTNAME
Bar
VAR_TEXT_STYLE
color=red;fit;wrap
This will show the text "Hello Foo Bar" in red on the key.
Example 3
The third example below shows how to use a variable in a path. Here we want to change the icon displayed depending on a variable.
We have two files:
- an image file named
IMAGE;colorize=white;file=__inside__containing/path/to/icons/$VAR_ICON.png - a variable file named
VAR_ICONcontaingthumbs-up
An event or an external script can then change the content of the VAR_ICON file to update the key.
Example 4
The fourth example below shows how to alternate between 3 emojis.
We use the fact that we can have many times the same event defined (here ON_PRESS) but the disabled ones are ignored. So we only keep one enabled.
And the action of the event is to set the next emoji in a variable, variable that is used to display the emoji on the key, and to know which events to disable.
So we have:
- A text defined like this:
TEXT;fit;text=$VAR_EMOJI - A variable file defined like this:
VAR_EMOJI;value=:joy: - And three
ON_PRESSwhere only one will be activated depending on the emoji, to display the next one:ON_PRESS;VAR_EMOJI=:joy:;enabled={"$VAR_EMOJI" == ":sob:"}ON_PRESS;VAR_EMOJI=:neutral_face:;enabled={"$VAR_EMOJI" == ":joy:"}ON_PRESS;VAR_EMOJI=:sob:;enabled={"$VAR_EMOJI" == ":neutral_face:"}
Another way to write this example if we don't want to hardcode emojis in many files:
- Same text as above:
TEXT;fit;text=$VAR_EMOJI - A variable file defined like this
VAR_EMOJI;value=$VAR_EMOJI1 - Three variables for our emojis, so we can change them without changing anything else:
VAR_EMOJI1;value=:joy:VAR_EMOJI2;value=:neutral_face:VAR_EMOJI3;value=:sob:
- And our three
ON_PRESS:ON_PRESS;VAR_EMOJI=$VAR_EMOJI1;enabled={"$VAR_EMOJI" == "$VAR_EMOJI3"}ON_PRESS;VAR_EMOJI=$VAR_EMOJI2;enabled={"$VAR_EMOJI" == "$VAR_EMOJI1"}ON_PRESS;VAR_EMOJI=$VAR_EMOJI3;enabled={"$VAR_EMOJI" == "$VAR_EMOJI2"}
It could even be made more generic:
-
A text defined like this:
TEXT;fit;text=$VAR_TEXT$VAR_INDEX -
A variable file defined like this:
VAR_INDEX;value=1 -
Three variables for our texts, so we can change them without changing anything else:
VAR_TEXT1;value=:joy:VAR_TEXT2;value=:neutral_face:VAR_TEXT3;value=:sob:
-
And three
ON_PRESSwhere only one will be activated depending on the index, to display the next one:ON_PRESS;VAR_INDEX=1;enabled={$VAR_INDEX == 3}ON_PRESS;VAR_INDEX=2;enabled={$VAR_INDEX == 1}ON_PRESS;VAR_INDEX=3;enabled={$VAR_INDEX == 2}
The magic is in
TEXT;fit;text=$VAR_TEXT$VAR_INDEX, because$VAR_TEXTis not an existing variable but$VAR_INDEXis, so$VAR_INDEXis converted first, to1, and then we have$VAR_TEXT1that can be converted.
We could also use conditionals to reduce the number of files::
- We still have our text:
TEXT;fit;text=$VAR_TEXT$VAR_INDEX - And our index variable:
VAR_INDEX;value=1 - Our variables for the texts:
VAR_TEXT1;value=:joy:VAR_TEXT2;value=:neutral_face:VAR_TEXT3;value=:sob:
But instead of 3 ON_PRESS used to set the next index depending on the current one, we'll make a VAR_NEXT_INDEX variable:
VAR_NEXT_INDEX;if={$VAR_INDEX==1};then=2;elif={$VAR_INDEX==2};then=3;else=1
And finally our single ON_PRESS file:
ON_PRESS;VAR_INDEX=$VAR_NEXT_INDEX
Using lines indexing, we can reduce the number of files:
- We still have our text, but using indexing:
TEXT;fit;text=$VAR_TEXTS[$VAR_INDEX] - And our index variable:
VAR_INDEX;value=1 - And our
ON_PRESSfile:ON_PRESS;VAR_INDEX=$VAR_NEXT_INDEX - But we know have only one
VAR_TEXTSfile, containing three lines:
:joy:
:neutral_face:
:sob:
-
And our
$VAR_NEXT_INDEXis updated to take into account that lines start at 0: -
VAR_NEXT_INDEX;if={$VAR_INDEX==0};then=1;elif={$VAR_INDEX==1};then=2;else=0
And finally to make it works whatever the number of lines in VAR_TEXTS, we can use operations:
VAR_NEXT_INDEX;if={$VAR_INDEX==$VAR_TEXTS[#]-1};then=0;else={$VAR_INDEX+1}
API
As everything is done in file names (except sometimes for texts/images/variables), it's easy to update a key: simply rename the file to change its configuration options. And the StreamDeck will be updated in near real time. It can be done manually, or programmatically.
But when you do it programmatically you need to know the exact path and name of the file... that will change when you'll rename it, so by doing this you would have to keep the name.
streamdeckfs provides an API as a few commands to avoid doing that, that allow to do things like "disable the layer named foobar of the key mykey on the page mypage", or "move the right coordinate of this line to 90%" (now you can see why things like "coords.2" are useful). You can even create everything from this API.
Note that before being able to use the API commands listed below, you must have run successfully at least once the make-dirs or run commands. This is needed to store information about the StreamDeck, because the API does not connect to it (it only touches files).
With these commands you can, for a page, key, text, image, event or variable:
- list them
- get its path
- get its configuration options as JSON
- update one or many configuration options
- copy it
- move it
- delete it
- create one
The are all called the same way:
streamdeckfs COMMAND SERIAL_DIRECTORY ARGUMENTS
For all these configuration commands, the SERIAL_DIRECTORY is the one ending with the serial number of the StreamDeck for which you want to update the configuration. No connection will be done to the StreamDeck as the only thing these configuration commands do is to read the directories and files in this directory, extract the configuration and return what you asked, or create or rename the files if asked to
get-deck-info
Will print some information about the StreamDeck as JSON. Only work if make-dirs or run was already called once for the StreamDeck/directory.
streamdeckfs get-deck-conf SERIAL_DIRECTORY
Example:
$ streamdeckfs get-deck-info ~/streamdeck-data/MYDECKSERIAL
{'model': 'StreamDeckXL', 'nb_rows': 4, 'nb_cols': 8, 'key_width': 96, 'key_height': 96}
get-brightness
Will print the current brightness (integer from 0 to 100).
streamdeckfs get-brightness SERIAL_DIRECTORY
Example:
$ streamdeckfs get-brightness ~/streamdeck-data/MYDECKSERIAL
30
set-brightness
Will update the brightness.
streamdeckfs set-brightness SERIAL_DIRECTORY -b BRIGHTNESS
with:
BRIGHTNESS: the wanted brightness, as an integer between 0 and 100 (both included)
Example:
$ streamdeckfs set-brightness ~/streamdeck-data/MYDECKSERIAL -b 50
get-current-page
Will print some information about the current page, if any.
streamdeckfs get-current-page SERIAL_DIRECTORY
Example:
$ streamdeckfs get-current-page ~/streamdeck-data/MYDECKSERIAL
{"number": 60, "name": "spotify", "is_overlay": false}
set-current-page
Will make the asked page the active one.
streamdeckfs set-current-page SERIAL_DIRECTORY PAGE
with:
PAGE: the number or name of the wanted page, or one of:__first__to go to the first page number available__previous__to go to the previous page number (i.e., the actual page number minus 1)__next__to go to the following page number (i.e., the actual page number plus 1)__back__to go to the previous page that was displayed before the current one
Example, to open the spotify page:
$ streamdeckfs set-current-page ~/streamdeck-data/MYDECKSERIAL -p spotify
Example, to go back to the previous page:
$ streamdeckfs set-current-page ~/streamdeck-data/MYDECKSERIAL -p __back__
Note that if this command is executed while streamdeckfs is not running, it will open the wanted page the next time it will run.
list-pages
Will print the pages of the deck.
streamdeckfs list-pages SERIAL_DIRECTORY DISABLED
with:
DISABLED: either--without-disabled(the default, to only list the pages that can be rendered) or--with-disabled(to list all the pages)
Pages are listed one per output line, with for each the same result as if get-page-conf were called. See get-page-conf for output examples.
get-page-path
Will print the full path of the asked page.
streamdeckfs get-page-path SERIAL_DIRECTORY -p PAGE
with:
PAGE: the number or name of the wanted page
Example:
$ streamdeckfs get-page-path ~/streamdeck-data/MYDECKSERIAL -p spotify
/home/twidi/streamdeck-data/MYDECKSERIAL/PAGE_60;name=spotify
get-page-conf
Will print a JSON representation of the full configuration (including options inherited from references) of the asked page.
streamdeckfs get-page-conf SERIAL_DIRECTORY -p PAGE
with:
PAGE: the number or name of the wanted page
Example:
$ streamdeckfs get-page-conf ~/streamdeck-data/MYDECKSERIAL -p spotify
{"kind": "PAGE", "page": "60", "name": "spotify"}
set-page-conf
Will update the configuration of the asked page.
streamdeckfs get-page-conf SERIAL_DIRECTORY -p PAGE -c OPTION1 VALUE1 -c OPTION2 VALUE2
with:
PAGE: the number or name of the wanted pageOPTION: one option to updateVALUE: the value for the option
You can have many -c OPTION VALUE parts to update many configuration options. To remove a configuration option, pass an empty string for VALUE.
This command returns the updated path of the page. Use --dry-run to get this path without effectively doing the changes (can also be used to validate the arguments).
Example, to change the name of the page and disable it:
$ streamdeckfs set-page-conf ~/streamdeck-data/MYDECKSERIAL -p spotify -c name spotify2 -c disabled true
create-page
Will create a new page.
streamdeckfs create-page SERIAL_DIRECTORY -p NUMBER -c OPTION1 VALUE1 -c OPTION2 VALUE2
with:
-
NUMBER: the number of the page to create, or an expression to find an available page number. This argument is optional: not passing it (or passing it with an empty string) is like passing the "0+" expression, i.e., using the first available page number. Possible expressions are:NUMBER+: to get the first page available afterNUMBERNUMBER+NUMBER: to get the first page available between those two numbers (exclusive)?to get a random availble page numberNUMBER?to get a random available page number greater thanNUMBER?NUMBERto get a random available page number lower thanNUMBERNUMBER?NUMBERto get a random available page number between those two numbers ()
If no available page can be found matching the expression, an error will be raised. Note: available page numbers will only be searched between 0 and 100000.
-
OPTION: one option to set -
VALUE: the value for the option
You can have many -c OPTION VALUE parts to set many configuration options.
This command returns the full path of the newly created page. Use --dry-run to get this path without effectively doing the changes (can also be used to validate the arguments).
Example, to create page number 20 with foo as name:
$ streamdeckfs create-page ~/streamdeck-data/MYDECKSERIAL -p 20 -c name foo
/home/twidi/streamdeck-data/MYDECKSERIAL/PAGE_20;name=foo
Or to create it in an available page between 49 and 60 (both exclusive):
$ streamdeckfs create-page ~/streamdeck-data/MYDECKSERIAL -p '49?60' -c name foo
/home/twidi/streamdeck-data/MYDECKSERIAL/PAGE_53;name=foo
copy-page
Will make a full copy of a page (including its keys and all images, texts, events)
streamdeckfs copy-page SERIAL_DIRECTORY -p PAGE -tp NUMBER -c OPTION1 VALUE1 -c OPTION2 VALUE2
with:
-
PAGE: the number or name of the page to copy -
NUMBER: the number of the new page (-tpis for--to-page), or an expression to find an available page number. This argument is optional: not passing it (or passing it with an empty string) is like passing the "0+" expression, i.e., using the first available page number. Possible expressions are:NUMBER+: to get the first page available afterNUMBERNUMBER+NUMBER: to get the first page available between those two numbers (exclusive)?to get a random availble page numberNUMBER?to get a random available page number greater thanNUMBER?NUMBERto get a random available page number lower thanNUMBERNUMBER?NUMBERto get a random available page number between those two numbers ()
If no available page can be found matching the expression, an error will be raised. Note: available page numbers will only be searched between 0 and 100000.
-
OPTION: one option to update -
VALUE: the value for the option
You can have many -c OPTION VALUE parts to set many configuration options. It is recommended to set a name that is different than the source page.
This command returns the full path of the newly created page. Use --dry-run to get this path without effectively doing the changes (can also be used to validate the arguments).
Example, to create a copy of the page 20 having foo as name to a new page numbered 30, with bar as name:
$ streamdeckfs copy-page ~/streamdeck-data/MYDECKSERIAL -p 20 -tp 30 -c name bar
/home/twidi/streamdeck-data/MYDECKSERIAL/PAGE_30;name=bar
move-page
Will move the page to a different number
streamdeckfs move-page SERIAL_DIRECTORY -p PAGE -tp NUMBER -c OPTION1 VALUE1 -c OPTION2 VALUE2
with:
-
PAGE: the number or name of the page to move -
NUMBER: the number of the new page (-tpis for--to-page), or an expression to find an available page number. This argument is optional: not passing it (or passing it with an empty string) is like passing the "0+" expression, i.e., using the first available page number. Possible expressions are:NUMBER+: to get the first page available afterNUMBERNUMBER+NUMBER: to get the first page available between those two numbers (exclusive)?to get a random availble page numberNUMBER?to get a random available page number greater thanNUMBER?NUMBERto get a random available page number lower thanNUMBERNUMBER?NUMBERto get a random available page number between those two numbers ()
If no available page can be found matching the expression, an error will be raised. Note: available page numbers will only be searched between 0 and 100000.
-
OPTION: one option to update -
VALUE: the value for the option
You can have many -c OPTION VALUE parts to set many configuration options.
This command returns the full new path of the moved page. Use --dry-run to get this path without effectively doing the changes (can also be used to validate the arguments).
Example, to move the page 20 having foo as name to a number 30, with bar as name:
$ streamdeckfs move-page ~/streamdeck-data/MYDECKSERIAL -p 20 -tp 30 -c name bar
/home/twidi/streamdeck-data/MYDECKSERIAL/PAGE_30;name=bar
delete-page
Will delete the asked page directory.
streamdeckfs delete-page SERIAL_DIRECTORY -p PAGE
with:
PAGE: the number or name of the page to delete
This command returns the path of the deleted page directory. Use --dry-run to get this path without effectively doing the changes (can also be used to validate the arguments).
Example:
$ streamdeckfs delete-page ~/streamdeck-data/MYDECKSERIAL -p spotify
list-keys
Will print the keys of a page.
streamdeckfs list-keys SERIAL_DIRECTORY -p PAGE DISABLED
with:
PAGE: the number or name of the page for which to list the keysDISABLED: either--without-disabled(the default, to only list the keys that can be rendered) or--with-disabled(to list all the keys)
Keys are listed one per output line, with for each the same result as if get-key-conf were called. See get-key-conf for output examples.
get-key-path
Will print the full path of the asked key.
streamdeckfs get-key-path SERIAL_DIRECTORY -p PAGE -k KEY
with:
PAGE: the number or name of the page where to find the wanted keyKEY: the name of the key or its "position" (ROW,COL, for example1,2for second key of first row)
Example:
$ streamdeckfs get-key-path ~/streamdeck-data/MYDECKSERIAL -p spotify -k progress
/home/twidi/streamdeck-data/MYDECKSERIAL/PAGE_60;name=spotify/KEY_ROW_2_COL_4;name=progress
get-key-conf
Will print a JSON representation of the full configuration (including options inherited from references) of the asked key.
streamdeckfs get-key-conf SERIAL_DIRECTORY -p PAGE -k KEY
with:
PAGE: the number or name of the page where to find the wanted keyKEY: the name of the key or its "position" (ROW,COL, for example1,2for second key of first row)
Example:
$ streamdeckfs get-key-conf ~/streamdeck-data/MYDECKSERIAL -p spotify -k progress
{"kind": "KEY", "row": "2", "col": "4", "name": "progress"}
set-key-conf
Will update the configuration of the asked key.
streamdeckfs set-key-conf SERIAL_DIRECTORY -p PAGE -k KEY -c OPTION1 VALUE1 -c OPTION2 VALUE2
with:
PAGE: the number or name of the page where to find the wanted keyKEY: the name of the key or its "position" (ROW,COL, for example1,2for second key of first row)OPTION: one option to updateVALUE: the value for the option
You can have many -c OPTION VALUE parts to update many configuration options. To remove a configuration option, pass an empty string for VALUE.
This command returns the updated path of the key. Use --dry-run to get this path without effectively doing the changes (can also be used to validate the arguments).
Example, to disable the key:
$ streamdeckfs set-key-conf ~/streamdeck-data/MYDECKSERIAL -p spotify -k progress -c disabled true
create-key
Will create a new key.
streamdeckfs create-key SERIAL_DIRECTORY -p PAGE -k ROW,COL -c OPTION1 VALUE1 -c OPTION2 VALUE2
with:
-
PAGE: the number or name of the page where to create the wanted key -
ROW,COL: the position of the new key, or an expression to find an available key. This argument is optional: not passing it (or passing it with an empty string) is like passing the "+" expression. Possible expressions are:+: to get the first available key (row by row)?to get a random availble key
If no available key can be found matching the expression, an error will be raised.
-
OPTION: one option to set -
VALUE: the value for the option
You can have many -c OPTION VALUE parts to set many configuration options.
This command returns the full path of the newly created key. Use --dry-run to get this path without effectively doing the changes (can also be used to validate the arguments).
Example, to create a key in the first row and column, with foo as name:
$ streamdeckfs create-key ~/streamdeck-data/MYDECKSERIAL -p 20 -k 1,1 -c name foo
/home/twidi/streamdeck-data/MYDECKSERIAL/PAGE_20/KEY_ROW_1_COL_1;name=foo
Or to create it in an available random available key:
$ streamdeckfs create-key ~/streamdeck-data/MYDECKSERIAL -p 20 -k '?' -c name foo
/home/twidi/streamdeck-data/MYDECKSERIAL/PAGE_20/KEY_ROW_3_COL_2;name=foo
copy-key
Will make a full copy of a key (including all its texts, images, events), in the same page or another.
streamdeckfs copy-key SERIAL_DIRECTORY -p PAGE -k KEY -tp TO_PAGE -tk ROW,COL -c OPTION1 VALUE1 -c OPTION2 VALUE2
with:
-
PAGE: the number or name of the page where to find the key to copy -
KEY: the name of the key to copy, or its "position" (ROW,COL, for example1,2for second key of first row) -
TO_PAGE: the number or the name of the page where to copy the key (-tpis for--to-page). Optional: if not given, will use the page of the key to copy -
ROW,COL: the position of the new key (-tkif for--to-key) or an expression to find an available key. This argument is ptional: if not given, will keep the position of the key to copy. Possible expressions are:+: to get the first available key (row by row)?to get a random availble key
If no available key can be found matching the expression, an error will be raised.
-
OPTION: one option to update -
VALUE: the value for the option
You can have many -c OPTION VALUE parts to set many configuration options. If the copy is in the same page, it is recommended to set a name that is different than the source key.
This command returns the full path of the newly created key. Use --dry-run to get this path without effectively doing the changes (can also be used to validate the arguments).
Example, to create a copy of the key foo from the page 20 to 30 on row 1, col 1, with bar as name:
$ streamdeckfs copy-key ~/streamdeck-data/MYDECKSERIAL -p 20 -k foo -tp 30 -tk 1,1 -c name bar
/home/twidi/streamdeck-data/MYDECKSERIAL/PAGE_30/KEY_ROW_1_COL_1;name=bar
move-key
Will move a key to another page or another position
streamdeckfs move-key SERIAL_DIRECTORY -p PAGE -k KEY -tp TO_PAGE -tk ROW,COL -c OPTION1 VALUE1 -c OPTION2 VALUE2
with:
-
PAGE: the number or name of the page where to find the key to move -
KEY: the name of the key to move, or its "position" (ROW,COL, for example1,2for second key of first row) -
TO_PAGE: the number or the name of the page where to move the key (-tpis for--to-page). Optional: if not given, will stay in the same page -
ROW,COL: the new position of the key (-tkif for--to-key) or an expression to find an available key. This argument is ptional: if not given, will keep the same position. Possible expressions are:+: to get the first available key (row by row)?to get a random availble key
If no available key can be found matching the expression, an error will be raised.
-
OPTION: one option to update -
VALUE: the value for the option
You can have many -c OPTION VALUE parts to set many configuration options.
This command returns the new full path of the key. Use --dry-run to get this path without effectively doing the changes (can also be used to validate the arguments).
Example, to move the key foo from the page 20 to 30 on row 1, col 1, with bar as name:
$ streamdeckfs move-key ~/streamdeck-data/MYDECKSERIAL -p 20 -k foo -tp 30 -tk 1,1 -c name bar
/home/twidi/streamdeck-data/MYDECKSERIAL/PAGE_30/KEY_ROW_1_COL_1;name=bar
delete-key
Will delete the asked key directory.
streamdeckfs delete-key SERIAL_DIRECTORY -p PAGE -k KEY
with:
PAGE: the number or name of the page where to find the key to deleteKEY: the name of the key or its "position" (ROW,COL, for example1,2for second key of first row)
This command returns the path of the deleted key directory. Use --dry-run to get this path without effectively doing the changes (can also be used to validate the arguments).
Example:
$ streamdeckfs delete-key ~/streamdeck-data/MYDECKSERIAL -p spotify -k progress
list-images
Will print the image layers of a key.
streamdeckfs list-images SERIAL_DIRECTORY -p PAGE -k KEY DISABLED
with:
PAGE: the number or name of the page where to find the key for which to list the image layersKEY: the name of the key for which to list the image layers, or its "position" (ROW,COL, for example1,2for second key of first row)DISABLED: either--without-disabled(the default, to only list the image layers that can be rendered) or--with-disabled(to list all the image layers)
Image layers are listed one per output line, with for each the same result as if get-image-conf were called. See get-image-conf for output examples.
get-image-path
Will print the full path of the asked image layer.
streamdeckfs get-image-path SERIAL_DIRECTORY -p PAGE -k KEY -l LAYER
with:
PAGE: the number or name of the page where to find the wanted imageKEY: the name of the key where to find the wanted image, or its "position" (ROW,COL, for example1,2for second key of first row)LAYER: the number or name of the wanted layer (the whole-l LAYERpart can be ommited if you want to target the defaultIMAGE...file, the one without layer)
Example:
$ streamdeckfs get-image-path ~/streamdeck-data/MYDECKSERIAL -p spotify -k progress -l progress
/home/twidi/streamdeck-data/MYDECKSERIAL/PAGE_60;name=spotify/KEY_ROW_2_COL_4;name=progress/IMAGE;layer=0;name=progress;draw=arc;coords=0,0,100%,100%;outline=#8cc63f;width=5;angles=0,0%;angles.1=33%;opacity=50
Here you see angles and angles.1 because angles.1 was set by a call to set-image-conf
get-image-conf
Will print a JSON representation of the full configuration (including options inherited from references) of the asked image layer.
streamdeckfs get-image-conf SERIAL_DIRECTORY -p PAGE -k KEY -l LAYER
with:
PAGE: the number or name of the page where to find the wanted imageKEY: the name of the key where to find the wanted image, or its "position" (ROW,COL, for example1,2for second key of first row)LAYER: the number or name of the wanted layer (the whole-l LAYERpart can be ommited if you want to target the defaultIMAGE...file, the one without layer)
Example:
$ streamdeckfs get-image-conf ~/streamdeck-data/MYDECKSERIAL -p spotify -k progress -l progress
{"kind": "IMAGE", "layer": "0", "name": "progress", "draw": "arc", "coords": "0,0,100%,100%", "outline": "#8cc63f", "width": "5", "angles": "0,0%", "angles.1": "29%", "opacity": "50"}
You see that coords is not split as a JSON array, and that angles and angles.1 are not merged. It's because the returned configuration is only based on validated configuration options in the file names (and its references). But for margins and crops, you'll have objects with top, left, bottom and right keys, but the "raw" values (as string, like "10" or "10%")
set-image-conf
Will update the configuration of the asked image layer.
streamdeckfs set-image-conf SERIAL_DIRECTORY -p PAGE -k KEY -l LAYER -c OPTION1 VALUE1 -c OPTION2 VALUE2
with:
PAGE: the number or name of the page where to find the wanted imageKEY: the name of the key where to find the wanted image, or its "position" (ROW,COL, for example1,2for second key of first row)LAYER: the number or name of the wanted layer (the whole-l LAYERpart can be ommited if you want to target the defaultIMAGE...file, the one without layer)OPTION: one option to updateVALUE: the value for the option
You can have many -c OPTION VALUE parts to update many configuration options. To remove a configuration option, pass an empty string for VALUE.
This command returns the updated path of the image layer. Use --dry-run to get this path without effectively doing the changes (can also be used to validate the arguments).
Example, to update the end angle of the arc that we use as a circular progress bar:
$ streamdeckfs set-image-conf ~/streamdeck-data/MYDECKSERIAL -p spotify -k progress -l progress -c angles.1 '31%'
To have the progress bar automatically updates, you only need a script ON_START on a key that will regularly fetch the spotify API and call the above command with your real listening progress.
create-image
Will create a new image layer.
streamdeckfs create-image SERIAL_DIRECTORY -p PAGE -k KEY -c OPTION1 VALUE1 -c OPTION2 VALUE2 --link LINKED_FILE
with:
PAGE: the number or name of the page where to create the wanted imageKEY: the name of the key where to create the wanted image, or its "position" (ROW,COL, for example1,2for second key of first row)OPTION: one option to setVALUE: the value for the optionLINKED_FILE: optional path to a file to make a symbolic link to. If not defined, an empty file will be created.
You can have many -c OPTION VALUE parts to set many configuration options.
This command returns the full path of the newly created image layer. Use --dry-run to get this path without effectively doing the changes (can also be used to validate the arguments).
Example, to create an image layer drawing a red square
$ streamdeckfs create-image ~/streamdeck-data/MYDECKSERIAL -p 20 -k 1,1 -c name foo -c layer 1 -c draw rectangle -c coords '20%,20%,80%,80%' -c width 0 -c fill red
/home/twidi/streamdeck-data/MYDECKSERIAL/PAGE_20/KEY_ROW_1_COL_1/IMAGE;layer=1;name=foo;draw=rectangle;coords=20%,20%,80%,80%;fill=red;width=0
Or to use an existing image:
$ streamdeckfs create-image ~/streamdeck-data/MYDECKSERIAL -p 20 -k 1,1 -c name foo -c layer 1 --link /path/to/my/image
/home/twidi/streamdeck-data/MYDECKSERIAL/PAGE_20/KEY_ROW_1_COL_1/IMAGE;layer=1;name=foo
copy-image
Will make a copy of an image layer, in the same key or another.
streamdeckfs copy-image SERIAL_DIRECTORY -p PAGE -k KEY -l LAYER -tp TO_PAGE -tk TO_KEY -c OPTION1 VALUE1 -c OPTION2 VALUE2
with:
PAGE: the number or name of the page where to find the layer to copyKEY: the name of the key where to find the layer to copy, or its "position" (ROW,COL, for example1,2for second key of first row)LAYER: the number or name of the layer to copy (the whole-l LAYERpart can be ommited if you want to target the defaultIMAGE...file, the one without layer)TO_PAGE: the number or the name of the page where to copy the layer (-tpis for--to-page). Optional: if not given, will use the page of the layer to copyTO_KEY: the name of the key where to copy the layer (-tkif for--to-key). Optional: if not given, will use the key at the same position of the one containing the layer to copyOPTION: one option to updateVALUE: the value for the option
You can have many -c OPTION VALUE parts to set many configuration options. If the copy is in the same key, it is recommended to set a layer and name that are different than the source layer.
This command returns the full path of the newly created image layer. Use --dry-run to get this path without effectively doing the changes (can also be used to validate the arguments).
Example, to create a copy of the layer foo from the key 4,8 in page 20 to the key 1,1 in page 30, as the 2nd layer with bar as name:
$ streamdeckfs copy-image ~/streamdeck-data/MYDECKSERIAL -p 20 -k 4,8 -l foo -tp 30 -tk 1,1 -c layer 2 -c name bar
/home/twidi/streamdeck-data/MYDECKSERIAL/PAGE_30/KEY_ROW_1_COL_1/IMAGE;layer=2;name=bar
move-image
Will move an image layer to another key
streamdeckfs move-image SERIAL_DIRECTORY -p PAGE -k KEY -l LAYER -tp TO_PAGE -tk TO_KEY -c OPTION1 VALUE1 -c OPTION2 VALUE2
with:
PAGE: the number or name of the page where to find the layer to moveKEY: the name of the key where to find the layer to move, or its "position" (ROW,COL, for example1,2for second key of first row)LAYER: the number or name of the layer to move (the whole-l LAYERpart can be ommited if you want to target the defaultIMAGE...file, the one without layer)TO_PAGE: the number or the name of the page where to move the layer (-tpis for--to-page). Optional: if not given, will stay in the same pageTO_KEY: the name of the key where to move the layer (-tkif for--to-key). Optional: if not given, will use the key at the same position of the one containing the layer to moveOPTION: one option to updateVALUE: the value for the option
You can have many -c OPTION VALUE parts to set many configuration options.
This command returns the new full path of the image layer. Use --dry-run to get this path without effectively doing the changes (can also be used to validate the arguments).
Example, to move the layer foo from the key 4,8 in page 20 to the key 1,1 in page 30, as the 2nd layer with bar as name:
$ streamdeckfs move-image ~/streamdeck-data/MYDECKSERIAL -p 20 -k 4,8 -l foo -tp 30 -tk 1,1 -c layer 2 -c name bar
/home/twidi/streamdeck-data/MYDECKSERIAL/PAGE_30/KEY_ROW_1_COL_1/IMAGE;layer=2;name=bar
delete-image
Will delete the asked image file.
streamdeckfs delete-image SERIAL_DIRECTORY -p PAGE -k KEY -l LAYER
with:
PAGE: the number or name of the page where to find the layer to deleteKEY: the name of the key where to find the layer to delete, or its "position" (ROW,COL, for example1,2for second key of first row)LAYER: the number or name of the layer to delete (the whole-l LAYERpart can be ommited if you want to target the defaultIMAGE...file, the one without layer)
This command returns the path of the deleted image layer file. Use --dry-run to get this path without effectively doing the changes (can also be used to validate the arguments).
Example:
$ streamdeckfs delete-image ~/streamdeck-data/MYDECKSERIAL -p spotify -k progress -l progress
list-images
Will print the text lines of a key.
streamdeckfs list-texts SERIAL_DIRECTORY -p PAGE -k KEY DISABLED
with:
PAGE: the number or name of the page where to find the key for which to list the text linesKEY: the name of the key for which to list the text lines, or its "position" (ROW,COL, for example1,2for second key of first row)DISABLED: either--without-disabled(the default, to only list the text lines that can be rendered) or--with-disabled(to list all the text lines)
Text lines are listed one per output line, with for each the same result as if get-text-conf were called. See get-text-conf for output examples.
get-text-path
Will print the full path of the asked text line.
streamdeckfs get-text-path SERIAL_DIRECTORY -p PAGE -k KEY -l LINE
with:
PAGE: the number or name of the page where to find the wanted text lineKEY: the name of the key where to find the wanted text line, or its "position" (ROW,COL, for example1,2for second key of first row)LINE: the number or name of the wanted text line (the whole-l LINEpart can be ommited if you want to target the defaultTEXT...file, the one without line)
Example:
$ streamdeckfs get-text-path ~/streamdeck-data/MYDECKSERIAL -p spotify -k progress -l progress
/home/twidi/streamdeck-data/MYDECKSERIAL/PAGE_60;name=spotify/KEY_ROW_2_COL_4;name=progress/TEXT;line=1;name=progress;size=30;weight=black;color=#8cc63f;align=center;valign=middle;margin=12%,1,40%,1;text=2:23
get-text-conf
Will print a JSON representation of the full configuration (including options inherited from references) of the asked text line.
streamdeckfs get-text-conf SERIAL_DIRECTORY -p PAGE -k KEY -l LINE
with:
PAGE: the number or name of the page where to find the wanted text lineKEY: the name of the key where to find the wanted text line, or its "position" (ROW,COL, for example1,2for second key of first row)LINE: the number or name of the wanted text line (the whole-l LINEpart can be ommited if you want to target the defaultTEXT...file, the one without line)
Example:
$ streamdeckfs get-text-conf ~/streamdeck-data/MYDECKSERIAL -p spotify -k progress -l progress
{"kind": "TEXT", "line": "1", "name": "progress", "size": "30", "weight": "black", "color": "#8cc63f", "align": "center", "valign": "middle", "margin": {"top": "12%", "right": "1", "bottom": "40%", "left": "1"}}
You see that margins is an object with top, left, bottom and right keys, but with the "raw" values.
set-text-conf
Will update the configuration of the asked text line.
streamdeckfs set-text-conf SERIAL_DIRECTORY -p PAGE -k KEY -l LINE -c OPTION1 VALUE1 -c OPTION2 VALUE2
with:
PAGE: the number or name of the page where to find the wanted text lineKEY: the name of the key where to find the wanted text line, or its "position" (ROW,COL, for example1,2for second key of first row)LINE: the number or name of the wanted text line (the whole-l LINEpart can be ommited if you want to target the defaultTEXT...file, the one without line)OPTION: one option to updateVALUE: the value for the option
You can have many -c OPTION VALUE parts to update many configuration options. To remove a configuration option, pass an empty string for VALUE.
This command returns the updated path of the text line. Use --dry-run to get this path without effectively doing the changes (can also be used to validate the arguments).
Example, to update the text used to display the position in the current track:
$ streamdeckfs set-text-conf ~/streamdeck-data/MYDECKSERIAL -p spotify -k progress -l progress -c text '2:36'
To have this text automatically updates, you only need a script ON_START on a key that will regularly fetch the spotify API and call the above command with the real progression. Or you can avoid having the text configuration option and gt the path via get-text-path and write the text in the file. Or, even better (and the faster for your script), make this TEXT... file a link that point to a file inside which you write the text. streamdeckfs watches the file pointed by the symbolic link and will updates when it changes. So you can avoid a call to set-text-conf and just update a file that is finally not related to streamdeckfs.
create-text
Will create a new text line.
streamdeckfs create-text SERIAL_DIRECTORY -p PAGE -k KEY -c OPTION1 VALUE1 -c OPTION2 VALUE2 --link LINKED_FILE
with:
PAGE: the number or name of the page where to create the wanted textKEY: the name of the key where to create the wanted text, or its "position" (ROW,COL, for example1,2for second key of first row)OPTION: one option to setVALUE: the value for the optionLINKED_FILE: optional path to a file to make a symbolic link to. If not defined, an empty file will be created.
You can have many -c OPTION VALUE parts to set many configuration options.
This command returns the full path of the newly created text line. Use --dry-run to get this path without effectively doing the changes (can also be used to validate the arguments).
Example, to create a centered text "foo":
$ streamdeckfs create-text ~/streamdeck-data/MYDECKSERIAL -p 20 -k 1,1 -c name foo -c line 1 -c text foo -c align center -c valign middle
/home/twidi/streamdeck-data/MYDECKSERIAL/PAGE_20/KEY_ROW_1_COL_1/TEXT;line=1;name=foo;text=foo;align=center;valign=middle
Or to use an existing text file:
$ streamdeckfs create-image ~/streamdeck-data/MYDECKSERIAL -p 20 -k 1,1 -c name foo -c layer 1 --link /path/to/my/text-file
/home/twidi/streamdeck-data/MYDECKSERIAL/PAGE_20/KEY_ROW_1_COL_1/TEXT;line=1;name=foo
copy-text
Will make a copy of a text line, in the same key or another.
streamdeckfs copy-text SERIAL_DIRECTORY -p PAGE -k KEY -l LINE -tp TO_PAGE -tk TO_KEY -c OPTION1 VALUE1 -c OPTION2 VALUE2
with:
PAGE: the number or name of the page where to find the text line to copyKEY: the name of the key where to find the text line to copy, or its "position" (ROW,COL, for example1,2for second key of first row)LINE: the number or name of the text line to copy (the whole-l LINEpart can be ommited if you want to target the defaultTEXT...file, the one without line)TO_PAGE: the number or the name of the page where to copy the text line (-tpis for--to-page). Optional: if not given, will use the page of the text line to copyTO_KEY: the name of the key where to copy the text line (-tkif for--to-key). Optional: if not given, will use the key at the same position of the one containing the text line to copyOPTION: one option to updateVALUE: the value for the option
You can have many -c OPTION VALUE parts to set many configuration options. If the copy is in the same key, it is recommended to set a line and name that are different than the source line.
This command returns the full path of the newly created text line. Use --dry-run to get this path without effectively doing the changes (can also be used to validate the arguments).
Example, to create a copy of the text line foo from the key 4,8 in page 20 to the key 1,1 in page 30, as the 2nd line with bar as name:
$ streamdeckfs copy-text ~/streamdeck-data/MYDECKSERIAL -p 20 -k 4,8 -l foo -tp 30 -tk 1,1 -c line 2 -c name bar
/home/twidi/streamdeck-data/MYDECKSERIAL/PAGE_30/KEY_ROW_1_COL_1/TEXT;line=2;name=bar
move-text
Will move a text line to another key
streamdeckfs move-text SERIAL_DIRECTORY -p PAGE -k KEY -l LINE -tp TO_PAGE -tk TO_KEY -c OPTION1 VALUE1 -c OPTION2 VALUE2
with:
PAGE: the number or name of the page where to find the text line to moveKEY: the name of the key where to find the text line to move, or its "position" (ROW,COL, for example1,2for second key of first row)LINE: the number or name of the text line to move (the whole-l LINEpart can be ommited if you want to target the defaultTEXT...file, the one without line)TO_PAGE: the number or the name of the page where to move the text line (-tpis for--to-page). Optional: if not given, will stay in the same pageTO_KEY: the name of the key where to move the text line (-tkif for--to-key). Optional: if not given, will use the key at the same position of the one containing the text line to moveOPTION: one option to updateVALUE: the value for the option
You can have many -c OPTION VALUE parts to set many configuration options.
This command returns the new full path of the key. Use --dry-run to get this path without effectively doing the changes (can also be used to validate the arguments).
Example, to move the text line foo from the key 4,8 in page 20 to the key 1,1 in page 30, as the 2nd line with bar as name:
$ streamdeckfs move-text ~/streamdeck-data/MYDECKSERIAL -p 20 -k 4,8 -l foo -tp 30 -tk 1,1 -c line 2 -c name bar
/home/twidi/streamdeck-data/MYDECKSERIAL/PAGE_30/KEY_ROW_1_COL_1/TEXT;line=2;name=bar
delete-text
Will delete the asked text file.
streamdeckfs delete-text SERIAL_DIRECTORY -p PAGE -k KEY -l LINE
with:
PAGE: the number or name of the page where to find the text line to deleteKEY: the name of the key where to find the text line to delete, or its "position" (ROW,COL, for example1,2for second key of first row)LINE: the number or name of the text line to delete (the whole-l LINEpart can be ommited if you want to target the defaultTEXT...file, the one without line)
This command returns the path of the deleted text line file. Use --dry-run to get this path without effectively doing the changes (can also be used to validate the arguments).
Example:
$ streamdeckfs delete-text ~/streamdeck-data/MYDECKSERIAL -p spotify -k progress -l progress
list-events
Will print the events of the deck, a page or a key.
streamdeckfs list-events SERIAL_DIRECTORY -p PAGE -k KEY DISABLED
with:
PAGE: the number or name of the page for which to list the events, or if-kis passed, where to find the key for which to list the events. Do not pass this argument to list events of the deckKEY: the name of the key for which to list the events, or its "position" (ROW,COL, for example1,2for second key of first row). Do not pass this argument to list events of a page or the deckDISABLED: either--without-disabled(the default, to only list the events that can be rendered) or--with-disabled(to list all the events)
Events are listed one per output line, with for each the same result as if get-event-conf were called. See get-event-conf for output examples.
get-event-path
Will print the full path of the asked event.
streamdeckfs get-event-path SERIAL_DIRECTORY -p PAGE -k KEY -e EVENT
with:
PAGE: the number or name of the page where to find the wanted event. Do not pass this argument for a deck eventKEY: the name of the key where to find the wanted event, or its "position" (ROW,COL, for example1,2for second key of first row). Do not pass this argument for a page or deck eventEVENT: the kind (start,end,press,longpress, orreleasefor a key event, orstartorendfor a page or deck event) or name of the wanted event
Example:
$ streamdeckfs get-event-path ~/streamdeck-data/MYDECKSERIAL -p spotify -k seek-backward -e press
/home/twidi/streamdeck-data/MYDECKSERIAL/PAGE_60;name=spotify/KEY_ROW_2_COL_2;name=seek-backward/ON_PRESS;every=1000;unique
get-event-conf
Will print a JSON representation of the full configuration (including options inherited from references) of the asked event.
streamdeckfs get-event-conf SERIAL_DIRECTORY -p PAGE -k KEY -e EVENT
with:
PAGE: the number or name of the page where to find the wanted event. Do not pass this argument for a deck eventKEY: the name of the key where to find the wanted event, or its "position" (ROW,COL, for example1,2for second key of first row). Do not pass this argument for a page or deck eventEVENT: the kind (start,end,press,longpress, orreleasefor a key event, orstartorendfor a page or deck event) or name of the wanted event
Example:
$ streamdeckfs get-event-conf ~/streamdeck-data/MYDECKSERIAL -p spotify -k seek-backward -e press
{"kind": "PRESS", "every": "1000", "unique": true}
set-event-conf
Will update the configuration of the asked event.
streamdeckfs set-event-conf SERIAL_DIRECTORY -p PAGE -k KEY -e EVENT -c OPTION1 VALUE1 -c OPTION2 VALUE2
with:
PAGE: the number or name of the page where to find the wanted event. Do not pass this argument for a deck eventKEY: the name of the key where to find the wanted event, or its "position" (ROW,COL, for example1,2for second key of first row). Do not pass this argument for a page or deck eventEVENT: the kind (start,end,press,longpress, orreleasefor a key event, orstartorendfor a page or deck event) or name of the wanted eventOPTION: one option to updateVALUE: the value for the option
You can have many -c OPTION VALUE parts to update many configuration options. To remove a configuration option, pass an empty string for VALUE.
This command returns the updated path of the event. Use --dry-run to get this path without effectively doing the changes (can also be used to validate the arguments).
Example, to stop allowing repetition:
$ streamdeckfs set-event-conf ~/streamdeck-data/MYDECKSERIAL -p spotify -k seek-backward -e press -c every ''
Passing an empty string for the every configuration option removes it from the file name, as we can see just after by calling get-event-path and get-event-conf:
$ streamdeckfs get-event-path ~/streamdeck-data/MYDECKSERIAL -p spotify -k seek-backward -e press
/home/twidi/streamdeck-data/MYDECKSERIAL/PAGE_60;name=spotify/KEY_ROW_2_COL_2;name=seek-backward/ON_PRESS;every=1000;unique
$ streamdeckfs get-event-conf ~/streamdeck-data/MYDECKSERIAL -p spotify -k seek-backward -e press
{"kind": "PRESS", "unique": true}
If the action on the event is setting a variable content (ON_PRESS;VAR_NAME<=VALUE), notice that the key/value separator is the = so the < is in the first part of the -c argument:
$ streamdeckfs set-event-conf ~/streamdeck-data/MYDECKSERIAL -p page -k key -e press -c 'VAR_NAME<' VALUE
create-event
Will create a new event.
streamdeckfs create-event SERIAL_DIRECTORY -p PAGE -k KEY -e EVENT -c OPTION1 VALUE1 -c OPTION2 VALUE2 --link LINKED_FILE
with:
PAGE: the number or name of the page where to create the wanted event. Do not pass this argument for a deck eventKEY: the name of the key where to create the wanted event, or its "position" (ROW,COL, for example1,2for second key of first row). Do not pass this argument for a page or deck eventEVENT: the kind (start,end,press,longpress, orreleasefor a key event, orstartorendfor a page or deck event) of the event to createOPTION: one option to setVALUE: the value for the optionLINKED_FILE: optional path to a file to make a symbolic link to. If not defined, an empty file will be created.
You can have many -c OPTION VALUE parts to set many configuration options.
This command returns the full path of the newly created event. Use --dry-run to get this path without effectively doing the changes (can also be used to validate the arguments).
Example, to create an event launching the gnome-calculator when the key is pressed:
$ streamdeckfs create-event ~/streamdeck-data/MYDECKSERIAL -p 20 -k 1,1 --link "$(which gnome-calculator)"
/home/twidi/streamdeck-data/MYDECKSERIAL/PAGE_20/KEY_ROW_1_COL_1/ON_PRESS
copy-event
Will make a copy of an event, in the same key or another for a key event, or in the same page or another for a page event
streamdeckfs copy-event SERIAL_DIRECTORY -p PAGE -k KEY -e EVENT -tp TO_PAGE -tk TO_KEY -te TO_EVENT -c OPTION1 VALUE1 -c OPTION2 VALUE2
with:
PAGE: the number or name of the page where to find the event to copy. Do not pass this argument for a deck eventKEY: the name of the key where to find the event to copy, or its "position" (ROW,COL, for example1,2for second key of first row). Do not pass this argument for a page or deck eventEVENT: the kind (start,end,press,longpress, orreleasefor a key event, orstartorendfor a page or deck event) or name of the event to copyTO_PAGE: the number or the name of the page where to copy the event (-tpis for--to-page). Optional: if not given, will use the page of the event to copy. Do not pass this argument for a deck eventTO_KEY: the name of the key where to copy the event (-tkif for--to-key). Optional: if not given, will use the key at the same position of the one containing the event to copy. Do not pass this argument for a page or deck eventTO_EVENT: the kind (start,end,press,longpress, orreleasefor a key event, orstartorendfor a page or deck event) of the new event. Optional: if not given, will use the same kind as the event to copyOPTION: one option to updateVALUE: the value for the option
You can have many -c OPTION VALUE parts to set many configuration options. If the copy is in the same page/key, it is recommended to set a kind and name that are different than the source event.
This command returns the full path of the newly created event. Use --dry-run to get this path without effectively doing the changes (can also be used to validate the arguments).
Example, to create a copy of the ON_PRESS event from the key 4,8 in the page 20 to the key 1,1 in the page 30,:
$ streamdeckfs copy-event ~/streamdeck-data/MYDECKSERIAL -p 20 -k 4,8 -e press -tp 30 -tk 1,1
/home/twidi/streamdeck-data/MYDECKSERIAL/PAGE_30/KEY_ROW_1_COL_1/ON_PRESS
move-event
Will move an event to another key for a key event, or to another page for a page event
streamdeckfs move-event SERIAL_DIRECTORY -p PAGE -k KEY -e EVENT -tp TO_PAGE -tk TO_KEY -te TO_EVENT -c OPTION1 VALUE1 -c OPTION2 VALUE2
with:
PAGE: the number or name of the page where to find the event to move. Do not pass this argument for a deck eventKEY: the name of the key where to find the event to move, or its "position" (ROW,COL, for example1,2for second key of first row). Do not pass this argument for a page or deck eventEVENT: the kind (start,end,press,longpress, orreleasefor a key event, orstartorendfor a page or deck event) or name of the event to moveTO_PAGE: the number or the name of the page where to move the event (-tpis for--to-page). Optional: if not given, will stay in the same page. Do not pass this argument for a deck eventTO_KEY: the name of the key where to move the event (-tkif for--to-key). Optional: if not given, will use the key at the same position of the one containing the event to move. Do not pass this argument for a page or deck eventTO_EVENT: the kind (start,end,press,longpress, orreleasefor a key event, orstartorendfor a page or deck event) of the moved event. Optional: if not given, will use the same kind as the event to moveOPTION: one option to updateVALUE: the value for the option
You can have many -c OPTION VALUE parts to set many configuration options.
This command returns the new full path of event. Use --dry-run to get this path without effectively doing the changes (can also be used to validate the arguments).
Example, to move the ON_PRESS event from the key 4,8 in the page 20 to the key 1,1 in the page 30,:
$ streamdeckfs move-event ~/streamdeck-data/MYDECKSERIAL -p 20 -k 4,8 -e press -tp 30 -tk 1,1
/home/twidi/streamdeck-data/MYDECKSERIAL/PAGE_30/KEY_ROW_1_COL_1/ON_PRESS
delete-event
Will delete the asked event file.
streamdeckfs delete-event SERIAL_DIRECTORY -p PAGE -k KEY -e EVENT
with:
PAGE: the number or name of the page where to find the event to delete. Do not pass this argument for a deck eventKEY: the name of the key where to find the event to delete, or its "position" (ROW,COL, for example1,2for second key of first row). Do not pass this argument for a page or deck eventEVENT: the kind (start,end,press,longpress, orreleasefor a key event, orstartorendfor a page or deck event) or name of the event to delete
This command returns the path of the deleted event file. Use --dry-run to get this path without effectively doing the changes (can also be used to validate the arguments).
Example:
$ streamdeckfs delete-event ~/streamdeck-data/MYDECKSERIAL -p spotify -k progress -e press
list-vars
Will print the variables of the deck, a page or a key.
streamdeckfs list-vars SERIAL_DIRECTORY -p PAGE -k KEY DISABLED
with:
PAGE: the number or name of the page for which to list the variables, or if-kis passed, where to find the key for which to list the variables. Do not pass this argument to list variables of the deckKEY: the name of the key for which to list the variables, or its "position" (ROW,COL, for example1,2for second key of first row). Do not pass this argument to list variables of a page or the deckDISABLED: either--without-disabled(the default, to only list the variables that can be rendered) or--with-disabled(to list all the variables)
Variables are listed one per output line, with for each the same result as if get-var-conf were called. See get-var-conf for output examples.
get-var-path
Will print the full path of the asked variable.
streamdeckfs get-var-path SERIAL_DIRECTORY -p PAGE -k KEY -v VAR
with:
PAGE: the number or name of the page where to find the wanted variable. Do not pass this argument for a deck variableKEY: the name of the key where to find the wanted variable, or its "position" (ROW,COL, for example1,2for second key of first row). Do not pass this argument for a page or deck variableVAR: the name of the variable (can only contains capital letters fromAtoZ, digits from0to9, and the character_, cannot start by number or_, and cannot end by_). May be prefixed byVAR_.
Example:
$ streamdeckfs get-var-path ~/streamdeck-data/MYDECKSERIAL -p spotify -v ALBUM
/home/twidi/streamdeck-data/MYDECKSERIAL/PAGE_60;name=spotify/VAR_ALBUM
get-var-conf
Will print a JSON representation of the full configuration (including options inherited from references) of the asked variable.
streamdeckfs get-var-conf SERIAL_DIRECTORY -p PAGE -k KEY -v VAR
with:
PAGE: the number or name of the page where to find the wanted variable. Do not pass this argument for a deck variableKEY: the name of the key where to find the wanted variable, or its "position" (ROW,COL, for example1,2for second key of first row). Do not pass this argument for a page or deck variableVAR: the name of the variable (can only contains capital letters fromAtoZ, digits from0to9, and the character_, cannot start by number or_, and cannot end by_). May be prefixed byVAR_.
Example:
$ streamdeckfs get-var-conf ~/streamdeck-data/MYDECKSERIAL -p spotify -v ALBUM
{"kind": "VAR", "name": "ALBUM"}
get-var-value
Will print the value of the asked variable.
streamdeckfs get-var-value SERIAL_DIRECTORY -p PAGE -k KEY -v VAR
with:
PAGE: the number or name of the page where to find the wanted variable. Do not pass this argument for a deck variableKEY: the name of the key where to find the wanted variable, or its "position" (ROW,COL, for example1,2for second key of first row). Do not pass this argument for a page or deck variableVAR: the name of the variable (can only contains capital letters fromAtoZ, digits from0to9, and the character_, cannot start by number or_, and cannot end by_). May be prefixed byVAR_.
The variable does not need to be in the wanted key or page to be retrieved, as long as it is in one of its parent (the page or the deck when asking for a key variable, or the deck when asking for a page variable)
If the variable exist but does not hold any value (no content, no value configuration option or no linked file), nothing will be printed (but no errors will be raised)
Example:
$ streamdeckfs get-var-value ~/streamdeck-data/MYDECKSERIAL -p spotify -v ALBUM
Discovery
set-var-conf
Will update the configuration of the asked variable.
streamdeckfs set-var-conf SERIAL_DIRECTORY -p PAGE -k KEY -v VAR -c OPTION1 VALUE1 -c OPTION2 VALUE2
with:
PAGE: the number or name of the page where to find the wanted variable. Do not pass this argument for a deck variableKEY: the name of the key where to find the wanted variable, or its "position" (ROW,COL, for example1,2for second key of first row). Do not pass this argument for a page or deck variableVAR: the name of the variable (can only contains capital letters fromAtoZ, digits from0to9, and the character_, cannot start by number or_, and cannot end by_). May be prefixed byVAR_.OPTION: one option to updateVALUE: the value for the option
You can have many -c OPTION VALUE parts to update many configuration options. To remove a configuration option, pass an empty string for VALUE.
This command returns the updated path of the variable. Use --dry-run to get this path without effectively doing the changes (can also be used to validate the arguments).
Example, to set the value of a variable:
$ streamdeckfs set-var-conf ~/streamdeck-data/MYDECKSERIAL -p spotify -v ALBUM -c value Discovery
/home/twidi/streamdeck-data/MYDECKSERIAL/PAGE_60;name=spotify/VAR_ALBUM;value=Discovery
create-var
Will create a new variable.
streamdeckfs create-var SERIAL_DIRECTORY -p PAGE -k KEY -v VAR -c OPTION1 VALUE1 -c OPTION2 VALUE2 --link LINKED_FILE
with:
PAGE: the number or name of the page where to create the wanted variable. Do not pass this argument for a deck variableKEY: the name of the key where to create the wanted variable, or its "position" (ROW,COL, for example1,2for second key of first row). Do not pass this argument for a page or deck variableVAR: the name of the variable to create (can only contains capital letters fromAtoZ, digits from0to9, and the character_, cannot start by number or_, and cannot end by_). May be prefixed byVAR_.OPTION: one option to setVALUE: the value for the optionLINKED_FILE: optional path to a file to make a symbolic link to. If not defined, an empty file will be created.
You can have many -c OPTION VALUE parts to set many configuration options.
This command returns the full path of the newly created variable. Use --dry-run to get this path without effectively doing the changes (can also be used to validate the arguments).
Example:
$ streamdeckfs create-var ~/streamdeck-data/MYDECKSERIAL -p spotify -v ALBUM -c value Homework
/home/twidi/streamdeck-data/MYDECKSERIAL/PAGE_60;name=spotify/VAR_ALBUM;value=Homework
copy-var
Will make a copy of a variable, in the same key or another for a key variable, or in the same page or another for a page variable
streamdeckfs copy-var SERIAL_DIRECTORY -p PAGE -k KEY -v VAR -tp TO_PAGE -tk TO_KEY -tv TO_VAR -c OPTION1 VALUE1 -c OPTION2 VALUE2
with:
PAGE: the number or name of the page where to find the variable to copy. Do not pass this argument for a deck variableKEY: the name of the key where to find the variable to copy, or its "position" (ROW,COL, for example1,2for second key of first row). Do not pass this argument for a page or deck variableVAR: the name of the variable to copy (can only contains capital letters fromAtoZ, digits from0to9, and the character_, cannot start by number or_, and cannot end by_). May be prefixed byVAR_.TO_PAGE: the number or the name of the page where to copy the variable (-tpis for--to-page). Optional: if not given, will use the page of the variable to copy. Do not pass this argument for a deck variableTO_KEY: the name of the key where to copy the variable (-tkif for--to-key). Optional: if not given, will use the key at the same position of the one containing the variable to copy. Do not pass this argument for a page or deck variableTO_VAR: the name of the new variable (can only contains capital letters fromAtoZ, digits from0to9, and the character_, cannot start by number or_, and cannot end by_) Optional: if not given, will use the same name as the variable to copy. May be prefixed byVAR_.OPTION: one option to updateVALUE: the value for the option
You can have many -c OPTION VALUE parts to set many configuration options. If the copy is in the same page/key, it is recommended to set a name that is different than the source variable.
This command returns the full path of the newly created variable. Use --dry-run to get this path without effectively doing the changes (can also be used to validate the arguments).
Example:
$ streamdeckfs copy-var ~/streamdeck-data/MYDECKSERIAL -p spotify -v ALBUM -tv ARTIST -c value 'Daft Punk'
/home/twidi/streamdeck-data/MYDECKSERIAL/PAGE_60;name=spotify/VAR_ARTIST;value=Daft Punk
move-var
Will move a variable to another key for a key variable, or to another page for a page variable
streamdeckfs move-var SERIAL_DIRECTORY -p PAGE -k KEY -v VAR -tp TO_PAGE -tk TO_KEY -tv TO_VAR -c OPTION1 VALUE1 -c OPTION2 VALUE2
with:
PAGE: the number or name of the page where to find the variable to move. Do not pass this argument for a deck variableKEY: the name of the key where to find the variable to move, or its "position" (ROW,COL, for example1,2for second key of first row). Do not pass this argument for a page or deck variableVAR: the name of the variable to move (can only contains capital letters fromAtoZ, digits from0to9, and the character_, cannot start by number or_, and cannot end by_). May be prefixed byVAR_.TO_PAGE: the number or the name of the page where to move the variable (-tpis for--to-page). Optional: if not given, will stay in the same page. Do not pass this argument for a deck variableTO_KEY: the name of the key where to move the variable (-tkif for--to-key). Optional: if not given, will use the key at the same position of the one containing the variable to move. Do not pass this argument for a page or deck variableTO_VAR: the name of the moved variable (can only contains capital letters fromAtoZ, digits from0to9, and the character_, cannot start by number or_, and cannot end by_) Optional: if not given, will use the same name as the variable to move. May be prefixed byVAR_.OPTION: one option to updateVALUE: the value for the option
You can have many -c OPTION VALUE parts to set many configuration options.
This command returns the new full path of variable. Use --dry-run to get this path without effectively doing the changes (can also be used to validate the arguments).
Example:
$ streamdeckfs move-var ~/streamdeck-data/MYDECKSERIAL -p spotify -v ALBUM -tv ARTIST -c value 'Daft Punk'
/home/twidi/streamdeck-data/MYDECKSERIAL/PAGE_60;name=spotify/VAR_ARTIST;value=Daft Punk
delete-var
Will delete the asked variable file.
streamdeckfs delete-var SERIAL_DIRECTORY -p PAGE -k KEY -v VAR
with:
PAGE: the number or name of the page where to find the variable to delete. Do not pass this argument for a deck variableKEY: the name of the key where to find the variable to delete, or its "position" (ROW,COL, for example1,2for second key of first row). Do not pass this argument for a page or deck variableVAR: the name of the variable to delete (can only contains capital letters fromAtoZ, digits from0to9, and the character_, cannot start by number or_, and cannot end by_). May be prefixed byVAR_.
This command returns the path of the deleted variable file. Use --dry-run to get this path without effectively doing the changes (can also be used to validate the arguments).
Example:
$ streamdeckfs delete-var ~/streamdeck-data/MYDECKSERIAL -p spotify -v ALBUM
Example configurations
You can find example configurations in the examples directory of the Git repository
Web renderer
By default, when executing the run command, decks are also accessible in the web browser via the http://0.0.0.0:1910 address, without any password.
Configuration
You can disable the webserver by passing --no-web option.
But if not, there are some options to change the behavior of the web server:
-
--web: allows to use a different address or port than the default onehttp://0.0.0.0:1910. You can pass:- a port, for example
--web 8080will use the addresshttp://0.0.0.0:8080. - an ip address + port can be passed, for example
--web 127.0.0.1:8080 - a fully qualified domain name + port, for example
--web mycomputer.local:8080
- a port, for example
-
--web-password: it's a flag that will ask on the prompt for a password that will be required to access the decks in the browser -
--ssl-cert: path to the SSL certificate file to activate https -
--ssl-key: path to the SSL private key file used to generate the certificate
To generate a local self signed certificate you can use this command:
openssl req -new -newkey rsa:4096 -days 3650 -nodes -x509 -subj "/C=<Country Code>/ST=<State>/L=<City>/O=<Organization>/CN=<Common Name>" -keyout certificate.key -out certificate.crt
Don't forget to replace values between < and > (including the < and >)
Usage
When going to the address (displayed at the beginning of the output of the run command), a list of all StreamDecks will be displayed. Clicking on one will go to the deck page.
Keys will be visually updated on the web page when they are updated on the real deck. Press/release events from the deck are visible by a white border arround the pressed key.
And of course it's possible to click/tap a key on the web browser to simulate a click on the deck. To simulate a long press on the deck, simply keep the click/tag as long as you want.
If a password is asked, you'll be redirected to a page to enter it, then if ok you'll be redirected back to the wanted page.
Not connected decks are correctly handled in the browser so it's possible to plug/unplug decks without affecting the web usage.
To display a deck "full screen", double click on an "empty" area (i.e., not on a key).
Virtual decks (aka "web decks")
It's possible to use streamdeckfs without real Stream Decks! Or to create virtual ones in addition to the one(s) you already have. We call these virtual decks "web decks".
To create a "web deck", use the command create-web-deck:
streamdeckfs create-web-deck BASE_DIRECTORY -s SERIAL -r NB_ROWS -c NB_COLS
with:
DIRECTORY: the directory in which to create the configuration directory for the web deckSERIAL: the serial number for the new web deck. It's a string composed of 12 characters (it must only contains capital letters fromAtoZ, digits from0to9), starting with aW(serial numbers of real Stream Decks have the same format, except the first letter that depends on the model)NB_ROWS: number of rows for the web deck. From 1 to 8NB_COLS: number of cols for the web deck. From 1 to 12
To change the number of rows or cols of an already created web deck, repeat the command with the new values, the rest of the configuration (pages, keys...) will be untouched.
Once the web deck created, you can use the make-dirs command like this:
streamdeckfs make-dirs SERIAL BASE_DIRECTORY --pages PAGES
Release history Release notifications | RSS feed


Download files
Download the file for your platform. If you're not sure which to choose, learn more about installing packages.
Source Distributions
Built Distribution
Filter files by name, interpreter, ABI, and platform.
If you're not sure about the file name format, learn more about wheel file names.
Copy a direct link to the current filters
File details
Details for the file streamdeckfs-1.8.2-py3-none-any.whl.
File metadata
- Download URL: streamdeckfs-1.8.2-py3-none-any.whl
- Upload date:
- Size: 11.1 MB
- Tags: Python 3
- Uploaded using Trusted Publishing? No
- Uploaded via: twine/3.4.1 importlib_metadata/4.5.0 pkginfo/1.7.0 requests/2.25.1 requests-toolbelt/0.9.1 tqdm/4.61.0 CPython/3.9.5
File hashes
| Algorithm | Hash digest | |
|---|---|---|
| SHA256 |
21b5ecc426893f5487d4a53f549fe16775ef2f6a9f051444a00d1b54ec7fb8f1
|
|
| MD5 |
4b4a2c50e938b722aeec10212bef1c5e
|
|
| BLAKE2b-256 |
77d78b3198108800081f65b95ba6783dac293185c79307918ed5a6690744534e
|


