
Streamlit Keycloak
Keycloak user authentication and single sign-on inside your Streamlit app
Installation
pip install streamlit-keycloak
Usage
Provide the URL to your Keycloak server, the realm and client and the component will perform the authentication when the app is rendered. First it will attempt to silently authenticate using single sign-on. If this fails, a dialog will appear from which you can open a popup to the Keycloak login page.
When authentication is successful, the component returns a dataclass containing the authentication state, an access token, which can be used to access other restricted resources, a refresh token and a user info object, containing e.g. the username and group memberships. If your configuration provides refresh tokens, the access token can be automatically refreshed when it expires.
So far the component has not been tested in a wide variety of environments. So if you’re also using Keycloak and would benefit from less logging in and easy access to tokens, give this a go and share your experience. Feedback is always welcome.
Frontend authentication like this can only be done with clients that have their access type set to ‘public’ as their is no way to securely provide the client secret from the browser.
Examples
from dataclasses import asdict
from streamlit_keycloak import login
import streamlit as st


def main():
    st.subheader(f"Welcome {keycloak.user_info['preferred_username']}!")
    st.write(f"Here is your user information:")
    st.write(asdict(keycloak))


st.title("Streamlit Keycloak example")
keycloak = login(
    url="http://localhost:8080",
    realm="myrealm",
    client_id="myclient",
)

if keycloak.authenticated:
    main()
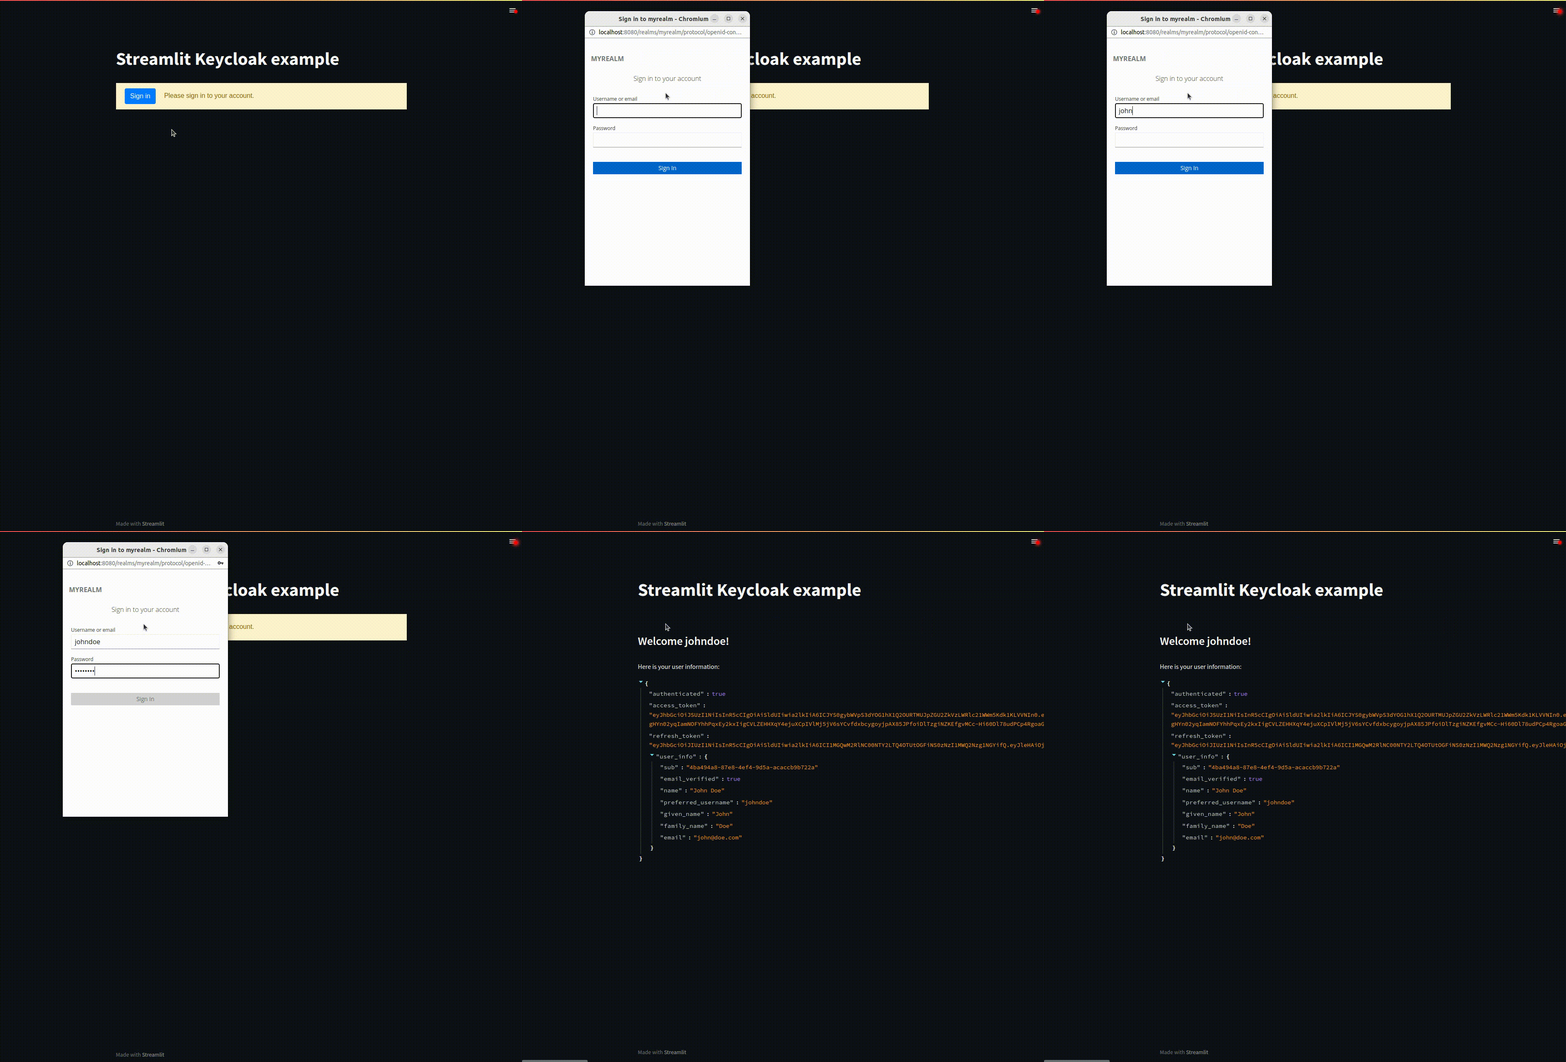
By default your access tokens will be refreshed when they expire. Refreshing the tokens will cause your app to be rerendered. If this is not desired, this behaviour can be disabled using the auto_refresh parameter.
keycloak = login(
    url="http://localhost:8080",
    realm="myrealm",
    client_id="myclient",
    auto_refresh=False
)
Depending on your Keycloak configuration, you might want to specify additional parameters to the Keycloak. These can be provided using the init_options parameter and will be passed to the init function in the frontend. See the keycloak-js documentation for details.
keycloak = login(
    url="http://localhost:8080",
    realm="myrealm",
    client_id="myclient",
    init_options={
        "checkLoginIframe": False
    }
)
All text in the login dialog can be customized using the custom_labels parameter, by providing a dictionary with specific keys set.
keycloak = login(
    url="http://localhost:8080",
    realm="myrealm",
    client_id="myclient",
    custom_labels={
        "labelButton": "Sign in",
        "labelLogin": "Please sign in to your account.",
        "errorNoPopup": "Unable to open the authentication popup. Allow popups and refresh the page to proceed.",
        "errorPopupClosed": "Authentication popup was closed manually.",
        "errorFatal": "Unable to connect to Keycloak using the current configuration."
    }
)
Getting started with Keycloak
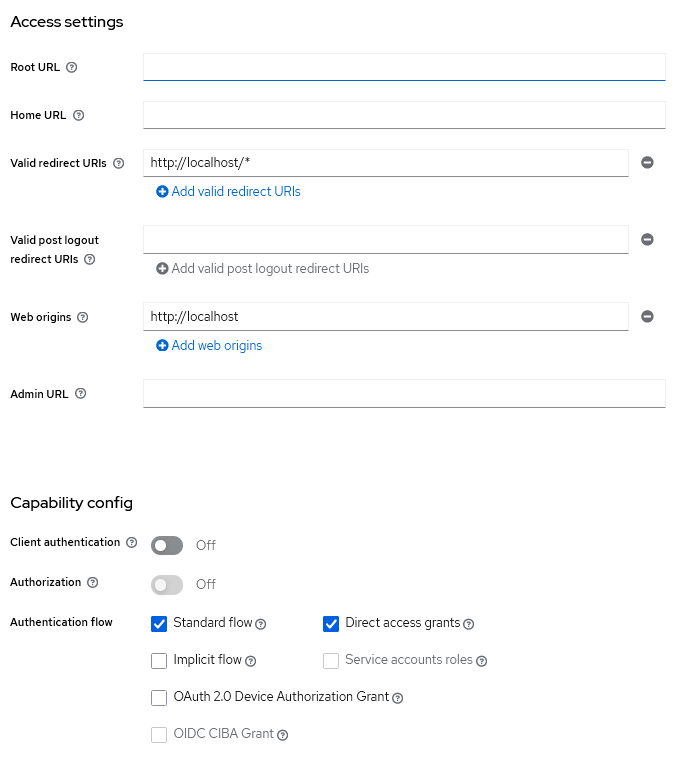
Setting up your own Keycloak instance can be tricky. This guide should get you started.
TLDR
- Create your Keycloak instance
- Create a realm
- Create a client
- Keep client authentication disabled
- Set a valid redirect uri, e.g. https://hostname:port/*
- Set valid web origins, e.g. https://hostname
- Create a user
- Set a password for it
A minimum configuration should look something like this:
Credits
Many thanks to the authors of the streamlit-auth0 and auth0-spa-js packages for inspiring a large part of the approach.
And thanks to 93degree for the Svelte component template, which is awesome.
1 maintainer

Metadata
1 maintainer
Release files for streamlit-keycloak-zpl 1.1.2
For a detailed explanation of source distributions (sdists) and built distributions (wheels), please see the package formats documentation.
Source distribution (sdist)
| File | Size | Uploaded | |
|---|---|---|---|
| streamlit_keycloak_zpl-1.1.2.tar.gz | 359.2 kB | Details |
Built distribution (wheel)
| File | Interpreter | ABI | Platform | Reset |
|---|---|---|---|---|
| streamlit_keycloak_zpl-1.1.2-py3-none-any.whl | Python 3 | none | any | Details |
Total release size: 720.9 kB
Release files / streamlit_keycloak_zpl-1.1.2.tar.gz
| Download URL | streamlit_keycloak_zpl-1.1.2.tar.gz |
|---|---|
| Size | 359.2 kB |
| Tags | Source |
|
SHA-256 checksum How to use checksums |
fb70723e14cfaf3aaee58b2fdb9da162a7762748e7da19c5db918f9be38593e3
|
|
BLAKE2b-256 checksum How to use checksums |
58826d8f5db4c391362ba2ddf31abc5667763bcd09416926d8b8770ad710456e
|
| Upload date | |
|
Uploaded using Trusted Publishing? What is trusted publishing? |
No |
| Uploaded via |
twine/6.1.0 CPython/3.12.9
|
Release files / streamlit_keycloak_zpl-1.1.2-py3-none-any.whl
| Download URL | streamlit_keycloak_zpl-1.1.2-py3-none-any.whl |
|---|---|
| Size | 361.7 kB |
| Tags | Python 3 |
|
SHA-256 checksum How to use checksums |
059f518cafed53b4a43c3beaffca7aefb0fbdb57aa88e1c3832a65c07e5cacc8
|
|
BLAKE2b-256 checksum How to use checksums |
4715764b4c88c72e61bd9060eab9397f514a3f850b7ebf650f354c51890d2bc5
|
| Upload date | |
|
Uploaded using Trusted Publishing? What is trusted publishing? |
No |
| Uploaded via |
twine/6.1.0 CPython/3.12.9
|













