
Automate your Streptomyces genome engineering workflows 🚀







StreptoCAD is an open-source software toolbox designed to automate and streamline genome engineering in Streptomyces. This tool supports various CRISPR-based techniques and gene overexpression methods, simplifying the genetic engineering process.
You can find it here: streptocad.bioengineering.dtu.dk
Features
- Automated Primer and sgRNA Design: Automatically generates necessary DNA primers and sgRNA sequences for your target genes.
- Plasmid Assembly Simulation: Simulates plasmid assemblies and the resulting genomic modifications.
- Six Design Workflows: Supports workflows including overexpression library construction, base-editing, and in-frame deletions using CRISPR-Cas9 and CRISPR-Cas3 systems.
- FAIR Compliance: Ensures data is Findable, Accessible, Interoperable, and Reusable, promoting reproducibility and ease of data management.
- User-Friendly: Suitable for both experienced users and beginners, facilitating collaboration and standardized workflows.
Why StreptoCAD?
Streptomyces is a prolific source of novel bioactive molecules, but current genetic engineering methods are inefficient and time-consuming. StreptoCAD addresses these challenges by automating the design process, reducing errors, and speeding up the development of genetically modified strains. This tool transforms complex genetic engineering tasks into straightforward, reproducible processes, enabling faster scientific advancements and discovery of new natural products.
For more details and an in-depth discussion of our approach, check out our bioXiv paper.
Workflows
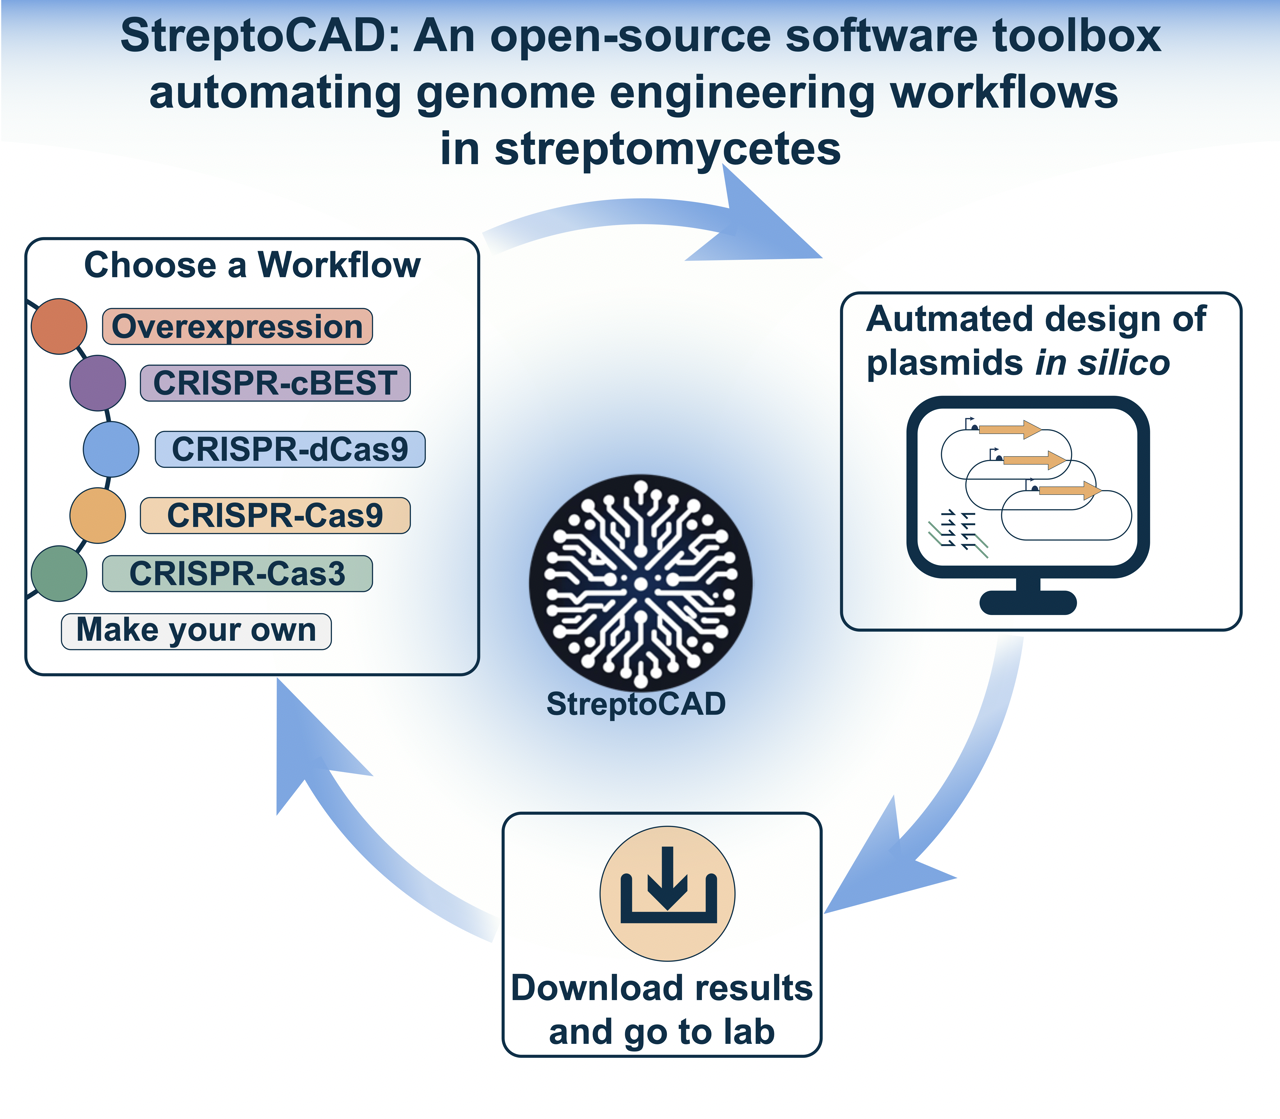
StreptoCAD offers six distinct workflows for various genetic engineering tasks:
-
Overexpression Plasmid Library Construction:
- Can be used to overexpress target proteins - we experimentally validated this by overexpressing regulators.
-
Single CRISPR-BEST Plasmid Generation:
- Base editing system in the genome of Streptomyces using single sgRNA for targeting.
-
Multiplexed CRISPR-BEST Plasmid Generation:
- Multiplexed base-editing in the genome for high-throughput genetic studies.
-
- Uses transcriptional interference to reversibly inactivate genes for functional studies.
-
- Can be used for random-sized or in-frame deletions with Cas9
-
- Can be used for random-sized or in-frame deletions with Cas3
Experimental Validation
StreptoCAD's efficiency and user-friendliness were validated by designing and constructing overexpression strains in Streptomyces Göe40/10 in just eight weeks. This highlights the tool's capability to accelerate genome engineering projects.
Future Developments
Future expansions will include additional genome engineering tools and integration with laboratory robotics systems for end-to-end automation, further enhancing the capabilities and efficiency of StreptoCAD.
Get Started
Visit streptocad.bioengineering.dtu.dk to try StreptoCAD, access documentation, and join the community of users and contributors working to advance Streptomyces research.
Use StreptoCAD as a Python library
The StreptoCAD toolbox is available on PyPI for Python 3.11 and 3.12:
pip install streptocad
The workflows can then be scripted directly. Here is a complete example that finds and filters sgRNAs for a gene with CRISPR-Cas9:
from streptocad.sequence_loading.sequence_loading import load_and_process_genome_sequences
from streptocad.crispr.guideRNAcas3_9 import SgRNAargs, extract_sgRNAs

genome = load_and_process_genome_sequences("Streptomyces_coelicolor_A3_chromosome.gb")[0]

args = SgRNAargs(
    dseqrecord=genome,
    locus_tag=["SCO5087"],   # the gene(s) to target
    cas_type="cas9",         # or "cas3"
    step=["find", "filter"], # find candidates, then apply the filters below
    gc_upper=0.8,            # drop guides above 80% GC
    gc_lower=0.3,            # drop guides below 30% GC
    off_target_seed=13,      # PAM-adjacent bases used as the off-target seed
)

sgrnas = extract_sgRNAs(args)
print(sgrnas.head(3))
This returns a pandas.DataFrame of candidate guides, ranked, with the information you
need to choose between them:
strain_name locus_tag  gene_loc  sgrna_strand  sgrna_loc   gc  pam                 sgrna  off_target_count
NC_003888.3   SCO5087   5529801            -1         26 0.80  CGG  TCCACCGGCGCCGCGTCCAG                 0
NC_003888.3   SCO5087   5529801             1       1189 0.80  TGG  GCTGGGCGCGATCGGCTCGC                 0
NC_003888.3   SCO5087   5529801             1       1181 0.75  CGG  GGCCACTCGCTGGGCGCGAT                 0
From there, streptocad.crispr.crispr_best and streptocad.cloning take the selected
guides through base-editing design and plasmid assembly. The
workflow notebooks
show each of the six workflows end to end.
The PyPI package contains the library only; to run the web app, follow the steps below.
Want to run StreptoCAD locally?
StreptoCAD uses uv to manage its environment. uv.lock
records the exact versions that CI tests against, so this gets you the same environment
the project is developed and tested in.
1. Install uv
curl -LsSf https://astral.sh/uv/install.sh | sh
On Windows, or for other installation methods, see the uv installation guide. You do not need to create a virtual environment or install Python yourself — uv handles both.
2. Install the dependencies
uv sync --group app
This creates .venv and installs the exact locked versions. Add more groups as needed:
--group dev for the test suite, --group notebooks for Jupyter, --group docs for the
documentation.
3. Run the application
uv run --group app python web_app/application.py
Follow the URL your terminal prints. To run the test suite instead:
uv run --group dev pytest
Tests marked integration call the live NEB melting-temperature API and are skipped by
default; run them with uv run --group dev pytest -m integration.
Alternatively, you can run the workflows as Jupyter notebooks with
uv sync --group notebooks.
Prefer conda or plain pip?
requirements.txt is generated from uv.lock and pins the full transitive dependency
set used for the Docker image, so it works as a conventional requirements file:
conda create --name streptocad python=3.11
conda activate streptocad
pip install -r requirements.txt
python web_app/application.py
Do not edit requirements.txt by hand — regenerate it with the command in its header.
If you only want the library rather than the web app, pip install streptocad is the
better route.
Running the StreptoCAD App via Docker
To run the StreptoCAD application using Docker, follow these steps:
1. Build the Docker Image
First, build the Docker image from the Dockerfile located in the root of the project:
docker build -t streptocad .
2. Run the Docker Container
Once the image is built, run the container:
docker run -d -p 8050:8050 streptocad
This will start the StreptoCAD application, exposing it on port 8050 of your local machine.
3. Open the application
The container is already running the app, so just open:
http://localhost:8050
Use docker logs -f <container-id> to follow its output, and docker stop <container-id>
to stop it.
Building for AWS: images built on Apple Silicon default to arm64 and will not run on App Runner. Build with
docker build --platform linux/amd64 -t streptocad .for deployment.
Making Your Own Workflow
StreptoCAD is designed to be modular and user-extensible. We’ve created a comprehensive guide to help you add your own custom workflows to the application. This guide covers:
- Creating new frontend components (tabs)
- Developing backend callback functions
- Writing tests
- Integrating your changes into the main app via GitHub
You can find the step-by-step guide here:
👉 Integrating New Workflows into StreptoCAD
Whether you want to adapt StreptoCAD for your research needs or contribute to the community, this documentation walks you through every stage of the process, including code examples and best practices.
If you need help:
- Check out the additional resources and documentation in the docs folder.
- Open an issue on GitHub or contact the development team.
We encourage all users to contribute and help make StreptoCAD even more powerful and versatile!
License
StreptoCAD is open-source and licensed under the MIT License.
Contact
For questions or contributions, please contact luclev@dtu.dk.
1 maintainer

Metadata
1 maintainer
Release files for streptocad 1.1.0
For a detailed explanation of source distributions (sdists) and built distributions (wheels), please see the package formats documentation.
Source distribution (sdist)
| File | Size | Uploaded | |
|---|---|---|---|
| streptocad-1.1.0.tar.gz | 62.1 kB | Details |
Built distribution (wheel)
| File | Interpreter | ABI | Platform | Reset |
|---|---|---|---|---|
| streptocad-1.1.0-py3-none-any.whl | Python 3 | none | any | Details |
Total release size: 136.2 kB
Release files / streptocad-1.1.0.tar.gz
| Download URL | streptocad-1.1.0.tar.gz |
|---|---|
| Size | 62.1 kB |
| Tags | Source |
|
SHA-256 checksum How to use checksums |
c3230cfe8a9221aab8f86f14f9d4faae3a9ccf4dcff498735eb329b3be4cba02
|
|
BLAKE2b-256 checksum How to use checksums |
5860c6aca045c523532200abeffa3c9e2d768fe5daba5e1417ed4d106fdf4ad8
|
| Upload date | |
|
Uploaded using Trusted Publishing? What is trusted publishing? |
Yes |
| Uploaded via |
twine/7.0.0 CPython/3.13.14
|
Provenance
Provenance describes where a file came from. On PyPI, provenance is shared via attestations, which provide a verifiable record of the build or publishing details. View details, limitations and caveats.


PyPI Publish Attestation
PyPI verified that this artifact, at this checksum, originated from the publisher listed below.
Signed by GitHub Actions, verified by PyPI on Oct 8, 2026.
Transparency logRelease files / streptocad-1.1.0-py3-none-any.whl
| Download URL | streptocad-1.1.0-py3-none-any.whl |
|---|---|
| Size | 74.1 kB |
| Tags | Python 3 |
|
SHA-256 checksum How to use checksums |
1e900850cbada9bbf54b9125385be58f2922437ffdb7607f8635b9981705ee29
|
|
BLAKE2b-256 checksum How to use checksums |
30f05b65d6774c63d1f1bf1ab8655f9930008950a3846347d7814ae4a8a0ba9b
|
| Upload date | |
|
Uploaded using Trusted Publishing? What is trusted publishing? |
Yes |
| Uploaded via |
twine/7.0.0 CPython/3.13.14
|
Provenance
Provenance describes where a file came from. On PyPI, provenance is shared via attestations, which provide a verifiable record of the build or publishing details. View details, limitations and caveats.
PyPI Publish Attestation
PyPI verified that this artifact, at this checksum, originated from the publisher listed below.
Signed by GitHub Actions, verified by PyPI on Oct 8, 2026.
Transparency log













