School-agnostic lib for implementing Student Success Tool workflows.

Project description
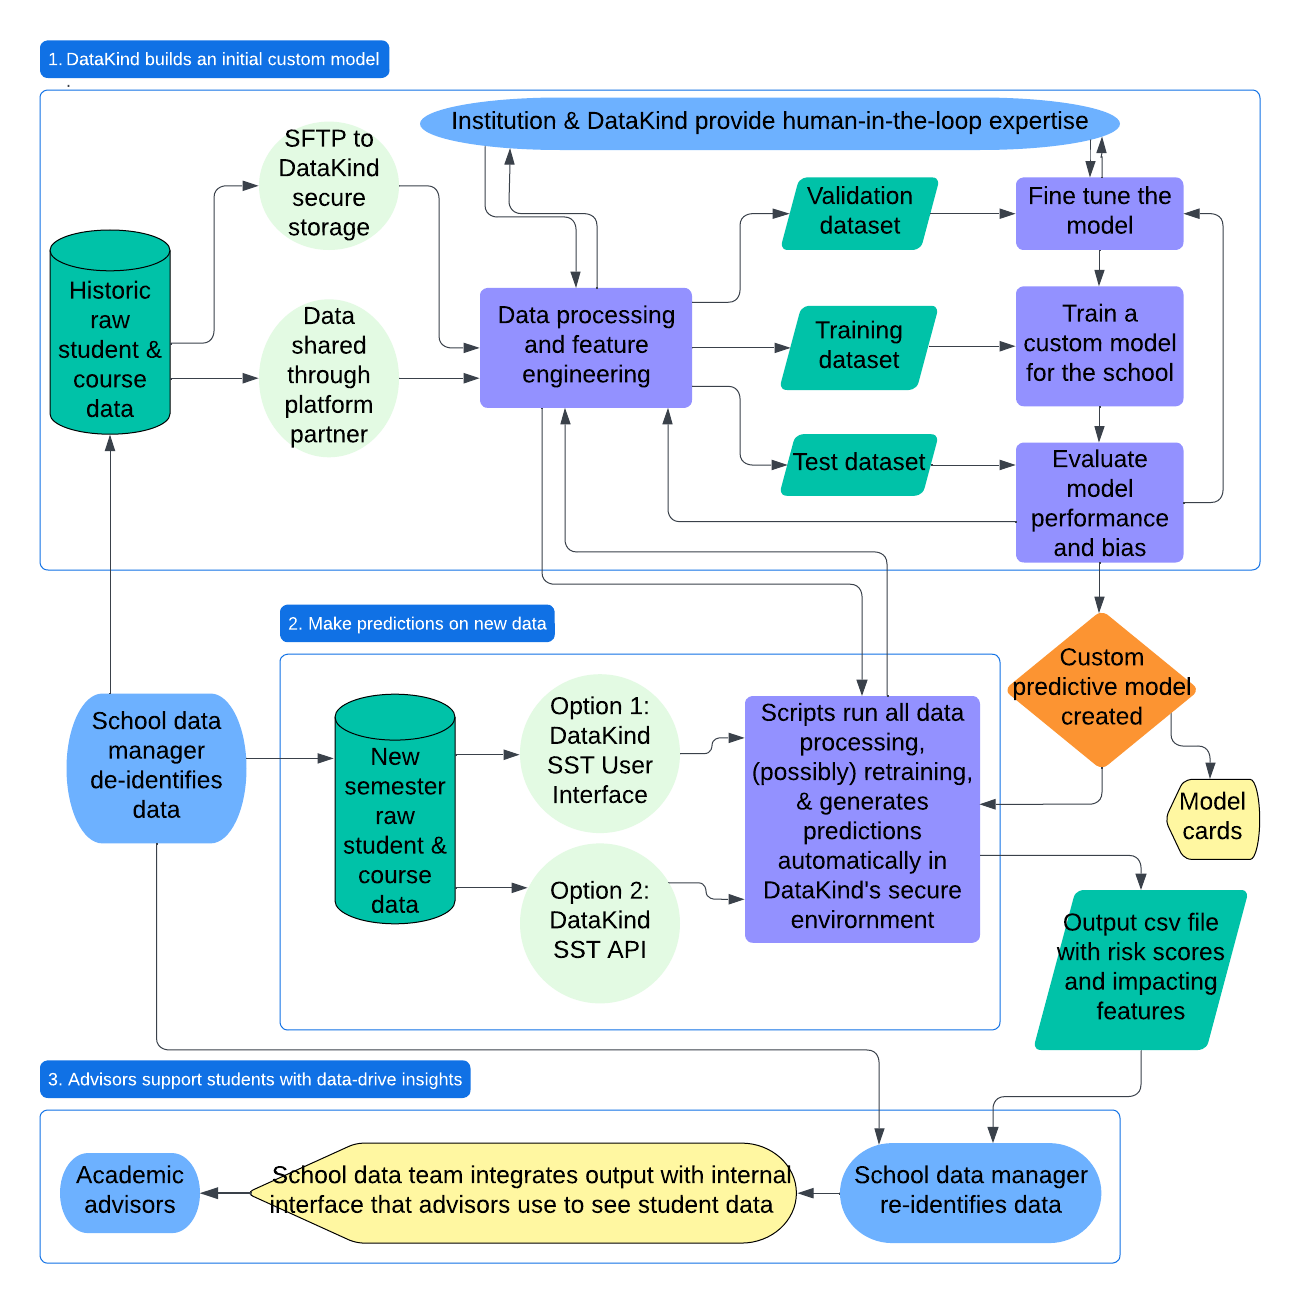
DataKind's Student Success Tool (SST)
Customized and easily actionable insights for data-assisted advising, at no cost
Data-assisted advising helps advisors use their limited time to more efficiently identify and reach out to those most in need of help. Using the Student Success Tool to implement data-assisted advising, John Jay College has reported a 32% increase in senior graduation rates in two years via their CUSP program. Based on the success of this implementation, DataKind is supported by Google.org to develop this solution with additional postsecondary institutions, at no institutional cost. This repo is where the google.org fellows team will collaborate with DataKind to develop and ultimately share the open source components of the tool.
DataKind's Product Principles
- Transparent: Our features and models will be openly shared with the institution, so you can know exactly what variables are leading to identifying those student most at risk of non graduation. Our end-to-end tool code will be openly shared in this github repo.
- Dedicated to bias reduction: We use bias-reducing techniques and regularly review our implementations for fairness and equity.
- Humans in the loop by design: Our interventions are designed to be additive to the student experience, and all algorithms are implemented through human actors (advisors).
Model Training and Prediction Workflow
What's in this repo?
Current PDP pipeline code: to be built into an actual installable python package
- Base schema: defines the standard data schema for PDP schools, with no customization
- Constants: defined for all schools
- Dataio: ingests the PDP data and restructures it for our workflow
- Features: subpackage for each grouping of features with a function that takes school customization arguments and adds the features to the data you give it as new columns.
- EDA: produces exploratory visualizations, summary statistics, and coorelation analysis for features
- Targets: defines and filters the data based on the student population, modeling checkpoint, and outcome variable
- Dataops: other functions frequently used across the process
- Modeling: AutoML.py is the main code that can be used for running and evaluating models, configured with parameters accepted from the config.yaml
- Tests: unit tests, to be built out into full unit testing suite (possibly fellows can help with this to get us set up for open source)
- Synthetic_data: Code for creating fake data for testing purposes
Contributing
Please read the CONTRIBUTING to learn how to contribute to the tool development.
Setup
local machine
- Install
uv(instructions here). - Install Python (instructions here). When running on Databricks, we're constrained to Python 3.11-3.12:
uv python install 3.11 - Install this package:
uv pip install -e .
databricks notebook
- Connect notebook to a cluster running Databricks Runtime 15.4 LTS or 16.x.
- Run the
%pipmagic command, pointing it at one of three places:- a local workspace directory:
%pip install ../../../student-success-tool/ - a GitHub repo (for a specific branch):
%pip install git+https://github.com/datakind/student-success-tool.git@develop - public PyPI:
%pip install student-success-tool == x.y.z
- a local workspace directory:
- Restart Python:
dbutils.library.restartPython()or%restart_python
Development
- Run unit tests:
uv run python -m pytest [ARGS](docs) - Run code linter:
uv tool run ruff check [ARGS](docs) - Run code formatter:
uv tool run ruff format [ARGS](docs)
Package Management
modifying dependencies
Package dependencies are declared in pyproject.toml, either in the project.dependencies array or in the dependency_groups mapping, where we also have dev-only dependencies; dependencies are managed using the uv tool.
- Manually add/remove/update dependencies by editing
pyproject.tomldirectly, or leverageuv'sadd/removecommands, as described here - Ensure that entries are formatted according to the PyPA dependency specifiers standard
- Once all dependencies have been modified, resolve them into the
uv.locklockfile by running theuv lockcommand, as described here - Optionally, sync your local environment with the new dependencies via
uv sync - If possible, submit a PR for the dependency changes only, rather than combining them with new features or other changes
Note: Since student_success_tool is a "library" (in Python packaging parlance), it's generally recommended to be permissive when setting dependencies' version constraints: better to set a safe minimum version and a loose maximum version, and leave tight version pinning to "application" packages.
releases
- Ensure that all changes (features, bug fixes, etc.) to be included in the release have been merged into the
developbranch. - Create a new feature branch based off
developthat includes three release-specific changes:- bump the
project.versionattribute in the package'spyproject.tomlfile to the desired version; follow SemVer conventions - add an entry in
CHANGELOG.mdfor the specified version, with a manually-curated summary of the changes included in the release, optionally including call-outs to specific PRs for reference - update the version in the templates and pipelines
- bump the
- Merge the above PR into
develop, then open a new PR to merge all changes indevelopinto themainbranch; merge it. Check that main is ahead by 0 from develop. If it is ahead of dev, then merge the main branch back into develop. - Go to the GitHub repo's Releases page, then click the "draft a new release" button
- choose a tag; it should be formatted as "v[VERSION]", for example "v0.2.0"
- choose
mainas the target branch - enter a release title; it could be as simple as "v[VERSION]"
- copy-paste the changelog entry for this version into the "describe this release" text input
- click the "publish release" button
- Check the repo's GitHub actions to ensure that the
publishworkflow runs, and once it completes, check the package's PyPI page to ensure that the new version is live
Et voilà, a new version has been released! :tada:
Release history Release notifications | RSS feed


Download files
Download the file for your platform. If you're not sure which to choose, learn more about installing packages.
Source Distribution
Built Distribution
Filter files by name, interpreter, ABI, and platform.
If you're not sure about the file name format, learn more about wheel file names.
Copy a direct link to the current filters
File details
Details for the file student_success_tool-0.3.4.tar.gz.
File metadata
- Download URL: student_success_tool-0.3.4.tar.gz
- Upload date:
- Size: 426.4 kB
- Tags: Source
- Uploaded using Trusted Publishing? No
- Uploaded via: twine/6.1.0 CPython/3.12.9
File hashes
| Algorithm | Hash digest | |
|---|---|---|
| SHA256 |
f28c0984b745c9e23aacf150d4706473d139833d48e8ea876cff102b94fce7ce
|
|
| MD5 |
d54552bb16bc43a9290d860252aa9351
|
|
| BLAKE2b-256 |
622f965c401992830bb40f9db29704cbae8b56224f4dbfd28b769e3b38ff3dbc
|
File details
Details for the file student_success_tool-0.3.4-py3-none-any.whl.
File metadata
- Download URL: student_success_tool-0.3.4-py3-none-any.whl
- Upload date:
- Size: 191.6 kB
- Tags: Python 3
- Uploaded using Trusted Publishing? No
- Uploaded via: twine/6.1.0 CPython/3.12.9
File hashes
| Algorithm | Hash digest | |
|---|---|---|
| SHA256 |
e79c6bb235c5c9d7c3eec8a8280186291239bdd3ab236abf1e391f3e9a2220f5
|
|
| MD5 |
8e4f3d34f7c05e0e489306b8396f497a
|
|
| BLAKE2b-256 |
e731c43b13ca0aa316c7b725b1dab2242803caacb16a2f0575871b4c6d0567a3
|


