Easy menu building for SwiftBar (... and xbar)

Project description
swiftbarmenu
✨ Easy menu building for SwiftBar (... and xbar).
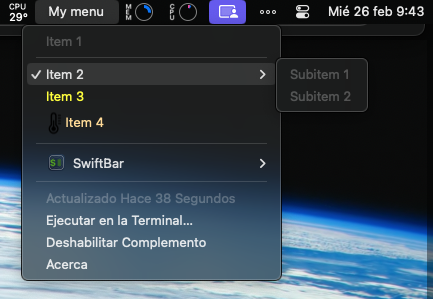
Transform this...
from swiftbarmenu import Menu

m = Menu('My menu')
m.add_item('Item 1')
item2 = m.add_item('Item 2', sep=True, checked=True)
item2.add_item('Subitem 1')
item2.add_item('Subitem 2')
m.add_link('Item 3', 'https://example.com', color='yellow')
m.add_item(':thermometer: Item 4', color='orange', sfcolor='black', sfsize=20)

m.dump()
Into this...
Installation
pip install swiftbarmenu
Check out uv!
Usage
This module offers the following features:
- Menu to display SwiftBar menus
- Notifications to show notifications from a SwiftBar plugin
- Persistence to store and load data for a SwiftBar plugin
Check out the features through basic examples below.
Menu
Basic menu
>>> from swiftbarmenu import Menu

>>> m = Menu('My menu')
>>> m.add_item('Item 1')
Item 1
>>> m.add_item('Item 2')
Item 2
>>> m.dump()
My menu
---
Item 1
Item 2
Added items are instances of MenuItem:
>>> from swiftbarmenu import MenuItem

>>> m = Menu('My menu')
>>> item = m.add_item('Item 1')
>>> isinstance(item, MenuItem)
True
>>> item.text
'Item 1'
Multiple header
>>> from swiftbarmenu import Menu

>>> m = Menu('My menu')
>>> m.add_header('Header 2')
Header 2
>>> m.add_header('Header 3')
Header 3
>>> m.dump()
My menu
Header 2
Header 3
---
Add parameters
You can add multiple parameters:
>>> from swiftbarmenu import Menu

>>> m = Menu('My menu')
>>> item = m.add_item('Item 1', color='orange', size=18, checked=True)
>>> item
Item 1|color=orange size=18 checked=True

>>> m.dump()
My menu
---
Item 1|color=orange size=18 checked=True

>>> item.text
'Item 1'
>>> item.params
{'color': 'orange', 'size': 18, 'checked': True}
>>>
Add links
>>> from swiftbarmenu import Menu

>>> m = Menu('My menu')
>>> m.add_link('GitHub', 'https://github.com')
GitHub|href=https://github.com
>>> m.dump()
My menu
---
GitHub|href=https://github.com
It's actually a shortcut for:
>>> m.add_item('GitHub', href='https://github.com')
GitHub|href=https://github.com
Nested items
>>> from swiftbarmenu import Menu

>>> m = Menu('My menu')
>>> item1 = m.add_item('Item 1')
>>> item1.add_item('Item 1.1')
Item 1.1
>>> item1.add_item('Item 1.2')
Item 1.2
>>> item1.add_item('Item 1.3')
Item 1.3
>>> m.dump()
My menu
---
Item 1
-- Item 1.1
-- Item 1.2
-- Item 1.3
Swift icons
You can add SF Symbols using :symbol: syntax
>>> from swiftbarmenu import Menu

>>> m = Menu('My menu')
>>> m.add_item('Sunny! :sun.max:')
Sunny! :sun.max:
>>> m.add_item('Cloudy! :cloud.rain:', sfcolor='blue')
Cloudy! :cloud.rain:|sfcolor=blue
>>> m.dump()
My menu
---
Sunny! :sun.max:
Cloudy! :cloud.rain:|sfcolor=blue
[!NOTE] The parameter
sfcoloronly colorizes sf symbols.
Search sf symbols here.
Add images
It's pretty simple to add an image (using path not base64) to a menu item:
>>> from swiftbarmenu import Menu

>>> m = Menu('My menu')

>>> m.add_image('tests/images/parrot.png', 'Parrot')
Parrot|image=iVBORw0KGgoAAAANSUhEUgAAABAAAAAQCAYAAAAf8/9hAAAAAXNSR0IArs4c6QAAAJZlWElmTU0AKgAAAAgABQEaAAUAAAABAAAASgEbAAUAAAABAAAAUgEoAAMAAAABAAIAAAExAAIAAAARAAAAWodpAAQAAAABAAAAbAAAAAAAAABgAAAAAQAAAGAAAAABd3d3Lmlua3NjYXBlLm9yZwAAAAOgAQADAAAAAQABAACgAgAEAAAAAQAAABCgAwAEAAAAAQAAABAAAAAA4+VmVAAAAAlwSFlzAAAOxAAADsQBlSsOGwAAAWRpVFh0WE1MOmNvbS5hZG9iZS54bXAAAAAAADx4OnhtcG1ldGEgeG1sbnM6eD0iYWRvYmU6bnM6bWV0YS8iIHg6eG1wdGs9IlhNUCBDb3JlIDYuMC4wIj4KICAgPHJkZjpSREYgeG1sbnM6cmRmPSJodHRwOi8vd3d3LnczLm9yZy8xOTk5LzAyLzIyLXJkZi1zeW50YXgtbnMjIj4KICAgICAgPHJkZjpEZXNjcmlwdGlvbiByZGY6YWJvdXQ9IiIKICAgICAgICAgICAgeG1sbnM6eG1wPSJodHRwOi8vbnMuYWRvYmUuY29tL3hhcC8xLjAvIj4KICAgICAgICAgPHhtcDpDcmVhdG9yVG9vbD53d3cuaW5rc2NhcGUub3JnPC94bXA6Q3JlYXRvclRvb2w+CiAgICAgIDwvcmRmOkRlc2NyaXB0aW9uPgogICA8L3JkZjpSREY+CjwveDp4bXBtZXRhPgqyyWIhAAACL0lEQVQ4Eb1TXUiTURh+ztn2bW7OmGa2DAIpt8ogRxS0q6Ifbyy88MIuEoIgUOznIop+WAWSlGHSTdBVN10s6C6Tlo0i+5EULFhQ68fSOecmubl92/fz9m06ZrHVXS8cznue93le3vc95wD/NpaApeYLYCpGZcXAPDazfXdr+ZrVJ3UNTofu2/eg7uvEQfZ8MJSPZ3f98kPBJ5bY2txltgp9ZC3Hu+YmsESiUuDsEHYN9hZ4RRLceIJagQynfcFVHY2j62EbTyFwqdvLjx2pd9bVTS0XZ/3fWuh/hQpZxFOjGa6EAqyYMqHlphsVcb7nx8O74xvs9sifCXge8BC4kkG/YIIrk9RKk7WV0iOjUjAZ148UE2e1uRl0+1AlPMJ1ZkR7fB6ILVQjGnbguJ/9XDvHO9inAQ0tbrkWLpzYcipkcvQOiW5EpVpY5JXomnyG+tTwyxc23T0DIQ2oUUllYUlSwjqJR8fS6Xm/3y8zELF9h/uuTNt3nuPVNWiqHEHDzOjbhfH3iZjZ6OYK6VUVcwCZGGNlinZQFDVGoJAsqUdzFfQccFsjnXcet22c2OGKDMSASSdzeSO3O9uc2hAkbZyzekG2iKroIKK9pNJ+znhjWlZalm6B+Pmx0OuLVfe3GeLJs2zzmavFO15EPR4Pt00HNqVFdXYRaaWyB2+8PgpcFunzrXV/E5eIEcsEetrpw7XhEoSS8NI7YGQAfdRYQyWZJQKFvyBRAEZZG9h/tl+8ztuKYW6OWAAAAABJRU5ErkJggg==
It's actually a shortcut for:
>>> m.add_item('Parrot', image='iVBORw0KGgoAAAANSUhEUgAAABAAAAAQCAYAAAAf8/9hAAAAAXNSR0IArs4c6QAAAJZlWElmTU0AKgAAAAgABQEaAAUAAAABAAAASgEbAAUAAAABAAAAUgEoAAMAAAABAAIAAAExAAIAAAARAAAAWodpAAQAAAABAAAAbAAAAAAAAABgAAAAAQAAAGAAAAABd3d3Lmlua3NjYXBlLm9yZwAAAAOgAQADAAAAAQABAACgAgAEAAAAAQAAABCgAwAEAAAAAQAAABAAAAAA4+VmVAAAAAlwSFlzAAAOxAAADsQBlSsOGwAAAWRpVFh0WE1MOmNvbS5hZG9iZS54bXAAAAAAADx4OnhtcG1ldGEgeG1sbnM6eD0iYWRvYmU6bnM6bWV0YS8iIHg6eG1wdGs9IlhNUCBDb3JlIDYuMC4wIj4KICAgPHJkZjpSREYgeG1sbnM6cmRmPSJodHRwOi8vd3d3LnczLm9yZy8xOTk5LzAyLzIyLXJkZi1zeW50YXgtbnMjIj4KICAgICAgPHJkZjpEZXNjcmlwdGlvbiByZGY6YWJvdXQ9IiIKICAgICAgICAgICAgeG1sbnM6eG1wPSJodHRwOi8vbnMuYWRvYmUuY29tL3hhcC8xLjAvIj4KICAgICAgICAgPHhtcDpDcmVhdG9yVG9vbD53d3cuaW5rc2NhcGUub3JnPC94bXA6Q3JlYXRvclRvb2w+CiAgICAgIDwvcmRmOkRlc2NyaXB0aW9uPgogICA8L3JkZjpSREY+CjwveDp4bXBtZXRhPgqyyWIhAAACL0lEQVQ4Eb1TXUiTURh+ztn2bW7OmGa2DAIpt8ogRxS0q6Ifbyy88MIuEoIgUOznIop+WAWSlGHSTdBVN10s6C6Tlo0i+5EULFhQ68fSOecmubl92/fz9m06ZrHVXS8cznue93le3vc95wD/NpaApeYLYCpGZcXAPDazfXdr+ZrVJ3UNTofu2/eg7uvEQfZ8MJSPZ3f98kPBJ5bY2txltgp9ZC3Hu+YmsESiUuDsEHYN9hZ4RRLceIJagQynfcFVHY2j62EbTyFwqdvLjx2pd9bVTS0XZ/3fWuh/hQpZxFOjGa6EAqyYMqHlphsVcb7nx8O74xvs9sifCXge8BC4kkG/YIIrk9RKk7WV0iOjUjAZ148UE2e1uRl0+1AlPMJ1ZkR7fB6ILVQjGnbguJ/9XDvHO9inAQ0tbrkWLpzYcipkcvQOiW5EpVpY5JXomnyG+tTwyxc23T0DIQ2oUUllYUlSwjqJR8fS6Xm/3y8zELF9h/uuTNt3nuPVNWiqHEHDzOjbhfH3iZjZ6OYK6VUVcwCZGGNlinZQFDVGoJAsqUdzFfQccFsjnXcet22c2OGKDMSASSdzeSO3O9uc2hAkbZyzekG2iKroIKK9pNJ+znhjWlZalm6B+Pmx0OuLVfe3GeLJs2zzmavFO15EPR4Pt00HNqVFdXYRaaWyB2+8PgpcFunzrXV/E5eIEcsEetrpw7XhEoSS8NI7YGQAfdRYQyWZJQKFvyBRAEZZG9h/tl+8ztuKYW6OWAAAAABJRU5ErkJggg==')
[!TIP] 💡 16x16 pixels is a nice size for menu images.
Add separators
A separator is a thin long line on the menu:
>>> from swiftbarmenu import Menu

>>> m = Menu('My menu')
>>> m.add_item('Item 1')
Item 1
>>> m.add_item('Item 2', sep=True)
Item 2
>>> m.add_item('Item 3')
Item 3
>>> m.dump()
My menu
---
Item 1
---
Item 2
Item 3
You can explicitly add a separator using:
>>> m.add_sep()
---
Add actions
Add action items to the Menu, when clicked a script will be invoked with the provided params:
>>> from swiftbarmenu import Menu

>>> m = Menu('My menu')
>>> m.add_action("Test action...", ["test"])
Test action...

>>> m.dump()
My menu
---
Test action...|bash=/usr/local/swiftbar_plugins/test_plugin.1h.py param0=test refresh=false terminal=false
[!NOTE] By default, this action will execute the current plugin script (if one is not specified using the
bashparameter) in background passing the provided parameters.
Custom script
Pass bash parameter to customize the script to be executed:
>>> from swiftbarmenu import Menu

>>> m = Menu('My menu')
>>> m.add_action("Echo action...", bash="/bin/echo", action_params=["test"])

>>> m.dump()
My menu
---
Echo action...|bash=/bin/echo param0=test refresh=false terminal=false
Nested actions
Action items can also be nested inside other Menu items:
>>> from swiftbarmenu import Menu

>>> m = Menu('My menu')
>>> item1 = m.add_item('Item 1')
>>> item1.add_action("Test action...", ["test"])

>>> m.dump()
My menu
---
Item 1
-- Test action...|bash=/usr/local/swiftbar_plugins/test_plugin.1h.py param0=test refresh=false terminal=false
Add "Refresh" action
Add a "Refresh..." action to the Menu, when clicked a refresh of the plugin will be triggered
>>> from swiftbarmenu import Menu

>>> m = Menu('My menu')
>>> m.add_action_refresh()
Refresh...
>>> m.add_action_refresh("Reload")
Reload
>>> m.add_action_refresh(sep=True)
Refresh...
>>> m.add_action_refresh("Reload", sep=True)
Reload

>>> m.dump()
My menu
---
Refresh...|refresh=true terminal=false
Reload|refresh=true terminal=false
---
Refresh...|refresh=true terminal=false
---
Reload|refresh=true terminal=false
[!NOTE] This action will only refresh the current plugin, not all installed plugins.
Access header and body
Within the menu, you can access the header and the body:
>>> from swiftbarmenu import Menu

>>> m = Menu('My menu')
>>> m.add_header('Header 2')
Header 2
>>> m.add_header('Header 3')
Header 3

>>> m.add_item('Item 1')
Item 1
>>> m.add_item('Item 2')
Item 2

>>> m.header
[My menu, Header 2, Header 3]
>>> m.body
[Item 1, Item 2]
You can also access items inside header and body:
>>> from swiftbarmenu import MenuItem

>>> m.header[0]
My menu
>>> isinstance(m.header[0], MenuItem)
True

>>> m.body[1]
Item 2
>>> isinstance(m.body[1], MenuItem)
True
Even with nested items:
>>> from swiftbarmenu import Menu

>>> m = Menu('My menu')

>>> item1 = m.add_item('Item 1')
>>> item1.add_item('Item 1.1')
Item 1.1
>>> item1.add_item('Item 1.2')
Item 1.2
>>> item1.add_item('Item 1.3')
Item 1.3

>>> item1[2]
Item 1.3
Clear items
You can clear whole menu:
>>> from swiftbarmenu import Menu

>>> m = Menu('My menu')
>>> m.add_header('Header 2')
Header 2
>>> m.add_header('Header 3')
Header 3
>>> m.add_item('Item 1')
Item 1
>>> m.add_item('Item 2')
Item 2

>>> m
My menu
Header 2
Header 3
---
Item 1
Item 2

>>> m.clear()
>>> m

>>> m.header
[]
>>> m.body
[]
You can also clear nested items for a certain item:
>>> from swiftbarmenu import Menu

>>> m = Menu('My menu')
>>> item1 = m.add_item('Item 1')
>>> item1.add_item('Item 1.1')
Item 1.1
>>> item1.add_item('Item 1.2')
Item 1.2
>>> item1.add_item('Item 1.3')
Item 1.3

>>> m
My menu
---
Item 1
-- Item 1.1
-- Item 1.2
-- Item 1.3

>>> item1.clear()

>>> m
My menu
---
Item 1
Notification
Basic usage
To create and show notifications from a SwiftBar plugin, do the following:
>>> from swiftbarmenu import Notification

>>> n = Notification("Title", "Subtitle", "Body", "https://example.com")

>>> n.show()
Notification(title='Title', subtitle='Subtitle', body='Body', href='https://example.com')

>>> n
Notification(title='Title', subtitle='Subtitle', body='Body', href='https://example.com')
[!NOTE] All parameters except for
titleare optional.
Silent notifications
To trigger notifications without sound, just pass the silent parameter to .show() method
>>> from swiftbarmenu import Notification

>>> n = Notification("Title", "Subtitle", "Body", "https://example.com")

>>> n.show(True) # pass True to show silently
Notification(title='Title', subtitle='Subtitle', body='Body', href='https://example.com')
Persistence
Basic usage
To store (and later load) data for a SwiftBar plugin, do the following:
>>> from swiftbarmenu import Persistence

>>> sample_data = {
    "data": "test",
    "nested": {
        "data1": "test",
        "data2": "test"
    }
}

>>> p = Persistence()
>>> p.save(sample_data)

>>> stored_data = p.load()
>>> stored_data
{'data': 'test', 'nested': {'data1': 'test', 'data2': 'test'}}

>>> p.clear()

>>> stored_data = p.load()
>>> stored_data
{}
[!NOTE]
.save()method supports adict[str, Any]as input and the data are stored using thepicklemodule internally.
Custom file name
To store (and later load) data for a SwiftBar plugin with a specific name, do the following:
>>> from swiftbarmenu import Persistence

>>> sample_data = {
    "data": "test",
    "nested": {
        "data1": "test",
        "data2": "test"
    }
}

>>> p = Persistence("example")
>>> p.save(sample_data)

>>> stored_data = p.load()
>>> stored_data
{'data': 'test', 'nested': {'data1': 'test', 'data2': 'test'}}

>>> p.clear()

>>> stored_data = p.load()
>>> stored_data
{}
Configuration
Basic usage
To manage configuration settings for a SwiftBar plugin, do the following:
>>> from swiftbarmenu import Configuration

>>> c = Configuration()
>>> c.set("api_key", "12345")
>>> c.set("refresh_interval", 60, type="int")
>>> c.set("notifications_enabled", True, type="bool")
>>> c.persist()

>>> api_key = c.get("api_key")
>>> interval = c.get("refresh_interval", type="int")
>>> notifications = c.get("notifications_enabled", type="bool")

>>> api_key
'12345'
>>> interval
60
>>> notifications
True
Check configuration existence
You can check if a configuration file already exists:
>>> from swiftbarmenu import Configuration

>>> c = Configuration()
>>> c.exists()
False

>>> c.persist()
>>> c.exists()
True
Loading configuration
You can load an existing configuration from file:
>>> from swiftbarmenu import Configuration

>>> c = Configuration(auto_load=False) # Disable configuration auto-loading
>>> c.load()  # Loads configuration from file if it exists

>>> # Configuration is now ready to use
>>> api_key = c.get("api_key")
>>> api_key
'12345'  # Value loaded from file
[!WARNING] The
load()method will be automatically invoked unless theauto_loadparameter is set toFalsewhen instantiating a newConfigurationinstance.
[!NOTE] The
load()method will silently continue if the configuration file doesn't exist yet. You can check if a value exists by providing a default value and comparing the result.
Sections
You can organize your configuration into sections:
>>> from swiftbarmenu import Configuration

>>> c = Configuration()
>>> api_section = c.section("API")
>>> api_section.set("key", "12345")
>>> api_section.set("endpoint", "https://api.example.com")

>>> ui_section = c.section("UI")
>>> ui_section.set("theme", "dark")
>>> ui_section.set("font_size", 14, type="int")

>>> c.persist()

>>> api_section.get("key")
'12345'
>>> ui_section.get("font_size", type="int")
14
Default values
You can provide default values when retrieving configuration:
>>> from swiftbarmenu import Configuration

>>> c = Configuration()
>>> value = c.get("nonexistent_key", default="default_value")
>>> value
'default_value'
Opening configuration file
You can open the configuration file in your default text editor:
>>> from swiftbarmenu import Configuration

>>> c = Configuration()
>>> c.open_editor()  # Opens in TextEdit by default

>>> c.open_editor("Visual Studio Code")  # Opens in VS Code
[!NOTE] Configuration files are stored in the plugin's data directory and use the INI file format. The file is automatically created when you call
.persist().
Development
To ensure a consistent and easy-to-set-up development environment, this project provides multiple options, including configuration for Dev Containers.
Using VS Code with Dev Containers (Local)
This method uses the .devcontainer/ configuration for a fully containerized environment managed by VS Code. It requires Docker Desktop and VS Code installed locally.
1. Prerequisites:
-
Install Docker Desktop and ensure it is running.
-
Install the Dev Containers extension for VS Code.
2. Steps:
-
Clone this repository
git clone git@github.com:sdelquin/swiftbarmenu.git

cd swiftbarmenu
-
Open the cloned folder in VS Code
code . -
VS Code should prompt you to "Reopen in Container". Click that button. (Alternatively, use the Command Palette:
Ctrl+Shift+PorCmd+Shift+Pand runDev Containers: Reopen in Container). -
VS Code will build the container (first time only) and reload the window connected to it.
3. Outcome:
You'll be inside the development container with Python 3.x and all dependencies pre-installed, ready for coding and testing with pytest and pytest-cov.
Using IntelliJ IDEA with Dev Containers (Local)
Modern versions of IntelliJ IDEA (especially Ultimate Edition) have built-in support for Dev Containers, allowing you to use the same .devcontainer/ configuration as VS Code.
1. Prerequisites:
-
Install Docker Desktop and ensure it is running.
-
Install IntelliJ IDEA (check JetBrains documentation for specific version/edition requirements for Dev Container support).
2. Steps:
-
Clone this repository
git clone git@github.com:sdelquin/swiftbarmenu.git

cd swiftbarmenu
-
Open the cloned repository folder as a project in IntelliJ IDEA.
-
IntelliJ may automatically detect the
devcontainer.jsonfile and offer to create the environment. Follow the IDE prompts. -
If not automatically detected, consult the official JetBrains documentation on Dev Containers for the specific steps to initiate the Dev Container environment for your version.
3. Outcome: IntelliJ IDEA will manage the containerized environment based on the .devcontainer/ configuration, providing consistency with other methods.
Using GitHub Codespaces (Remote)
This method runs the Dev Container configuration entirely in the cloud via GitHub.
1. Prerequisites:
- A GitHub account.
2. Steps:
-
Navigate to the repository on GitHub: https://github.com/sdelquin/swiftbarmenu
-
Click the green
<> Codebutton -> Codespaces tab. -
Click "Create codespace on main".
3. Outcome: A VS Code instance opens in your browser (or local VS Code) connected to the pre-configured Codespace environment.
Changelog
Releases use Semantic Versioning (<major>.<minor>.<patch>).
0.1.7
Released 2025-04-22
- Add Configuration management feature via pull request #5 (kudos to
@panz3r)
0.1.6
Released 2025-04-16
- Add Persistence feature via pull request #4 (kudos to
@panz3r)
0.1.5
Released 2025-04-09
- Add Notification functionality via pull request #3 (kudos to
@panz3r)
0.1.4
Released 2025-04-08
- Add development tooling (Dev Containers, Dependabot, GH Actions) via pull request #1 (kudos to
@panz3r). - Add action items via pull request #2 (kudos to
@panz3r).
0.1.3
Released 2025-03-08
- Add Mypy compatibility.
0.1.2
Released 2025-02-28
- Add feature to include images using path.
0.1.1
Released 2025-02-27
- Fixes menus with no header.
0.1.0
Released 2025-02-26
- First release.


Download files
Download the file for your platform. If you're not sure which to choose, learn more about installing packages.
Source Distribution
Built Distribution
Filter files by name, interpreter, ABI, and platform.
If you're not sure about the file name format, learn more about wheel file names.
Copy a direct link to the current filters


