

TailCam
Every webcam you own. One private dashboard. Anywhere.
TailCam turns any Linux, macOS, or Windows machine with a webcam into a private, AI-powered camera system you can watch from anywhere over Tailscale — no TailCam cloud, account, or subscription, and no port forwarding.






Install · Tour · Multi-host · Local AI · Agents / MCP · Plugins · Security · Development
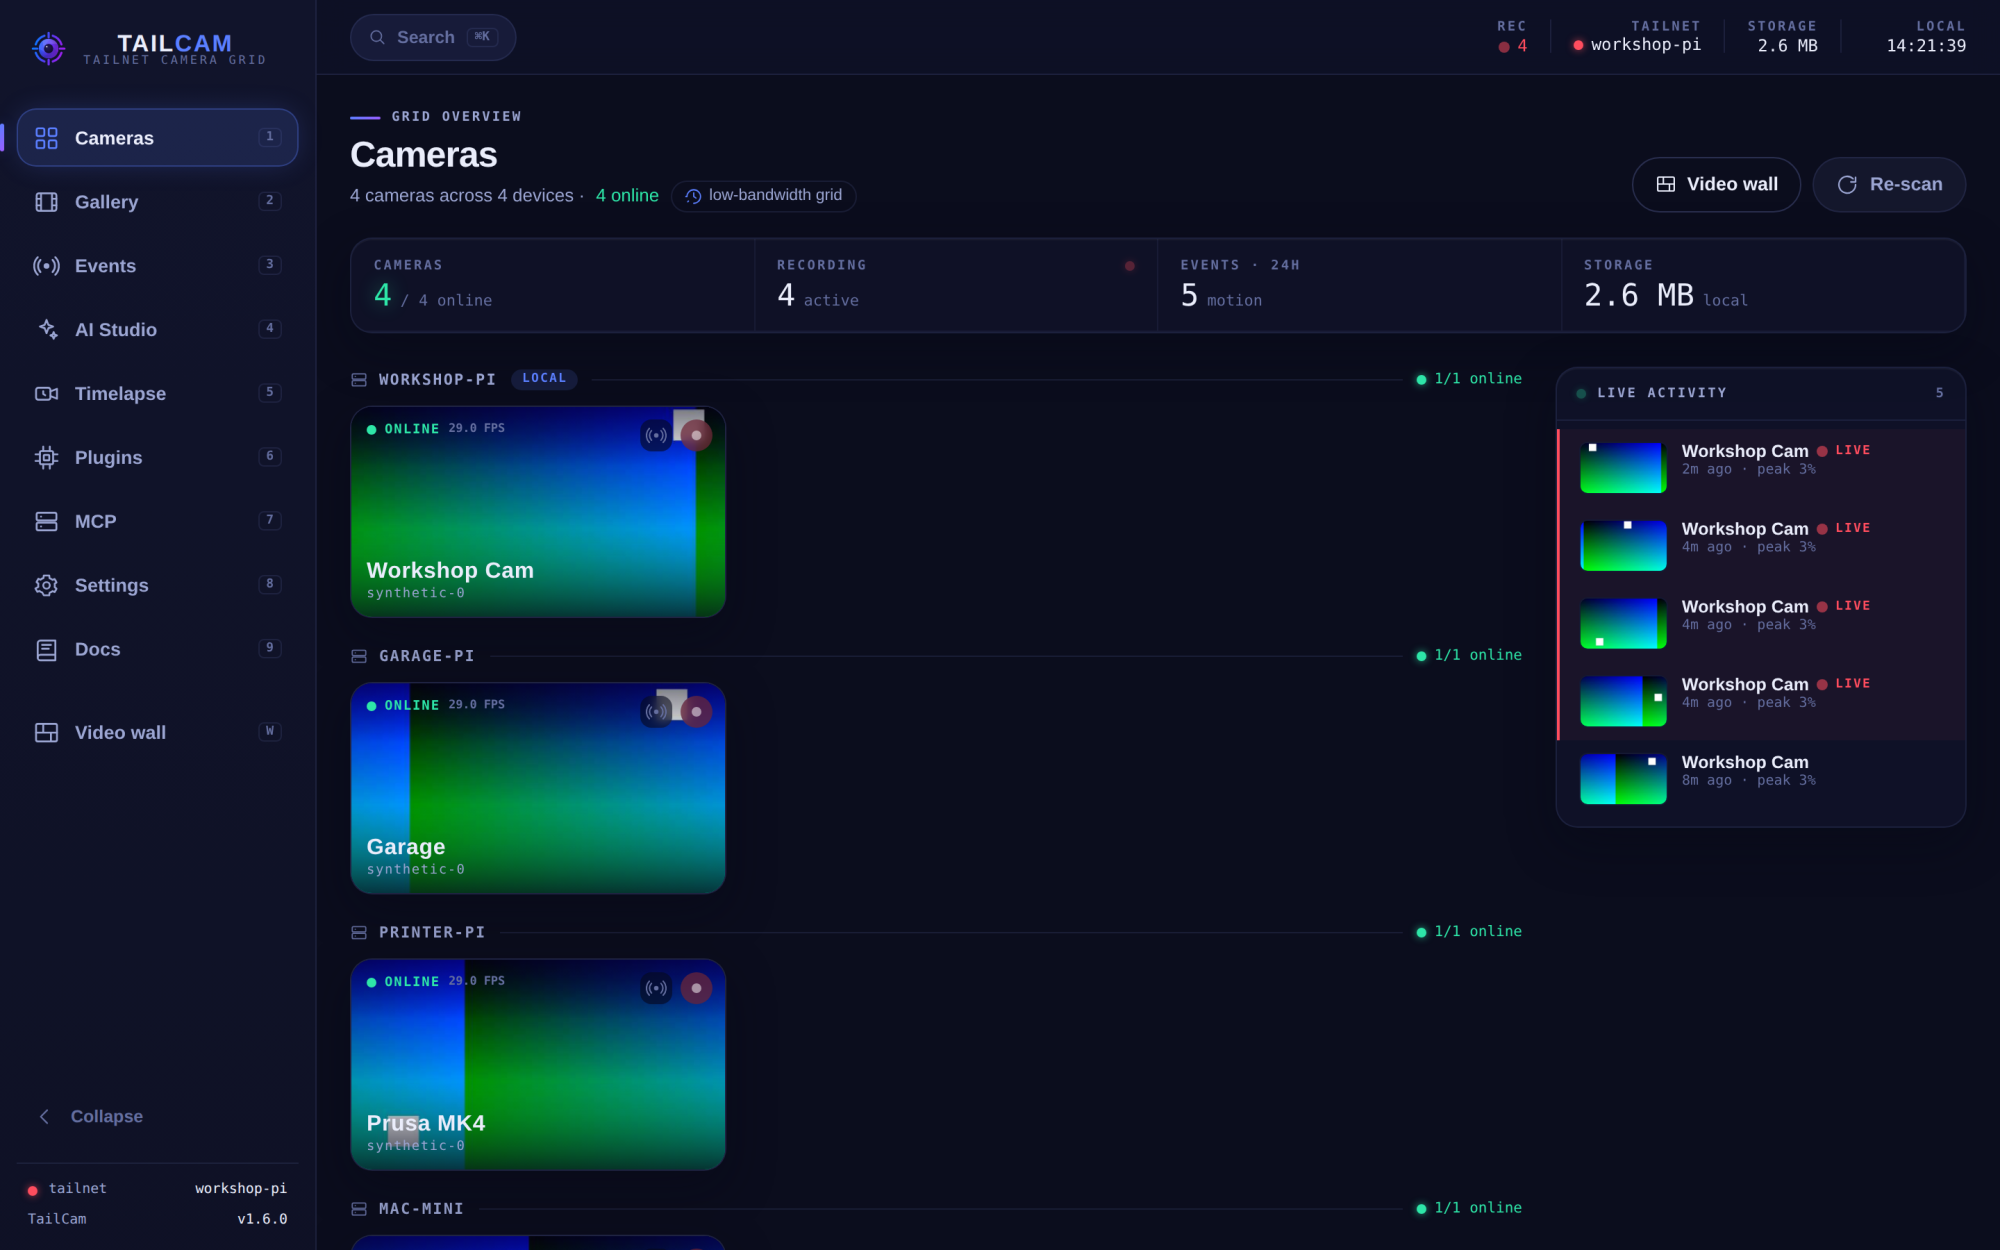
The dashboard aggregating four cameras across four tailnet devices — live grid, stats, and motion activity feed. All screenshots on this page are the real app running with TailCam's built-in synthetic demo camera.
Why TailCam?
Old webcams are everywhere — in drawers, on shelves, attached to machines that are already running. TailCam puts them to work as a monitoring system that is genuinely yours:
- Private by construction — the server binds to
127.0.0.1and is only reachable over your tailnet. Tailscale's encryption and identity are the security boundary; there is nothing to expose to the internet and no vendor in the loop. - A real product, not a science project — a polished installable PWA dashboard, desktop tray apps for all three OSes, an optional browser extension, motion detection with recording, object detection out of the box, timelapses, a plugin marketplace, and an MCP server for AI agents.
- Fleet-native — install it on two, three, ten machines; every node discovers the others and shows all cameras in one dashboard, from any device.
- Local AI, zero setup — live bounding boxes and labeled motion events from a built-in detector that downloads itself on first use and runs entirely on your hardware. Scale up to Ollama vision models, or train your own — still local.
A quick tour
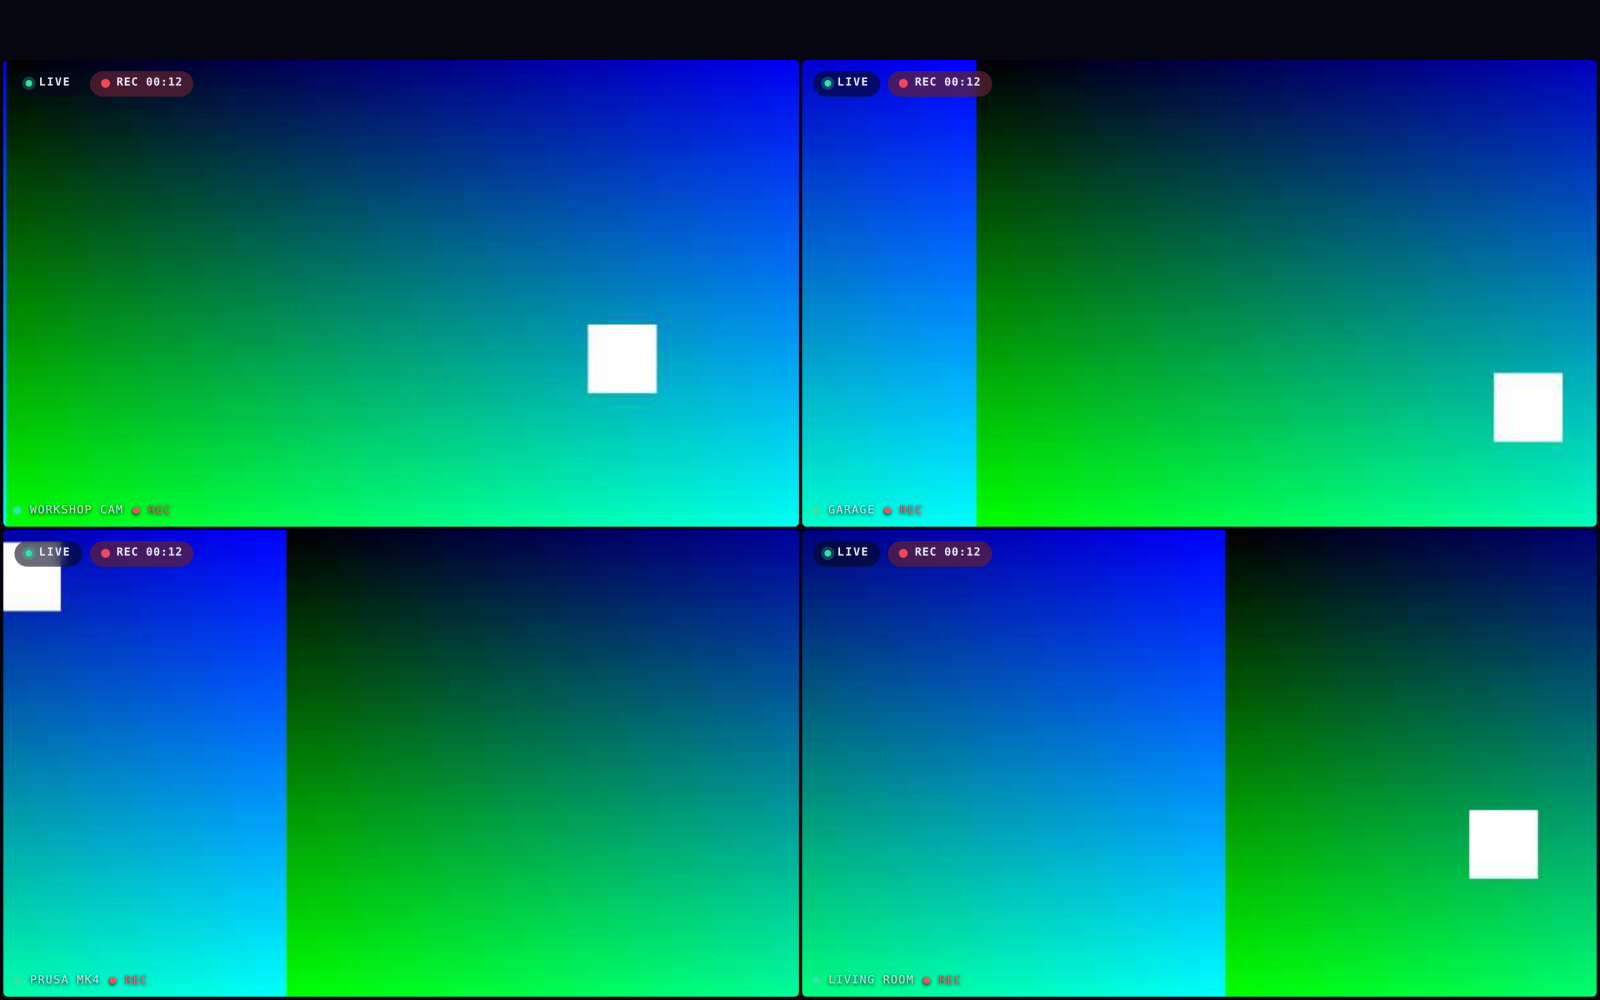
Video wall — every camera full-bleed on one screen (press W). Low-bandwidth tiles; click any feed for full quality.
|
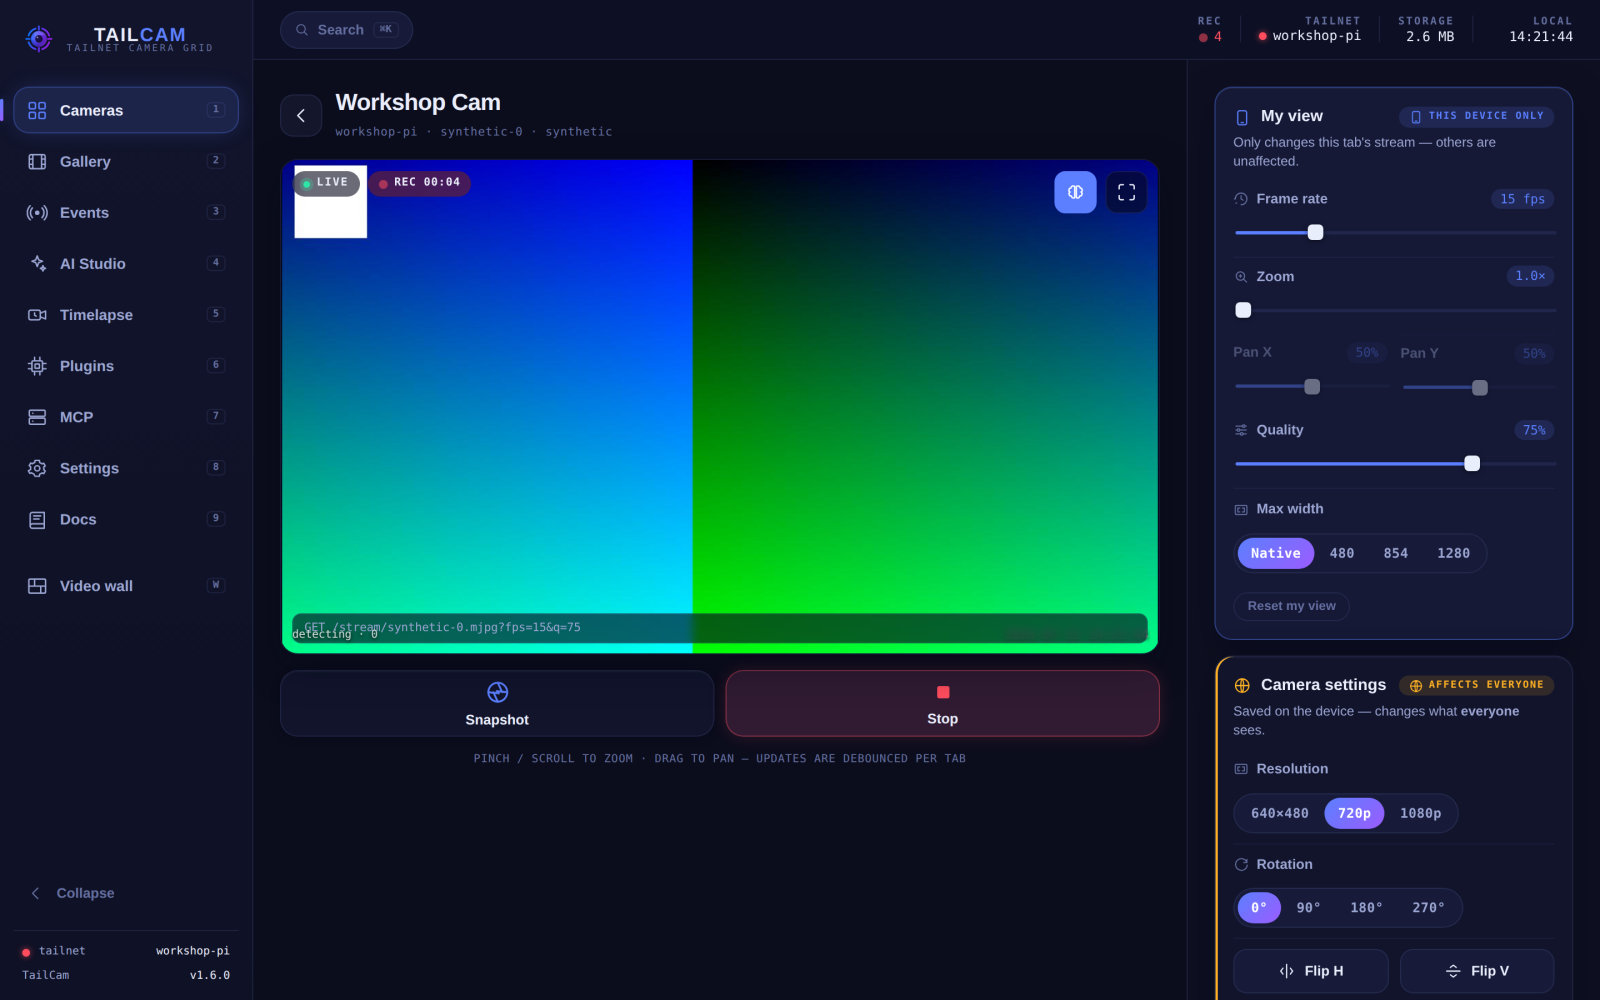
Camera view — live stream with per-viewer FPS/zoom/pan/quality, plus device-wide resolution, rotation, and flips. Snapshot and record in one tap. |
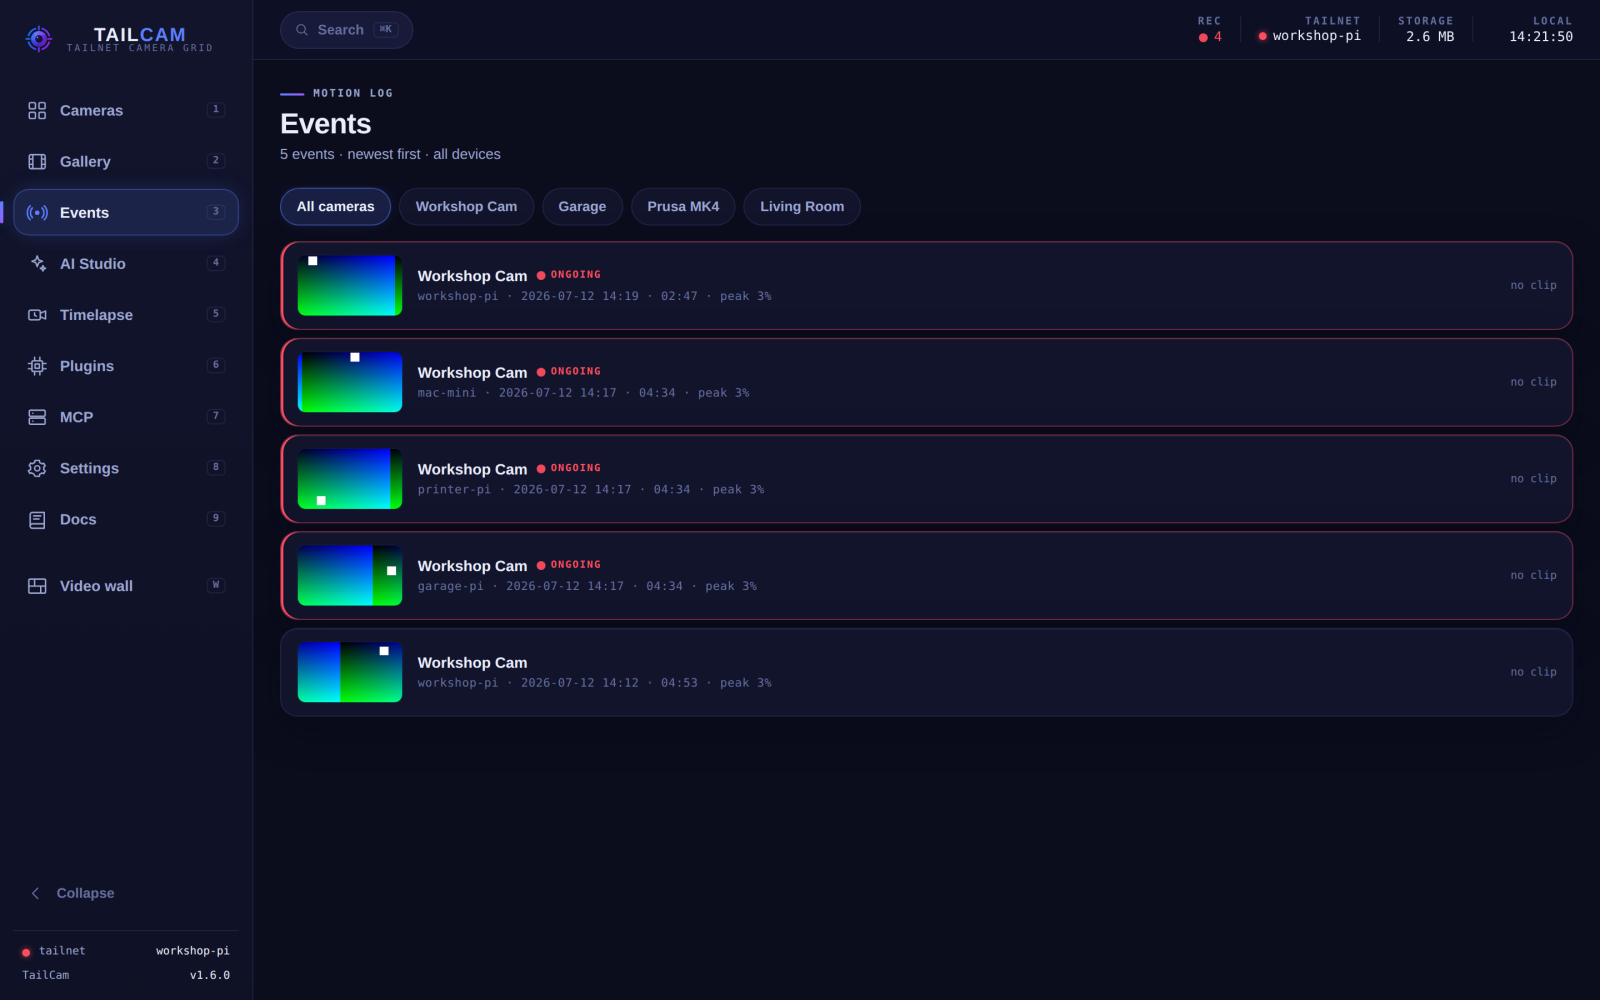
Events — the motion log across all devices, with per-event clips, thumbnails, and AI labels when enabled. |
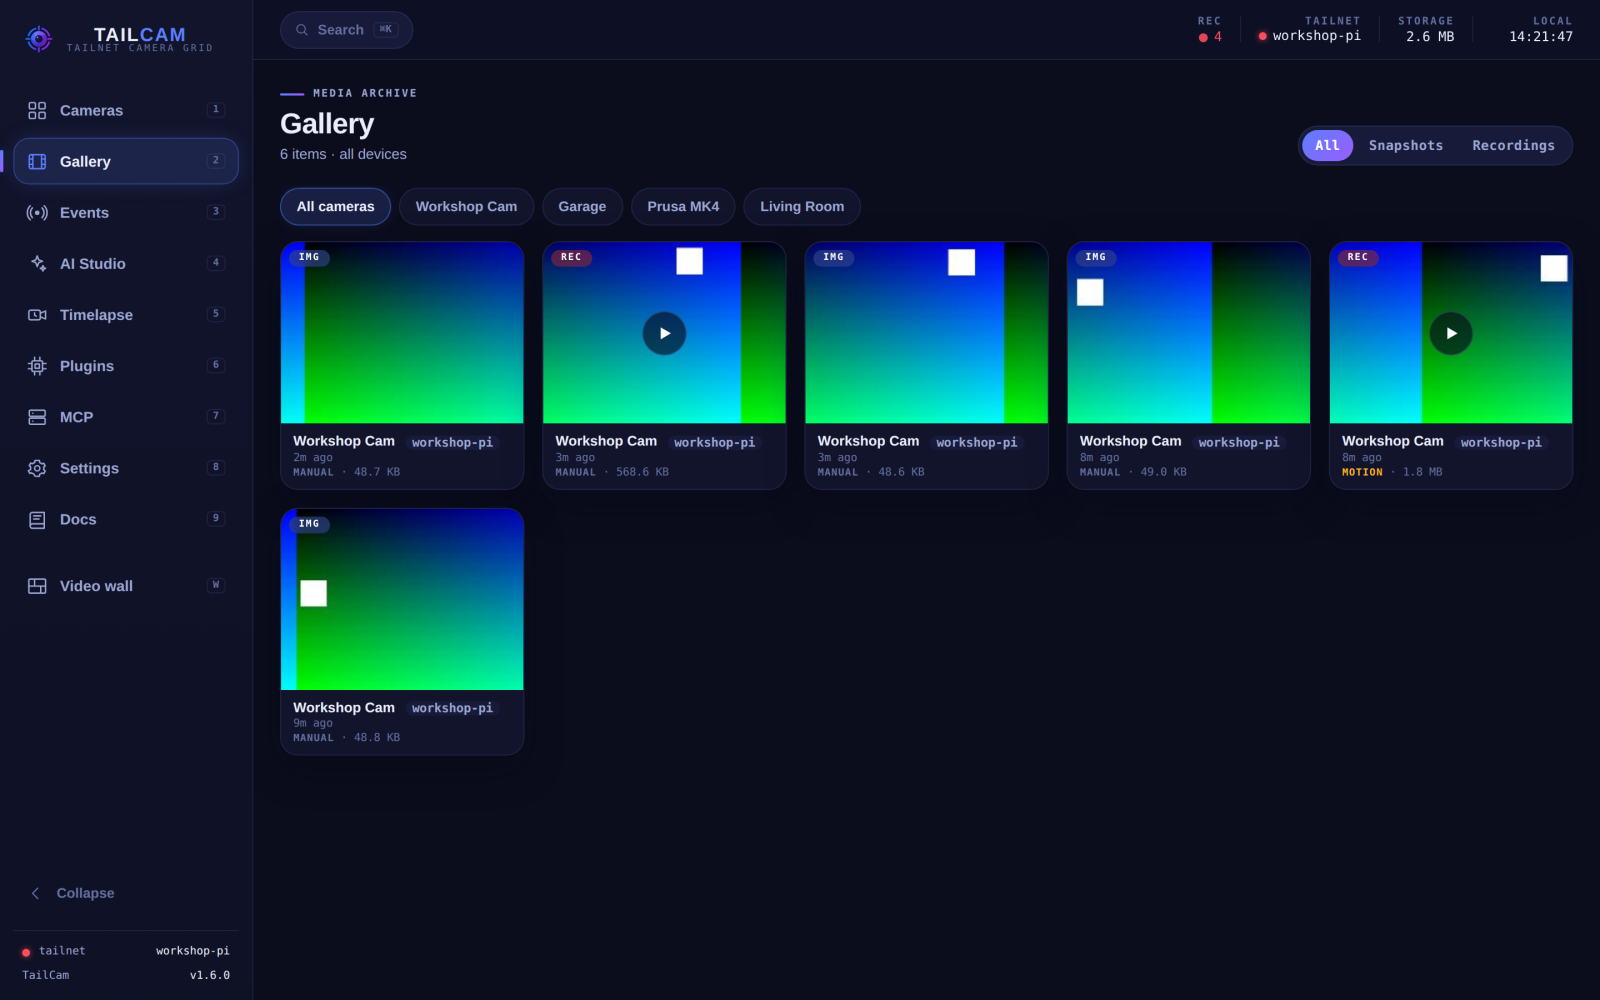
Gallery — snapshots and recordings from every camera, filterable by device and type. |
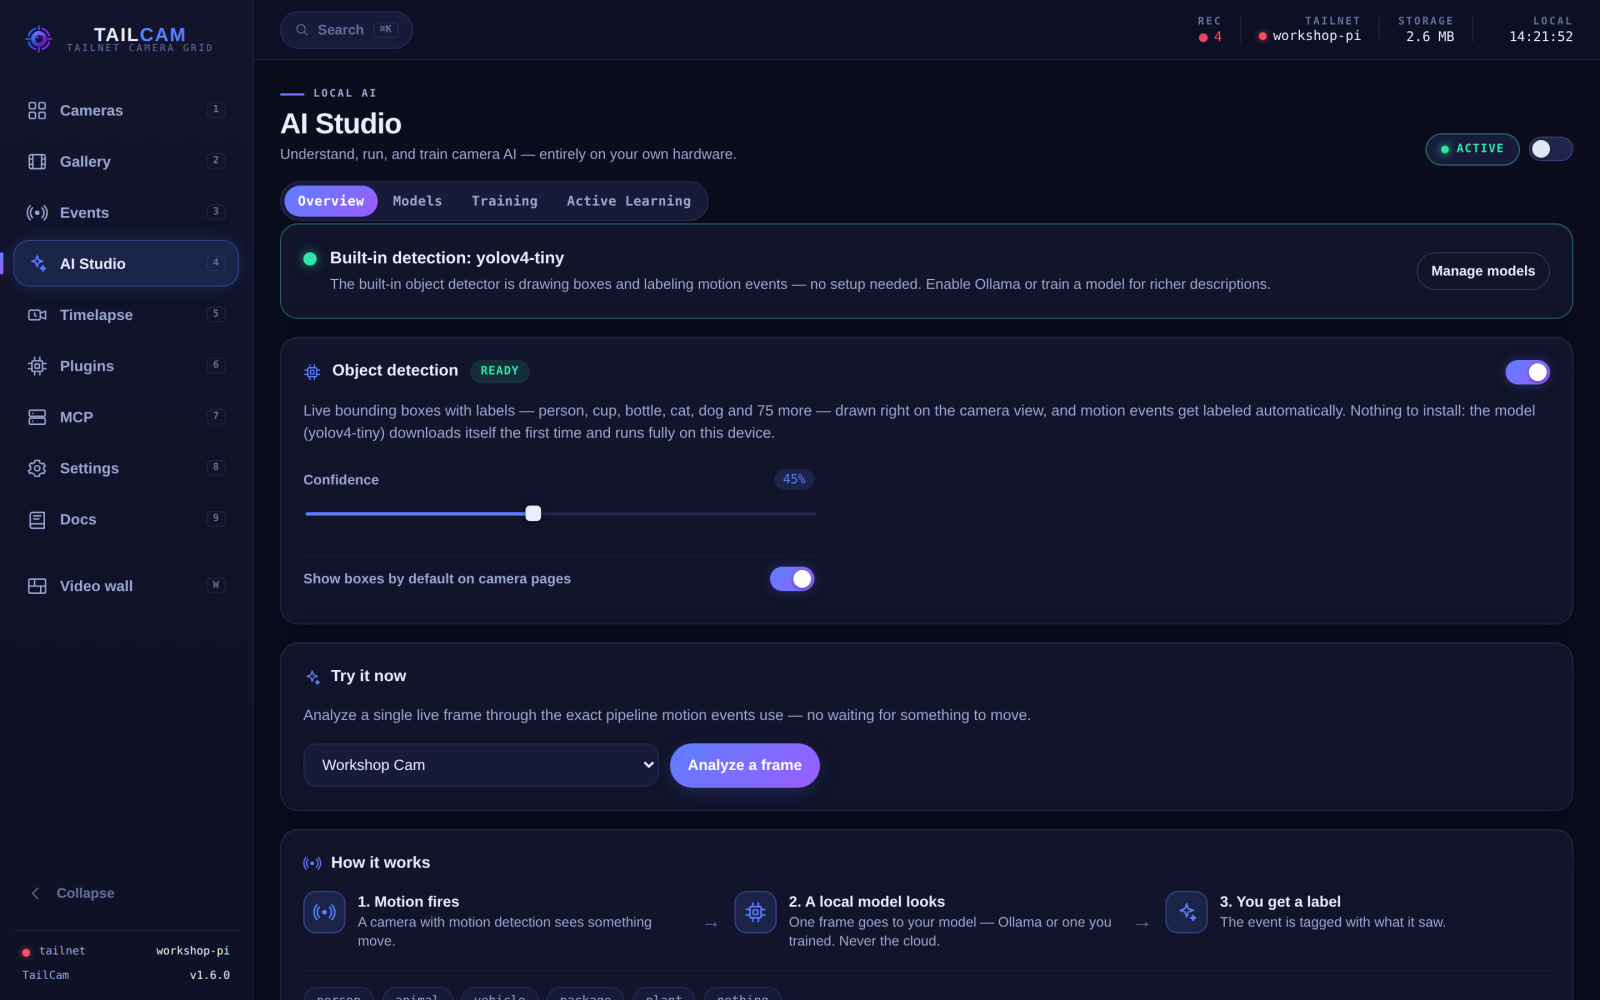
AI Studio — object detection, Ollama motion analysis, training, and active learning — all local, managed from one place. |
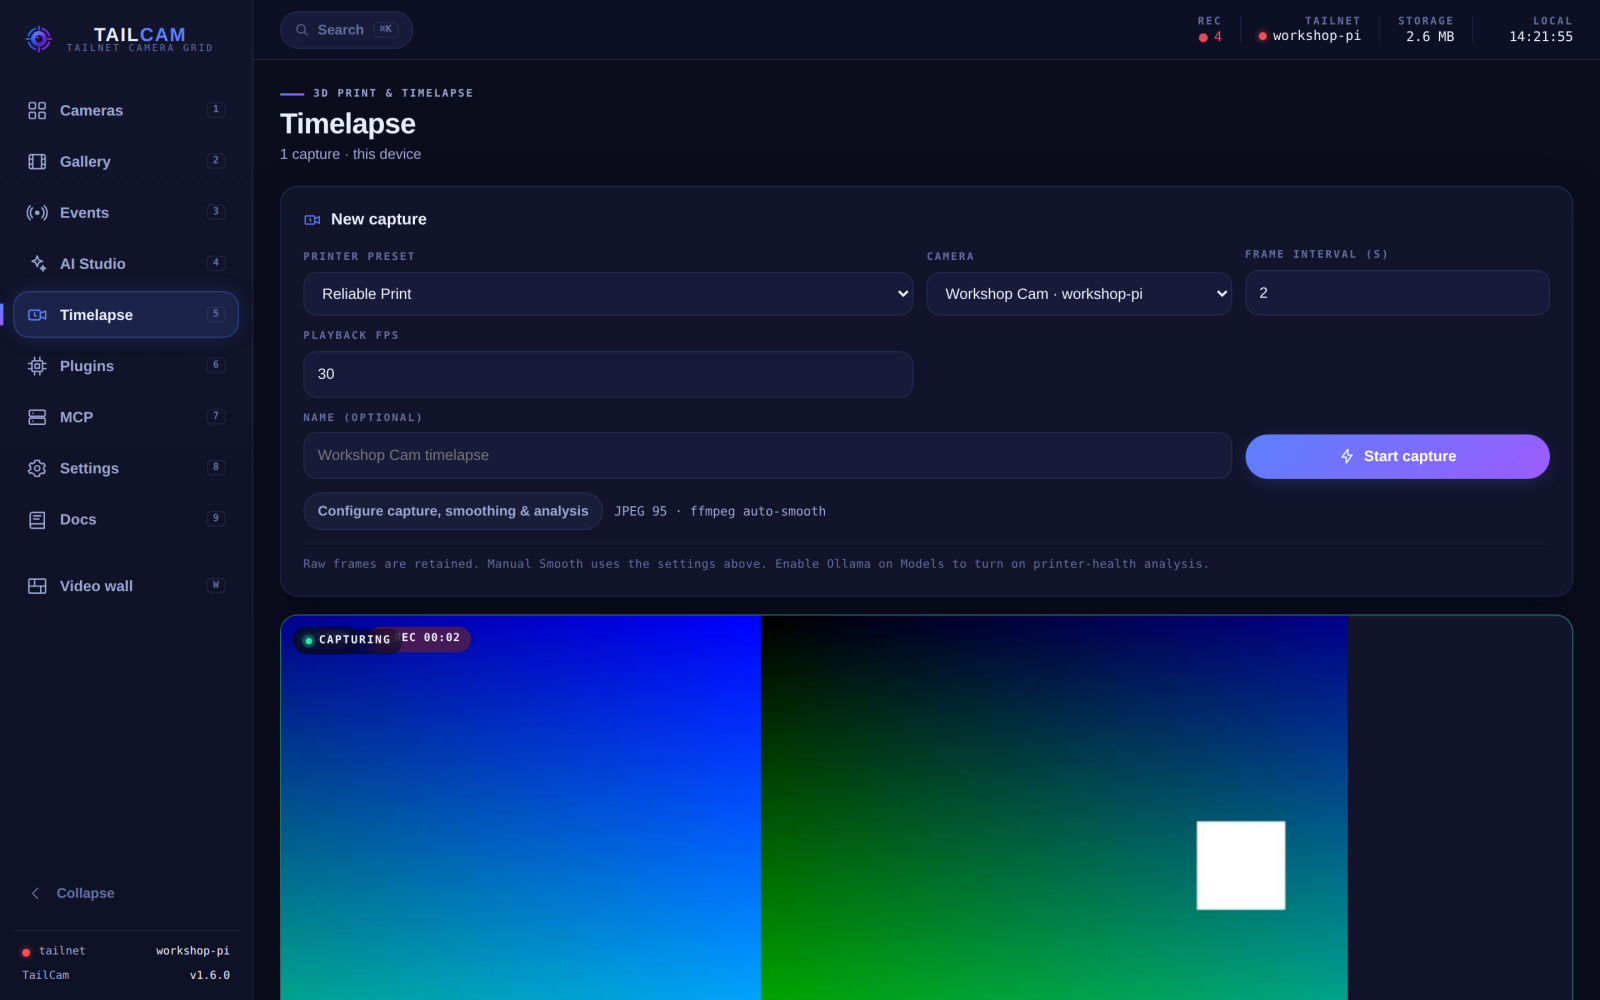
Timelapse — long captures with printer presets, then “Smooth” them into flowing motion with ffmpeg or GPU RIFE interpolation. |
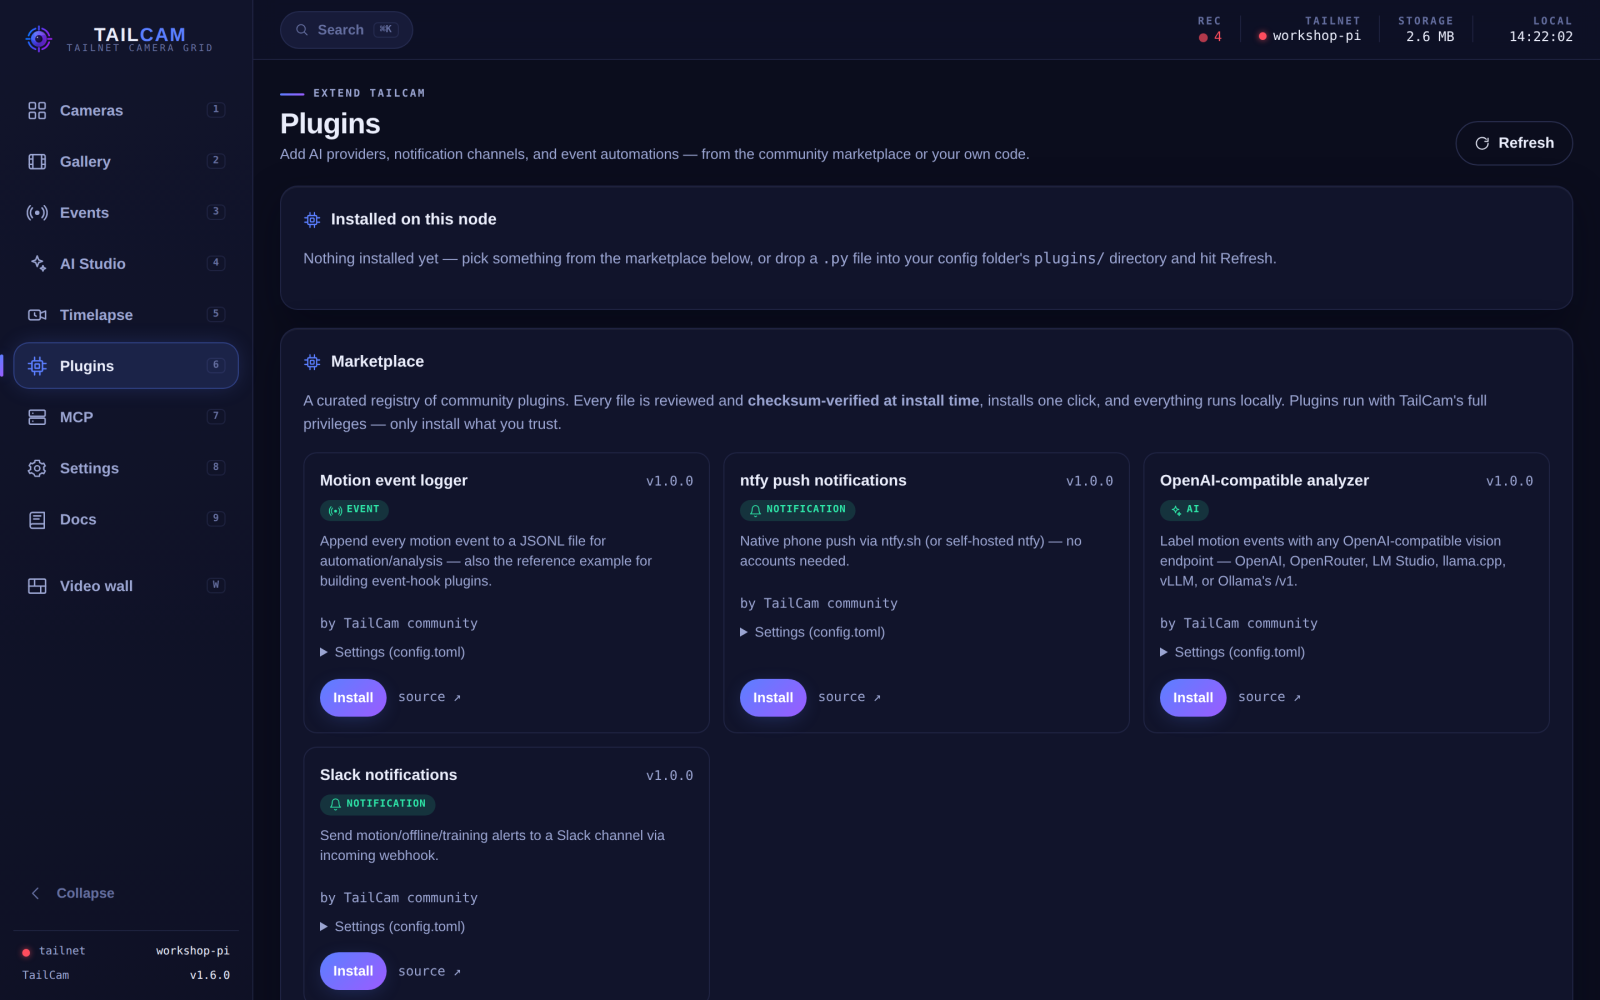
Plugins — one-click, checksum-verified community plugins: notification channels, AI providers, event automations. |
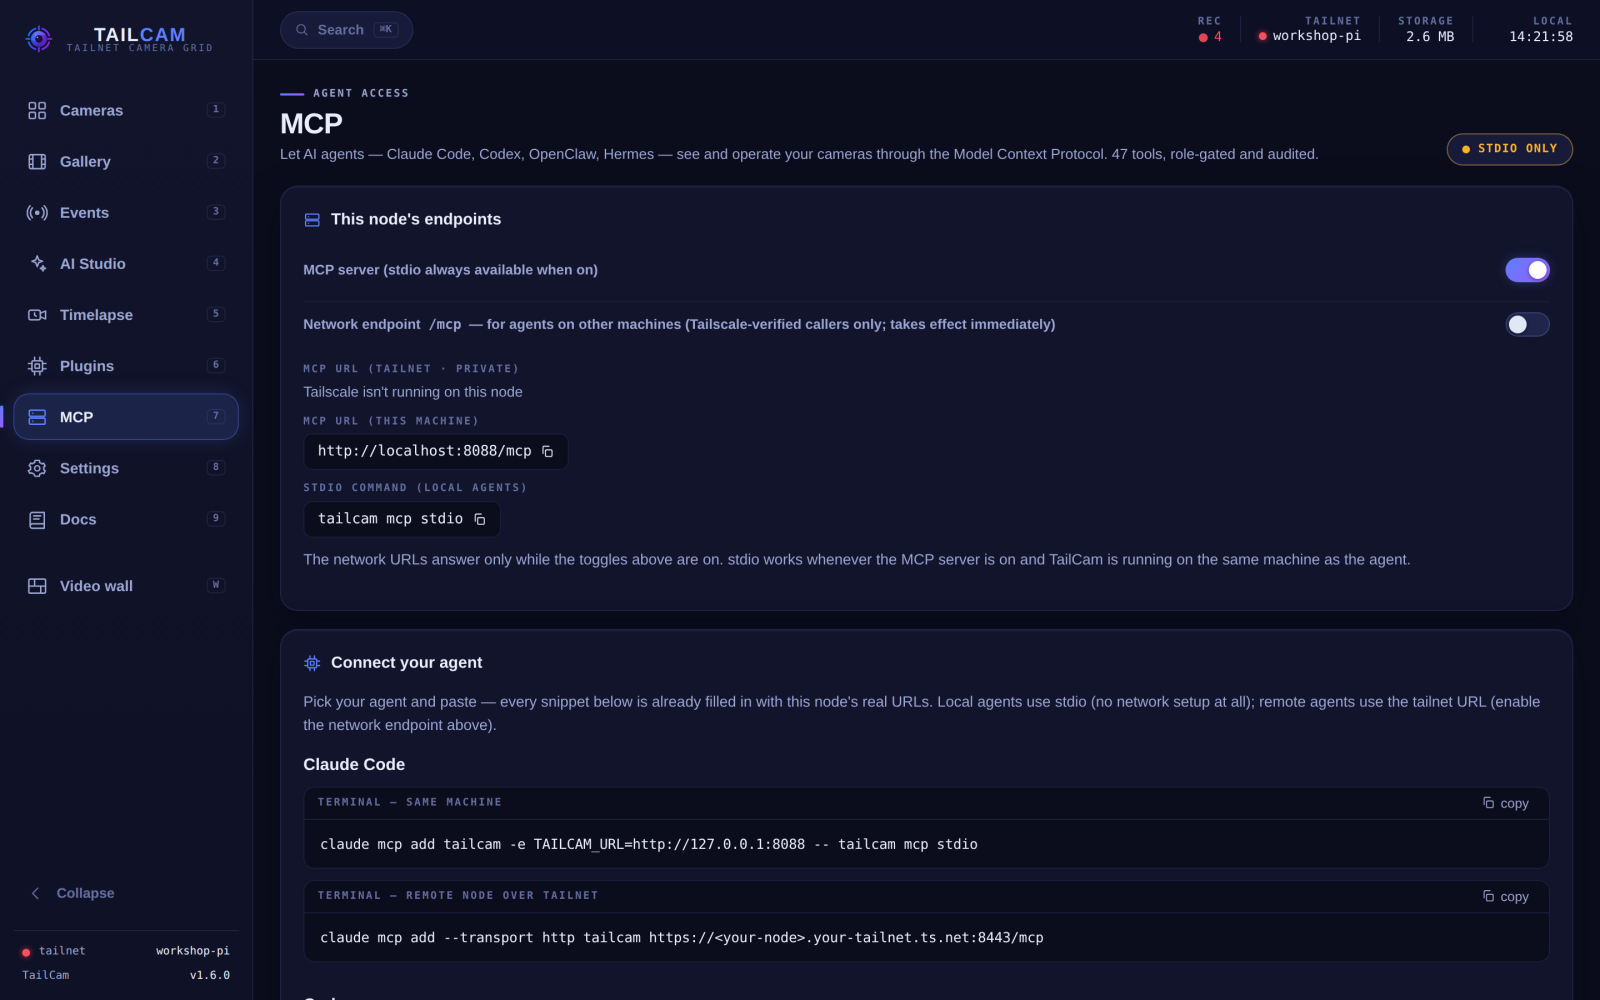
MCP — connect Claude Code, Codex, or any MCP agent to your cameras with copy-paste snippets. 47 tools, role-gated and audited, over a stateless endpoint. |
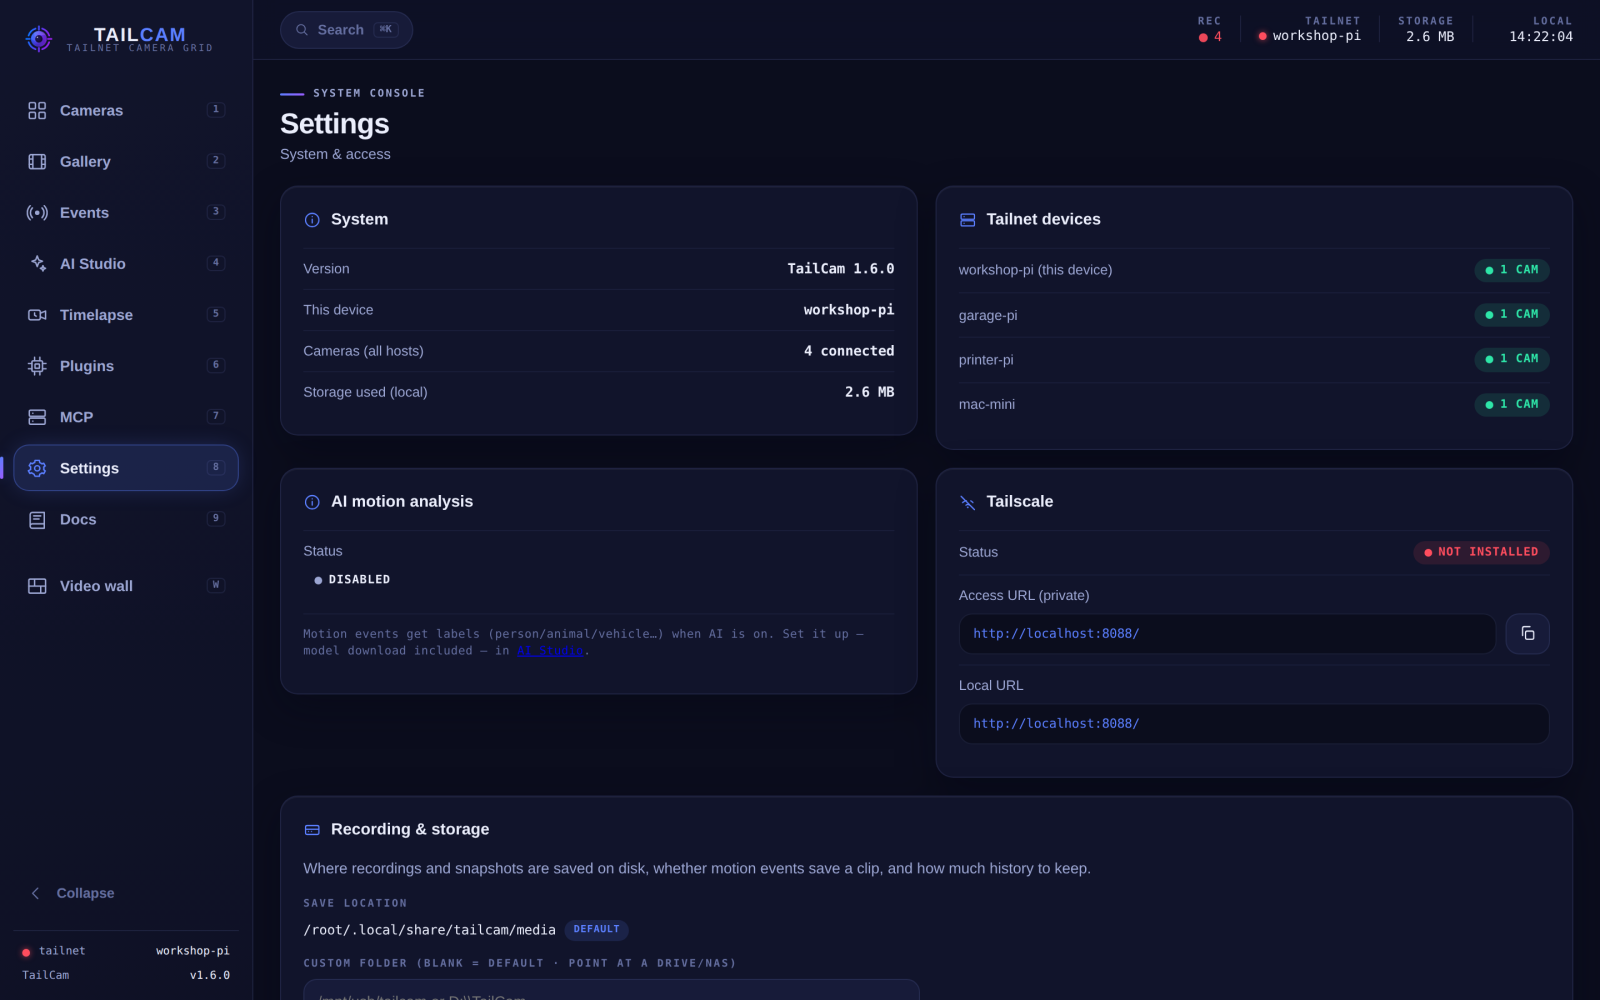
Settings — system console: fleet devices, Tailscale status, storage and retention, integrations. |
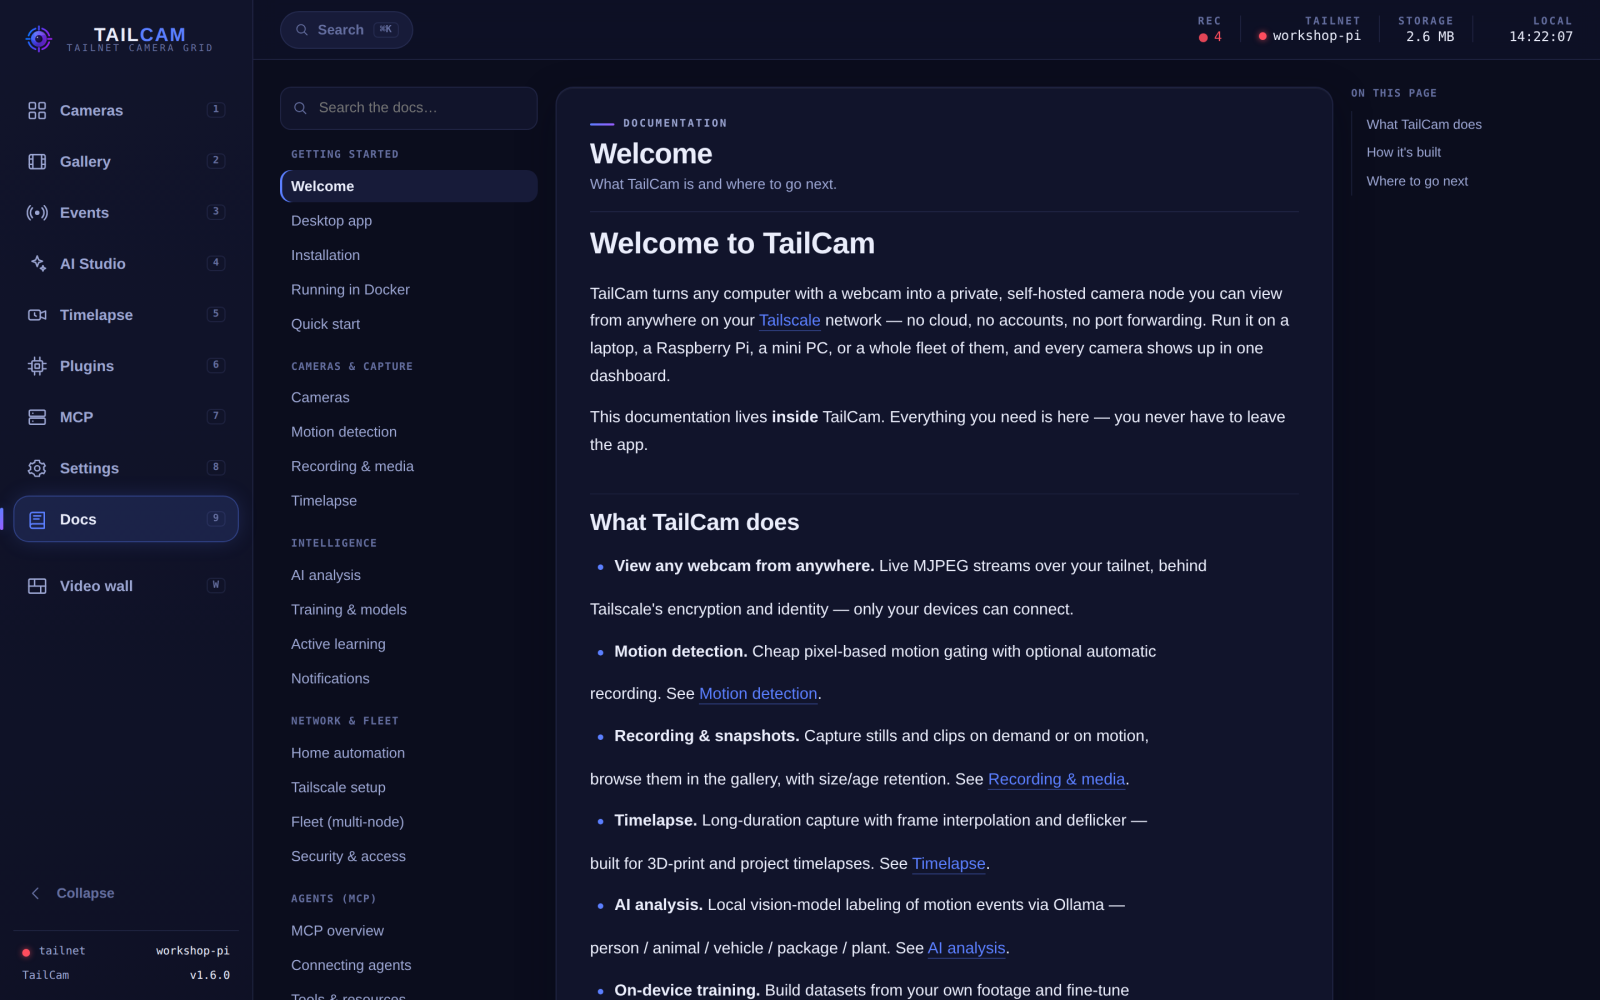
Docs — the full manual ships inside the app. Everything you need without leaving the dashboard. |
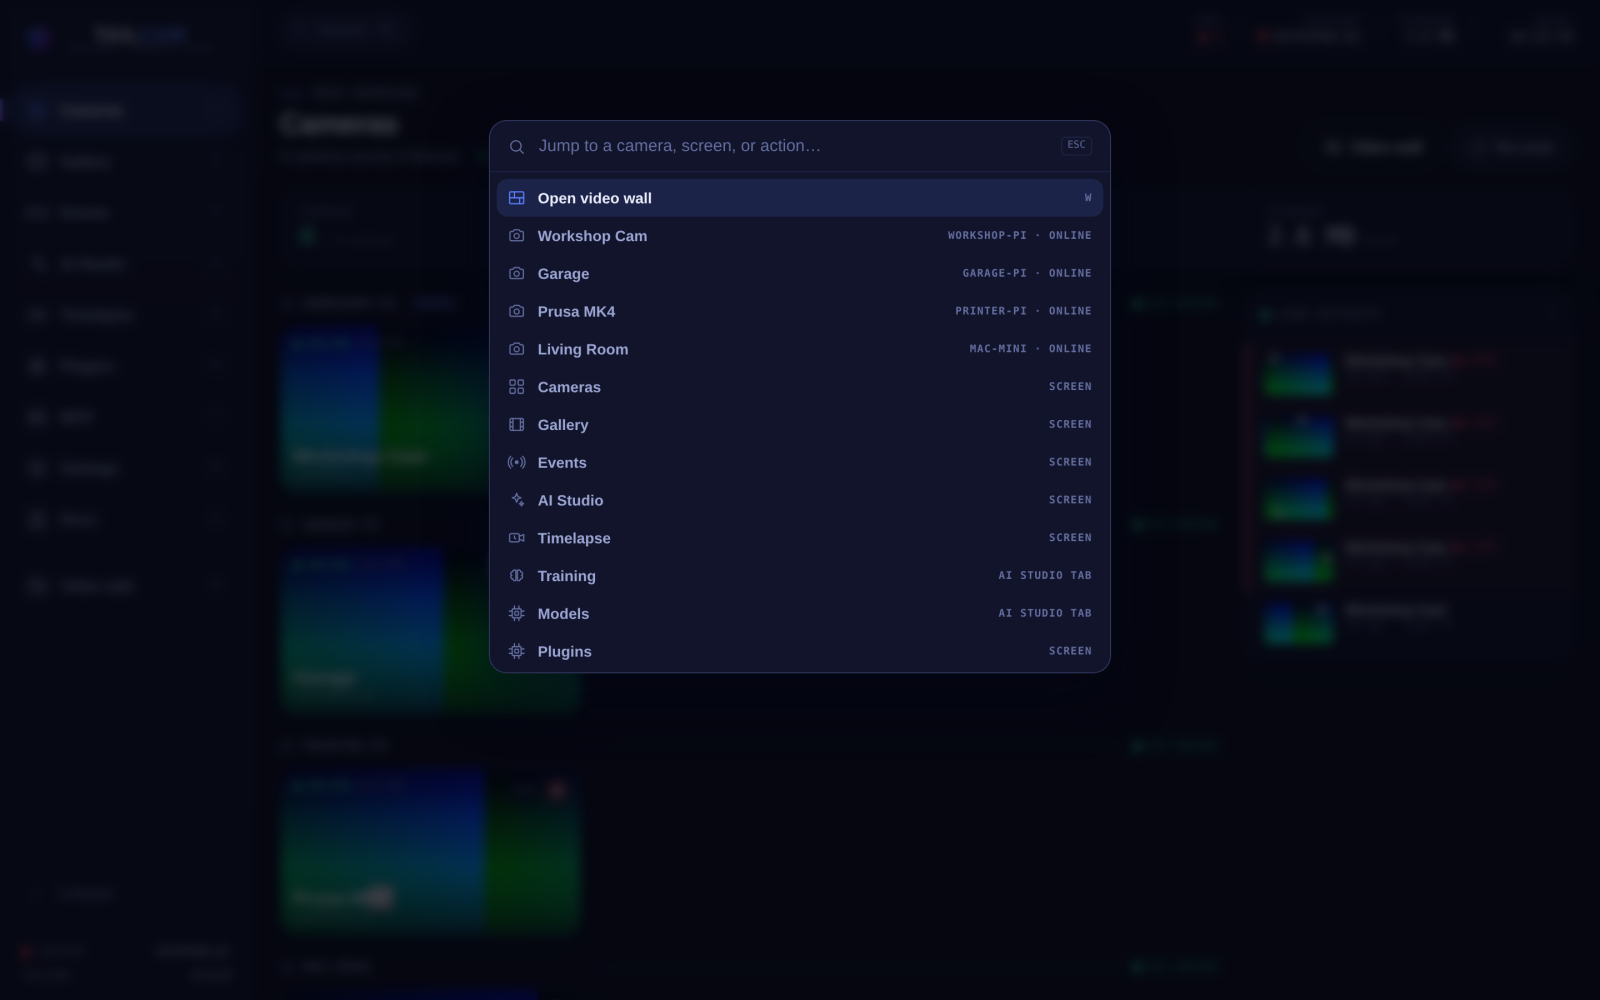
Command palette — Cmd/Ctrl K jumps to any camera, screen, or action.
Install in 60 seconds
TailCam is available on PyPI. For the published release, use pipx or pip with Python 3.10+:
pipx install tailcam
tailcam run
Open http://localhost:8088/. The package includes the built dashboard; Node.js
and a Git checkout are not needed. See pipx setup if
the pipx command isn't installed.
For automatic system dependencies, Tailscale setup, and a background service,
use the OS installer below. These installers fetch GitHub main by default,
which can be newer than the published PyPI release.
Linux (Debian/Ubuntu/Raspberry Pi OS):
curl -fsSL https://raw.githubusercontent.com/factshin/tailcam/main/install-linux.sh | bash
macOS:
curl -fsSL https://raw.githubusercontent.com/factshin/tailcam/main/install-macos.sh | bash
Windows (PowerShell):
irm https://raw.githubusercontent.com/factshin/tailcam/main/install.ps1 | iex
Each installer:
- checks for Python 3.10+ (Linux also installs the system libraries numpy/OpenCV need),
- installs TailCam into an isolated virtualenv,
- registers a background user service so TailCam starts automatically —
systemd
--user+ lingering (Linux), launchd agent (macOS), or a logon Scheduled Task (Windows), - detects Tailscale and, if it's running, exposes the UI over HTTPS with
tailscale serve.
After install, open the URL printed at the end (your tailnet HTTPS address, or
http://localhost:8088/ locally).
Installer options & uninstall
# Linux / macOS — download then run with flags:
curl -fsSL https://raw.githubusercontent.com/factshin/tailcam/main/install-linux.sh -o install-linux.sh
bash install-linux.sh --port 9000 --no-tailscale
# Windows:
irm https://raw.githubusercontent.com/factshin/tailcam/main/install.ps1 -OutFile install.ps1
.\install.ps1 -Port 9000 -NoTailscale
Linux/macOS flags: --port, --ref <tag>, --no-service, --no-tailscale,
--no-tailscale-install. Windows: -Port, -Ref, -NoService, -NoTailscale,
-NoTailscaleInstall.
Tailscale is set up for you. If Tailscale isn't installed, the installer installs
it (official script on Linux, Homebrew on macOS, winget on Windows). If it isn't
signed in, the installer runs tailscale up, prints the login link — open it on any
device — and waits (up to TAILCAM_TAILSCALE_LOGIN_TIMEOUT seconds, default 600)
until the machine joins your tailnet, then enables tailscale serve. Pass
--no-tailscale-install to keep the old "warn only" behaviour; nothing here ever
fails the install — TailCam always works locally.
To uninstall: run uninstall-linux.sh / uninstall-macos.sh / uninstall.ps1, or
tailcam uninstall-service to just remove the background service.
Windows notes (ARM64, service model, camera names)
Windows on ARM (Surface Laptop 7 / Snapdragon X, and other ARM64 PCs): the
installer automatically uses x64 Python, which Windows 11 runs
transparently under emulation — TailCam's camera stack (OpenCV) publishes no
native ARM64 wheels yet, so native ARM64 Python cannot install it. Windows 11
is required on ARM (Windows 10 on ARM can't emulate x64). Every install writes
a full log to %LOCALAPPDATA%\TailCam\install-<timestamp>.log; if something
fails, the window stays open and points you at that file.
The logon Scheduled Task runs TailCam in your user session (so the webcam is
accessible) and starts after you log in — the same "user session" model as the
Mac/Linux services. Camera names need the optional pygrabber package
(installed automatically); without it cameras show as "Camera 0/1…".
Install from PyPI
pipx keeps TailCam in its own environment and exposes the tailcam command:
pipx install tailcam
tailcam run
For a fresh install with HomeKit, use pipx install 'tailcam[homekit]' instead.
To add HomeKit to an existing pipx install, use
pipx inject tailcam 'tailcam[homekit]' and restart TailCam.
pip in a virtual environment — Linux/macOS:
python3 -m venv .venv
.venv/bin/python -m pip install tailcam
.venv/bin/tailcam run
Windows PowerShell (use x64 Python on Windows ARM):
py -3 -m venv .venv
.\.venv\Scripts\python.exe -m pip install tailcam
.\.venv\Scripts\tailcam.exe run
Install extras using the same environment as the running server, for example
.venv/bin/python -m pip install 'tailcam[homekit,mqtt]' on Linux/macOS or
.\.venv\Scripts\python.exe -m pip install 'tailcam[homekit,mqtt]' on Windows.
HomeKit live video also needs system ffmpeg. Manual PyPI installs do not
install Tailscale or register a background service; see the
installation guide for those steps and
the environment paths used by the OS installers.
Updating
- PyPI / pipx:
pipx upgrade tailcam. - PyPI / venv:
.venv/bin/python -m pip install --upgrade tailcam(Windows:.\.venv\Scripts\python.exe -m pip install --upgrade tailcam). Include your extras, such as'tailcam[homekit,mqtt]', when upgrading their dependencies too. - GitHub installer / development channel:
tailcam updatechecks and installs GitHubmain;tailcam update --checkonly checks. The dashboard and desktop update actions use this same channel, even for a PyPI install.
Restart the running server after a package upgrade (tailcam restart for a
registered service), then check tailcam version. To stay on published PyPI
releases, use pip/pipx upgrades rather than the in-app updater. Source installs
remain available with python -m pip install git+https://github.com/factshin/tailcam.git in an activated virtual environment.
Docker
Run TailCam fully isolated in a container. The image bundles TailCam, the dashboard, Tailscale, and the OpenCV/ffmpeg libraries.
One-liner (Linux host with Docker) — pulls the prebuilt image and runs it:
# local-only (open http://localhost:8088/)
curl -fsSL https://raw.githubusercontent.com/factshin/tailcam/main/install-docker.sh | bash

# join your tailnet and serve over Tailscale
curl -fsSL https://raw.githubusercontent.com/factshin/tailcam/main/install-docker.sh | bash -s -- --authkey tskey-auth-xxxx
Prebuilt image (multi-arch — amd64 + arm64/Raspberry Pi):
docker pull ghcr.io/factshin/tailcam:latest
Docker Compose (from a repo checkout):
# local-only — reach it on the host at http://localhost:8088/
docker compose up -d

# or join your tailnet and serve over Tailscale
TS_AUTHKEY=tskey-auth-xxxx docker compose up -d
With TS_AUTHKEY set, the container starts tailscaled, joins your tailnet as
tailcam, and serves at https://tailcam.<tailnet>.ts.net:8443/ — the same
experience as a native install, plus full verified-admin access. Without it,
TailCam runs local-only on the published port.
Pass a webcam with --device /dev/video0:/dev/video0 (Linux hosts only —
Docker Desktop on macOS/Windows can't see host USB cameras; use a native install
there, or TAILCAM_SYNTHETIC=1 to test). Data, config, and Tailscale identity
persist in named volumes. Build directly with docker build -t tailcam ..
Full details — networking modes, persistence, env vars, and troubleshooting — are
in the in-app Docs → Running in Docker page (also served at /docs/docker).
Feature highlights
- Polished dashboard (PWA) — a responsive React web app (installable on phone or
desktop) with a live camera grid grouped by device, a video wall, a command palette
(Cmd/Ctrl+K), a mobile-first camera view with pinch/zoom, gallery, and motion
events. Built and shipped inside the package; see
web-ui/. - Desktop app (macOS, Linux, Windows) — a menu-bar/tray app with the dashboard in
its own window, service controls, fleet-node switching, and one-click updates
(
tailcam app) on all three platforms. - Browser extension (optional) — TailCam Companion for Chrome, Edge, Firefox, and Safari; see below.
- Multi-host aggregation — see every camera, recording, event, and timelapse across all your tailnet devices from any one of them.
- Storage node & detection node — record, timelapse, and run object detection for a small node's cameras on a bigger machine on your tailnet (the box with the disk, the box with the GPU); the Pi just captures and streams.
- Multi-camera — auto-detects connected webcams; name them and view them in a grid.
- Resolution, zoom & pan — set capture resolution; pinch/zoom + pan; rotate/flip; brightness/contrast controls; device-wide stream settings (fps, quality, size) that are the same on every screen.
- Snapshots & recording — capture stills and record browser-playable H.264 clips to disk (or a NAS folder picked with the built-in folder browser), with a gallery.
- Motion detection — detect motion, log events, and save a clip per event (on by default); remembered across restarts.
- Object detection — built-in live bounding boxes + labels (80 COCO classes), zero setup, auto-downloading local model; per-camera on/off; upgrades itself to Ultralytics YOLO11 when torch is installed.
- Timelapse + smoothing — capture a timelapse (great for 3D prints) on any node,
then "Smooth" it into flowing motion with a bundled ffmpeg engine or an optional
GPU RIFE model (
rife-ncnn-vulkan), with automatic fallback. - Raspberry Pi friendly — a low-power profile (lighter streams, MJPEG capture, shared JPEG encoding, ultrafast x264) keeps a 1 GB Pi 5 streaming two cameras.
- Train your own model — collect and label footage from your own cameras and
fine-tune a private model on your Mac/Windows GPU (optional
tailcam[training]extra) — classification or object detection, with in-dashboard box drawing. - Active learning (human-in-the-loop) — auto-label confident detections, send only uncertain frames to Label Studio, and fine-tune YOLO, Florence-2, or Qwen2.5-VL from the synced annotations.
- Plugin marketplace — one-click, checksum-verified community plugins (AI providers, notification channels, event automations); write your own with a single Python file.
- MCP server — agents (Claude, Codex, …) can inspect cameras, events, and health
and run guarded admin workflows, over a stateless (session-free) HTTP endpoint or
local stdio; see
docs/mcp.md. - Tailscale-native — secure access over your tailnet; fully usable on a LAN too.
Multi-host: every camera, from any device
Install TailCam on more than one machine on the same tailnet (a Raspberry Pi, a Mac, a Linux box…) and each node automatically discovers the others and shows all of their cameras. Open the dashboard on any device and you see every camera across your tailnet in one place — no matter which machine the webcam is physically plugged into.
How it works:
-
The node you're viewing becomes an aggregator: it finds the other TailCam nodes, asks each for its camera list, merges them, and reverse-proxies the remote video and controls — so your browser only ever talks to the node you opened (one origin, one Tailscale cert).
-
Discovery is automatic over Tailscale (it probes online tailnet peers for a running TailCam). You can also list peers explicitly:
# ~/.config/tailcam/config.toml
[peers]
auto_discover = true
static = ["https://tailcam-pi.your-tailnet.ts.net:8443"]   # optional explicit peers
-
Name a node with
TAILCAM_HOST(otherwise its Tailscale MagicDNS name / hostname is used), e.g.TAILCAM_HOST=garage-pi. -
GET /api/hostslists every node (local + peers) and their camera counts.
Choose what runs on each node
The 1.9.0 source builds add Settings → Node purpose and CLI presets. For a manual install, configure a hub before its first startup:
tailcam config --init --preset hub --node-name "Workshop hub"
tailcam run
Presets: all-in-one (default), camera (capture + storage), hub (fleet
dashboard/control), storage, and compute (analysis + training). For custom
combinations, use --roles capture,storage or the independent Settings switches.
Use --roles capture when a camera should stream and send recordings elsewhere.
Roles take effect on server restart; Settings shows saved and active roles. Valid older configs keep all four roles. The node UUID survives config changes and restarts, while existing host/proxy links keep working. These are workload roles, separate from viewer/operator/admin permissions. Hub startup skips camera scans and local models; the base package still includes OpenCV. Role-aware OS installer prompts and lean packaging remain follow-up work. The current OS installers start all-in-one on a fresh install; use manual setup for a hub's first startup.
Storage node: record on the machine with the disk
Every node can send its own cameras' recordings, motion clips, and timelapses to a
different node. Pick it in Settings → Recording & storage (each node's free space is
shown) or set [storage] node = "nas-box". The storage node pulls the camera's MJPEG
stream over the tailnet and runs the recorder/timelapse worker itself, so the files land
on its disk and a Raspberry Pi never encodes video. Connectivity fallback can save
locally only with the source's storage role enabled. A destination's disabled-role
refusal never falls back. The picker marks nodes whose storage role is off. The
storage node's save folder can be browsed and set from any dashboard.
Detection node: run the models where the CPU is
In AI Studio → Object detection → Run detection on, pick another node. Frames from
this node's cameras are sent (downscaled, about 50 KB, at most once a second per camera)
to that node's POST /api/detect-image, which answers with boxes and motion labels from
its pipeline. The sending node never loads a model. Ollama already works the same way
via its base_url.
Notes:
- Remote cameras are fully viewable and controllable (resolution, stream settings, zoom/pan, snapshot, record, timelapse).
- The gallery, events, and timelapse list are fleet-wide — anything captured on any node shows up (and can be stopped or deleted) from any dashboard.
- This treats every TailCam node on your tailnet as trusted — the intended model for a personal tailnet (there is no separate auth; Tailscale is the security boundary).
- Linux, macOS, and Windows nodes all participate in the same tailnet dashboard.
Local AI
Object detection — built in, zero setup
Open any camera and TailCam draws live bounding boxes with labels — person,
cup, bottle, cat, dog, and the rest of the 80 COCO classes — using a built-in
detector that's on by default (off by default on a low-power host such as a
Raspberry Pi — route it to a bigger node instead) and runs entirely on your
hardware. The model (a few MB of YOLO) downloads itself the first time it's
needed; nothing to install or configure. Motion events are labeled from the same
detector, so the Events page gets PERSON / DOG / CUP chips out of the box. Turn it
on or off per camera, and tune it (confidence, class filter, engine, bigger
models, which node runs it) in AI Studio → Object detection or the
[detection] config section.
AI motion analysis — local, optional
Motion detection is free pixel-diff; when it fires, TailCam can ask a local Ollama vision model to label the event (person / animal / vehicle / package / …) with a short description — no cloud. Because cheap motion gates the model, it's only consulted a frame or two per event, so one machine can analyze the whole fleet.
Set up (e.g. on a Mac mini):
# Install Ollama and pull a vision model (moondream is small + fast):
ollama pull moondream          # or: qwen2.5vl / llava for better labels
Then enable it from the dashboard: open AI Studio → Models, flip Motion AI
(Ollama) on, set the model and the Ollama URL (http://localhost:11434, or a
tailnet host like http://mac-mini.your-tailnet.ts.net:11434 to analyze the
whole fleet), and hit Save & test — no restart, no config file. The panel
shows whether Ollama is reachable and the model is pulled. (You can still set
[ai] in config.toml if you prefer.)
Motion events then show a label chip (🧍 person, 🚗 vehicle…) + the trigger
thumbnail. To let one node analyze another's events, point the URL at that node
(and run Ollama with OLLAMA_HOST=0.0.0.0 so the tailnet can reach it). See
AI analysis for current usage. The original
AI roadmap is retained as historical design context.
Train your own — and let the loop label for you
Collect and label footage from your own cameras, then fine-tune a private model on
your Mac/Windows GPU (optional tailcam[training] extra). Build either a
classification model (one label per frame) or an object-detection model —
draw bounding boxes (where and what) right in the dashboard, train a YOLO
detector, and overlay live boxes on any camera.
With active learning, a labeling model (built-in YOLO, your trained model, Ollama, Florence-2, or Qwen2.5-VL) watches your cameras, auto-labels confident detections, and sends only the uncertain frames to Label Studio for you to review; synced annotations fine-tune YOLO, Florence-2, or Qwen2.5-VL (via Unsloth, CUDA). One click in AI Studio → Active Learning; see the in-app Docs → Active learning page.
AI agents (MCP)
TailCam ships an MCP server, so agents like Claude Code and Codex can inspect
cameras, events, and node health — and run guarded admin workflows — over
tailcam mcp stdio or the authenticated /mcp HTTP mount. The MCP page in
the dashboard generates ready-to-paste connection snippets for each agent.
The HTTP endpoint is stateless: no Mcp-Session-Id, nothing kept between
requests, every POST a self-contained exchange. There is no session to resume or
expire, so restarting a node never strands a connected agent, and an agent can
call a tool without replaying initialize first. Each request states its own
revision in the MCP-Protocol-Version header, and authorization is re-derived
from the live Tailscale principal every time — so there's no session token to
steal or replay, and a revoked role takes effect on the agent's next call. Clients
that send a session id anyway are simply ignored, never bounced.
See docs/mcp.md and
docs/mcp-security.md.
Plugins & marketplace
TailCam is extensible: AI providers, notification channels, and motion-event automations are plugins. Open Plugins in the nav to browse the curated marketplace — Slack and ntfy.sh alerts, an OpenAI-compatible analyzer (LM Studio / llama.cpp / OpenRouter / OpenAI), a motion-event logger — and install with one click. Every marketplace file is reviewed and sha256-verified at install time, installs hot-load without a restart, and everything runs locally.
Building your own is one Python file with one import
(tailcam.plugins.sdk) — see the in-app Docs → Plugins authoring guide and
marketplace/ for the template + contribution process.
Community plugins land in the registry via reviewed pull requests.
Browser extension (optional)
TailCam Companion brings the dashboard into your browser chrome — strictly an enhancement, never a requirement. One shared WebExtension codebase ships for Chrome, Edge, Firefox, and Safari (Manifest V3, no frameworks, no third-party servers, no analytics):
- Toolbar mini-dashboard — live camera thumbnails across all your nodes, one-tap snapshot/record, and the latest motion events with their AI label chips.
- Badge + notifications — unseen-event count on the toolbar icon; native notifications filterable to labeled-only or person-only, with quiet hours.
- Glance window — pop any camera into a small floating viewer and keep working.
- Omnibox — type
tc <camera name>in the address bar to jump straight to it. - Keyboard shortcuts — open the dashboard or glance your pinned camera.
The extension talks directly to the nodes you configure (over your tailnet), and
host permission is requested per node at runtime. Source, build script, and
per-browser install instructions live in
browser-extensions/.
CLI
| Command | Description |
|---|---|
tailcam run |
Start the web server |
tailcam status |
Cameras + tailnet nodes (Rich table) and the access URL |
tailcam doctor |
Diagnostics: Python, OpenCV, cameras, Tailscale, fleet reachability |
tailcam cameras |
List detected cameras |
tailcam update [--check] |
Update from GitHub main (or only check); see Updating for PyPI |
tailcam start / stop / restart |
Control the background service |
tailcam install-service / uninstall-service |
Register/remove the background service |
tailcam tailscale serve / serve-off / status |
Manage tailnet exposure |
tailcam config [--init] [--port N] [--serve-port N] [--host H] |
Show or update config |
tailcam mcp stdio |
Run the MCP server for local agents |
tailcam app |
Launch the desktop app |
Tab-completion: tailcam --install-completion. tailcam --version prints the version.
Ports & Tailscale
There are two separate ports:
server.port(default 8088) — the local web UI:http://localhost:8088/.tailscale.serve_port(default 8443) — the tailnet-facing HTTPS port.
TailCam serves on https://<host>.<tailnet>.ts.net:8443/ by default rather than the
root (:443), so it won't clobber another app (e.g. OpenClaw) already served at the root
URL. Tailscale permits 443, 8443, and 10000 for serve/funnel.
To change the tailnet port:
tailcam tailscale serve --https-port 10000   # one-off + saved to config
# or edit ~/.config/tailcam/config.toml  ([tailscale] serve_port = 10000) and restart the service
If TailCam previously grabbed the root URL and you want it back for another app:
tailcam tailscale serve-off --https-port 443 # removes only TailCam's :443 handler
Security model
TailCam's boundary is your Tailscale network: the server binds to 127.0.0.1 and is reached
over your tailnet, with no per-request login. On top of that, TailCam ships defense-in-depth:
- Cross-origin / drive-by protection — state-changing requests (snapshot, record, delete,
settings) from a foreign web origin are rejected; only localhost and your tailnet (
*.ts.net) may mutate. This stops a malicious site you visit from poking your local TailCam (CSRF / DNS rebinding). - Security headers on every response —
Content-Security-Policy(same-origin only),X-Frame-Options,X-Content-Type-Options: nosniff,Referrer-Policy,Permissions-Policy. - No SSRF amplification — the peer reverse-proxy does not follow redirects.
- Anti-DNS-rebinding — state-changing requests are accepted only when the
Hostis loopback, an IP literal, or your tailnet (*.ts.net); a rebound attacker hostname is rejected. - Secrets (MQTT password, HomeKit pin, Tailscale keys) live in
config.toml, written0600in cleartext — secure your backups and support bundles accordingly. - No TailCam account or hosted camera service. Update checks, package/plugin/model downloads, and Tailscale setup contact their respective services. Optional notification and AI-provider plugins can send events or frames to the endpoints you configure; review those integrations before enabling them.
Keep the default 127.0.0.1 bind — don't expose TailCam directly to a public network; let
Tailscale handle access.
Architecture
One capture thread per camera publishes the latest frame into a lock-light
FrameBuffer; FastAPI serves an MJPEG stream (multipart/x-mixed-replace) with
JPEG encoding offloaded to a thread pool so the event loop never blocks. The
streaming layer sits behind a StreamBackend abstraction, so a low-latency
WebRTC backend can be added later without changing capture or the web layer.
Settings live in a TOML config; the camera registry, media index, and motion
events live in SQLite.
Development
python3 -m venv .venv && source .venv/bin/activate
python -m pip install -e ".[dev,homekit,mqtt]"
TAILCAM_SYNTHETIC=1 tailcam run    # run without a physical webcam
pytest                             # tests use a synthetic camera, no hardware needed
ruff check src tests && mypy src/tailcam
Set TAILCAM_SYNTHETIC=1 to use a built-in synthetic camera source — useful on
headless servers, in containers, and in CI where no webcam exists.
The dashboard front-end lives in web-ui/ (React + Vite). Its build
output is committed to src/tailcam/web/spa/ and ships in the wheel, so end users
never need Node. Dashboard development requires Node.js 22 or newer; CI and the
Docker build use Node 22. To change the UI or in-app docs:
cd web-ui && npm ci && npm run typecheck && npm run build, then commit both the
source and the regenerated src/tailcam/web/spa/. Run npm audit after dependency
changes and follow the dashboard development guide for browser checks.
Releases: bump __version__ in src/tailcam/__init__.py and the
version in web-ui/package.json, web-ui/package-lock.json, and all four
browser-extensions/*/manifest.json files (keep them identical) with every change
merged to main; tests enforce they match. Update the extension options-page
version label too. The version is shown by tailcam version (and tailcam --version), tailcam status, /api/system, and the
dashboard Settings page — it's how you confirm a node is actually running the
build you think it is.
Publishing a release
PyPI publishing uses GitHub Trusted Publishing through
.github/workflows/pypi-publish.yml and the pypi environment; no PyPI API token
is needed. The project already exists at PyPI,
so maintain its publisher under the project's publishing settings rather than
creating another pending publisher.
- Bump the version, rebuild any changed dashboard/docs, and run the checks above.
- Build and validate the distributions:
python -m pip install build twine, thenpython -m buildandpython -m twine check --strict dist/*in a clean checkout. - Merge the PR, then publish a GitHub Release whose
vX.Y.Ztag points to that merged commit. The tag must match the package version; the workflow does not bump or validate the version for you. Alternatively, run Publish to PyPI manually frommainonce for that version. - Confirm the workflow succeeds and
python -m pip index versions tailcamshows the new version. Test installation in a fresh virtual environment.
Merging alone does not publish to PyPI. Avoid uploading the same version via both triggers: PyPI rejects reusing distribution filenames. The PyPI description comes from the README packaged with each release; editing GitHub's README does not change an already uploaded distribution.
License
1 maintainer

Metadata
1 maintainer
Release files for tailcam 1.9.0
For a detailed explanation of source distributions (sdists) and built distributions (wheels), please see the package formats documentation.
Source distribution (sdist)
| File | Size | Uploaded | |
|---|---|---|---|
| tailcam-1.9.0.tar.gz | 5.4 MB | Details |
Built distribution (wheel)
| File | Interpreter | ABI | Platform | Reset |
|---|---|---|---|---|
| tailcam-1.9.0-py3-none-any.whl | Python 3 | none | any | Details |
Total release size: 6.5 MB
Release files / tailcam-1.9.0.tar.gz
| Download URL | tailcam-1.9.0.tar.gz |
|---|---|
| Size | 5.4 MB |
| Tags | Source |
|
SHA-256 checksum How to use checksums |
6175a71260880c4c6464a6544bb35092ad5992b0444e85504b1e760b8482d543
|
|
BLAKE2b-256 checksum How to use checksums |
ec8ad7b0dfc412a785d734401062f9f08355e609237aab2efe140a92893afdb7
|
| Upload date | |
|
Uploaded using Trusted Publishing? What is trusted publishing? |
Yes |
| Uploaded via |
twine/7.0.0 CPython/3.13.14
|
Provenance
Provenance describes where a file came from. On PyPI, provenance is shared via attestations, which provide a verifiable record of the build or publishing details. View details, limitations and caveats.


PyPI Publish Attestation
PyPI verified that this artifact, at this checksum, originated from the publisher listed below.
Signed by GitHub Actions, verified by PyPI on Sep 11, 2026.
Transparency logRelease files / tailcam-1.9.0-py3-none-any.whl
| Download URL | tailcam-1.9.0-py3-none-any.whl |
|---|---|
| Size | 1.1 MB |
| Tags | Python 3 |
|
SHA-256 checksum How to use checksums |
26d4f45f02c521ea5e4045749313d9f29602b9c6522650c74f01a51f4e270aac
|
|
BLAKE2b-256 checksum How to use checksums |
a6417c2db67d08ed98cd67c3835ade642ab64bfd3d3c35cfe20ee742a54c5ab4
|
| Upload date | |
|
Uploaded using Trusted Publishing? What is trusted publishing? |
Yes |
| Uploaded via |
twine/7.0.0 CPython/3.13.14
|
Provenance
Provenance describes where a file came from. On PyPI, provenance is shared via attestations, which provide a verifiable record of the build or publishing details. View details, limitations and caveats.
PyPI Publish Attestation
PyPI verified that this artifact, at this checksum, originated from the publisher listed below.
Signed by GitHub Actions, verified by PyPI on Sep 11, 2026.
Transparency log













