
TeleInfo Reader
Application used to read the user data transmitted by Linky meter system (TeleInfo) from Enedis. The application then provides the data using a socket server to connected clients and also publish it to a local database. The application runs on a Raspberry Pi Zero and is used only to collect the user data from the meter equipment, the monitoring is done with another application which connects to the Raspberry Pi and plot all the gathered information (see TeleInfoMonitor application).
Hardware Description
Material
Raspberry Pi Zero
Board version:
$ cat /proc/device-tree/model
Raspberry Pi Zero W Rev 1.1
OS version:
$ cat /etc/os-release
PRETTY_NAME="Raspbian GNU/Linux 10 (buster)"
Serial Link Configuration
The acquisition of the user data frame (TeleInfo) is done using the serial link provided by Enedis meter equipment. On the Raspberry Pi, the reception of the serial data is done using a hardware module called PiTInfo, which is connected on the GPIOs of the Raspberry Pi board.
How to plug the PiTInfo module
The PiTInfo module should be plugged on GPIO pins {1..10} like in below picture:
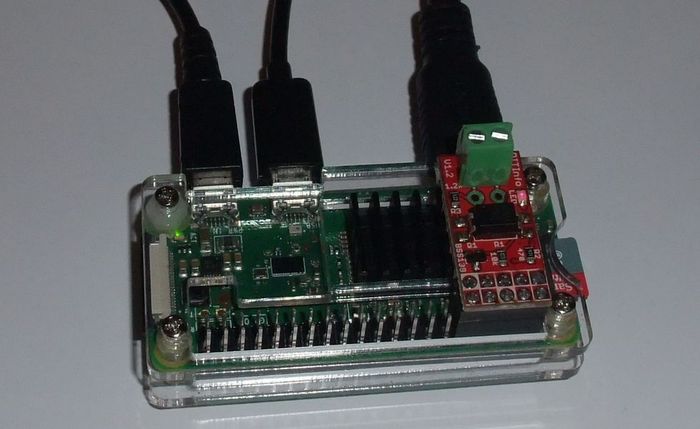
For information, the full mapping of GPIOs can be found here: model-zerow-rev1
Pin 8 and 10, respectively GPIO 15 and 16 corresponds to the UART, which means where we get the serial data from Linky meter.
Serial Link Configuration
- Disable serial console (in order to use the serial link device for Linky reception):
- Edit /boot/cmdline.txt
- Remove line:
console=serial0,(...)
- Disable bluetooth module(so it doesn't use UART):
- Edit /boot/config.txt
- Add line:
dtoverlay=pi3-miniuart-bt
- Reboot raspberry
How to test serial link
$ sudo stty -F /dev/ttyAMA0 1200 sane evenp parenb cs7 -crtscts
$ sudo chmod 666 /dev/ttyAMA0
$ sudo cat /dev/ttyAMA0
This should output the data collected from Linky. If nothing returned, then serial link is probably not well configured.
How to create database on Raspberry
The application collects the TeleInfo frames and stores them into a local database called teleinfodb. This database
should be created and configured manually on the Raspberry Pi.
Install MariaDB server locally
$ sudo apt update
$ sudo apt upgrade
$ sudo apt install mariadb-server
$ sudo apt install libmariadbclient-dev # For python bindings
$ sudo apt install libmariadb3 libmariadb-dev # For python3 mariadb connectors
For Windows, in order to install mariadb python package, it is required to install:
- MariaDB's connectors, which can be found here
- Microsoft Visual C++ 14.0 or greater:
- Download Microsoft Build Tools here
- Select custom installation and install "MSVC v143 - VS 2022 C++ x64/x86 build tools (Latest)"
Create and configure database
Creation
Secure and configure mysql:
$ sudo mysql_secure_installation # Say yes to all
$ sudo mysql -u root -p
Create database (replace <user>, <password> and <remote-ip-address> by your own):
NB: is the IP address of the remote client from where it'll try to connect to the Raspberry Pi.
CREATE DATABASE teleinfodb;
CREATE USER '<user>'@'<remote-ip-address>' IDENTIFIED BY '<password>';
GRANT ALL PRIVILEGES ON teleinfodb.* TO '<user>'@'<remote-ip-address>';
FLUSH PRIVILEGES;
Configuration
Enable remote access to database (in order for a third party tool to connect to the database on the Raspberry Pi):
In file /etc/mysql/mariadb.conf.d/50-server.cnf, change line bind-address = 127.0.0.1 to bind-address = *
Restart mysql:
$ sudo service mysql restart
To connect remotely:
$ mysql -u <user> -p -h <raspberry-ip-address>
Creating the DB schema and table
create schema teleinfodb;
use teleinfodb;
create table teleinfoframes
(
    timestamp                    timestamp default current_timestamp() not null on update current_timestamp() comment 'Frame timestamp in format YYYY-MM-DD HH:mm:ss.zzzzzz'
        primary key,
    meter_identifier             char(12)                              not null comment 'Identifier of Enedis telemeter',
    subscription_type            char(4)                               not null comment 'Customer subscription mode',
    subscription_power_in_a      tinyint unsigned                      not null comment 'Power in amperes',
    total_base_index_in_wh       int unsigned                          not null comment 'Total base index in W.h',
    current_pricing_period       char(4)                               not null comment 'Current period if using peak/off-peak pricing',
    instantaneous_intensity_in_a smallint unsigned                     not null comment 'Current intensity in amperes',
    intensity_max_in_a           smallint unsigned                     not null comment 'Maximum intensity in amperes',
    power_consumption_in_va      mediumint unsigned                    not null comment 'Power consumption in V.A',
    peak_off_peak_schedule       char                                  not null comment 'Peak/Off-peak time schedule',
    meter_state_code             char(6)                               null comment 'Error code returned by telemeter'
)
    comment 'Table containing the teleinfo frames' collate = utf8mb4_general_ci;
Get size of database
SELECT table_schema                                            'teleinfodb',
       SUM(data_length + index_length)                         'Size in Bytes',
       ROUND(SUM(data_length + index_length) / 1024 / 1024, 2) 'Size in MiB'
FROM information_schema.tables
WHERE table_schema = 'teleinfodb'
GROUP BY table_schema;
How to create TeleInfoReader daemon service
Here we describe how to configure a Linux service for the application in order to automatically start after the Raspberry Pi boot sequence.
- Copy teleinforeader.service file into
/lib/systemd/system/ - Use below commands to enable the service:
$ sudo systemctl daemon-reload # To reload available services
$ sudo systemctl start teleinforeader.service
$ sudo systemctl status teleinforeader.service # To check if it worked
$ sudo systemctl enable teleinforeader.service # To enable service at boot
$ sudo systemctl disable teleinforeader.service # To disable the service at boot
- Program should run automatically at next reboot
Project Management
How to publish project on Pypi
Test publish using TestPyPi (from host):
Pre-requisites:
- Create an account on TestPypi
- Create file ~/.pypirc containing the PyPi API token
$ python -m pip install --upgrade pip setuptools wheel build
$ python -m pip install --upgrade twine
Publishing:
$ poetry version patch # To increment the version number
$ poetry build  # To generate distribution packages for the package
$ poetry config repositories.test-pypi https://test.pypi.org/legacy/
$ poetry publish --build -r test-pypi --username __token__ --password <api-token>
New version checklist
Create a pre-release tag
- Update project version:
$ poetry version patch
$ poetry build
- Update Changelog.md file
- Run tests locally
- Commit new version with comment
Update version to vX.Y.Z - If CI is passed, create a new pre-release tag
vX.Y.Z_pre-release - Push the new tag -> pre-release workflow should be executed
- If pre-release passed, then project is available on TestPyPi
- Update application on Raspberry Pi and test it
1 maintainer

Metadata
1 maintainer
Release files for teleinforeader 0.1.3
For a detailed explanation of source distributions (sdists) and built distributions (wheels), please see the package formats documentation.
Source distribution (sdist)
| File | Size | Uploaded | |
|---|---|---|---|
| teleinforeader-0.1.3.tar.gz | 15.3 kB | Details |
Built distribution (wheel)
| File | Interpreter | ABI | Platform | Reset |
|---|---|---|---|---|
| teleinforeader-0.1.3-py3-none-any.whl | Python 3 | none | any | Details |
Total release size: 30.5 kB
Release files / teleinforeader-0.1.3.tar.gz
| Download URL | teleinforeader-0.1.3.tar.gz |
|---|---|
| Size | 15.3 kB |
| Tags | Source |
|
SHA-256 checksum How to use checksums |
30be3e6b15429802bd8931eadb3133b7446d66017d5fb138537f432ad27d14b3
|
|
BLAKE2b-256 checksum How to use checksums |
154376a993af3e1e7459e5b7c6bd47fce799e188ce5f8507bea65575bc01b73c
|
| Upload date | |
|
Uploaded using Trusted Publishing? What is trusted publishing? |
No |
| Uploaded via |
poetry/1.2.2 CPython/3.7.15 Linux/5.15.0-1023-azure
|
Release files / teleinforeader-0.1.3-py3-none-any.whl
| Download URL | teleinforeader-0.1.3-py3-none-any.whl |
|---|---|
| Size | 15.2 kB |
| Tags | Python 3 |
|
SHA-256 checksum How to use checksums |
592696cb57978e77ef697a6b4287c01a6878af1e0e1886bfc03f7c816350d26a
|
|
BLAKE2b-256 checksum How to use checksums |
3431d371fdc9ef7378df535ee7199aa321170b11e82907e9b5113efba4bd75ac
|
| Upload date | |
|
Uploaded using Trusted Publishing? What is trusted publishing? |
No |
| Uploaded via |
poetry/1.2.2 CPython/3.7.15 Linux/5.15.0-1023-azure
|














