

terminal-tiger
Photographic, animated portraits for your terminal and your AI coding agents. A tiger (or your dog, your logo, your face) that reveals itself when you open a shell or start Claude Code, Codex or Gemini CLI.


Live playground · Quick start · AI agents · Make it yours · Share it · How it works
Built at Google for Startups · Los Angeles Tech Week 2026
Quick start
Try it without installing anything (needs uv):
uvx terminal-tiger
Install it and set it up:
uv tool install terminal-tiger
tiger --install-shell --wrap
Open a new terminal to meet your tiger. It greets you once a day when a shell
opens. --wrap also plays it every time you start claude, codex or
gemini. Both live in one marked block in your ~/.zshrc, ~/.bashrc or fish
config (whichever shell you use). Delete the block to undo.
No uv? Use pipx install terminal-tiger.
The first run downloads the tiger photo into ~/.cache/terminal-tiger/. After
that it works offline.
In Claude Code, Codex & Gemini CLI
With --wrap, claude plays the reveal at double speed and then starts
Claude Code as usual. Ctrl-C skips straight to the agent.
- Headless runs stay clean.
claude -p,codex exec,gemini -pand--versionget no portrait. Neither do commands an agent runs itself, because they have no terminal attached. - IDE terminals too. VS Code, Cursor and Antigravity load your shell, so their built-in terminals get the greeting and the launchers.
- Any command.
tiger --install-shell --wrap claude aiderwraps the commands you name instead.
Tune it with a [greet] table in your config:
[greet]
preset = "cookie"     # which portrait to show (default: your default preset)
speed = 3             # animation tempo (default 2)
once_a_day = true     # only the first launch of each agent per day
A pet for Codex
The Codex CLI can keep an animated pet beside its prompt. Make yours:
tiger --codex-pet # or: tiger cookie --codex-pet
This writes ~/.codex/pets/tiger/. Pick it in Codex's pet menu, or set
pet = "custom:tiger" under [tui] in ~/.codex/config.toml. Its eyes burn
while Codex waits for you, the reveal ripple loops while it thinks, and it
turns gray when it's blocked. Codex draws pets in terminals with Kitty graphics
or Sixel (Ghostty, Kitty, WezTerm, iTerm2 3.6+, Windows Terminal), outside tmux.
Make it yours
Any photo works. Front-facing, evenly lit, on a plain or dark background works best.
tiger ~/Pictures/cookie.jpg --title cookie
tiger https://example.com/logo.png --reveal iris --accent "#3fa9ff"
| Flag | What it does | Default |
|---|---|---|
--crop L T R B |
Crop box, as fractions of the image | 0 0 1 1 |
--eyes X,Y X,Y |
Eye positions (fractions of the cropped image). The ripple starts here. | none |
--title TEXT |
Letter-spaced title, typed out after the reveal | tiger (tiger preset) |
--subtitle TEXT |
Dim line below. Tokens: {user} {host} {date} {time} {cwd} |
none |
--accent #hex |
Color of the reveal flash and the title | #ff8c1e |
--title-color #hex |
Title color, if different from the accent | accent |
--bg #hex |
Your terminal background, so the vignette fades into it | asks your terminal |
--reveal STYLE |
ripple · iris · scan · dissolve · none |
ripple |
--duration SEC |
How long the wave takes to cross the image | 1.6 |
--speed N |
Tempo of the whole animation (2 = twice as fast) |
1 |
--vignette N |
Edge softness, 0 = off |
1.4 |
--saturation --contrast --sharpen |
Photo tuning | 1.15 1 1 |
--width --max-height |
Size in terminal cells | fit the terminal |
--mode |
auto · true (24-bit) · direct (old tmux) · 256 |
auto |
--no-anim |
Draw instantly | |
--once-a-day |
Show at most once per day (for shell startup) |
Finding the eyes: open the image in any editor and read the pixel coordinates of each pupil. Subtract the crop's left/top edge, then divide by the crop's width/height. Or just guess, run it, and nudge. It takes about a minute.
Presets & config
Save your look in ~/.config/terminal-tiger/config.toml (see
examples/config.toml):
preset = "cookie"            # what `tiger` shows with no arguments

[style]                      # applies to every preset
subtitle = "welcome back, {user}"

[presets.cookie]
image = "~/Pictures/cookie.jpg"
crop = [0.10, 0.00, 0.90, 0.85]
eyes = [[0.40, 0.42], [0.60, 0.42]]
title = "cookie"
accent = "#ffd166"
Settings are applied in this order, each overriding the last: built-in
defaults → built-in preset → [style] → [presets.NAME] → command-line flags.
Run tiger --list to see your presets.
Share it
- Your look, as a link. Pick a reveal, accent and title in the playground, then press Copy link. Whoever opens it sees your version and gets the matching command.
- Your preset. A preset is a few lines of TOML, and
imagecan be a URL, so one pasted into a gist or your dotfiles works on any machine. - A GIF.
tools/make_demo.pyrecords the real CLI to a GIF, headless. - The showcase. Made something great? Open a PR that adds it below.
Showcase
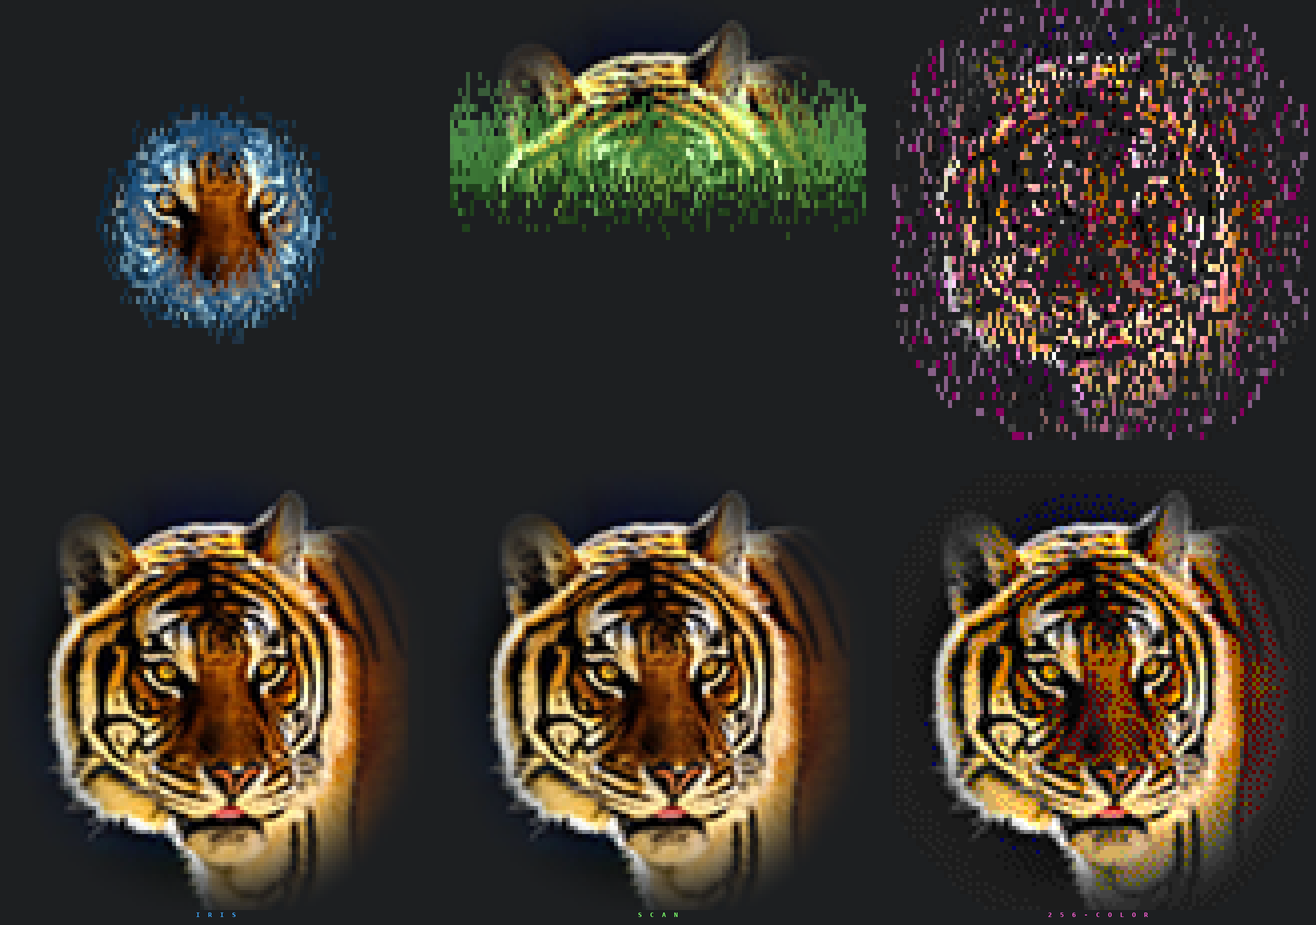
Top row: mid-reveal. Bottom row: finished. Left to right: --reveal iris --accent "#3fa9ff", --reveal scan --accent "#7cff6b", --mode 256 --reveal dissolve --accent "#ff4fd8".
How it works
The project started as a plain ASCII tiger that looked like static. These are the changes that turned it into a portrait, roughly in order of impact:
- Half-block pixels. Each character cell prints
▀with a 24-bit foreground color (the top pixel) and a 24-bit background color (the bottom pixel). That gives two square-ish pixels per cell, full color, and no aspect-ratio squash. Brightness-ramp ASCII throws all that color away. - Pick the right photo. A dark background, a front-facing pose and both ears in frame mattered more than any code change.
- Contrast without changing the colors. Plain
autocontraststretches the R, G and B channels separately, which turned brown fur red.preserve_tone=Truestretches brightness only. - A vignette fades the edges into your terminal background, so the portrait floats instead of sitting in a rectangle. The background color comes from the terminal itself (an OSC 11 query), so it matches without setup.
- The tmux trap. Google Cloud Shell runs inside tmux 2.1, which
silently converts 24-bit color to 256 colors (truecolor passthrough arrived
in tmux 2.2).
--mode directdetects this and writes straight to the client's tty withtmux display -p '#{client_tty}', skipping tmux entirely. - A 256-color fallback that still looks good. For terminals without truecolor, the image is Floyd–Steinberg dithered into the xterm-256 palette with perceptual weights, so browns don't collapse into maroon.
- The reveal. Every cell gets a start time from its distance to the eyes, plus a little noise, so the edge looks organic instead of a perfect circle. It fades up from black through a flash of the accent color. Only cells that change are redrawn, at roughly 30 fps. Cells are positioned with save/restore cursor and relative moves, so it draws inline under your prompt without clearing the screen.
Terminal support
| Terminal | Mode picked by auto |
|---|---|
| iTerm2, WezTerm, Kitty, Ghostty, Alacritty, Windows Terminal, VS Code, Cursor, Antigravity, GNOME Terminal | true |
tmux ≥ 2.2 with set -as terminal-features ',*:RGB' |
true |
| tmux ≥ 2.2 without RGB enabled | 256 (add the line above to ~/.tmux.conf for full color) |
| tmux < 2.2 (e.g. Google Cloud Shell) | direct |
| Apple Terminal, Linux console | 256 |
Output that is piped or redirected gets static lines with no cursor movement,
so tiger > tiger.ans && cat tiger.ans works.
Record your own demo
tools/make_demo.py runs the real CLI inside a virtual terminal (a pty plus
pyte) and turns the byte stream into a
GIF. No screen recorder is needed, and it works headless:
uv run tools/make_demo.py docs/mine.gif --bg "#1d1f21" -- ~/me.jpg --title me --bg "#1d1f21"
Development
uv run pytest # tests: config, dithering, reveal timing, rendering, shell hooks, Codex pet
The CLI is a single, dependency-light file
(terminal_tiger.py) with inline
PEP 723 metadata, so it even runs
straight from GitHub with nothing installed:
uv run https://raw.githubusercontent.com/joshogden360/terminal-tiger/main/terminal_tiger.py.
Its source is
ASCII-only on purpose, so it can be pasted or typed into any terminal, even
through a browser. See CONTRIBUTING.md.
Credits
- Built at Google for Startups · Los Angeles Tech Week 2026 by Josh Ogden.
- Default photo: “Bengal Tiger Portrait” by Shootsalot, licensed CC BY-SA 4.0, via Wikimedia Commons. The photo is not included in this repository. It is downloaded on first run.
docs/demo.gif,docs/demo.png,docs/styles.png,docs/og.png, the pet preview and the cell data embedded indocs/index.htmlare renderings of that photo, and are shared under CC BY-SA 4.0. See CREDITS.md.- Code: MIT.
1 maintainer

Metadata
1 maintainer
Release files for terminal-tiger 0.2.0
For a detailed explanation of source distributions (sdists) and built distributions (wheels), please see the package formats documentation.
Source distribution (sdist)
| File | Size | Uploaded | |
|---|---|---|---|
| terminal_tiger-0.2.0.tar.gz | 26.9 kB | Details |
Built distribution (wheel)
| File | Interpreter | ABI | Platform | Reset |
|---|---|---|---|---|
| terminal_tiger-0.2.0-py3-none-any.whl | Python 3 | none | any | Details |
Total release size: 49.3 kB
Release files / terminal_tiger-0.2.0.tar.gz
| Download URL | terminal_tiger-0.2.0.tar.gz |
|---|---|
| Size | 26.9 kB |
| Tags | Source |
|
SHA-256 checksum How to use checksums |
7ff858dee9f2055bb6727fd77b7f75dcce0c9af5bed2acb6c740ecbd8f79f793
|
|
BLAKE2b-256 checksum How to use checksums |
453d084727410c06a588f2d879be81cdf9463287986768cbb6fc11616d1178eb
|
| Upload date | |
|
Uploaded using Trusted Publishing? What is trusted publishing? |
Yes |
| Uploaded via |
uv/0.13.1 {"installer":{"name":"uv","version":"0.13.1","subcommand":["publish"]},"python":null,"implementation":{"name":null,"version":null},"distro":{"name":"Ubuntu","version":"24.04","id":"noble","libc":null},"system":{"name":null,"release":null},"cpu":null,"openssl_version":null,"setuptools_version":null,"rustc_version":null,"ci":true}
|
Release files / terminal_tiger-0.2.0-py3-none-any.whl
| Download URL | terminal_tiger-0.2.0-py3-none-any.whl |
|---|---|
| Size | 22.4 kB |
| Tags | Python 3 |
|
SHA-256 checksum How to use checksums |
79c8c43a978cbccc47915d5f551c2f79c375dc1145fd584df45ee40e5950a488
|
|
BLAKE2b-256 checksum How to use checksums |
379bb8953baaef98543fac776b870f89a69da72e191d3b5ff5fecb8f9d0a0d27
|
| Upload date | |
|
Uploaded using Trusted Publishing? What is trusted publishing? |
Yes |
| Uploaded via |
uv/0.13.1 {"installer":{"name":"uv","version":"0.13.1","subcommand":["publish"]},"python":null,"implementation":{"name":null,"version":null},"distro":{"name":"Ubuntu","version":"24.04","id":"noble","libc":null},"system":{"name":null,"release":null},"cpu":null,"openssl_version":null,"setuptools_version":null,"rustc_version":null,"ci":true}
|














