
GPU and CPU thermal gauges for Linux — six circular arc gauges on a dedicated monitor

Project description






The Linux software for dedicated hardware monitoring screens — like AIDA64's sensor panel, but native to your desktop.
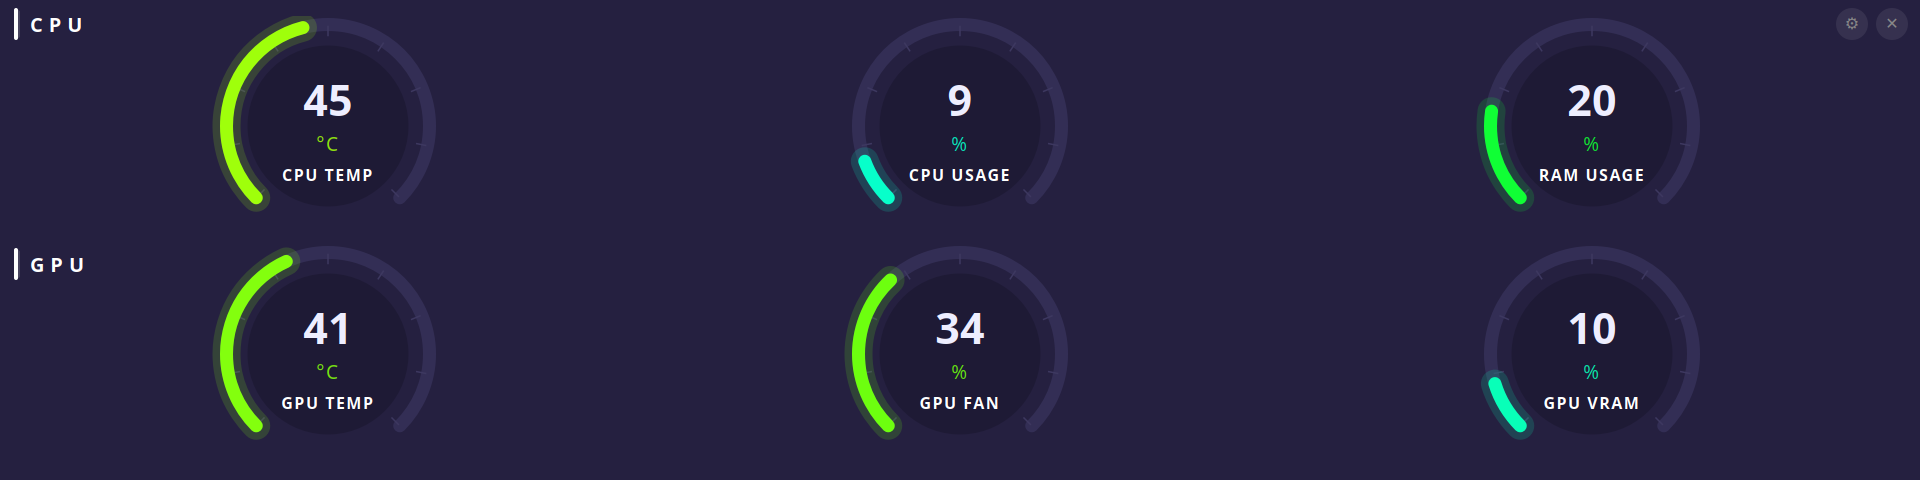
6 circular arc gauges (CPU temp, usage, RAM · GPU temp, fan, VRAM) built with PyQt6 and pynvml. Smooth 60fps animation, rolling average stabilisation, dynamic heat colors. Auto-starts on login.
Built for dedicated monitoring screens — works out of the box on stretched panels (1920×480), small IPS monitors, or any secondary display you use as a permanent hardware panel.
⚠ Important — this is NOT an overlay. Thermal Canary is a fullscreen app intended for a dedicated monitor. Don't try to use it as an in-game overlay (use MangoHud for that).
Fully responsive — gauges scale to any resolution and orientation: ultrawide, portrait, rotated, compact.
One-command install — pipx install thermalcanary and you're done.
Dedicated monitoring screen setup
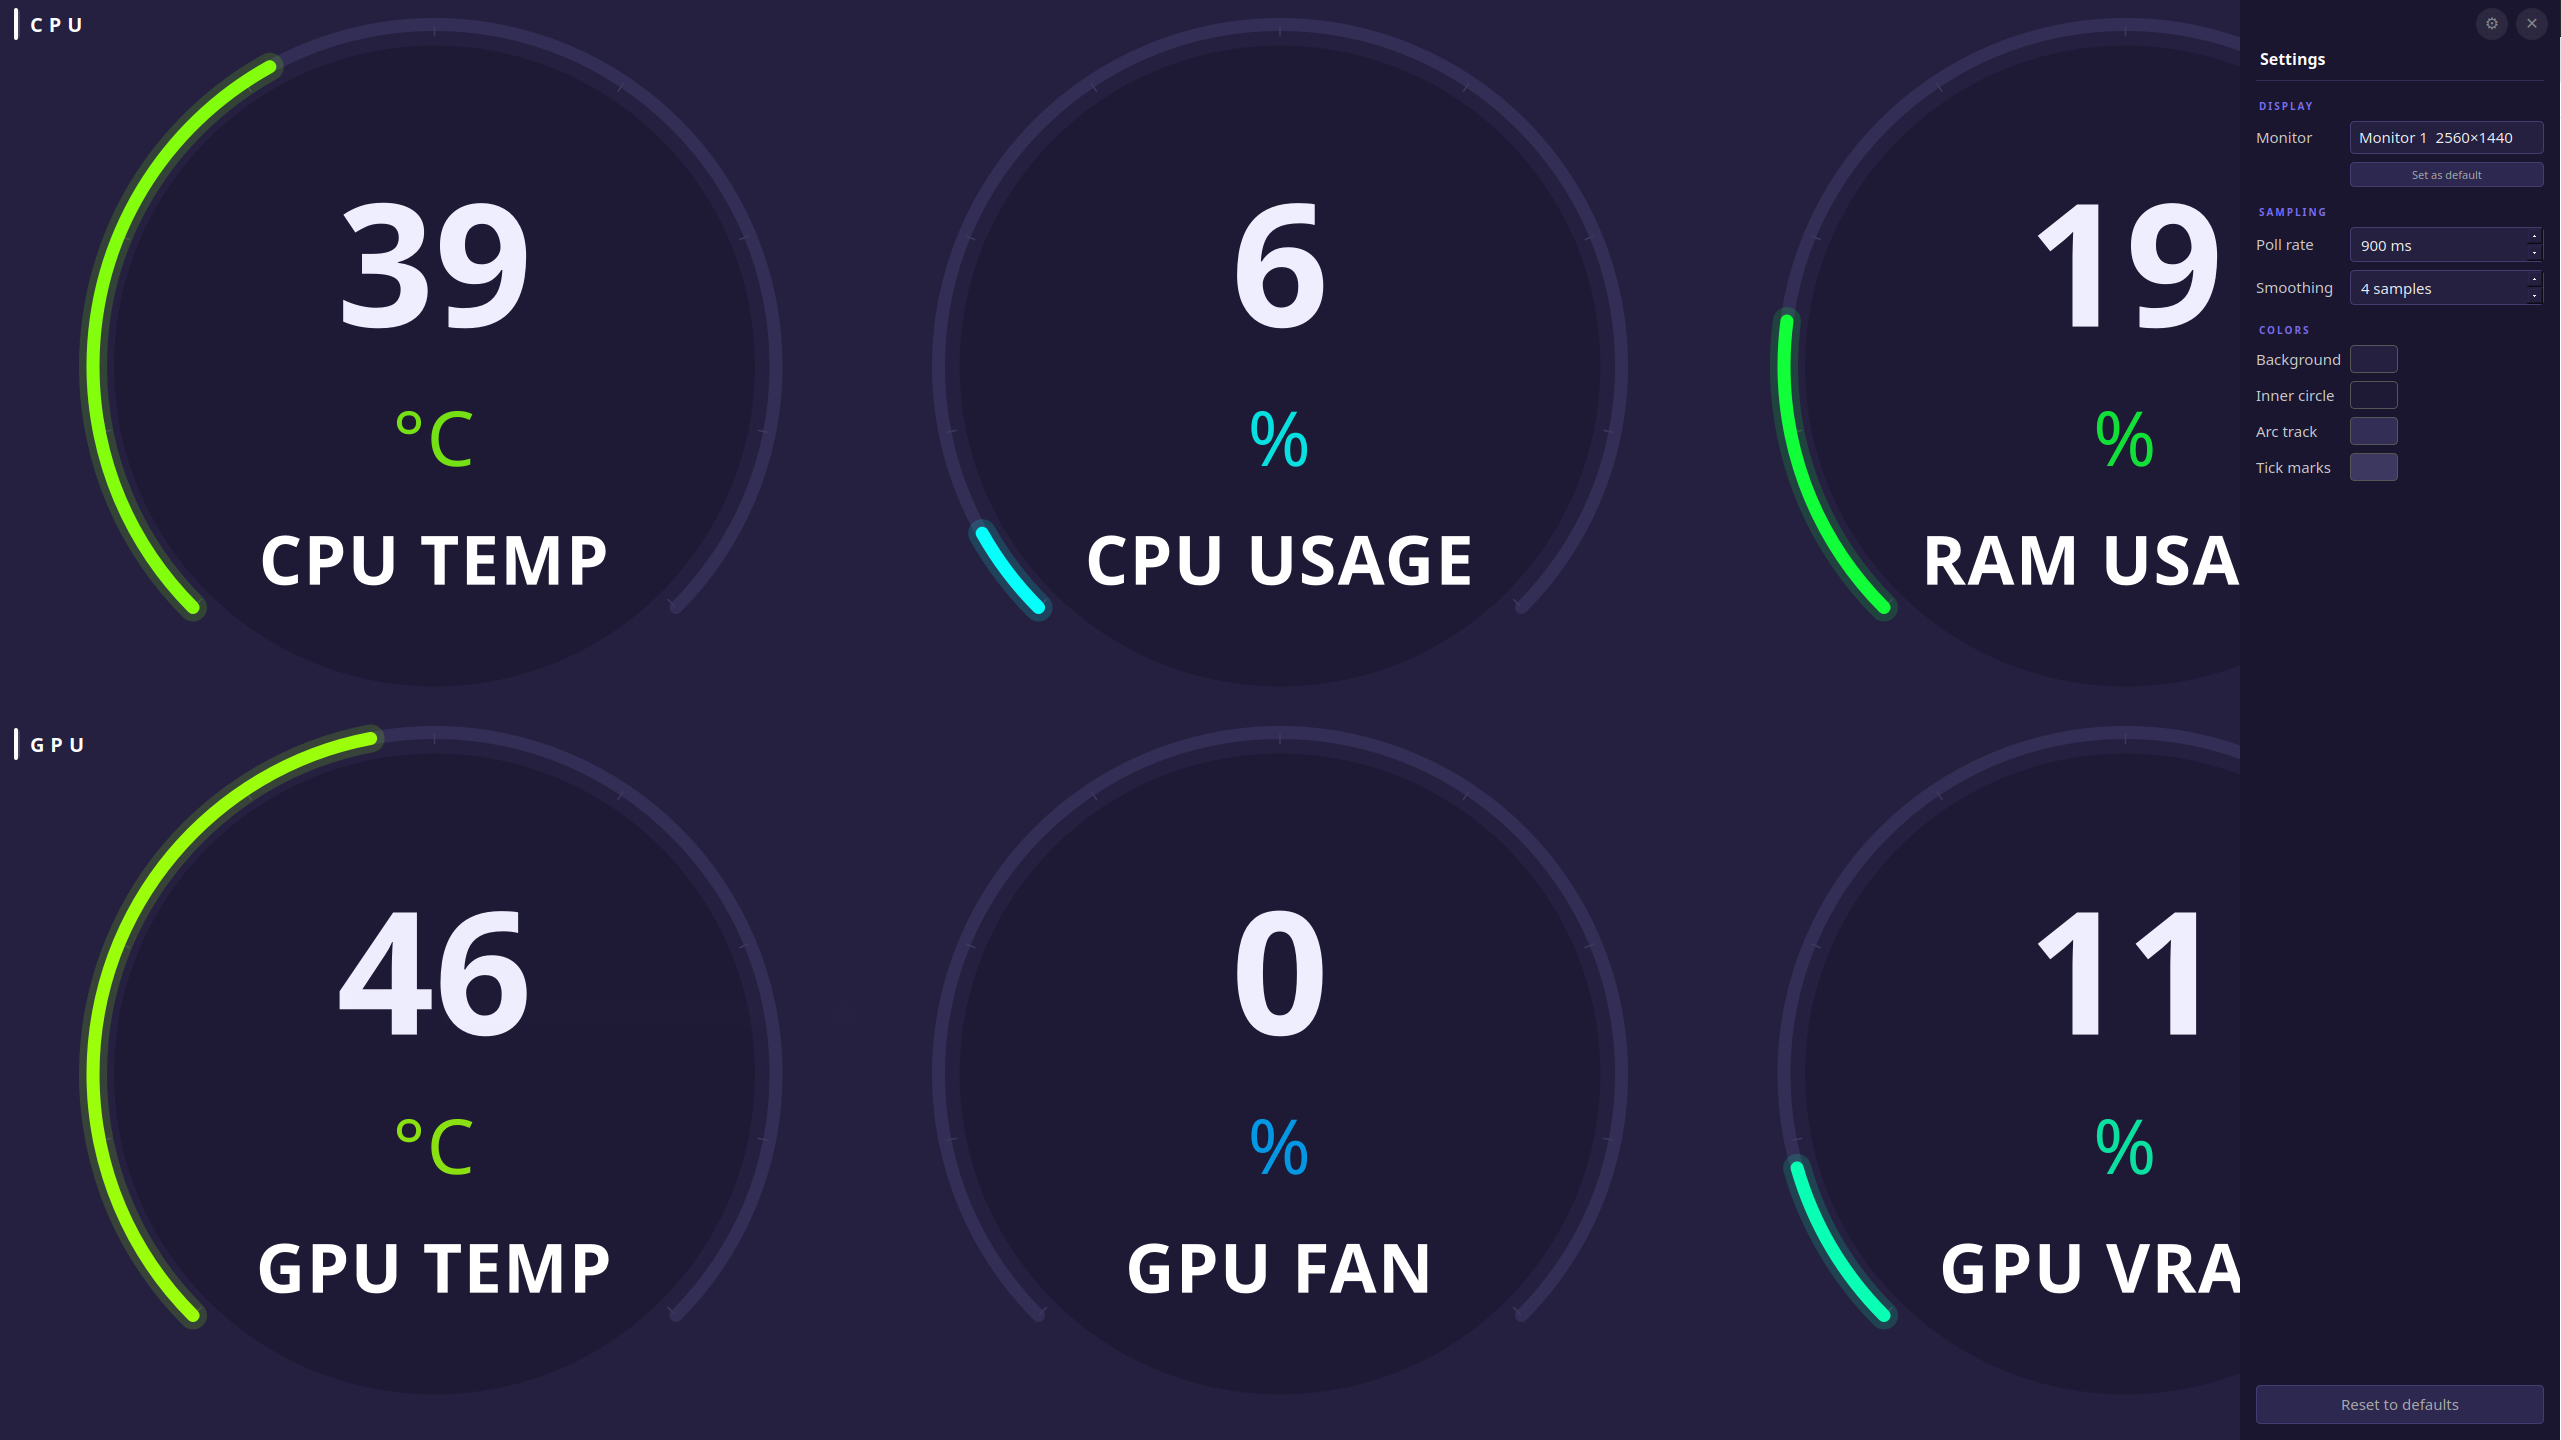
Plug in a secondary screen (a stretched panel, a small IPS monitor, anything), select it in the Settings sidebar under Monitor, and click Set as default. Thermal Canary will always open on that screen at login — no configuration files to edit.
Gauges
| Row | Gauge | Source |
|---|---|---|
| CPU | CPU Temperature | psutil.sensors_temperatures() — coretemp/k10temp (configurable) |
| CPU | CPU Usage % | psutil |
| CPU | RAM Usage % | psutil |
| GPU | GPU Temperature | NVIDIA: pynvml · AMD: sysfs hwmon · Intel: xe/i915 sysfs |
| GPU | GPU Fan Speed % | NVIDIA: pynvml · AMD: sysfs hwmon (0% = fans stopped or AMD integrated GPU with no fan) |
| GPU | GPU VRAM Usage % | NVIDIA: pynvml · AMD: sysfs hwmon · Intel: always 0 (not exposed by driver) |
Requirements
Tested and supported on Ubuntu 24.04 LTS. Other distros (Fedora, Arch, openSUSE) are supported by the installer but have not been formally tested yet. Ubuntu versions below 24.04 may work but are not guaranteed.
The installer checks and installs everything automatically. Here is the full dependency list:
System packages (installed automatically via your distro's package manager):
| Dependency | Purpose |
|---|---|
| Python 3.10+ | Runtime |
python3-venv |
Isolated Python environment |
lm-sensors |
Populates /sys/class/hwmon for CPU temperature |
XCB cursor libs (libxcb-cursor0 / xcb-util-cursor) |
Required by PyQt6 on X11 |
NVIDIA driver — checked separately. The installer prints distro-specific install instructions if the driver is missing. GPU gauges (temperature, fan, VRAM) require the driver for NVIDIA; AMD and Intel GPUs are read via sysfs without any driver installation.
GPU backends: NVIDIA (
pynvml, direct NVML — nonvidia-smisubprocess), AMD (amdgpusysfs hwmon — kernel driver, no extra install), Intel (xe/i915sysfs hwmon). The backend is auto-detected at startup or can be forced in the Settings sidebar. If no GPU is detected, all three GPU gauges show—.
Python libraries (installed automatically into a venv):
| Library | Purpose |
|---|---|
PyQt6 |
GUI framework |
psutil |
CPU temperature, CPU usage, RAM usage |
nvidia-ml-py (pynvml) |
GPU metrics via direct NVML calls — no nvidia-smi subprocess |
PyYAML |
Config file read/write |
Supported package managers: apt (Debian/Ubuntu), dnf (Fedora/RHEL), pacman (Arch), zypper (openSUSE).
Install
Prerequisites
Install these system packages once before the first run (needed by PyQt6 on X11):
| Distro | Command |
|---|---|
| Ubuntu / Debian | sudo apt install lm-sensors libxcb-cursor0 libxcb-xinerama0 |
| Fedora / RHEL | sudo dnf install lm_sensors xcb-util-cursor |
| Arch | sudo pacman -S lm_sensors xcb-util-cursor |
| openSUSE | sudo zypper install lm-sensors xcb-util-cursor |
NVIDIA users: GPU gauges require the proprietary NVIDIA driver. Without it the three GPU gauges show — but everything else works fine.
Install
pipx install thermalcanary
thermalcanary
Thermal Canary runs entirely as your user — no root needed at runtime.
On first launch, it automatically installs the app grid icon and sets up autostart on login (8-second delay to let the desktop session initialize). No extra commands needed.
Migrating from a previous bash install.sh install
# Remove old install.sh files
rm -rf ~/.local/share/thermalcanary
rm -f ~/.config/autostart/thermalcanary.desktop
rm -f ~/.local/share/applications/thermalcanary.desktop

# Install fresh
pipx install thermalcanary
thermalcanary
Installed file layout
| Path | What |
|---|---|
~/.local/share/pipx/venvs/thermalcanary/ |
pipx-managed venv |
~/.local/bin/thermalcanary |
Entry point |
~/.local/share/icons/hicolor/256x256/apps/thermalcanary.png |
App icon |
~/.local/share/applications/thermalcanary.desktop |
App grid entry |
~/.config/thermalcanary/config.yaml |
User configuration (auto-saved by the app) |
~/.config/autostart/thermalcanary.desktop |
Autostart on login (8s delay) |
Launch manually
thermalcanary
Settings sidebar
Two buttons sit in the top-right corner: ⚙ opens the settings sidebar, ✕ closes the app (with confirmation). Press Ctrl+, to toggle the sidebar from the keyboard. All changes apply live without restarting.
| Section | Setting | Description |
|---|---|---|
| Display | Monitor | Which monitor to display on — works with any number of monitors and any orientation |
| Display | Set as default | Save the current monitor as the startup monitor — the app always opens here on launch |
| Sampling | Poll rate | Sensor poll interval (100ms – 10s) |
| Sampling | Smoothing | Rolling average window size (1–60 samples) |
| Colors | Background | Window background color |
| Colors | Inner circle | Gauge center fill color |
| Colors | Arc track | Unfilled arc track color |
| Colors | Tick marks | Tick mark color |
The Reset to defaults button restores all colors and sampling values to factory settings while keeping your saved default monitor.
Configuration file
~/.config/thermalcanary/config.yaml is written automatically by the settings sidebar. You can also edit it by hand; changes take effect on next launch.
poll_ms:  1000     # sensor poll interval in milliseconds
smooth_n: 5        # rolling average window (number of samples)

bg_color:    "#252040"   # window background
inner_color: "#1e1a35"   # gauge inner circle
track_color: "#332e55"   # arc track (unfilled)
tick_color:  "#3d3860"   # tick marks

# screen_index and default_screen_index are set via the Settings sidebar
Autostart caveat
The autostart entry inherits $DISPLAY from the login session, falling back to :0. If the app doesn't start on login, check your display number with echo $DISPLAY and edit ~/.config/autostart/thermalcanary.desktop accordingly.
Uninstall
thermalcanary-setup --uninstall   # removes icon, desktop entry, autostart
pipx uninstall thermalcanary
Architecture
- SensorWorker runs in a
QThread— all sensor reads are off the main thread - GPU metrics use pynvml (direct NVML calls, <1ms) — never
subprocess nvidia-smiwhich causes observer-effect CPU temperature spikes of 10–15°C - CPU temp and usage are stabilised with a
deque-based rolling average - Config is reactive:
Config(QObject)emits a signal on every change, all settings apply live - Window runs fullscreen (
showFullScreen) — no title bar, fills the entire monitor. This bypasses Mutter'sWM_NORMAL_HINTSenforcement which otherwise clamps window geometry tominimumSizeHint, making maximize unreliable on short or rotated monitors - Monitor switching uses an event-driven state machine:
showNormal()→ wait forWindowStateChange(Mutter ack) →windowHandle().setScreen()+setGeometry()→ 50ms →showFullScreen().wmctrlis called once after first show to set_NET_WM_STATE_SKIP_TASKBAR/SKIP_PAGER(hides the window from GNOME Dash without usingQt.WindowType.Tool, which would break cross-monitor placement on Mutter) - Monitor indices are validated against actual connected screens at startup — safe on any number of monitors
- Single-instance lock via
fcntl.flockon$XDG_RUNTIME_DIR/thermalcanary.lock - Runs entirely as the logged-in user — no root required at runtime
License
MIT — see LICENSE
Release history Release notifications | RSS feed


Download files
Download the file for your platform. If you're not sure which to choose, learn more about installing packages.
Source Distribution
Built Distribution
Filter files by name, interpreter, ABI, and platform.
If you're not sure about the file name format, learn more about wheel file names.
Copy a direct link to the current filters
File details
Details for the file thermalcanary-1.1.6.tar.gz.
File metadata
- Download URL: thermalcanary-1.1.6.tar.gz
- Upload date:
- Size: 793.4 kB
- Tags: Source
- Uploaded using Trusted Publishing? No
- Uploaded via: twine/6.2.0 CPython/3.11.14
File hashes
| Algorithm | Hash digest | |
|---|---|---|
| SHA256 |
96830efa254f2e1c8ffa75d9cc36abc3c36ecd767759a62bfa33562a2c30eb27
|
|
| MD5 |
f4b7397d935c0c9a8d35d4f202291d57
|
|
| BLAKE2b-256 |
e237033d4659ca6aa77f27215f4d2195c48ef63d85e15c465aa7212e3c11c5e9
|
File details
Details for the file thermalcanary-1.1.6-py3-none-any.whl.
File metadata
- Download URL: thermalcanary-1.1.6-py3-none-any.whl
- Upload date:
- Size: 90.6 kB
- Tags: Python 3
- Uploaded using Trusted Publishing? No
- Uploaded via: twine/6.2.0 CPython/3.11.14
File hashes
| Algorithm | Hash digest | |
|---|---|---|
| SHA256 |
1c557cec7bde1a25c397d0e116a7e6c5405245d009122762ebe2372679430830
|
|
| MD5 |
9802d8a60560f09e1adcc3a9e3639600
|
|
| BLAKE2b-256 |
ede79ec48b01863406d757e7f0f250d79cc0f79fa5a0a988fb2a03190bd01aa8
|






