A thin-ish wrapper around tkinter for specifying GUIs declaratively.

Project description
Table of Contents
Ticklish - Declarative style GUI programming in Python
The ticklish_ui package is a wrapper around the tkinter and
tkinter.ttk widgets which aims to simplify GUI creation by allowing
users to specify the layout declaratively while decoupling GUI
creation from event binding.
Ticklish works by wrapping the underlying widgets in factory objects deferring actual widget creation until the entire layout has been specified. Layouts are specified as rows of widgets which are laid out from left to right. Once created, event streams are used to bind actions to specific widgets.
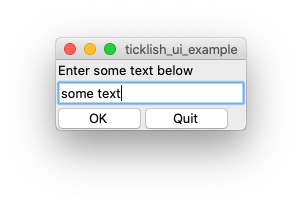
The following simple example creates a window which accepts some input, prints it to the console when the OK button is clicked, and closes the application when the Quit button is clicked.
from ticklish_ui import *

# Define the layout.  An application can have any number of rows and
# rows can contain any number of widgets.
app = Application(
    'ticklish_ui_example',

    # .row1
    [Label('Enter some text below')],

    # .row2
    [Entry().options(name='entry')],

    # .row3
    [Button('OK').options(name='ok'), CloseButton('Quit')]
)

def print_input(event):
    entry = app.nametowidget('.row2.entry')
    print(entry.get())

# click captures all click events anywhere in the application.
click = app.get_event_stream('<ButtonRelease-1>')

# An event stream can then be filtered and bound to some action(s)
(click
 # Here we filter by the name of the widget clicked.
 .by_name('ok')

 # And then map/bind an action to that event.
 .map(print_input)
)

app.mainloop()
The use of event streams is optional. Users can retrieve widgets and bind events and commands in a more traditional way if they prefer. The following would also have worked in the above example.
def print_input():
    entry = app.nametowidget('.row2.entry')
    print(entry.get())

ok_button = app.nametowidget('.row3.ok')
ok_button['command'] = print_input

# Or you can bind events.
#ok_button.bind('<ButtonRelease-1>', do_something)
Most ticklish widgets are just straight wrappers for the underlying widgets but additions have been made for convenience. For instance, CloseButton in the above example is a button which automatically calls the destory() method on the toplevel window that contains it. Similarly, there are RadioGroup and CheckGroup widgets which allow you to lay out whole sets of the corresponding buttons easily.
The goal of ticklish is to simplify the creation and implementation of GUIs without abstracting away any of their power.
Getting Started
To start using ticklish_ui install it from the Python Package Index
with pip:
pip3 install ticklish_ui
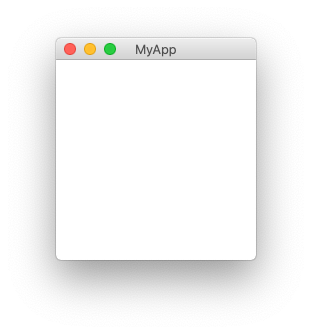
Check that the install worked by running the following code either from a file or the python interactive interpreter.
import ticklish_ui as tui

tui.Application('MyApp').mainloop()
You should get something that looks like this:
Next Steps
-
Themes
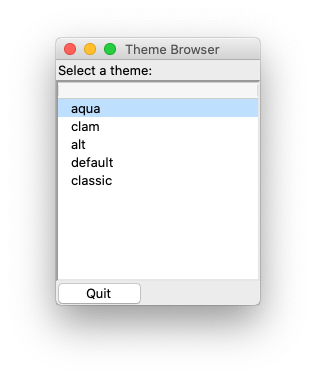
Ticklish is set up to use the ttk default theme out-of-the-box which probably won't look that great. Once created, you can use the application's
styleproperty to change the theme.app = Application( 'MyApp', # Rows... ) app.style.theme_use('aqua') # Or whatever theme you're using app.mainloop()The
aquatheme is used in the above screenshots but may not be available on all systems.You can use the theme viewer example to see the themes available on your system and then set one as above.
-
Module Documentation
An attempt has been made to make the
ticklish_uimodule documentation as comprehensive as possible. It can be viewed in a number of ways.With pydoc from the commandline:
pydoc3 ticklish_ui.widgets.applicationWith
help()from the python interactive interpreter:>>> import ticklish_ui >>> help(ticklish_ui.events.EventStream)Or just by browsing the source code on github.
The github repository also includes a number of examples.
-
Tutorial
A more in-depth example implementing a simple application for drawing graphs can be found here.
Features
Widgets
The following widgets are currently implemented. Widgets which are
marked as ticklish_ui additions are not part of the standard
tkinter/tkinter.ttk widgets sets and may have additional attributes
and behaviours in addition to those provided by the base widget.
| `ticklish_ui` name | Base widget | `ticklish_ui` addition |
|---|---|---|
| Application | tkinter.Tk | yes |
| Button | tkinter.ttk.Button | no |
| Canvas | tkinter.Canvas | no |
| CheckGroup | tkinter.ttk.Frame | yes |
| Checkbutton | tkinter.ttk.Checkbutton | no |
| CloseButton | tkinter.ttk.Button | yes |
| Combobox | tkinter.ttk.Combobox | no |
| Dropdown | tkinter.ttk.Combobox | yes\* |
| Entry | tkinter.ttk.Entry | no |
| Frame | tkinter.ttk.Frame | no |
| Label | tkinter.ttk.Label | no |
| LabelFrame | tkinter.ttk.LabelFrame | no |
| Listbox | tkinter.ttk.Treeview | yes\* |
| Notebook | tkinter.ttk.Notebook | no |
| PanedWindow | tkinter.ttk.PanedWindow | no |
| Progressbar | tkinter.ttk.Progressbar | no |
| RadioGroup | tkinter.ttk.Frame | yes |
| Radiobutton | tkinter.ttk.Radiobutton | no |
| Scale | tkinter.ttk.Scale | no |
| Scrollable | tkinter.Canvas | yes |
| Scrollbar | tkinter.ttk.Scrollbar | no |
| Separator | tkinter.ttk.Separator | no |
| Text | tkinter.Text | no |
| Toplevel | tkinter.Toplevel | no |
| Treeview | tkinter.ttk.Treeview | no |
*These widgets are additions in the sense that they use specific settings to get a particular default behaviour but are otherwise just wrappers around the base widget.
Eventually ticklish will provide wrappers out-of-the-box for all tkinter and tkinter.ttk widgets. Users can implement or wrap additional widgets by subclassing the WidgetFactory or ContainerFactory classes as needed.
Streams
Ticklish provides a very simple Stream construct. Data can be inserted into a stream and will be acted on automatically before being passed to any child streams if they exist. Child streams are created by filtering and mapping existing streams. Filtering determines what data is allowed into the stream; mapping, how the data is handled and/or transformed.
Here's a quick example:
from ticklish_ui.events import Stream

base = Stream()

odd_stream = base.filter(lambda n: n % 2 == 1).map(lambda n: print(f'odd: {n}'))
even_stream = base.filter(lambda n: n % 2 == 0).map(lambda n: print(f'even: {n}'))

base.insert(1)
base.insert(2)
base.insert(3)
base.insert(4)
base.insert(5)
base.insert(6)
base.insert(7)
base.insert(8)
base.insert(9)
base.insert(10)
RESULTS:
odd: 1
even: 2
odd: 3
even: 4
odd: 5
even: 6
odd: 7
even: 8
odd: 9
even: 10
Note that, although data is being inserted into the base stream,
it's the child streams — odd_stream and even_stream —
which are doing the actual work. If either of the mapped functions
returned a value then further filtering and mapping could be done
creating a whole pipeline of actions to be carried out
automatically any time a value is inserted into the base stream.
The EventStream class provides default filters for dealing specifically with tkinter events — filtering by the name of the widget involved, for instance — but is otherwise just a regular stream.
Streams allow program authors to handle normal data and user generated events in similar ways but are entirely optional.
Future Development
On the todo list in no particular order:
- Allow merging streams
- Implement the rest of the tkinter and tkinter.ttk widgets
- Add a way to declaratively define grid layouts
Contributing
For detailed information on contributing to ticklish_ui see
CONTRIBUTING.org on github.
License
ticklish_ui is free software licensed under the BSD-3-Clause License.
Changes
v0.3.0 (2021-03-13)
Chore
- Adds CHANGES.md to long_description for pypi
- Updates README.org with newly added widgets
Docs
- Adds a more complex application menu example
- Adds Treeview example
- Adds an example for the Separator widget
Feat
- Adds Treeview widget
- Changes menubar() to work with MenuSpecification objects
- Adds MenuSpecification class for defining hierarchical menus.
- Adds the Separator widget
Fix
- Fixes Application.menubar() so nested menu entries are named properly
v0.2.0 (2021-03-02)
Chore
- Update to version 0.2.0
- updates .gitignore
Docs
- Adds PanedWindow example
- Adds an example of Notebook
- Adds two examples using Scrollable widgets
- Adds tags_example.py
- Adds an example of the Text widget
- Adds an example for scale widgets
- Adds an example demonstrating virtual event user data.
Feat
- Adds PanedWindow widget
- Adds Notebook widget
- Adds Scrollbar widget and Scrollable container
- Adds tags option to all widgets
- Adds wrapper class for the Text widget
- Adds Scale widget
- Adds progressbar widget
- Allows user data with virtual events in event streams.
Fix
- Makes sure tags are applied to containers and not just contents
v0.1.3 (2021-02-21)
v0.1.2 (2021-02-21)
v0.1.1 (2021-02-13)
v0.1.0 (2021-02-13)


Download files
Download the file for your platform. If you're not sure which to choose, learn more about installing packages.
Source Distribution
Built Distribution
Filter files by name, interpreter, ABI, and platform.
If you're not sure about the file name format, learn more about wheel file names.
Copy a direct link to the current filters
File details
Details for the file ticklish_ui-0.3.0.tar.gz.
File metadata
- Download URL: ticklish_ui-0.3.0.tar.gz
- Upload date:
- Size: 24.2 kB
- Tags: Source
- Uploaded using Trusted Publishing? No
- Uploaded via: twine/3.3.0 pkginfo/1.7.0 requests/2.25.1 setuptools/52.0.0 requests-toolbelt/0.9.1 tqdm/4.58.0 CPython/3.8.2
File hashes
| Algorithm | Hash digest | |
|---|---|---|
| SHA256 |
db280eeeff56ccd0bfd5aa18f30a4c52b588766ac6410ef7ac906dc6c2523933
|
|
| MD5 |
0226de4a3d5db67daa7443ffff0f3c72
|
|
| BLAKE2b-256 |
f73f73481759e01aa5a11f475b26f96ac65ec01c7adc9129a6fa22011826800f
|
File details
Details for the file ticklish_ui-0.3.0-py3-none-any.whl.
File metadata
- Download URL: ticklish_ui-0.3.0-py3-none-any.whl
- Upload date:
- Size: 46.9 kB
- Tags: Python 3
- Uploaded using Trusted Publishing? No
- Uploaded via: twine/3.3.0 pkginfo/1.7.0 requests/2.25.1 setuptools/52.0.0 requests-toolbelt/0.9.1 tqdm/4.58.0 CPython/3.8.2
File hashes
| Algorithm | Hash digest | |
|---|---|---|
| SHA256 |
265cd9a941670144c874dd55f217c87970321372781c0a2da880fa2049687b12
|
|
| MD5 |
898538a9cc6a76326c23abbb4d7a7582
|
|
| BLAKE2b-256 |
4658f2212bf9245e573f7bede1aa6f365a5df5c82aa2dd221f181060af8bb2ff
|


