No project description provided


Project description
TigerGraph-MCP
TigerGraph-MCP enables AI agents to interact with TigerGraph through the Model Context Protocol (MCP). It exposes TigerGraph's graph capabilities via an MCP-compliant API, allowing LLM-based agents to retrieve contextual data, perform actions, and reason with connected information.
Requirements
This project requires Python 3.10, 3.11, or 3.12 and TigerGraph 4.1 or later. Ensure you meet the following prerequisites before proceeding:
1. Python
- Ensure Python 3.10, 3.11, or 3.12 is installed on your system.
- You can download and install it from the official Python website.
2. TigerGraph
TigerGraph version 4.1 or higher is required to run TigerGraph-MCP. You can set it up using one of the following methods:
- TigerGraph DB: Install and configure a local instance.
- TigerGraph Savanna: Use a managed TigerGraph instance in the cloud.
- TigerGraph Docker: Run TigerGraph in a containerized environment.
⚠️ Minimum Required Version: TigerGraph 4.1 ✅ Recommended Version: TigerGraph 4.2+ to enable TigerVector and advanced hybrid retrieval features.
Download from the TigerGraph Downloads page, and follow the official documentation for setup.
Installation Steps
Option 1: Install from PyPI
The easiest way to get started is by installing TigerGraph-MCP from PyPI. A virtual environment is recommended:
pip install tigergraph-mcp
Verify Installation
Run the following command to verify the installation:
python -c "import tigergraph_mcp; print('TigerGraph-MCP installed successfully!')"
Expected output:
TigerGraph-MCP installed successfully!
Option 2: Build from Source
If you want to explore or modify the code, clone the repository and install it manually. TigerGraph-MCP uses Poetry to manage dependencies.
First, install Poetry by following the Poetry installation guide.
Then, clone the repo and install:
git clone https://github.com/TigerGraph-DevLabs/tigergraph-mcp.git
cd tigergraph-mcp
Core Installation
If you need only the core functionality of TigerGraph-MCP (without running application examples like AI Agent, unit tests, or integration tests), run:
poetry env use python3.12  # Replace with your Python version (3.10–3.12)
poetry install --without dev
This command will:
- Install only the dependencies required for the core features of TigerGraph-MCP.
Development Installation
If you’re contributing to the project or want to use advanced features like running the AI Agent examples or test cases, run:
poetry env use python3.12  # Replace with your Python version (3.10–3.12)
poetry install --with dev
This command will:
- Install all core dependencies.
- Include development dependencies defined under
[tool.poetry.group.dev.dependencies]inpyproject.toml.
Verify Setup
After installing dependencies, verify your setup by listing the installed packages:
poetry show --with dev
This ensures all required dependencies (including optional ones) are successfully installed.
Activate the Virtual Environment
Activate the environment using:
eval $(poetry env activate)
For more information about managing virtual environments in Poetry, please refer to the official documentation: Managing Environments.
Using TigerGraph-MCP Tools with GitHub Copilot Chat in VS Code
To enable the use of TigerGraph-MCP tools via GitHub Copilot Chat in VS Code, follow these steps:
1. Set Up GitHub Copilot Chat
Follow the official GitHub Copilot Chat documentation to set up GitHub Copilot Chat.
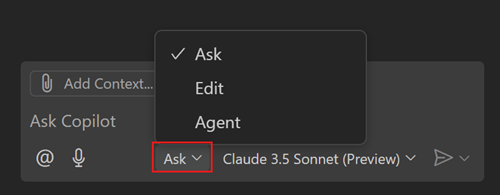
2. Enable Agent Mode
Open GitHub Copilot Chat and switch to "Agent" mode using the Mode dropdown in the Chat view.
3. Create the .env File
In the root of your project, create a .env file with the following content:
OPENAI_API_KEY=<YOUR OPENAI KEY>
TG_HOST=http://127.0.0.1
TG_USERNAME=tigergraph
TG_PASSWORD=tigergraph
Replace
<YOUR OPENAI KEY>with your actual OpenAI API key. This configuration assumes you're running TigerGraph locally and logging in with a username and password. See the Alternative Connection Setup Methods for additional ways to connect to TigerGraph.
4. Create .vscode/mcp.json and Start TigerGraph-MCP
Add the following configuration to .vscode/mcp.json in your workspace:
{
  "inputs": [],
  "servers": {
    "tigergraph-mcp-server": {
      "command": "${workspaceFolder}/.venv/bin/python",
      "args": [
        "-m",
        "tigergraph_mcp.main"
      ],
      "envFile": "${workspaceFolder}/.env"
    }
  }
}
Note: Adjust the path in
"command"if your virtual environment is located elsewhere.
After creating this file, you'll see a "Start" button appear above the line containing "tigergraph-mcp-server":. Click it to start the TigerGraph-MCP server.
5. Interact with the MCP Tool
You can now interact with the MCP tool by entering instructions like:
Suppose I have the following CSV files, please help create a graph schema in TigerGraph:

from_name,to_name,since,closeness
Alice,Bob,2018-03-05,0.9
Bob,Charlie,2020-07-08,0.7
Charlie,Alice,2022-09-10,0.5
Alice,Diana,2021-01-02,0.8
Eve,Alice,2023-03-05,0.6
GitHub Copilot will automatically select the graph__create_schema tool and configure the parameters.
Click "See more" to expand and edit the parameters if needed, or provide another suggestion in the chat to let Copilot modify the parameters based on your needs.
Then click the "Continue" button to run the tool. It will return a message such as:
I have created a TigerGraph schema named "SocialGraph"
indicating that the graph has been created successfully.
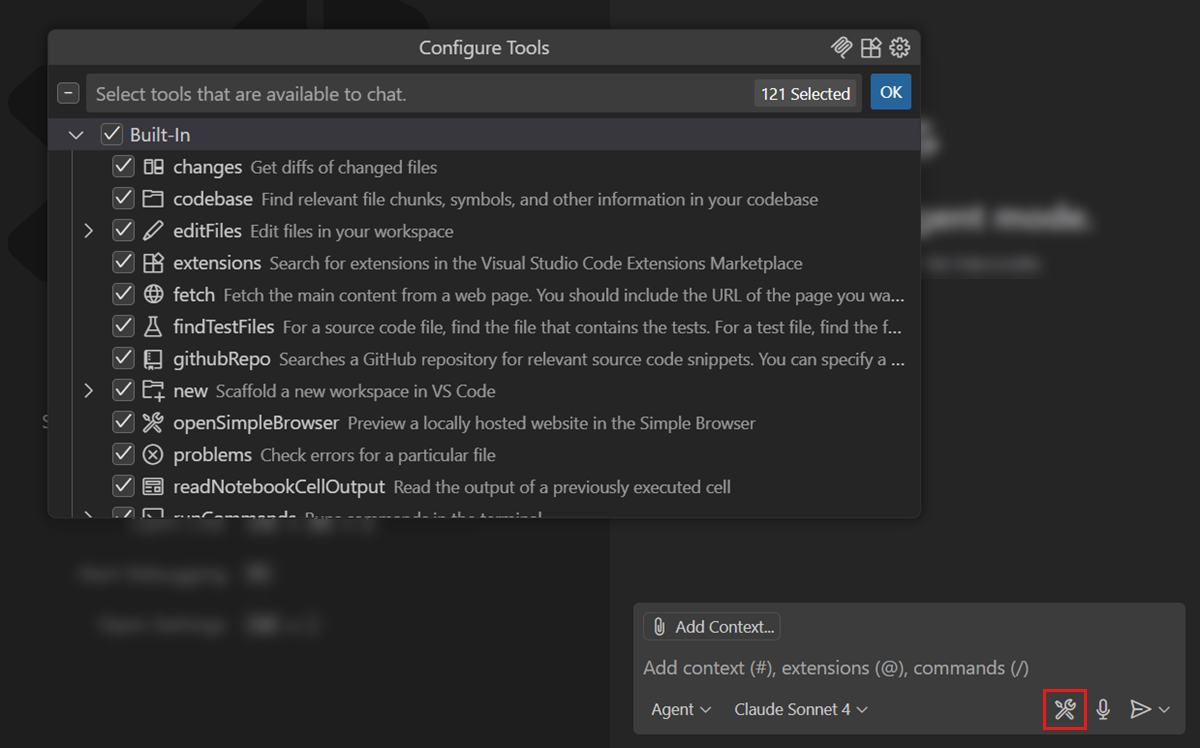
6. View Available Tools in TigerGraph-MCP
Click the Tools icon to view all available tools in TigerGraph-MCP.
If you'd like to request additional tools for TigerGraph, feel free to create an issue in the repository.
Note: TigerGraph-MCP is based on TigerGraphX, a high-level Python library that provides a unified, Python-native interface for TigerGraph. For more details about the APIs, refer to the TigerGraphX API Reference.
Using TigerGraph-MCP Tools with CrewAI
GitHub Copilot Chat is a simple and effective way to get started with TigerGraph-MCP. Since most tools in TigerGraph-MCP are straightforward, the parameters generated by the LLM are typically of high quality. However, for more complex tools—such as those for creating schemas or loading data—the required parameters involve intricate Python dictionary structures and rely on best practices that may not be well-represented in the LLM’s training data.
In other cases, you might prefer more control over how MCP tools are used, including the ability to define custom AI agents and workflows. In such scenarios, using an open-source AI agent framework like LangGraph or CrewAI is a great option.
We provide a CrewAI example in the repository. See tigergraph_chat for more details.
To run the demo:
- Clone the repository and install it with development dependencies.
- Activate your virtual environment.
- Run the chat interface using either of the following commands:
tigergraph_chat
# or
panel serve examples/tigergraph_chat/main.py
You should see output similar to:
Poe => panel serve examples/tigergraph_chat/main.py
2025-05-21 14:54:21,472 Starting Bokeh server version 3.7.2 (running on Tornado 6.4.2)
2025-05-21 14:54:21,473 User authentication hooks NOT provided (default user enabled)
2025-05-21 14:54:21,476 Bokeh app running at: http://localhost:5006/main
2025-05-21 14:54:21,476 Starting Bokeh server with process id: 22032
Open http://localhost:5006/main in your browser to start chatting with the AI agents.
Release history Release notifications | RSS feed


Download files
Download the file for your platform. If you're not sure which to choose, learn more about installing packages.
Source Distribution
Built Distribution
Filter files by name, interpreter, ABI, and platform.
If you're not sure about the file name format, learn more about wheel file names.
Copy a direct link to the current filters
File details
Details for the file tigergraph_mcp-0.1.3.tar.gz.
File metadata
- Download URL: tigergraph_mcp-0.1.3.tar.gz
- Upload date:
- Size: 27.1 kB
- Tags: Source
- Uploaded using Trusted Publishing? No
- Uploaded via: poetry/2.0.1 CPython/3.12.6 Darwin/23.6.0
File hashes
| Algorithm | Hash digest | |
|---|---|---|
| SHA256 |
ffdde146de361c2d538df05de0a95614d8c50e6cab66b130f70e446b118ec923
|
|
| MD5 |
3543196db7635cc83b3e88958c9d03f2
|
|
| BLAKE2b-256 |
7d5374f4935e0845ef3fc14ff39bdd1a0673ce64490ab792cacaa5f2b280f486
|
File details
Details for the file tigergraph_mcp-0.1.3-py3-none-any.whl.
File metadata
- Download URL: tigergraph_mcp-0.1.3-py3-none-any.whl
- Upload date:
- Size: 61.3 kB
- Tags: Python 3
- Uploaded using Trusted Publishing? No
- Uploaded via: poetry/2.0.1 CPython/3.12.6 Darwin/23.6.0
File hashes
| Algorithm | Hash digest | |
|---|---|---|
| SHA256 |
e568a246c803c34f0312678616db0dce26710c1b39f50705ed3f3e1d0d62ef19
|
|
| MD5 |
765daea0d8019f3be29ed5c20ed45d91
|
|
| BLAKE2b-256 |
3763858a8070b0df786b08ee5ff9b12e06d0401e8cc5dcfa929d12c37daa5f7c
|


