
tljh-repo2docker

This service allows users to create and use Docker images for their JupyterHub environments, using repositories from platforms like GitHub or GitLab. It can be deployed as part of The Littlest JupyterHub (TLJH) or as a standalone service in any JupyterHub setup.
The Docker images can be built locally using repo2docker or via the binderhub service.
Requirements
This plugin requires:
- JupyterHub 1.0 or later (running on JupyterHub 4+).
- Optional: The Littlest JupyterHub
Installation
TLJH Installation (Optional)
During the TLJH installation process, use the following post-installation script:
#!/bin/bash

# install Docker
sudo apt update && sudo apt install -y apt-transport-https ca-certificates curl software-properties-common
curl -fsSL https://download.docker.com/linux/ubuntu/gpg | sudo apt-key add -
sudo add-apt-repository -y "deb [arch=amd64] https://download.docker.com/linux/ubuntu bionic stable"
sudo apt update && sudo apt install -y docker-ce

# pull the repo2docker image
sudo docker pull quay.io/jupyterhub/repo2docker:main

# install TLJH 2.0
curl https://tljh.jupyter.org/bootstrap.py
  | sudo python3 - \
    --version 2.0.0 \
    --admin test:test \
    --plugin tljh-repo2docker
Refer to The Littlest JupyterHub documentation for more info on installing TLJH plugins.
Configuration
This Python package is designed for deployment as a service managed by JupyterHub. The service runs its own Tornado server. Requests will be forwarded to it by the JupyterHub internal proxy from the standard URL https://{my-hub-url}/services/my-service/.
The available settings for this service are:
port: Port of the service; defaults to 6789ip: Internal IP of the service; defaults to 127.0.0.1default_memory_limit: Default memory limit of a user server; defaults toNonedefault_cpu_limit: Default CPU limit of a user server; defaults toNonemachine_profiles: Instead of entering directly the CPU and Memory value,tljh-repo2dockercan be configured with pre-defined machine profiles and users can only choose from the available option; defaults to[]binderhub_url: The optional URL of thebinderhubservice. If it is available,tljh-repo2dockerwill use this service to build images.db_url: The connection string of the database.tljh-repo2dockerneeds a database to store the image metadata. By default, it will create asqlitedatabase in the starting directory of the service. To use other databases (PostgreSQLorMySQL), users need to specify the connection string via this config and install the additional drivers (asyncpgoraiomysql).
This service requires the following scopes : read:users, admin:servers and read:roles:users. If binderhub service is used, access:services!service=binderis also needed. Here is an example of registering tljh_repo2docker's service with JupyterHub
# jupyterhub_config.py

from tljh_repo2docker import TLJH_R2D_ADMIN_SCOPE
import sys

c.JupyterHub.services.extend(
    [
        {
            "name": "tljh_repo2docker",
            "url": "http://127.0.0.1:6789", # URL must match the `ip` and `port` config
            "command": [
                sys.executable,
                "-m",
                "tljh_repo2docker",
                "--ip",
                "127.0.0.1",
                "--port",
                "6789"
            ],
            "oauth_no_confirm": True,
        }
    ]
)
# Set required scopes for the service and users
c.JupyterHub.load_roles = [
    {
        "description": "Role for tljh_repo2docker service",
        "name": "tljh-repo2docker-service",
        "scopes": [
            "read:users",
            "read:roles:users",
            "admin:servers",
            "access:services!service=binder",
        ],
        "services": ["tljh_repo2docker"],
    },
    {
        "name": "user",
        "scopes": [
            "self",
            # access to the serve page
            "access:services!service=tljh_repo2docker",
        ],
    },
]
By default, only users with an admin role can access the environment builder page and APIs, by leveraging the RBAC system of JupyterHub, non-admin users can also be granted the access right.
Here is an example of the configuration
# jupyterhub_config.py

from tljh_repo2docker import TLJH_R2D_ADMIN_SCOPE
import sys

c.JupyterHub.services.extend(
    [
        {
            "name": "tljh_repo2docker",
            "url": "http://127.0.0.1:6789",
            "command": [
                sys.executable,
                "-m",
                "tljh_repo2docker",
                "--ip",
                "127.0.0.1",
                "--port",
                "6789"
            ],
            "oauth_no_confirm": True,
            "oauth_client_allowed_scopes": [
                TLJH_R2D_ADMIN_SCOPE, # Allows this service to check if users have its admin scope.
            ],
        }
    ]
)

c.JupyterHub.custom_scopes = {
    TLJH_R2D_ADMIN_SCOPE: {
        "description": "Admin access to tljh_repo2docker",
    },
}

c.JupyterHub.load_roles = [
    ... # Other role settings
    {
        "name": 'tljh-repo2docker-service-admin',
        "users": ["alice"],
        "scopes": [TLJH_R2D_ADMIN_SCOPE],
    },
]
Usage
List the environments
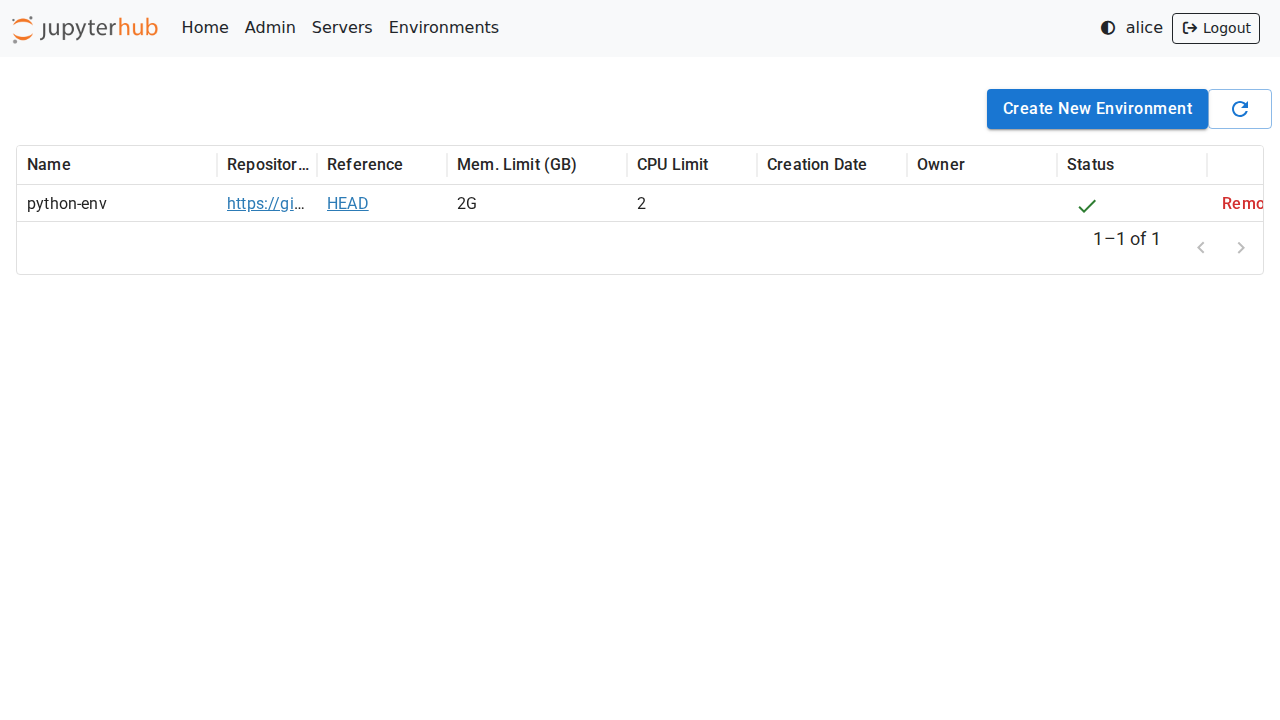
The Environments page shows the list of built environments, as well as the ones currently being built:
Add a new environment
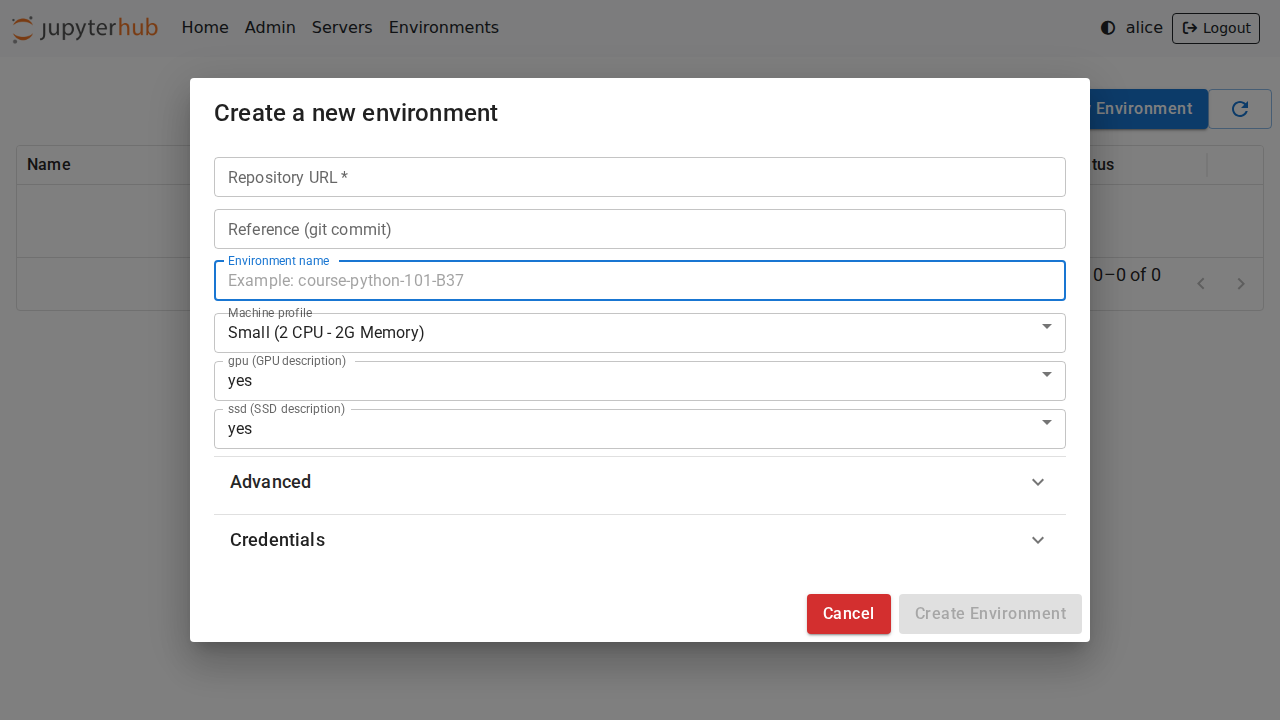
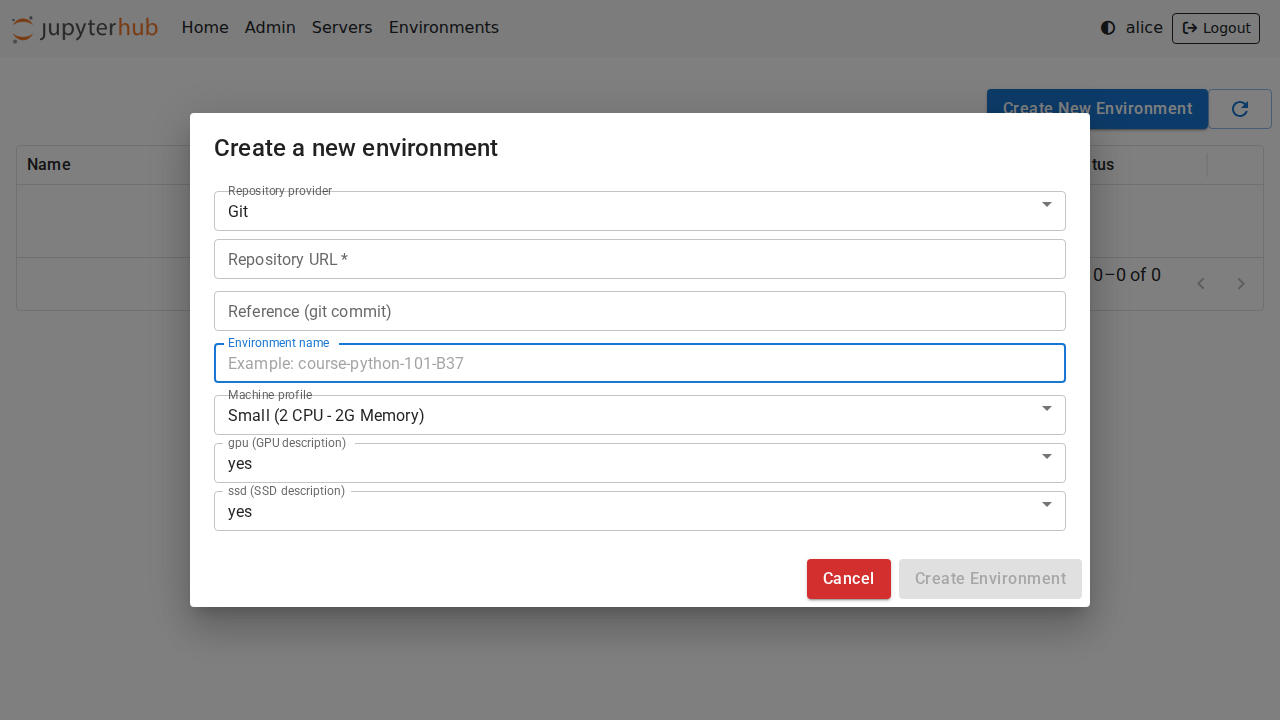
Just like on Binder, new environments can be added by clicking on the Add New button and providing a URL to the repository. Optional names, memory, and CPU limits can also be set for the environment:
Follow the build logs
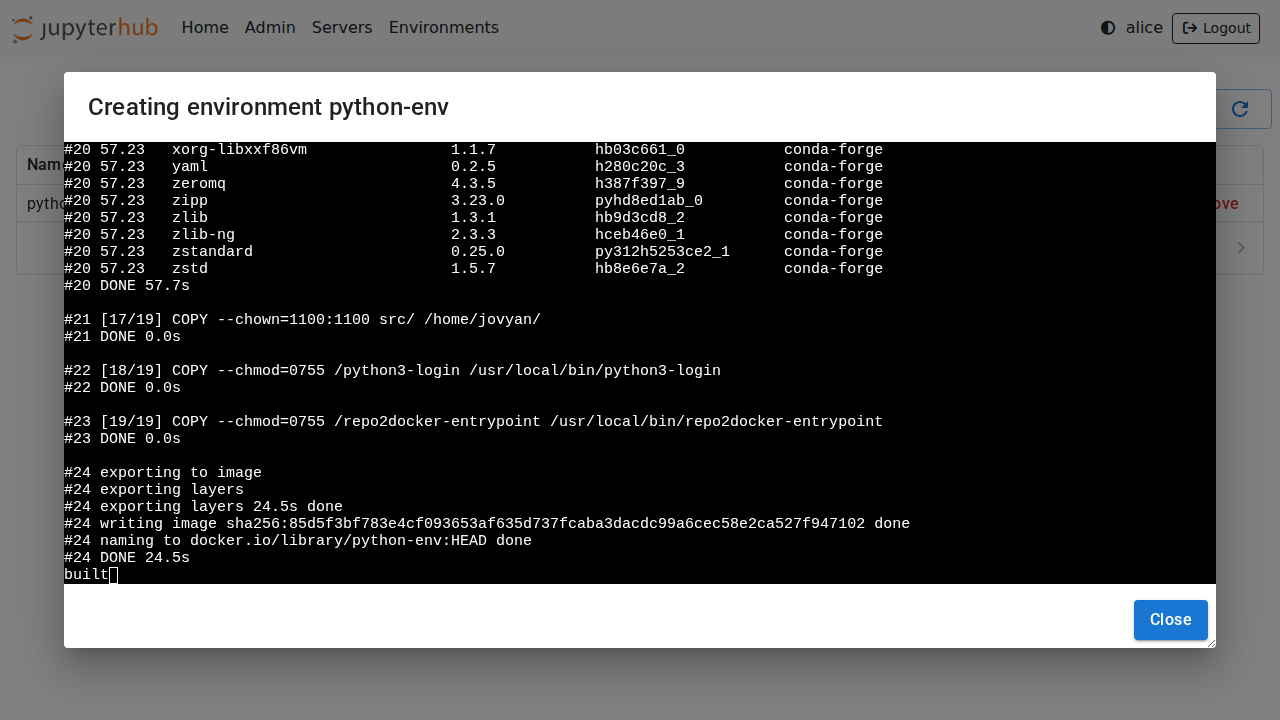
Clicking on the Logs button will open a new dialog with the build logs:
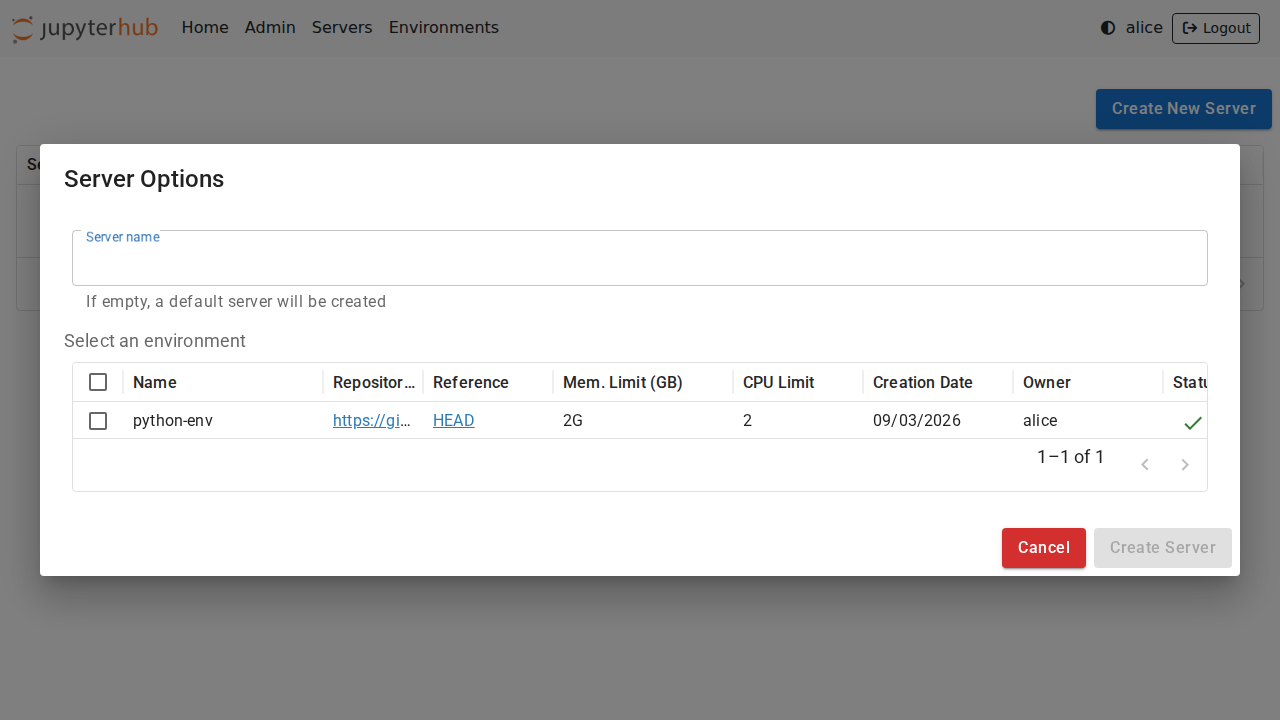
Select an environment
Once ready, the environments can be selected from the JupyterHub spawn page:
Private Repositories
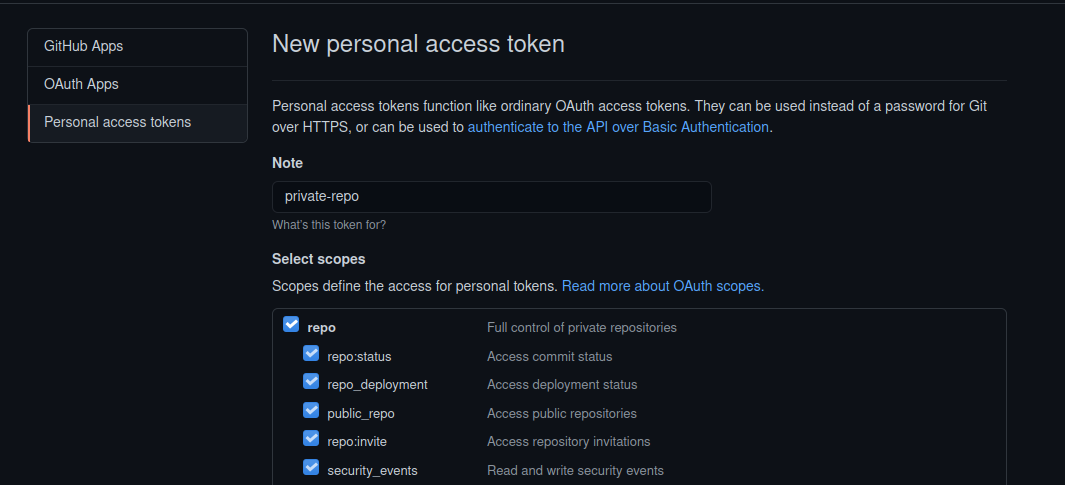
tljh-repo2docker also supports building environments from private repositories.
It is possible to provide the username and password in the Credentials section of the form:
On GitHub and GitLab, a user might have to first create an access token with read access to use as the password:
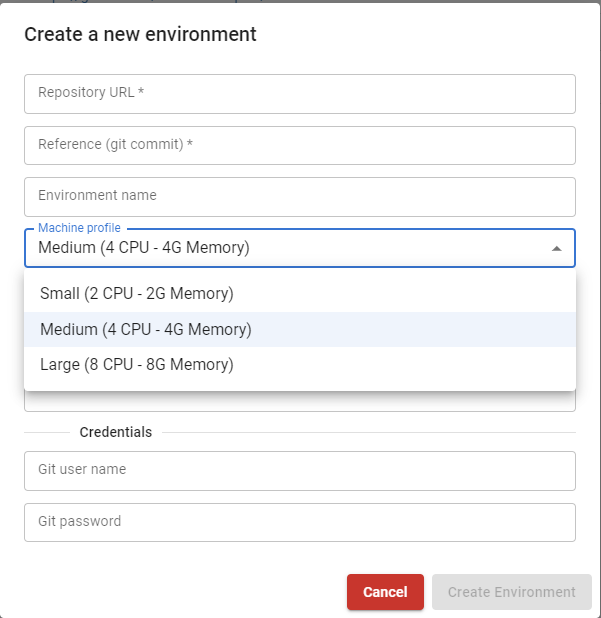
Machine profiles
Instead of entering directly the CPU and Memory value, tljh-repo2docker can be configured with pre-defined machine profiles and users can only choose from the available options. The following configuration will add 3 machines with labels Small, Medium and Large to the profile list:
c.JupyterHub.services.extend(
    [
        {
            "name": "tljh_repo2docker",
            "url": "http://127.0.0.1:6789",
            "command": [
                sys.executable,
                "-m",
                "tljh_repo2docker",
                "--ip",
                "127.0.0.1",
                "--port",
                "6789",
                "--machine_profiles",
                '{"label": "Small", "cpu": 2, "memory": 2}',
                "--machine_profiles",
                '{"label": "Medium", "cpu": 4, "memory": 4}',
                "--machine_profiles",
                '{"label": "Large", "cpu": 8, "memory": 8}'
            ],
            "oauth_no_confirm": True,
        }
    ]
)
Node Selector
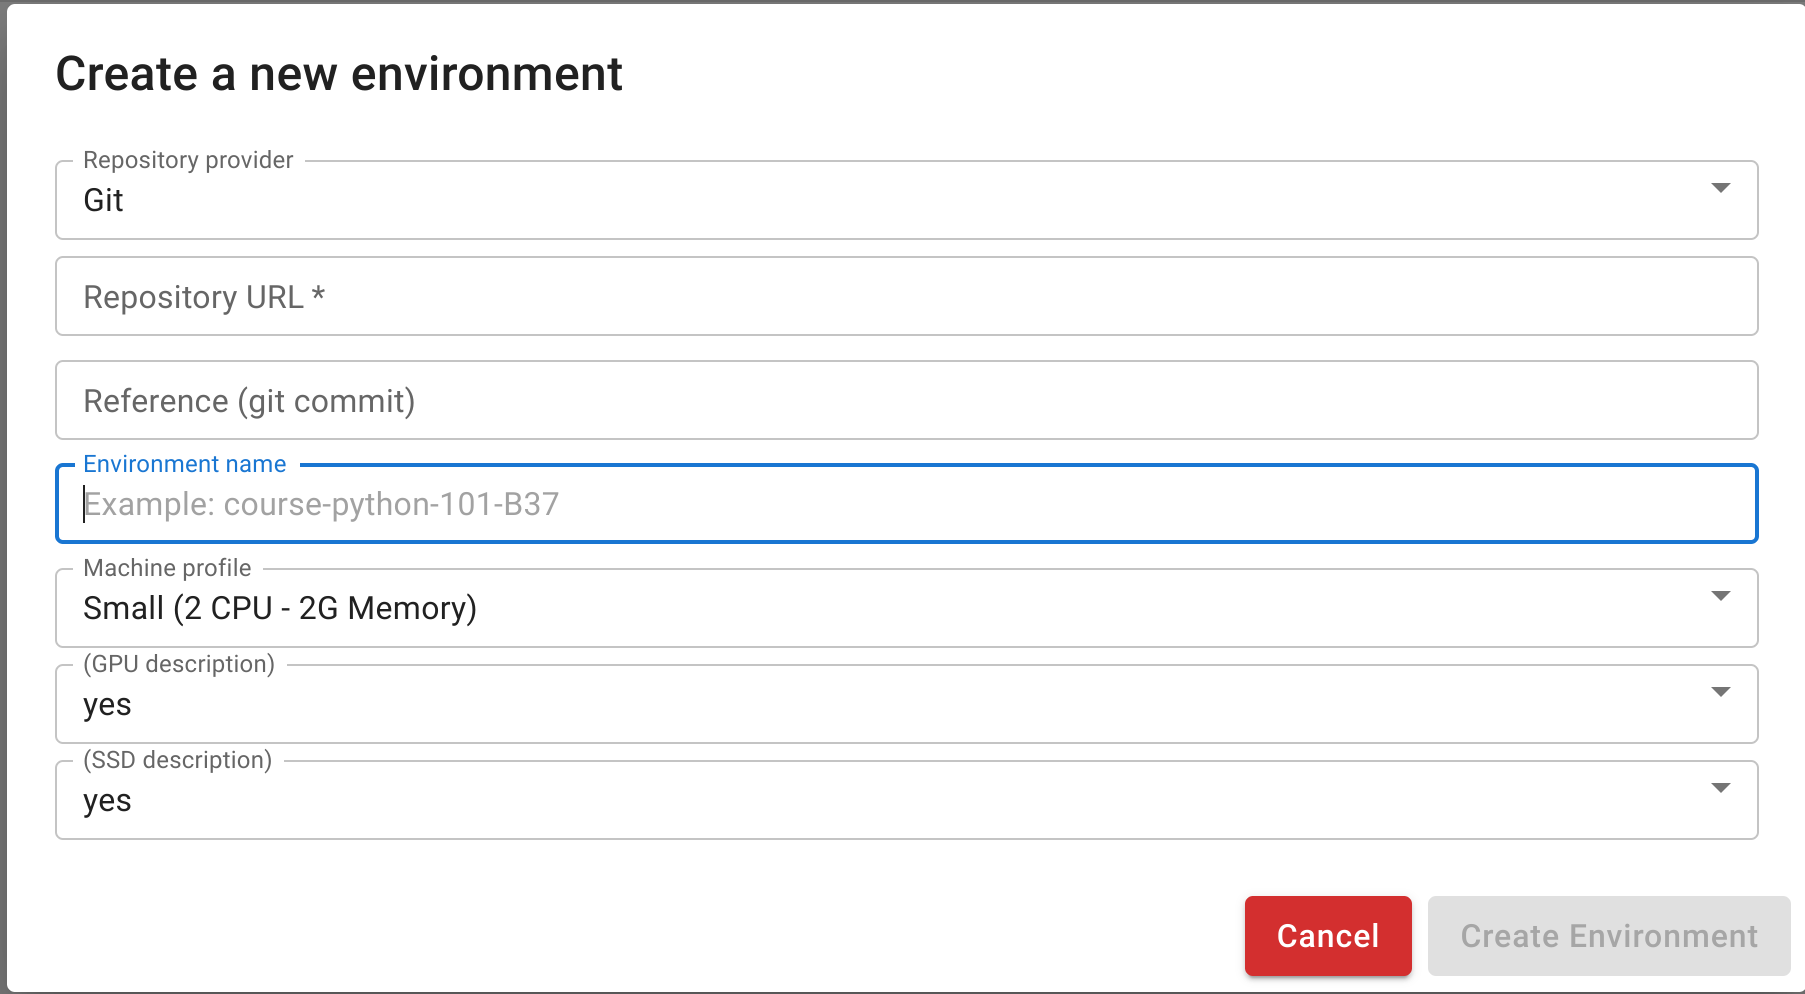
tljh-repo2docker allows specifying node selectors to control which Kubernetes nodes user environments are scheduled on. This can be useful for assigning workloads to specific nodes based on hardware characteristics like GPUs, SSD storage, or other node labels.
Configuring Node Selectors
To configure node selectors, add the --node_selector argument in the service definition:
c.JupyterHub.services.extend(
    [
        {
            "name": "tljh_repo2docker",
            "url": "http://127.0.0.1:6789",
            "command": [
                sys.executable,
                "-m",
                "tljh_repo2docker",
                "--ip",
                "127.0.0.1",
                "--port",
                "6789",
                "--node_selector",
                '{"gpu": {"description": "GPU availability", "values": ["yes", "no"]},'
                ' "ssd": {"description": "SSD availability", "values": ["yes", "no"]}}'
            ],
            "oauth_no_confirm": True,
        }
    ]
)
This ensures that workloads are scheduled only on nodes that meet the specified criteria.
Accessing Node Selector in Spawner
The node selector information is passed through the metadata field of user_options and can be accessed in the start method of the spawner:
user_options["metadata"]["node_selector"]
Direct link to server
You can create a direct link to launch a single-user server with a custom environment using the following format:
https://<jupyterhub-server>/services/tljhrepo2docker/servers?name=foo&environment=bar
This link will start a server named foo using the bar environment. If a server with the same name already exists, it will open automatically; otherwise, tljh-repo2docker will initiate a new server for you.
Extra documentation
tljh-repo2docker is currently developed as part of the Plasma project.
See the Plasma documentation on user environments for more info.
Building JupyterHub-ready images
See: https://repo2docker.readthedocs.io/en/latest/howto/jupyterhub_images.html
Deploy on Kubernetes cluster with Zero to JupyterHub
Check out the instructions in DEPLOYMENT.md to set up the deployment.
Run Locally
Check out the instructions in CONTRIBUTING.md to set up a local environment.
2 maintainers


Metadata
2 maintainers
Release files for tljh-repo2docker 3.0.18
For a detailed explanation of source distributions (sdists) and built distributions (wheels), please see the package formats documentation.
Source distribution (sdist)
| File | Size | Uploaded | |
|---|---|---|---|
| tljh_repo2docker-3.0.18.tar.gz | 2.9 MB | Details |
Built distribution (wheel)
| File | Interpreter | ABI | Platform | Reset |
|---|---|---|---|---|
| tljh_repo2docker-3.0.18-py3-none-any.whl | Python 3 | none | any | Details |
Total release size: 4.8 MB
Release files / tljh_repo2docker-3.0.18.tar.gz
| Download URL | tljh_repo2docker-3.0.18.tar.gz |
|---|---|
| Size | 2.9 MB |
| Tags | Source |
|
SHA-256 checksum How to use checksums |
e1bfac7eaa42aac2f988d7600af4bd71f26dd834c08a97347acfaa5ad8554b25
|
|
BLAKE2b-256 checksum How to use checksums |
5889df323aebab8272b06e3ec0b9e442348e2b2275c0b73b39c9d2264b244380
|
| Upload date | |
|
Uploaded using Trusted Publishing? What is trusted publishing? |
Yes |
| Uploaded via |
twine/7.0.0 CPython/3.12.14
|
Release files / tljh_repo2docker-3.0.18-py3-none-any.whl
| Download URL | tljh_repo2docker-3.0.18-py3-none-any.whl |
|---|---|
| Size | 1.9 MB |
| Tags | Python 3 |
|
SHA-256 checksum How to use checksums |
4e0c83f51d0a28f4e58223b059f0ad4d7a10f25f7988058e20646bd1df2bf01f
|
|
BLAKE2b-256 checksum How to use checksums |
2e18b7f0bccdd7ebbf3cc7cf503f7f77a308528f3127dd197f2500aedabf8e0f
|
| Upload date | |
|
Uploaded using Trusted Publishing? What is trusted publishing? |
Yes |
| Uploaded via |
twine/7.0.0 CPython/3.12.14
|














