

PyTorch is a Python package that provides two high-level features:
- Tensor computation (like NumPy) with strong GPU acceleration
- Deep neural networks built on a tape-based autograd system
You can reuse your favorite Python packages such as NumPy, SciPy, and Cython to extend PyTorch when needed.
Our trunk health (Continuous Integration signals) can be found at hud.pytorch.org.
- More About PyTorch
- Installation
- Getting Started
- Resources
- Communication
- Releases and Contributing
- The Team
- License
More About PyTorch
At a granular level, PyTorch is a library that consists of the following components:
| Component | Description |
|---|---|
| torch | A Tensor library like NumPy, with strong GPU support |
| torch.autograd | A tape-based automatic differentiation library that supports all differentiable Tensor operations in torch |
| torch.jit | A compilation stack (TorchScript) to create serializable and optimizable models from PyTorch code |
| torch.nn | A neural networks library deeply integrated with autograd designed for maximum flexibility |
| torch.multiprocessing | Python multiprocessing, but with magical memory sharing of torch Tensors across processes. Useful for data loading and Hogwild training |
| torch.utils | DataLoader and other utility functions for convenience |
Usually, PyTorch is used either as:
- A replacement for NumPy to use the power of GPUs.
- A deep learning research platform that provides maximum flexibility and speed.
Elaborating Further:
A GPU-Ready Tensor Library
If you use NumPy, then you have used Tensors (a.k.a. ndarray).
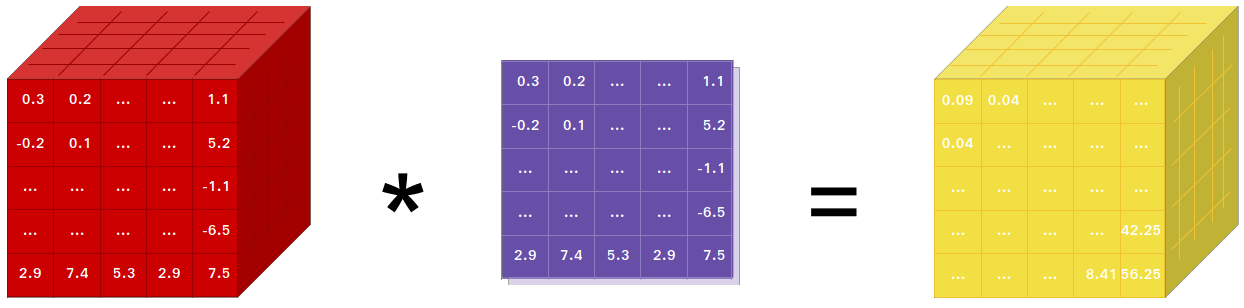
PyTorch provides Tensors that can live either on the CPU or the GPU and accelerates the computation by a huge amount.
We provide a wide variety of tensor routines to accelerate and fit your scientific computation needs such as slicing, indexing, mathematical operations, linear algebra, reductions. And they are fast!
Dynamic Neural Networks: Tape-Based Autograd
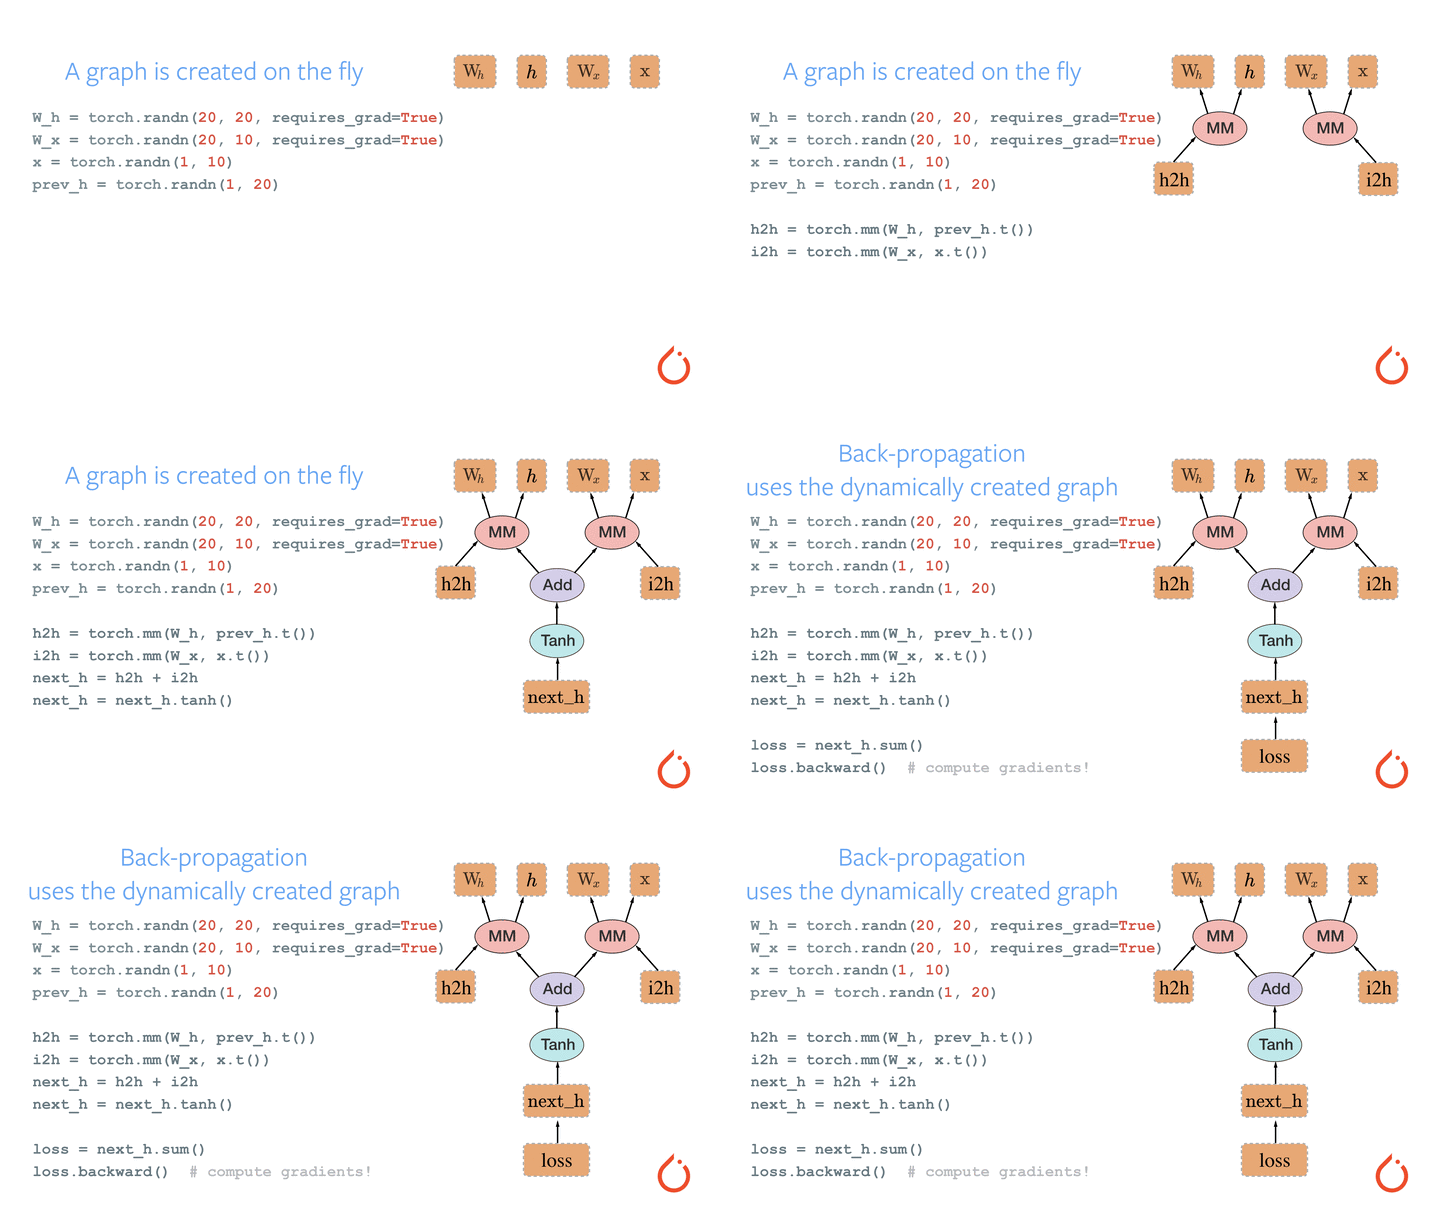
PyTorch has a unique way of building neural networks: using and replaying a tape recorder.
Most frameworks such as TensorFlow, Theano, Caffe, and CNTK have a static view of the world. One has to build a neural network and reuse the same structure again and again. Changing the way the network behaves means that one has to start from scratch.
With PyTorch, we use a technique called reverse-mode auto-differentiation, which allows you to change the way your network behaves arbitrarily with zero lag or overhead. Our inspiration comes from several research papers on this topic, as well as current and past work such as torch-autograd, autograd, Chainer, etc.
While this technique is not unique to PyTorch, it's one of the fastest implementations of it to date. You get the best of speed and flexibility for your crazy research.
Python First
PyTorch is not a Python binding into a monolithic C++ framework. It is built to be deeply integrated into Python. You can use it naturally like you would use NumPy / SciPy / scikit-learn etc. You can write your new neural network layers in Python itself, using your favorite libraries and use packages such as Cython and Numba. Our goal is to not reinvent the wheel where appropriate.
Imperative Experiences
PyTorch is designed to be intuitive, linear in thought, and easy to use. When you execute a line of code, it gets executed. There isn't an asynchronous view of the world. When you drop into a debugger or receive error messages and stack traces, understanding them is straightforward. The stack trace points to exactly where your code was defined. We hope you never spend hours debugging your code because of bad stack traces or asynchronous and opaque execution engines.
Fast and Lean
PyTorch has minimal framework overhead. We integrate acceleration libraries such as Intel MKL and NVIDIA (cuDNN, NCCL) to maximize speed. At the core, its CPU and GPU Tensor and neural network backends are mature and have been tested for years.
Hence, PyTorch is quite fast — whether you run small or large neural networks.
The memory usage in PyTorch is extremely efficient compared to Torch or some of the alternatives. We've written custom memory allocators for the GPU to make sure that your deep learning models are maximally memory efficient. This enables you to train bigger deep learning models than before.
Extensions Without Pain
Writing new neural network modules, or interfacing with PyTorch's Tensor API, was designed to be straightforward and with minimal abstractions.
You can write new neural network layers in Python using the torch API or your favorite NumPy-based libraries such as SciPy.
If you want to write your layers in C/C++, we provide a convenient extension API that is efficient and with minimal boilerplate. No wrapper code needs to be written. You can see a tutorial here and an example here.
Installation
Binaries
Commands to install binaries via Conda or pip wheels are on our website: https://pytorch.org/get-started/locally/
NVIDIA Jetson Platforms
Python wheels for NVIDIA's Jetson Nano, Jetson TX1/TX2, Jetson Xavier NX/AGX, and Jetson AGX Orin are provided here and the L4T container is published here
They require JetPack 4.2 and above, and @dusty-nv and @ptrblck are maintaining them.
From Source
Prerequisites
If you are installing from source, you will need:
- Python 3.10 or later
- A compiler that fully supports C++20, such as clang or gcc (gcc 11.3.0 or newer is required, on Linux)
- Visual Studio or Visual Studio Build Tool (Windows only)
- At least 10 GB of free disk space
- 30-60 minutes for the initial build (subsequent rebuilds are much faster)
* PyTorch CI uses Visual C++ BuildTools, which come with Visual Studio Enterprise, Professional, or Community Editions. You can also install the build tools from https://visualstudio.microsoft.com/visual-cpp-build-tools/. The build tools do not come with Visual Studio Code by default.
An example of environment setup is shown below:
- Linux:
$ source <CONDA_INSTALL_DIR>/bin/activate
$ conda create -y -n <CONDA_NAME>
$ conda activate <CONDA_NAME>
- Windows:
$ source <CONDA_INSTALL_DIR>\Scripts\activate.bat
$ conda create -y -n <CONDA_NAME>
$ conda activate <CONDA_NAME>
$ call "C:\Program Files\Microsoft Visual Studio\<VERSION>\Community\VC\Auxiliary\Build\vcvarsall.bat" x64
A conda environment is not required. You can also do a PyTorch build in a
standard virtual environment, e.g., created with tools like uv, provided
your system has installed all the necessary dependencies unavailable as pip
packages (e.g., CUDA, MKL.)
NVIDIA CUDA Support
If you want to compile with CUDA support, select a supported version of CUDA from our support matrix, then install the following:
- NVIDIA CUDA
- NVIDIA cuDNN v9.0 or above
- Compiler compatible with CUDA
Note: You could refer to the cuDNN Support Matrix for cuDNN versions with the various supported CUDA, CUDA driver, and NVIDIA hardware.
If you want to disable CUDA support, export the environment variable USE_CUDA=0.
Other potentially useful environment variables are documented in cmake/EnvVarForwarding.cmake. If
CUDA is installed in a non-standard location, set PATH so that the nvcc you
want to use can be found (e.g., export PATH=/usr/local/cuda-12.8/bin:$PATH).
If you are building for NVIDIA's Jetson platforms (Jetson Nano, TX1, TX2, AGX Xavier), Instructions to install PyTorch for Jetson Nano are available here
AMD ROCm Support
If you want to compile with ROCm support, install
- AMD ROCm 4.0 and above installation
- ROCm is currently supported only for Linux systems.
By default the build system expects ROCm to be installed in /opt/rocm. If ROCm is installed in a different directory, the ROCM_PATH environment variable must be set to the ROCm installation directory. The build system automatically detects the AMD GPU architecture. Optionally, the AMD GPU architecture can be explicitly set with the PYTORCH_ROCM_ARCH environment variable AMD GPU architecture
If you want to disable ROCm support, export the environment variable USE_ROCM=0.
Other potentially useful environment variables are documented in cmake/EnvVarForwarding.cmake.
Intel GPU Support
If you want to compile with Intel GPU support, follow these
- PyTorch Prerequisites for Intel GPUs instructions.
- Intel GPU is supported for Linux and Windows.
If you want to disable Intel GPU support, export the environment variable USE_XPU=0.
Other potentially useful environment variables are documented in cmake/EnvVarForwarding.cmake.
Get the PyTorch Source
git clone https://github.com/pytorch/pytorch
cd pytorch
# if you are updating an existing checkout
git submodule sync
git submodule update --init --recursive
Install Dependencies
Common
# Run this command from the PyTorch directory after cloning the source code using the “Get the PyTorch Source“ section above
pip install --group dev
On Linux
pip install mkl-static mkl-include
# CUDA only: Add LAPACK support for the GPU if needed
# magma installation: run with active conda environment. specify CUDA version to install
.ci/docker/common/install_magma_conda.sh 12.4

# (optional) If using torch.compile with inductor/triton, install the matching version of triton
# Run from the pytorch directory after cloning
# For Intel GPU support, please explicitly `export USE_XPU=1` before running command.
make triton
On Windows
pip install mkl-static mkl-include
# Add these packages if torch.distributed is needed.
# Distributed package support on Windows is a prototype feature and is subject to changes.
conda install -c conda-forge libuv=1.51
Install PyTorch
On Linux
If you're compiling for AMD ROCm then first run this command:
# Only run this if you're compiling for ROCm
python tools/amd_build/build_amd.py
Install PyTorch
# the CMake prefix for conda environment
export CMAKE_PREFIX_PATH="${CONDA_PREFIX:-'$(dirname $(which conda))/../'}:${CMAKE_PREFIX_PATH}"
python -m pip install --no-build-isolation -v -e .

# the CMake prefix for non-conda environment, e.g. Python venv
# call following after activating the venv
export CMAKE_PREFIX_PATH="${VIRTUAL_ENV}:${CMAKE_PREFIX_PATH}"
On macOS
python -m pip install --no-build-isolation -v -e .
On Windows
If you want to build legacy python code, please refer to Building on legacy code and CUDA
CPU-only builds
In this mode PyTorch computations will run on your CPU, not your GPU.
python -m pip install --no-build-isolation -v -e .
Note on OpenMP: The desired OpenMP implementation is Intel OpenMP (iomp). In order to link against iomp, you'll need to manually download the library and set up the building environment by tweaking CMAKE_INCLUDE_PATH and LIB. The instruction here is an example for setting up both MKL and Intel OpenMP. Without these configurations for CMake, Microsoft Visual C OpenMP runtime (vcomp) will be used.
CUDA based build
In this mode PyTorch computations will leverage your GPU via CUDA for faster number crunching
NVTX is needed to build PyTorch with CUDA. NVTX is a part of CUDA distributive, where it is called "Nsight Compute". To install it onto an already installed CUDA run CUDA installation once again and check the corresponding checkbox. Make sure that CUDA with Nsight Compute is installed after Visual Studio.
Currently, VS 2017 / 2019, and Ninja are supported as the generator of CMake. If ninja.exe is detected in PATH, then Ninja will be used as the default generator, otherwise, it will use VS 2017 / 2019.
If Ninja is selected as the generator, the latest MSVC will get selected as the underlying toolchain.
Additional libraries such as Magma, oneDNN, a.k.a. MKLDNN or DNNL, and Sccache are often needed. Please refer to the installation-helper to install them.
You can refer to the build_pytorch.bat script for some other environment variables configurations
cmd

:: Set the environment variables after you have downloaded and unzipped the mkl package,
:: else CMake would throw an error as `Could NOT find OpenMP`.
set CMAKE_INCLUDE_PATH={Your directory}\mkl\include
set LIB={Your directory}\mkl\lib;%LIB%

:: Read the content in the previous section carefully before you proceed.
:: [Optional] If you want to override the underlying toolset used by Ninja and Visual Studio with CUDA, please run the following script block.
:: "Visual Studio 2019 Developer Command Prompt" will be run automatically.
:: Make sure you have CMake >= 3.12 before you do this when you use the Visual Studio generator.
set CMAKE_GENERATOR_TOOLSET_VERSION=14.27
set DISTUTILS_USE_SDK=1
for /f "usebackq tokens=*" %i in (`"%ProgramFiles(x86)%\Microsoft Visual Studio\Installer\vswhere.exe" -version [15^,17^) -products * -latest -property installationPath`) do call "%i\VC\Auxiliary\Build\vcvarsall.bat" x64 -vcvars_ver=%CMAKE_GENERATOR_TOOLSET_VERSION%

:: [Optional] If you want to override the CUDA host compiler
set CUDAHOSTCXX=C:\Program Files (x86)\Microsoft Visual Studio\2019\Community\VC\Tools\MSVC\14.27.29110\bin\HostX64\x64\cl.exe

python -m pip install --no-build-isolation -v -e .
Intel GPU builds
In this mode PyTorch with Intel GPU support will be built.
Please make sure the common prerequisites as well as the prerequisites for Intel GPU are properly installed and the environment variables are configured prior to starting the build. For build tool support, Visual Studio 2022 is required.
Then PyTorch can be built with the command:
:: CMD Commands:
:: Set the CMAKE_PREFIX_PATH to help find corresponding packages
:: %CONDA_PREFIX% only works after `conda activate custom_env`

if defined CMAKE_PREFIX_PATH (
    set "CMAKE_PREFIX_PATH=%CONDA_PREFIX%\Library;%CMAKE_PREFIX_PATH%"
) else (
    set "CMAKE_PREFIX_PATH=%CONDA_PREFIX%\Library"
)

python -m pip install --no-build-isolation -v -e .
Adjust Build Options (Optional)
You can adjust the configuration of CMake variables through environment variables, which the
build forwards to CMake (see cmake/EnvVarForwarding.cmake for
the full list). For example, pointing the build at a specific Conda prefix, CuDNN, or BLAS:
On Linux
export CMAKE_PREFIX_PATH="${CONDA_PREFIX:-'$(dirname $(which conda))/../'}:${CMAKE_PREFIX_PATH}"
spin develop
On macOS
export CMAKE_PREFIX_PATH="${CONDA_PREFIX:-'$(dirname $(which conda))/../'}:${CMAKE_PREFIX_PATH}"
MACOSX_DEPLOYMENT_TARGET=11.0 spin develop
After a first spin develop, you can inspect or adjust the CMake cache interactively with
ccmake build (or cmake-gui build) and rebuild with spin develop; your edits persist, because
reconfiguration does not use --fresh and environment variables only seed cache entries that are
not already set. The corollary: once a variable is in the cache, changing its environment variable
no longer affects it -- edit the cache directly (or delete build/CMakeCache.txt) to change it.
The build type and compiler are the exception; the build always re-applies them.
Docker Image
Using pre-built images
You can also pull a pre-built docker image from Docker Hub and run with docker v23.0+
docker run --gpus all --rm -ti --ipc=host pytorch/pytorch:latest
Please note that PyTorch uses shared memory to share data between processes, so if torch multiprocessing is used (e.g.
for multithreaded data loaders) the default shared memory segment size that container runs with is not enough, and you
should increase shared memory size either with --ipc=host or --shm-size command line options to nvidia-docker run.
Building the image yourself
NOTE: Must be built with a Docker version >= 23.0
The Dockerfile is supplied to build images with CUDA 12.6 support and cuDNN v9.
You can pass PYTHON_VERSION=x.y make variable to specify which Python version is to be used by Miniconda, or leave it
unset to use the default, as the Dockerfile uses system Python.
make -f docker.Makefile
# images are tagged as docker.io/${your_docker_username}/pytorch
You can also pass the CMAKE_VARS="..." environment variable to specify additional CMake variables to be passed to CMake during the build.
See cmake/EnvVarForwarding.cmake for the list of available variables.
make -f docker.Makefile
Building the Documentation
To build documentation in various formats, you will need Sphinx
and the pytorch_sphinx_theme2.
Before you build the documentation locally, ensure torch is
installed in your environment. For small fixes, you can install the
nightly version as described in Getting Started.
For more complex fixes, such as adding a new module and docstrings for the new module, you might need to install torch from source. See Docstring Guidelines for docstring conventions.
cd docs/
pip install -r requirements.txt
make html
make serve
Run make to get a list of all available output formats.
If you get a katex error run npm install katex. If it persists, try
npm install -g katex
Troubleshooting CI Errors
Your build may show errors you didn't have locally - here's how to find the errors relevant to the docs.
If the build has any errors, you will see something like this on the PR:
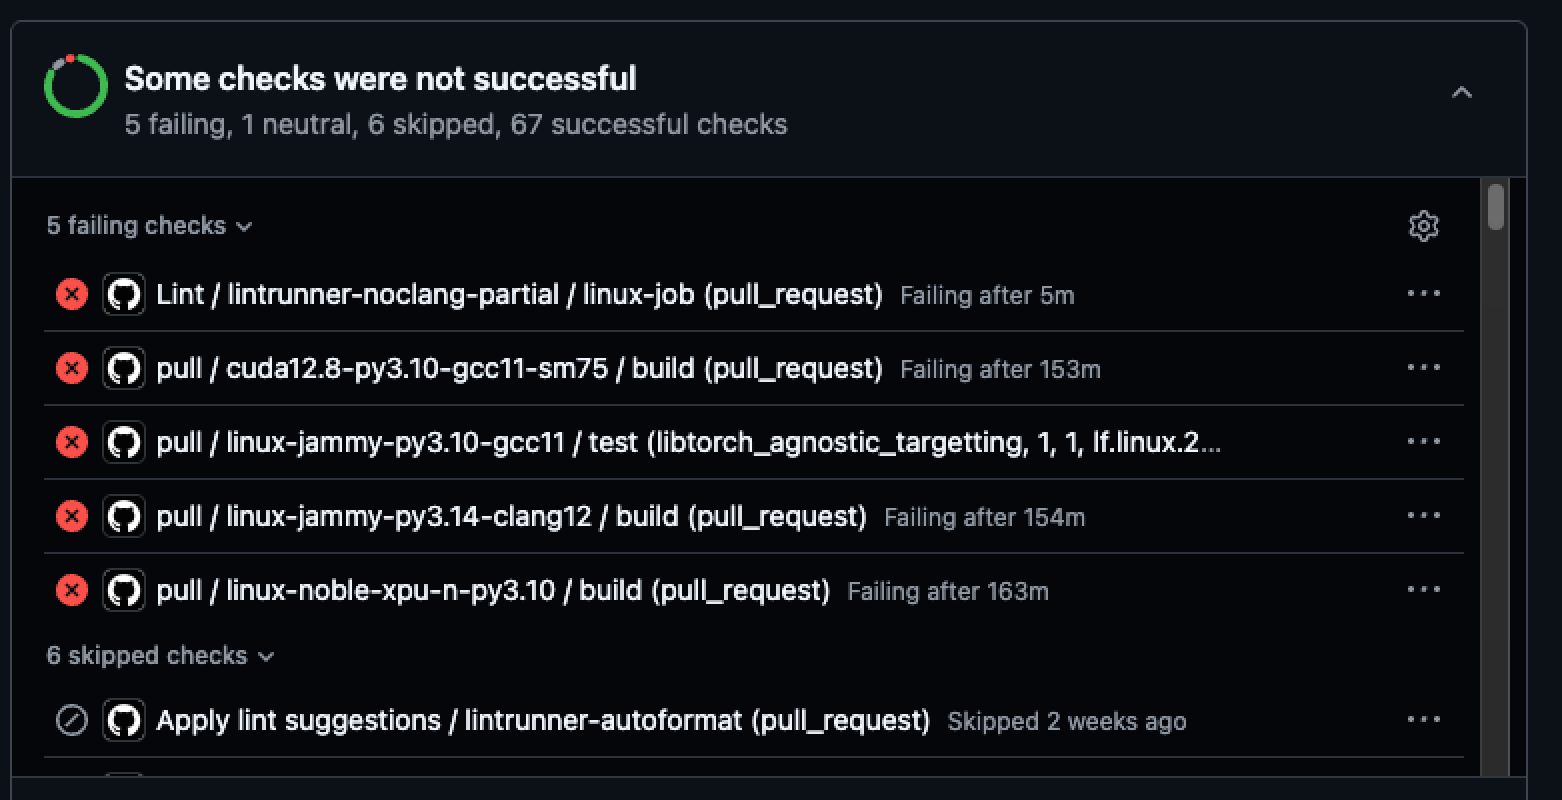
Any doc-related errors will occur in jobs that include "doc" somewhere in the title. It doesn't look like any of these jobs are relevant to our docs.
Let's take a look anyway. Click on the job to see the logs:
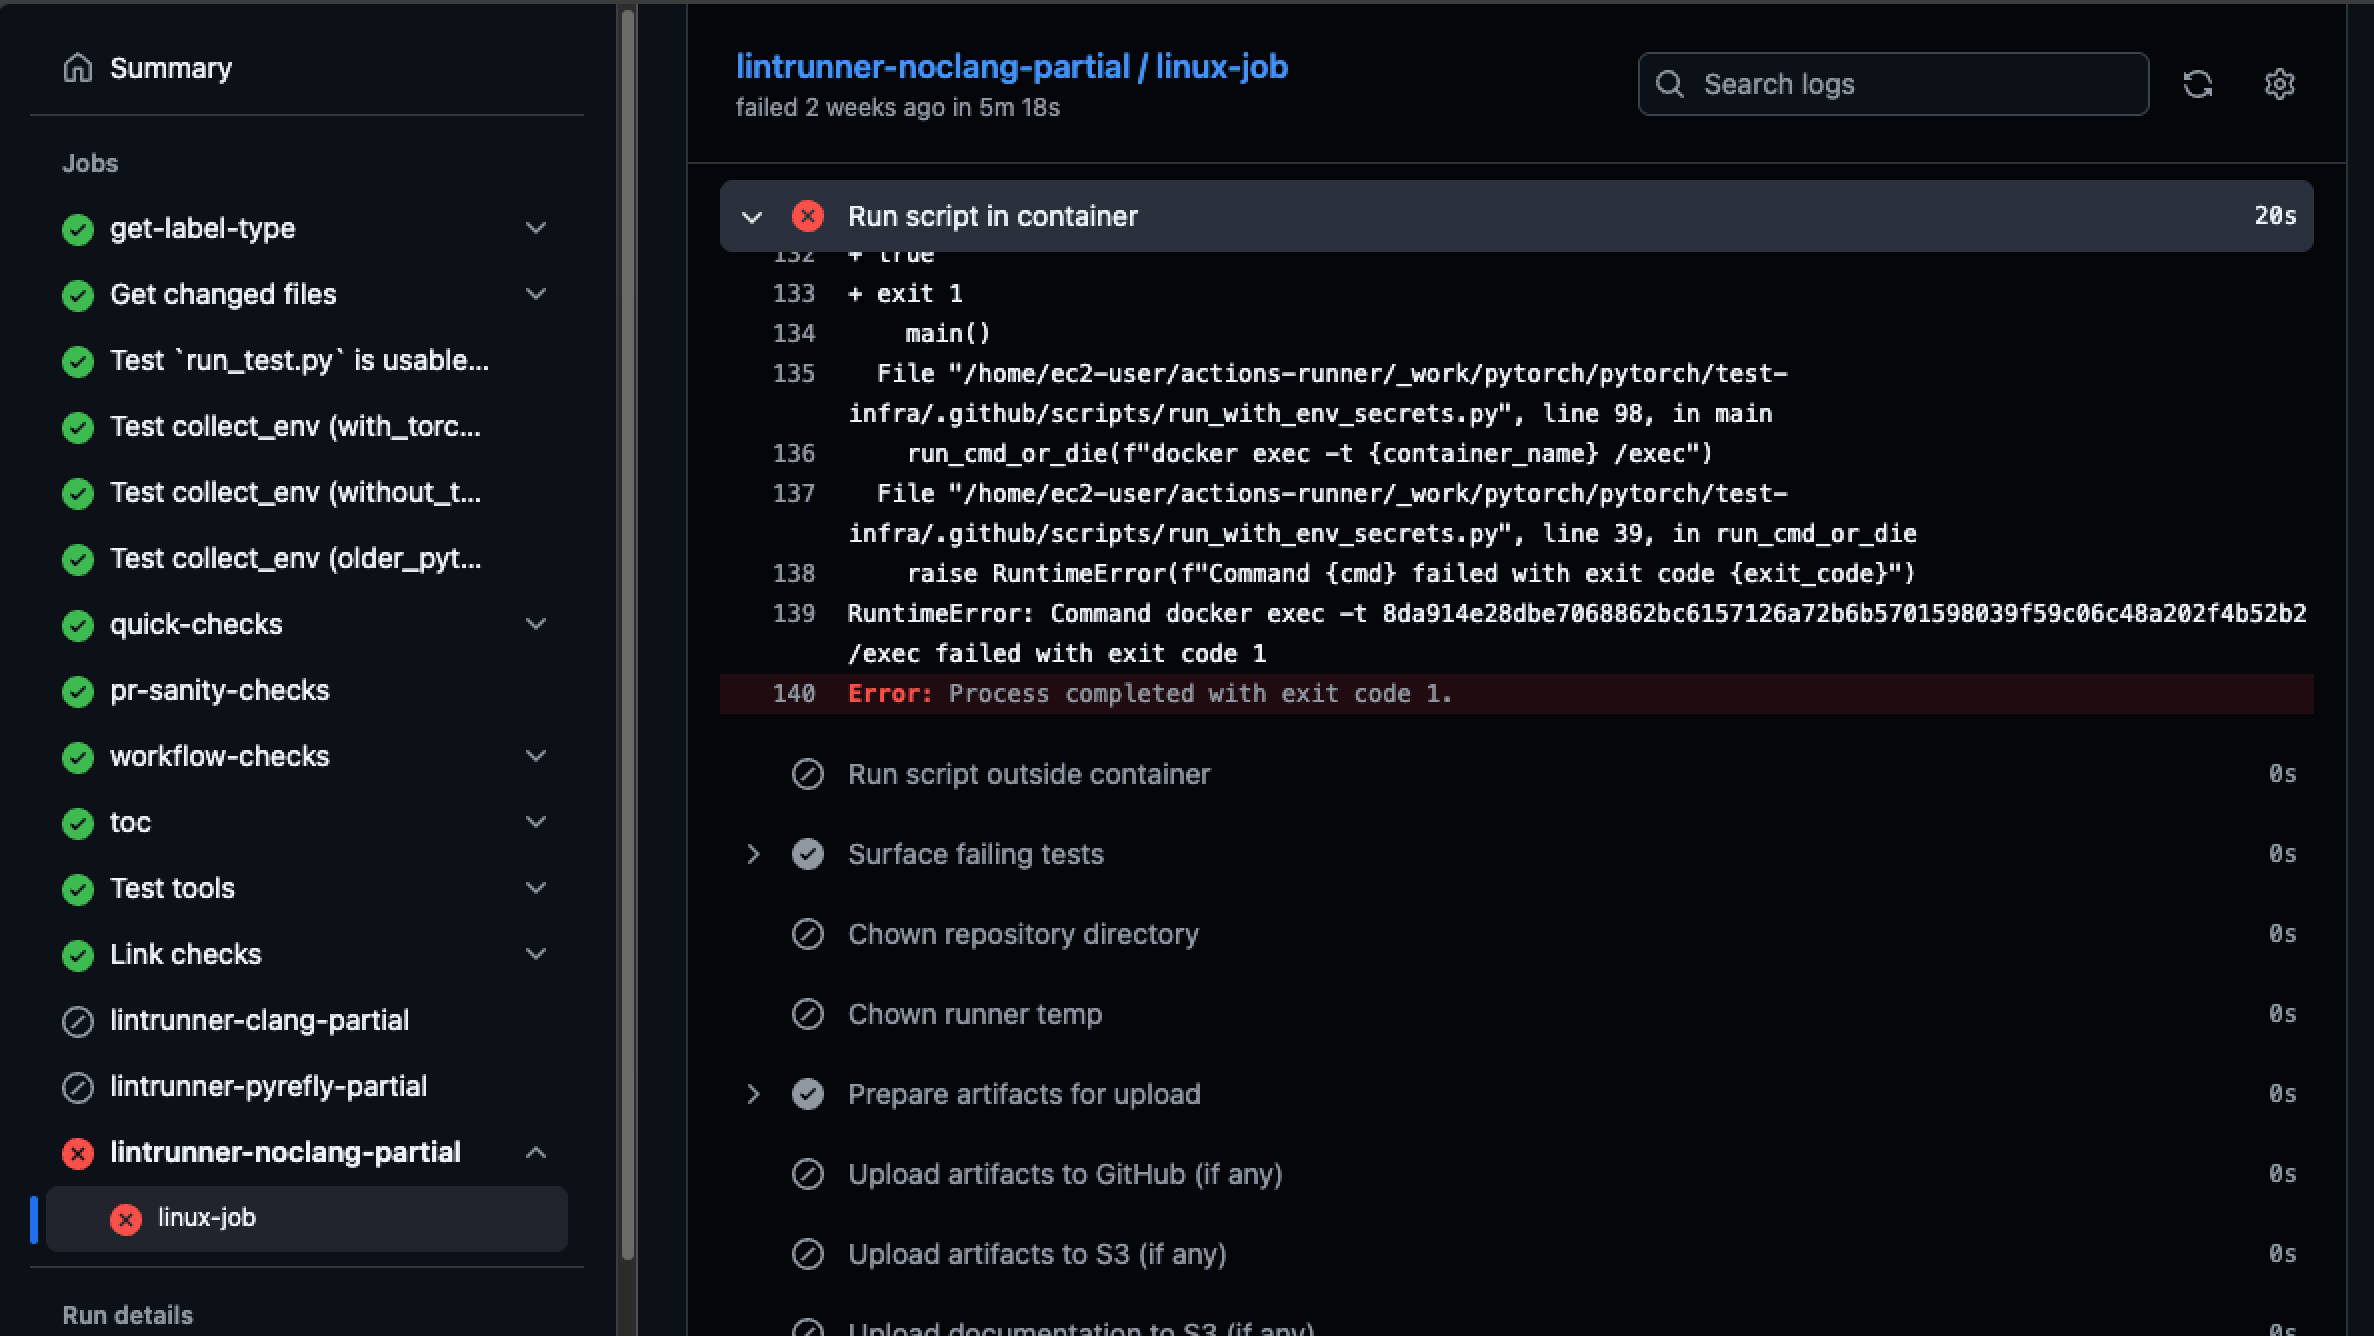
And we can be sure that this job does not involve docs.
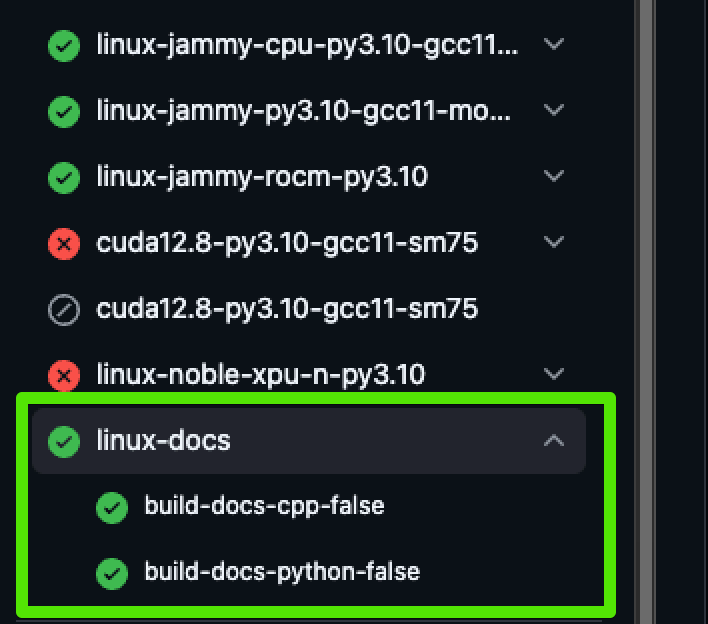
Looking at this build, we can see these jobs are relevant to our docs - and they didn't have any errors:
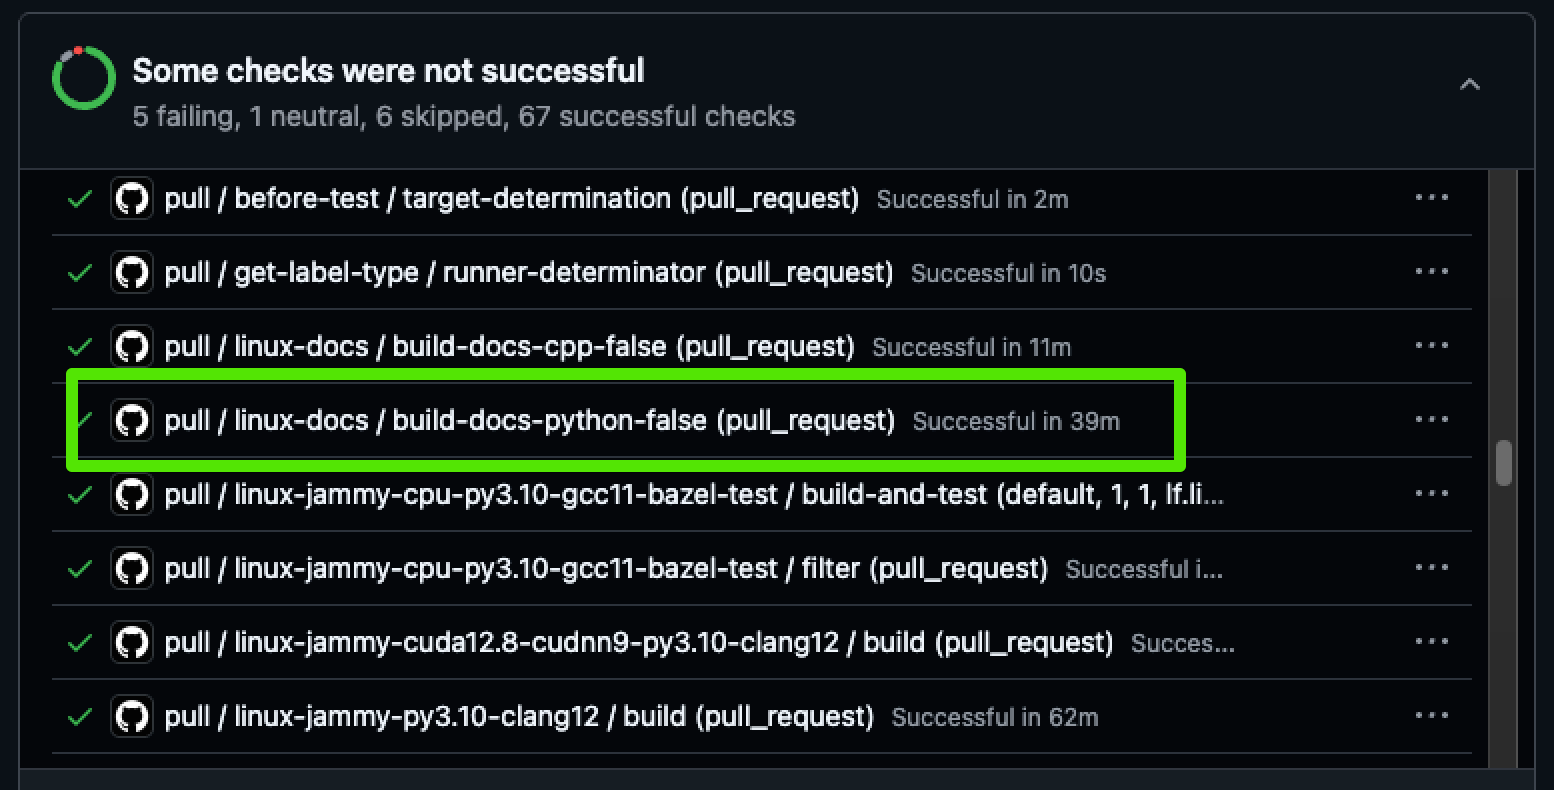
You might also see a comment on the PR like this:
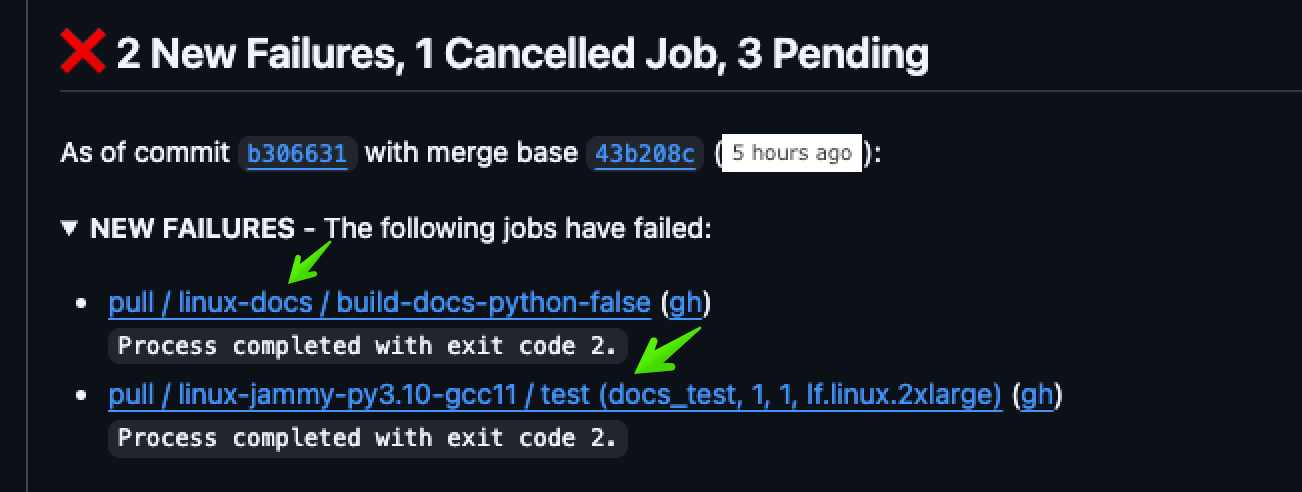
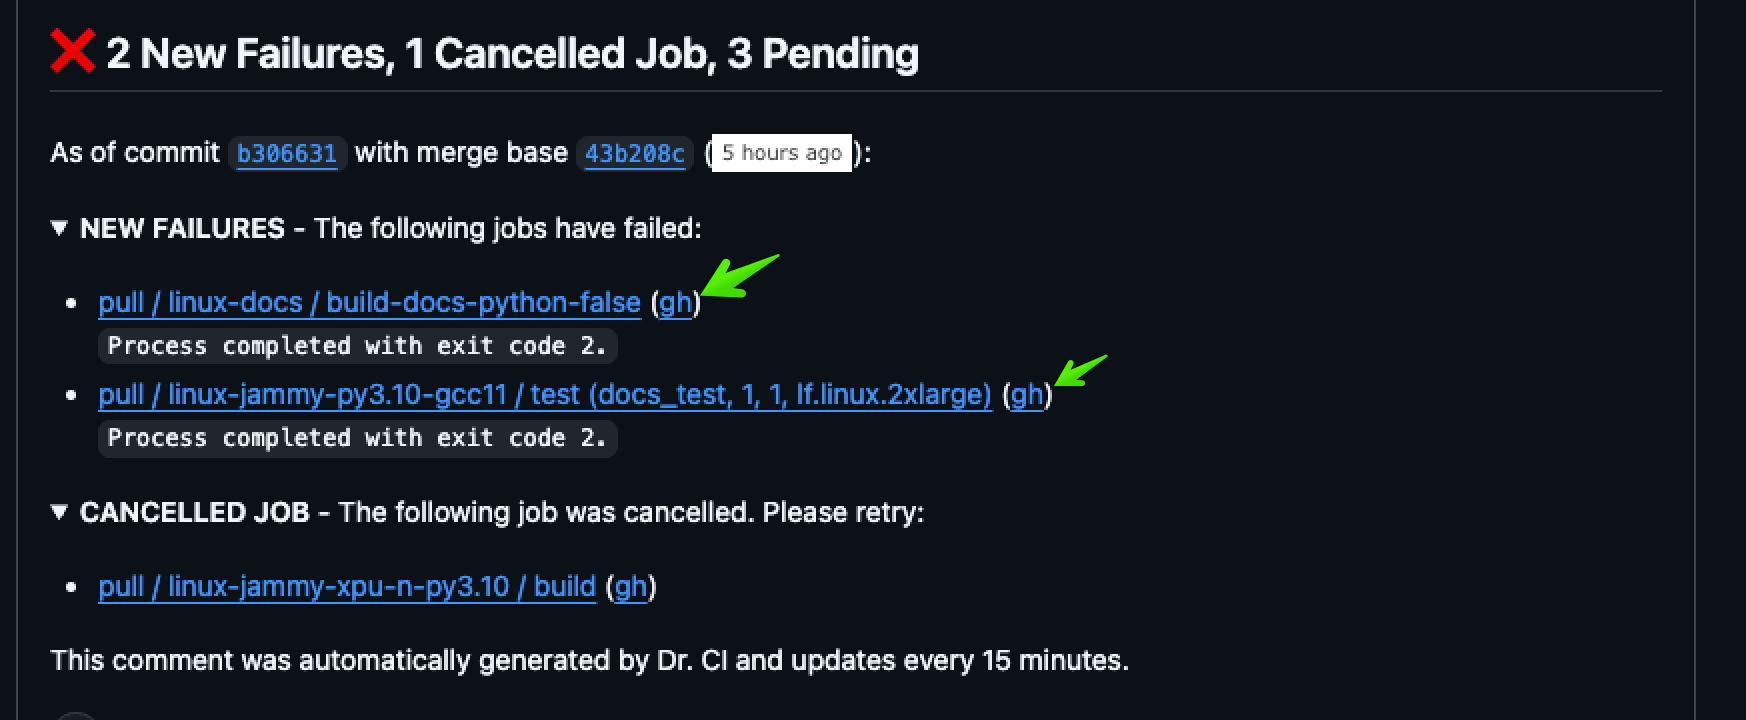
We can see that some of these issues are relevant to our docs.
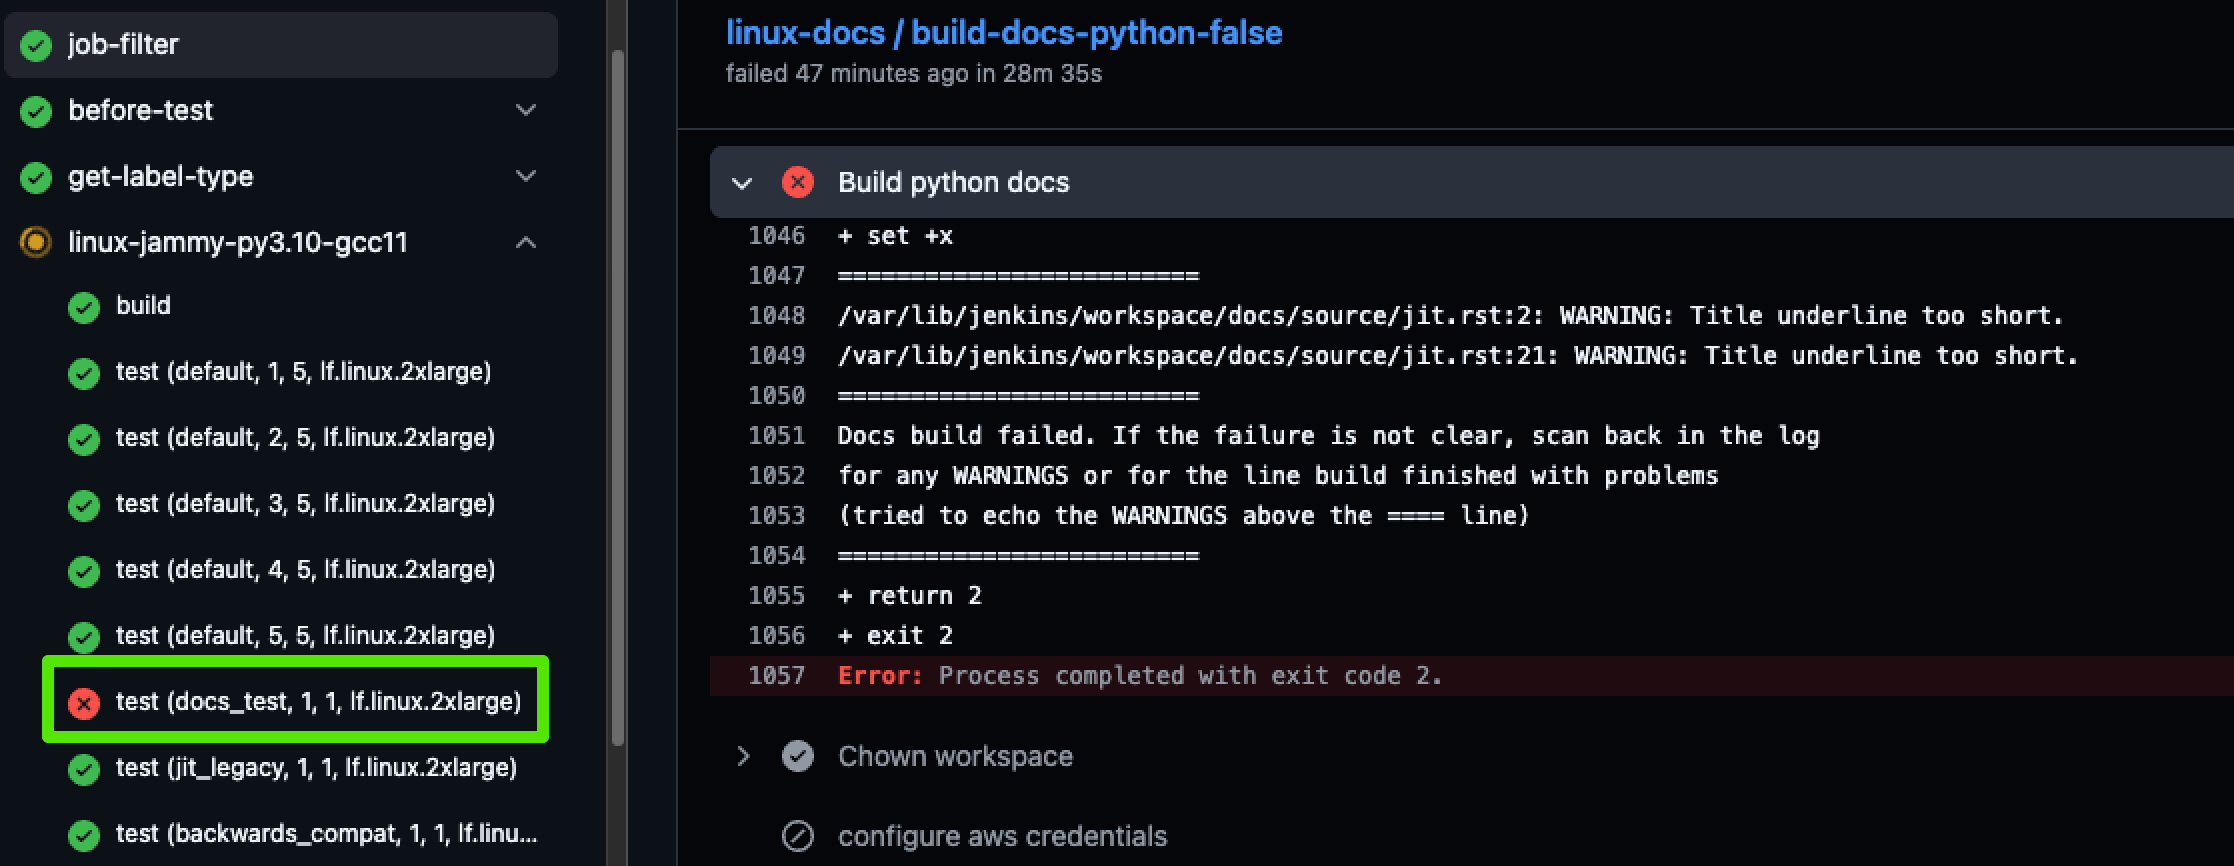
Open the logs by clicking on the gh link:
And here we can see there is a doc-related error:
You can always find the relevant doc builds by going to the Checks tab on your PR, and scrolling down to pull.
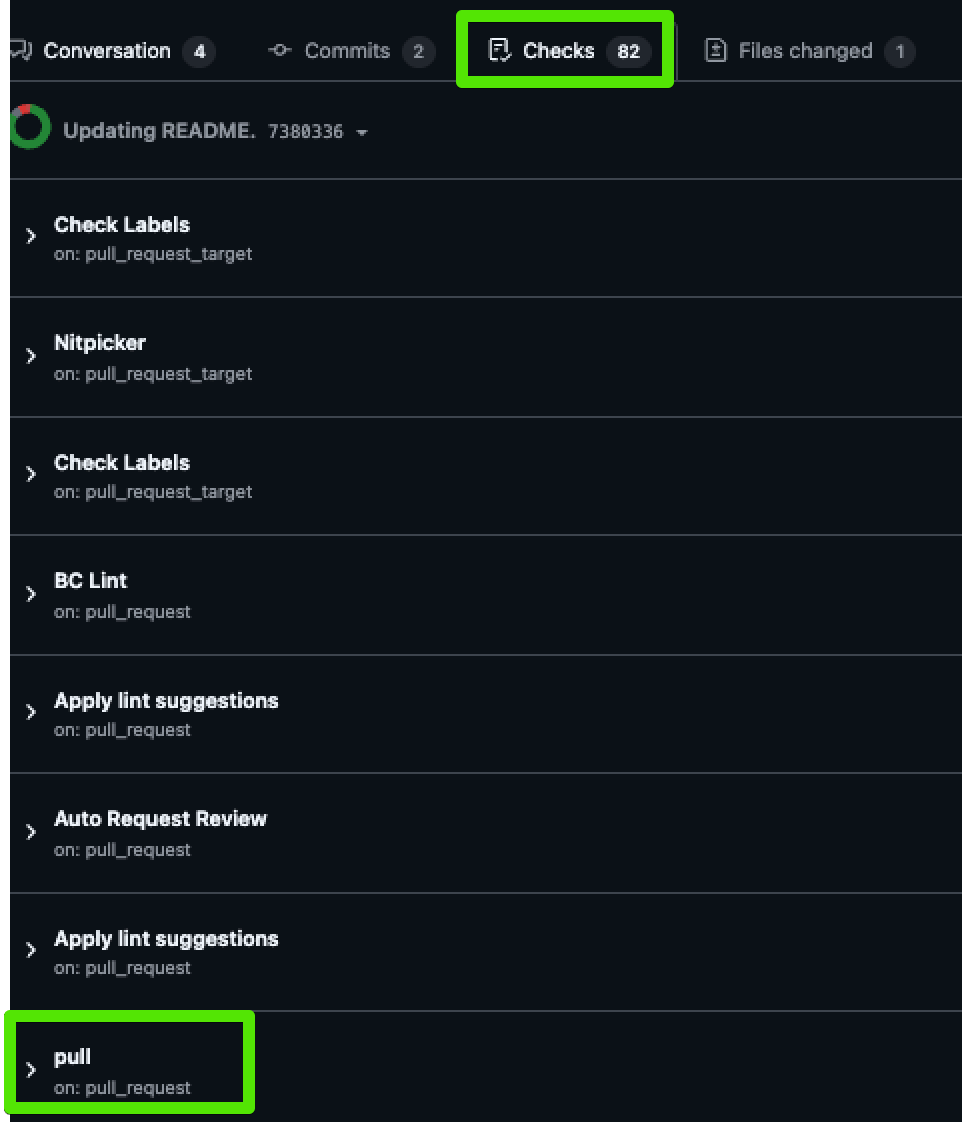
You can either click through or toggle the accordion to see all of the jobs here, where you can see the docs jobs highlighted:
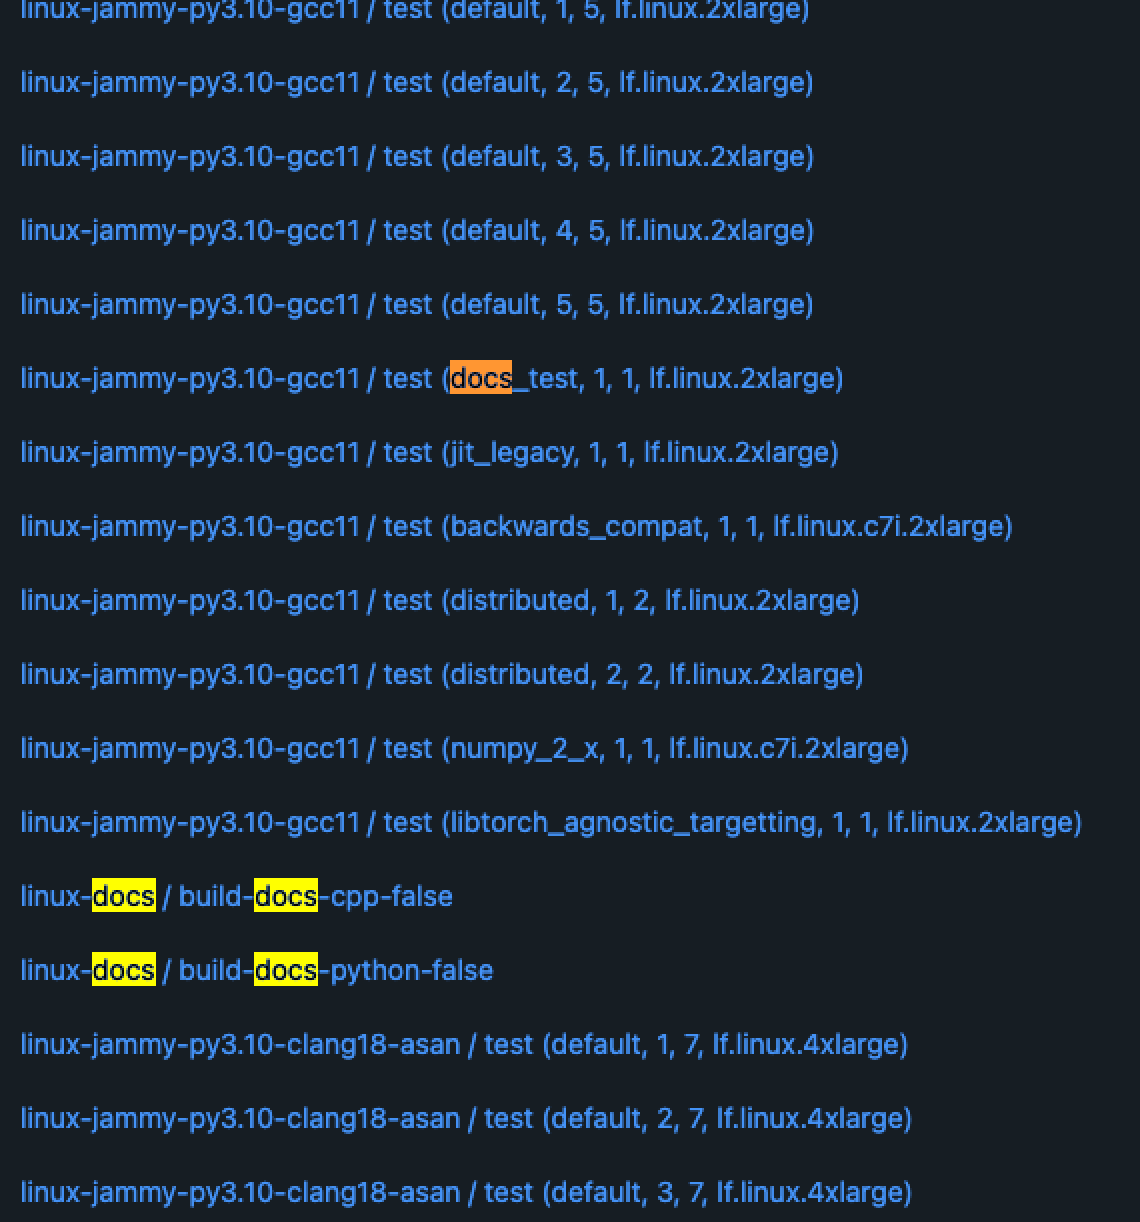
If you click through, you'll see the doc jobs at the bottom, like this:
Building a PDF
To compile a PDF of all PyTorch documentation, ensure you have
texlive and LaTeX installed. On macOS, you can install them using:
brew install --cask mactex
To create the PDF:
-
Run:
make latexpdfThis will generate the necessary files in the
build/latexdirectory. -
Navigate to this directory and execute:
make LATEXOPTS="-interaction=nonstopmode"This will produce a
pytorch.pdfwith the desired content. Run this command one more time so that it generates the correct table of contents and index.
Previous Versions
Installation instructions and binaries for previous PyTorch versions may be found on our website.
Getting Started
Pointers to get you started:
- Tutorials: get you started with understanding and using PyTorch
- Examples: easy to understand PyTorch code across all domains
- The API Reference
- Glossary
Resources
- PyTorch.org
- PyTorch Tutorials
- PyTorch Examples
- PyTorch Models
- Intro to Deep Learning with PyTorch from Udacity
- Intro to Machine Learning with PyTorch from Udacity
- Deep Neural Networks with PyTorch from Coursera
- PyTorch Twitter
- PyTorch Blog
- PyTorch YouTube
Communication
- Forums: Discuss implementations, research, etc. https://discuss.pytorch.org
- GitHub Issues: Bug reports, feature requests, install issues, RFCs, thoughts, etc.
- Slack: The PyTorch Slack hosts a primary audience of moderate to experienced PyTorch users and developers for general chat, online discussions, collaboration, etc. If you are a beginner looking for help, the primary medium is PyTorch Forums. If you need a slack invite, please fill this form: https://goo.gl/forms/PP1AGvNHpSaJP8to1
- Newsletter: No-noise, a one-way email newsletter with important announcements about PyTorch. You can sign-up here: https://eepurl.com/cbG0rv
- Facebook Page: Important announcements about PyTorch. https://www.facebook.com/pytorch
- For brand guidelines, please visit our website at pytorch.org
Releases and Contributing
Typically, PyTorch has three minor releases a year. Please let us know if you encounter a bug by filing an issue.
We appreciate all contributions. If you are planning to contribute back bug-fixes, please do so without any further discussion.
If you plan to contribute new features, utility functions, or extensions to the core, please first open an issue and discuss the feature with us. Sending a PR without discussion might end up resulting in a rejected PR because we might be taking the core in a different direction than you might be aware of.
To learn more about making a contribution to PyTorch, please see our Contribution page. For more information about PyTorch releases, see Release page.
The Team
PyTorch is a community-driven project with several skillful engineers and researchers contributing to it.
PyTorch is currently maintained by Soumith Chintala, Gregory Chanan, Dmytro Dzhulgakov, Edward Yang, Alban Desmaison, Piotr Bialecki and Nikita Shulga with major contributions coming from hundreds of talented individuals in various forms and means. A non-exhaustive but growing list needs to mention: Trevor Killeen, Sasank Chilamkurthy, Sergey Zagoruyko, Adam Lerer, Francisco Massa, Alykhan Tejani, Luca Antiga, Alban Desmaison, Andreas Koepf, James Bradbury, Zeming Lin, Yuandong Tian, Guillaume Lample, Marat Dukhan, Natalia Gimelshein, Christian Sarofeen, Martin Raison, Edward Yang, Zachary Devito.
Note: This project is unrelated to hughperkins/pytorch with the same name. Hugh is a valuable contributor to the Torch community and has helped with many things Torch and PyTorch.
License
PyTorch has a BSD-style license, as found in the LICENSE file.
4 maintainers


Release files for torch 2.14.1
For a detailed explanation of source distributions (sdists) and built distributions (wheels), please see the package formats documentation.
Built distributions (wheels)
Total release size: 7.6 GB
Release files / torch-2.14.1-cp314-cp314t-win_amd64.whl
| Download URL | torch-2.14.1-cp314-cp314t-win_amd64.whl |
|---|---|
| Size | 124.4 MB |
| Tags | CPython 3.14 CPython 3.14 free-threading Windows x86-64 |
|
SHA-256 checksum How to use checksums |
e07306caa1de2a4ac1467e11ecfc92fc44f523dd6a521145039aef46d913963c
|
|
BLAKE2b-256 checksum How to use checksums |
4505451a69a4287033d8f106f5c65f92c2c0c37229d81ea101d4b047caf758cc
|
| Upload date | |
|
Uploaded using Trusted Publishing? What is trusted publishing? |
No |
| Uploaded via |
twine/7.0.0 CPython/3.14.7
|
Release files / torch-2.14.1-cp314-cp314t-manylinux_2_28_x86_64.whl
| Download URL | torch-2.14.1-cp314-cp314t-manylinux_2_28_x86_64.whl |
|---|---|
| Size | 554.6 MB |
| Tags | CPython 3.14 CPython 3.14 free-threading Linux glibc 2.28+ x86-64 |
|
SHA-256 checksum How to use checksums |
e65d5fe136e533b23c2d134377f7f126721c7c78dd75b3dbb735af082a8aeb85
|
|
BLAKE2b-256 checksum How to use checksums |
03d88272157c438cc26a199a8fa0caf87985477b8a1ed8a09084eb2ae40609d8
|
| Upload date | |
|
Uploaded using Trusted Publishing? What is trusted publishing? |
No |
| Uploaded via |
twine/7.0.0 CPython/3.14.7
|
Release files / torch-2.14.1-cp314-cp314t-manylinux_2_28_aarch64.whl
| Download URL | torch-2.14.1-cp314-cp314t-manylinux_2_28_aarch64.whl |
|---|---|
| Size | 454.0 MB |
| Tags | CPython 3.14 CPython 3.14 free-threading Linux glibc 2.28+ ARM64 |
|
SHA-256 checksum How to use checksums |
9113f94f70429f9f302bf55b090b5411269083e8a72a5d015ffcc5a7f83f2c69
|
|
BLAKE2b-256 checksum How to use checksums |
e494b97e863c9ceef2bc6e082e967cbfb9065b5e232f2a60c5af0f5115a1bc31
|
| Upload date | |
|
Uploaded using Trusted Publishing? What is trusted publishing? |
No |
| Uploaded via |
twine/7.0.0 CPython/3.14.7
|
Release files / torch-2.14.1-cp314-cp314t-macosx_14_0_arm64.whl
| Download URL | torch-2.14.1-cp314-cp314t-macosx_14_0_arm64.whl |
|---|---|
| Size | 127.7 MB |
| Tags | CPython 3.14 CPython 3.14 free-threading macOS 14.0+ ARM64 |
|
SHA-256 checksum How to use checksums |
06c3ec25f3b497f9a73dc0c36f293f295cfe8d5584fd446238d9a501b30a66d5
|
|
BLAKE2b-256 checksum How to use checksums |
2dbc1afbd1a22f6023eafcdb9295ac1d97137a7816f54091d693701072da2218
|
| Upload date | |
|
Uploaded using Trusted Publishing? What is trusted publishing? |
No |
| Uploaded via |
twine/7.0.0 CPython/3.14.7
|
Release files / torch-2.14.1-cp314-cp314-win_amd64.whl
| Download URL | torch-2.14.1-cp314-cp314-win_amd64.whl |
|---|---|
| Size | 124.1 MB |
| Tags | CPython 3.14 Windows x86-64 |
|
SHA-256 checksum How to use checksums |
d02a4c48a2ca5fb7654e36e71f710f74494d83f1f10aaff8e059dd554adca956
|
|
BLAKE2b-256 checksum How to use checksums |
d9dca36a4431ab5e3ad168a75f341e24677a4bbbf0c5dda59c97a7079262bb94
|
| Upload date | |
|
Uploaded using Trusted Publishing? What is trusted publishing? |
No |
| Uploaded via |
twine/7.0.0 CPython/3.14.7
|
Release files / torch-2.14.1-cp314-cp314-manylinux_2_28_x86_64.whl
| Download URL | torch-2.14.1-cp314-cp314-manylinux_2_28_x86_64.whl |
|---|---|
| Size | 554.6 MB |
| Tags | CPython 3.14 Linux glibc 2.28+ x86-64 |
|
SHA-256 checksum How to use checksums |
1d4df07be7338bbcc4d54085adee21363c91314702b9bd4d78ef72ffac9465ba
|
|
BLAKE2b-256 checksum How to use checksums |
fddf23c69e9b9fd19fe6563422f1bc59f89601bda47234a89a1cf432cfde3aee
|
| Upload date | |
|
Uploaded using Trusted Publishing? What is trusted publishing? |
No |
| Uploaded via |
twine/7.0.0 CPython/3.14.7
|
Release files / torch-2.14.1-cp314-cp314-manylinux_2_28_aarch64.whl
| Download URL | torch-2.14.1-cp314-cp314-manylinux_2_28_aarch64.whl |
|---|---|
| Size | 454.0 MB |
| Tags | CPython 3.14 Linux glibc 2.28+ ARM64 |
|
SHA-256 checksum How to use checksums |
f68f5476e2bc0e8f60b74f7ca21acda885c4477af6392f8977e4f0d1ea1aa162
|
|
BLAKE2b-256 checksum How to use checksums |
93f494219ada13edd62fda1f976163292b7b8595f1fd2f4ef74af24b3baad375
|
| Upload date | |
|
Uploaded using Trusted Publishing? What is trusted publishing? |
No |
| Uploaded via |
twine/7.0.0 CPython/3.14.7
|
Release files / torch-2.14.1-cp314-cp314-macosx_14_0_arm64.whl
| Download URL | torch-2.14.1-cp314-cp314-macosx_14_0_arm64.whl |
|---|---|
| Size | 127.3 MB |
| Tags | CPython 3.14 macOS 14.0+ ARM64 |
|
SHA-256 checksum How to use checksums |
cee091caf2a6229e248daf41d18ceebf590ba02d9179205610062c64ee5fef03
|
|
BLAKE2b-256 checksum How to use checksums |
431923a1aed488423a5055727256b25406e4b93bd2bcf1352bef582b9951c10c
|
| Upload date | |
|
Uploaded using Trusted Publishing? What is trusted publishing? |
No |
| Uploaded via |
twine/7.0.0 CPython/3.14.7
|
Release files / torch-2.14.1-cp313-cp313-win_amd64.whl
| Download URL | torch-2.14.1-cp313-cp313-win_amd64.whl |
|---|---|
| Size | 124.1 MB |
| Tags | CPython 3.13 Windows x86-64 |
|
SHA-256 checksum How to use checksums |
711713391d26a1ce5e9fbc6c996d954a8c12e8825374cc77b809a6af29539b8c
|
|
BLAKE2b-256 checksum How to use checksums |
7b4b32c00cacbe682a4c08d9c6c3e7a7116c912184cc7155f06c64f545db97d1
|
| Upload date | |
|
Uploaded using Trusted Publishing? What is trusted publishing? |
No |
| Uploaded via |
twine/7.0.0 CPython/3.14.7
|
Release files / torch-2.14.1-cp313-cp313-manylinux_2_28_x86_64.whl
| Download URL | torch-2.14.1-cp313-cp313-manylinux_2_28_x86_64.whl |
|---|---|
| Size | 554.6 MB |
| Tags | CPython 3.13 Linux glibc 2.28+ x86-64 |
|
SHA-256 checksum How to use checksums |
c8f71aabc67bcbfc9373dc131537a5968d04edce73e88add21354a7cd0a76985
|
|
BLAKE2b-256 checksum How to use checksums |
7cccbb579ac0c80e077c58204e43b37a254b74dea5873635100bea25789a55d4
|
| Upload date | |
|
Uploaded using Trusted Publishing? What is trusted publishing? |
No |
| Uploaded via |
twine/7.0.0 CPython/3.14.7
|
Release files / torch-2.14.1-cp313-cp313-manylinux_2_28_aarch64.whl
| Download URL | torch-2.14.1-cp313-cp313-manylinux_2_28_aarch64.whl |
|---|---|
| Size | 454.0 MB |
| Tags | CPython 3.13 Linux glibc 2.28+ ARM64 |
|
SHA-256 checksum How to use checksums |
6d530bd11479fb574567af3a1f384af9a77bf5bb9550cde8080b356ca7220d5a
|
|
BLAKE2b-256 checksum How to use checksums |
601f0330275c705b846882531c64e80d32b13fb572eeb9b995e87e84154b0712
|
| Upload date | |
|
Uploaded using Trusted Publishing? What is trusted publishing? |
No |
| Uploaded via |
twine/7.0.0 CPython/3.14.7
|
Release files / torch-2.14.1-cp313-cp313-macosx_14_0_arm64.whl
| Download URL | torch-2.14.1-cp313-cp313-macosx_14_0_arm64.whl |
|---|---|
| Size | 127.3 MB |
| Tags | CPython 3.13 macOS 14.0+ ARM64 |
|
SHA-256 checksum How to use checksums |
dbe359d705f4d67236743794c296c6dee93a922fd8117eff8c3e880d7d0fb2b9
|
|
BLAKE2b-256 checksum How to use checksums |
7d11faaca4f8541c45127b7e0d6bb141221fe944c8466d89986b8466c6c195f9
|
| Upload date | |
|
Uploaded using Trusted Publishing? What is trusted publishing? |
No |
| Uploaded via |
twine/7.0.0 CPython/3.14.7
|
Release files / torch-2.14.1-cp312-cp312-win_amd64.whl
| Download URL | torch-2.14.1-cp312-cp312-win_amd64.whl |
|---|---|
| Size | 124.1 MB |
| Tags | CPython 3.12 Windows x86-64 |
|
SHA-256 checksum How to use checksums |
38bee9f2a2ccfc6898172a5075e4ba52522fbe143eeb099674fc67ab390e858d
|
|
BLAKE2b-256 checksum How to use checksums |
ad1ab9648b0d228e513f69f8453ec3f90a8d436d78ff6d85a2773e539f0c07cf
|
| Upload date | |
|
Uploaded using Trusted Publishing? What is trusted publishing? |
No |
| Uploaded via |
twine/7.0.0 CPython/3.14.7
|
Release files / torch-2.14.1-cp312-cp312-manylinux_2_28_x86_64.whl
| Download URL | torch-2.14.1-cp312-cp312-manylinux_2_28_x86_64.whl |
|---|---|
| Size | 554.6 MB |
| Tags | CPython 3.12 Linux glibc 2.28+ x86-64 |
|
SHA-256 checksum How to use checksums |
23011fe29a99b591eabb3a31a25080c62e2c2f0690a3c798744e5489dae50451
|
|
BLAKE2b-256 checksum How to use checksums |
bafdc470857d0dfc5d4c94430658b3eed60fd5292b0bf596a8aae7b9fd66d674
|
| Upload date | |
|
Uploaded using Trusted Publishing? What is trusted publishing? |
No |
| Uploaded via |
twine/7.0.0 CPython/3.14.7
|
Release files / torch-2.14.1-cp312-cp312-manylinux_2_28_aarch64.whl
| Download URL | torch-2.14.1-cp312-cp312-manylinux_2_28_aarch64.whl |
|---|---|
| Size | 454.0 MB |
| Tags | CPython 3.12 Linux glibc 2.28+ ARM64 |
|
SHA-256 checksum How to use checksums |
0b13acde294b401509830d85a8906cbf2fc97425a12a66cce1d9fa13c5106a2a
|
|
BLAKE2b-256 checksum How to use checksums |
a43e474930ab971e306957ec763b7df695d659179e15ccab9e7073d47ae14ce8
|
| Upload date | |
|
Uploaded using Trusted Publishing? What is trusted publishing? |
No |
| Uploaded via |
twine/7.0.0 CPython/3.14.7
|
Release files / torch-2.14.1-cp312-cp312-macosx_14_0_arm64.whl
| Download URL | torch-2.14.1-cp312-cp312-macosx_14_0_arm64.whl |
|---|---|
| Size | 127.3 MB |
| Tags | CPython 3.12 macOS 14.0+ ARM64 |
|
SHA-256 checksum How to use checksums |
420dbf314c180ee4b86e9bc00aee5746a7d6e5bacdd7df925af671ed393f0b2e
|
|
BLAKE2b-256 checksum How to use checksums |
4b3c379349820e9a6e713826de3d0b88f07728541bdcabe2a3afd128871cdc4b
|
| Upload date | |
|
Uploaded using Trusted Publishing? What is trusted publishing? |
No |
| Uploaded via |
twine/7.0.0 CPython/3.14.7
|
Release files / torch-2.14.1-cp311-cp311-win_amd64.whl
| Download URL | torch-2.14.1-cp311-cp311-win_amd64.whl |
|---|---|
| Size | 124.1 MB |
| Tags | CPython 3.11 Windows x86-64 |
|
SHA-256 checksum How to use checksums |
0bd2fb0c4098856bc5af59fe5988bf38bdbcdb6550b44273c12ae425cb8ec17e
|
|
BLAKE2b-256 checksum How to use checksums |
fe544e0a71376b2fb15aaf65ed9e6a4c8043d36f554338c6daabc63059a5e157
|
| Upload date | |
|
Uploaded using Trusted Publishing? What is trusted publishing? |
No |
| Uploaded via |
twine/7.0.0 CPython/3.14.7
|
Release files / torch-2.14.1-cp311-cp311-manylinux_2_28_x86_64.whl
| Download URL | torch-2.14.1-cp311-cp311-manylinux_2_28_x86_64.whl |
|---|---|
| Size | 554.6 MB |
| Tags | CPython 3.11 Linux glibc 2.28+ x86-64 |
|
SHA-256 checksum How to use checksums |
305a61f61f35f128579f299c5bd33d475f6a01c6307336139632e30856c4854d
|
|
BLAKE2b-256 checksum How to use checksums |
aa4f7af6fbada912b3023cc79b6ab30f89234b258a9a373880ea52ed914a2ae9
|
| Upload date | |
|
Uploaded using Trusted Publishing? What is trusted publishing? |
No |
| Uploaded via |
twine/7.0.0 CPython/3.14.7
|
Release files / torch-2.14.1-cp311-cp311-manylinux_2_28_aarch64.whl
| Download URL | torch-2.14.1-cp311-cp311-manylinux_2_28_aarch64.whl |
|---|---|
| Size | 454.0 MB |
| Tags | CPython 3.11 Linux glibc 2.28+ ARM64 |
|
SHA-256 checksum How to use checksums |
ef1276fd07adb8d463ac402a24ea7482e45c9a42df8ebdac211aa757779200ba
|
|
BLAKE2b-256 checksum How to use checksums |
8d0e21281ff4015779255229f487f4481c5bfba53b8c83e01eaa4a8a8f1180c9
|
| Upload date | |
|
Uploaded using Trusted Publishing? What is trusted publishing? |
No |
| Uploaded via |
twine/7.0.0 CPython/3.14.7
|
Release files / torch-2.14.1-cp311-cp311-macosx_14_0_arm64.whl
| Download URL | torch-2.14.1-cp311-cp311-macosx_14_0_arm64.whl |
|---|---|
| Size | 127.3 MB |
| Tags | CPython 3.11 macOS 14.0+ ARM64 |
|
SHA-256 checksum How to use checksums |
b6074b130fd26bc50f5d171f07dfed70db22dd0c354ab34767729249f9e0f042
|
|
BLAKE2b-256 checksum How to use checksums |
5d9bfd1cd143a7bda5abc1fc352ed7b431f6f52aa3c454293211a33656db2cb5
|
| Upload date | |
|
Uploaded using Trusted Publishing? What is trusted publishing? |
No |
| Uploaded via |
twine/7.0.0 CPython/3.14.7
|
Release files / torch-2.14.1-cp310-cp310-win_amd64.whl
| Download URL | torch-2.14.1-cp310-cp310-win_amd64.whl |
|---|---|
| Size | 124.1 MB |
| Tags | CPython 3.10 Windows x86-64 |
|
SHA-256 checksum How to use checksums |
9ee7d50ec80ae5b4258cafc0ea108711988d961f21d0a68cf685650da2812e5f
|
|
BLAKE2b-256 checksum How to use checksums |
488828360126b07082ce4ab96a1bf8547595d06d6fea5eaffdfc7d2b56459e79
|
| Upload date | |
|
Uploaded using Trusted Publishing? What is trusted publishing? |
No |
| Uploaded via |
twine/7.0.0 CPython/3.14.7
|
Release files / torch-2.14.1-cp310-cp310-manylinux_2_28_x86_64.whl
| Download URL | torch-2.14.1-cp310-cp310-manylinux_2_28_x86_64.whl |
|---|---|
| Size | 554.6 MB |
| Tags | CPython 3.10 Linux glibc 2.28+ x86-64 |
|
SHA-256 checksum How to use checksums |
1fee6b20869a90ccec05e35559a706338ac8aab40a9c4fb58f16667e93af36ae
|
|
BLAKE2b-256 checksum How to use checksums |
5491365b45c4c8a16c7c398354b341273d15cdbd01c9feeadac16a02ce070b27
|
| Upload date | |
|
Uploaded using Trusted Publishing? What is trusted publishing? |
No |
| Uploaded via |
twine/7.0.0 CPython/3.14.7
|
Release files / torch-2.14.1-cp310-cp310-manylinux_2_28_aarch64.whl
| Download URL | torch-2.14.1-cp310-cp310-manylinux_2_28_aarch64.whl |
|---|---|
| Size | 454.0 MB |
| Tags | CPython 3.10 Linux glibc 2.28+ ARM64 |
|
SHA-256 checksum How to use checksums |
957df236525bcd940ccd9ca59074e9821182171253417c0d98e7b82647254799
|
|
BLAKE2b-256 checksum How to use checksums |
95b3fcbd9ff6ef8a0c318275e613b085d0c49b4fd549fa25bf62496b10a540e8
|
| Upload date | |
|
Uploaded using Trusted Publishing? What is trusted publishing? |
No |
| Uploaded via |
twine/7.0.0 CPython/3.14.7
|
Release files / torch-2.14.1-cp310-cp310-macosx_14_0_arm64.whl
| Download URL | torch-2.14.1-cp310-cp310-macosx_14_0_arm64.whl |
|---|---|
| Size | 127.2 MB |
| Tags | CPython 3.10 macOS 14.0+ ARM64 |
|
SHA-256 checksum How to use checksums |
e24b9815001d18e73e76eae1ea25f8ef908c6103e857378ad20f8f6cf5c954f5
|
|
BLAKE2b-256 checksum How to use checksums |
7a45b0c389051ed02d77227202caf2c2abb1706ca4362781eb79bd6707359970
|
| Upload date | |
|
Uploaded using Trusted Publishing? What is trusted publishing? |
No |
| Uploaded via |
twine/7.0.0 CPython/3.14.7
|














