TorchRender3D is an advanced visualization tool designed for PyTorch developers and researchers to explore the internal structure of custom neural networks specifically CNNs. Leveraging the power of VTK (Visualization Toolkit) for 3D rendering, TorchRender3D enables real-time, interactive visualizations of neural network layers and outputs.

Project description

Introduction
TorchRender3D is an advanced visualization tool designed for PyTorch developers and researchers to explore the internal structure of custom neural networks specifically CNNs. Leveraging the power of VTK (Visualization Toolkit) for 3D rendering, TorchRender3D enables real-time, interactive visualizations of neural network layers and outputs.
Requirements
-
Operating Systems:
- macOS, Windows, or Linux (excluding Linux on ARM64 architecture)
-
Python Version:
- Python 3.x (>=3.10 recommended)
-
Dependencies:
Features
- Visualize neural network parameters in a 3D space.
- Interactive rendering with support for keyboard and mouse events.
- Capture and save rendered frames as TIFF images for animation purposes.
- Support for different neural network architectures.
- Easy-to-use interface for integrating with existing PyTorch models.
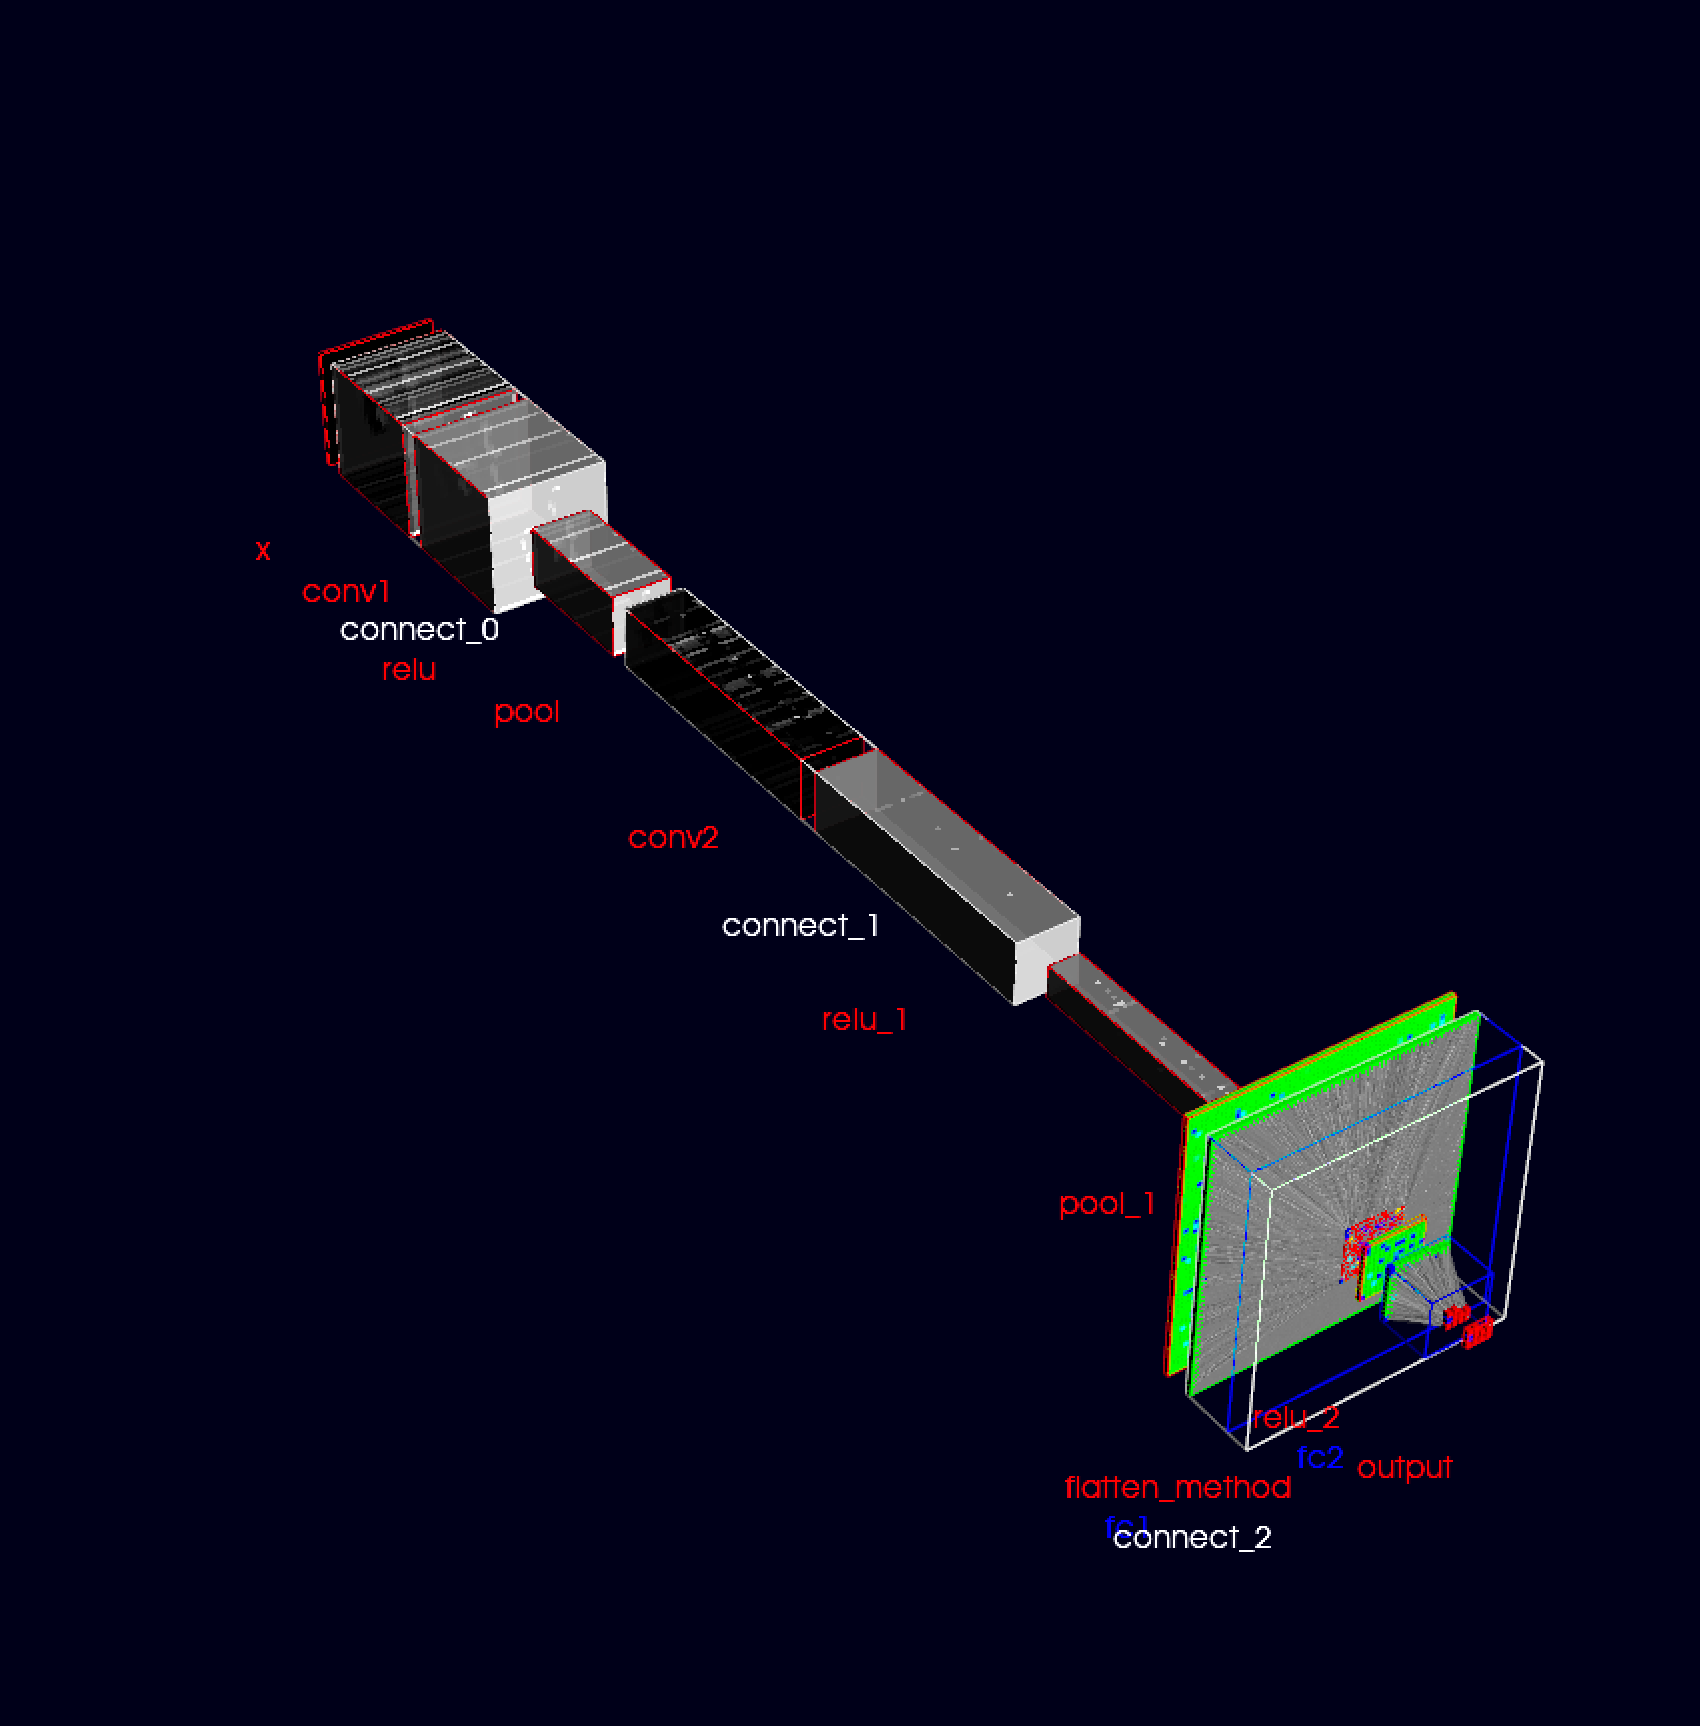
Below is a simple render example of the learnable parameter space of a simple CNN:
Installation
- Clone from gitlab repo as
git clone https://gitlab.com/ml-ppa-derivatives/torchrender3d.git
- Create a virtual environment (recomended but can be skipped) as and activate it
python -m venv <venv_name>
source <venv_name>/bin/activate
- Install using pip from local as
pip install -e .
- Or from PyPI as
pip install torchrender3d
Implementation
Plotting network parameters
- Define or import your own neural network developed using pytorch
import torch
import torch.nn as nn
import torch.nn.functional as F
from torchrender3d import PlotNetwork3D

#: Define a simple neural net or import your own model
class SimpleCNN(nn.Module):
    def __init__(self):
        super(SimpleCNN, self).__init__()
        self.conv1 = nn.Conv2d(in_channels=1, out_channels=32, kernel_size=3, stride=1, padding=1)
        self.pool = nn.MaxPool2d(kernel_size=2, stride=2)
        self.conv2 = nn.Conv2d(in_channels=32, out_channels=64, kernel_size=3, stride=1, padding=1)
        self.flatten_method = nn.Flatten()
        self.fc1 = nn.Linear(64 * 7 * 7, 128)
        self.fc2 = nn.Linear(128, 10)

    def forward(self, x):
        x = self.pool(F.relu(self.conv1(x)))  # 28x28 -> 14x14 after pool
        x = self.pool(F.relu(self.conv2(x)))  # 14x14 -> 7x7 after pool
        x = self.flatten_method(x)
        x = F.relu(self.fc1(x))               # Fully connected layer
        x = self.fc2(x)                       # Output layer
        return x

stored_network_params_path = 'path_to_trained_model'
torch.save(model.state_dict(), stored_network_params_path)
- Instantiate the model and the model plotter
model = SimpleCNN()
stored_network_params_path = './example_nets/simplecnn'
torch.save(model.state_dict(), stored_network_params_path)

model_plotter = PlotNetwork3D(
                              neural_network=model,
                              stored_network_params_path=stored_network_params_path, #: can be a random string, but required a valid path for updating feature
                              normalize=False,
                              plot_type='param', # if 'output' then plots the output of each steps in the forward method; elif 'param' then shows the learnable parameters
                              )
- Call model plotter to show the plot in 3D
model_plotter()
- Visualize network parameter evolution during training
#: call it with the 'update_with_timer' parameter and 'timer_interval' (if True) else can be updating by clicking 'u'
model_plotter(update_with_timer = True,timer_interval: int = 5000)
- The plots during each update can be stored as tiff file format, later to visualize as an animation
#: if make_animation==True, then instantiate the model_plotter with 'output_anim_folder' set to a valid path
model_plotter(update_with_timer = True,timer_interval: int = 5000,make_animation=True)
Plotting output from each layer
- Prepare test data.
from torchvision import datasets, transforms

transform = transforms.Compose(
    [
        transforms.ToTensor(),
        transforms.Normalize((0.5,), (0.5,)),  # Normalize grayscale images
    ]
)

test_dataset = datasets.MNIST(
    root="./data", train=False, download=True, transform=transform
)

test_data = np.array([test_dataset[i][0] for i in range(100)])
- Instantiating the model_plotter with the parameter plot_type='output'.
model_plotter = PlotNetwork3D(
                              neural_network=model,
                              stored_network_params_path=stored_network_params_path, #: can be a random string, but required a valid path for updating feature
                              normalize=False,
                              plot_type='output', # if 'output' then plots the output of each steps in the forward method; elif 'param' then shows the learnable parameters
                              test_data=test_data,
                              )
- run the call method to plot
model_plotter()
- Box-widget feature can be used to expand cnn layers for more detailed view from each kernels. This can be acheived by instantiating the model_plotter with "add_box_widget=True" as shown below:
model_plotter = PlotNetwork3D(
                              neural_network=model,
                              stored_network_params_path=stored_network_params_path, #: can be a random string, but required a valid path for updating feature
                              normalize=False,
                              plot_type='output', # if 'output' then plots the output of each steps in the forward method; elif 'param' then shows the learnable parameters
                              test_data=test_data,
                              add_box_widget=True,
                              box_render_range=[-100, 100, -100, 100, -5, 5], #: Size of the box-widget
                              box_step=5 #: To traverse the box_widget with step by scrolling
                              )
model_plotter() #: Can be updated manually with press of 'u' while setting the parameter 'update_with_timer=False'
                #: or automatically 'update_with_timer=True'. time interval can be set with 'timer_interval=3000' for 3 secs
- animations can me made by setting 'make_animation=True' as shown below:
model_plotter(update_with_timer=True, timer_interval=1000,make_animation=True)
Authors and acknowledgment
Authors: Tanumoy Saha
Acknowledgment: We would like to acknowledge PUNCH4NFDI and InterTwin consortium for the funding and the members of TA5 for their valuable support
Project
Initial stage (Beta) of development (Version: 0.1).


Download files
Download the file for your platform. If you're not sure which to choose, learn more about installing packages.
Source Distribution
Built Distribution
Filter files by name, interpreter, ABI, and platform.
If you're not sure about the file name format, learn more about wheel file names.
Copy a direct link to the current filters
File details
Details for the file torchrender3d-0.0.7.tar.gz.
File metadata
- Download URL: torchrender3d-0.0.7.tar.gz
- Upload date:
- Size: 30.2 kB
- Tags: Source
- Uploaded using Trusted Publishing? No
- Uploaded via: twine/5.1.1 CPython/3.10.11
File hashes
| Algorithm | Hash digest | |
|---|---|---|
| SHA256 |
4e7a122e276d736f33640d2ca4ee75268b48ed764ccf8eb74f158bd6e43f3dd2
|
|
| MD5 |
3af133dbfc89528256816854ba1fa167
|
|
| BLAKE2b-256 |
bed9e26d9c703a984118f61a2924d0bb109043536a079be4a5196beb663387ad
|
File details
Details for the file torchrender3d-0.0.7-py3-none-any.whl.
File metadata
- Download URL: torchrender3d-0.0.7-py3-none-any.whl
- Upload date:
- Size: 28.1 kB
- Tags: Python 3
- Uploaded using Trusted Publishing? No
- Uploaded via: twine/5.1.1 CPython/3.10.11
File hashes
| Algorithm | Hash digest | |
|---|---|---|
| SHA256 |
19678fda2a112d76afdfa3d1fae2163d12255131ee7b696d91dad3520327402b
|
|
| MD5 |
254ff7ce3a0d721c37fe2e7ac22b51dd
|
|
| BLAKE2b-256 |
8b8128ed60fbc5f979ce1d4ae919e94c916e8eee7c4fe760a13c16cd0dd7f321
|


