
TQRAR - AI-powered assistant for JupyterLab

Project description
تِقرار (Tqrar)

AI-Powered JupyterLab Extension with Conversational Assistant



🎬 Demo
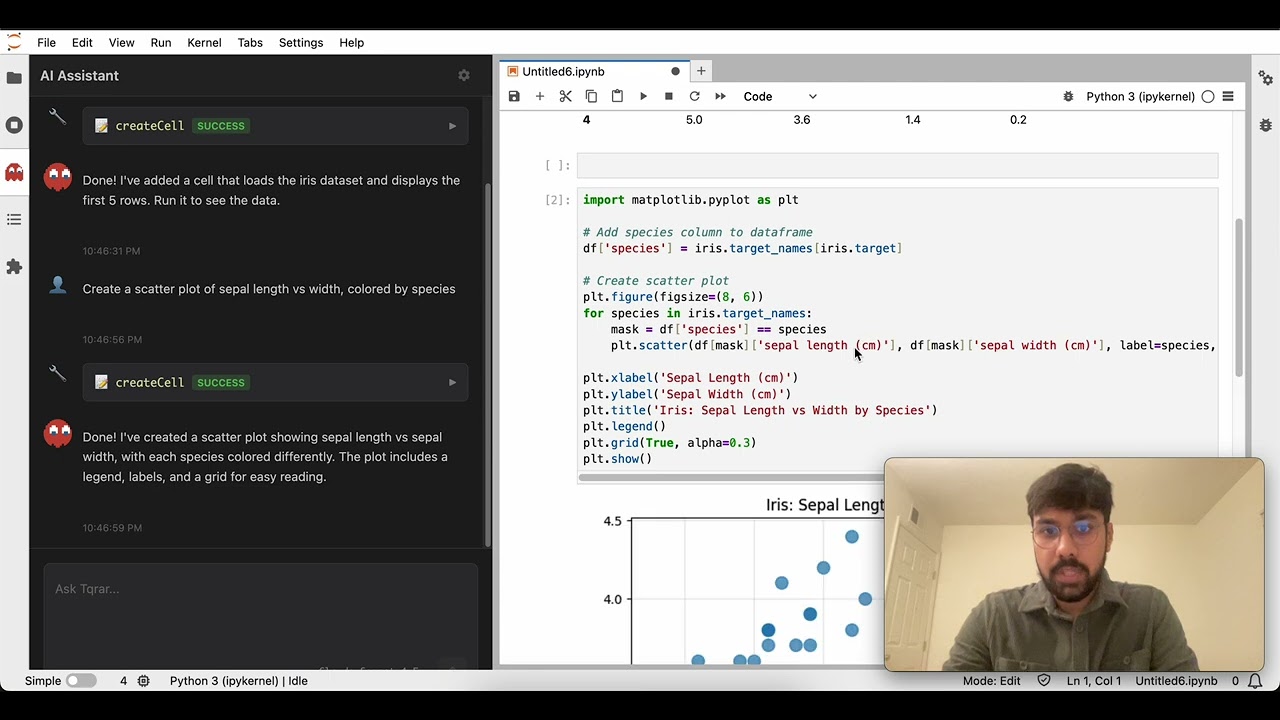
Click to watch Tqrar in action
About
Tqrar (تِقرار) — meaning "conversation" or "discussion" in Arabic and Urdu — is a native JupyterLab extension that brings AI assistance directly into your data science workflow.
Unlike standalone AI tools, Tqrar integrates seamlessly into JupyterLab, adding an AI assistant panel that understands your notebook context. It can analyze code, explain errors, generate visualizations, and manipulate cells through natural language.
What it does
- Analyzes and explains your code
- Helps debug errors with context-aware suggestions
- Generates data visualizations and analysis code
- Creates and modifies notebook cells on command
- Answers questions about your datasets and libraries
Key capabilities
- Context-aware: Understands your active notebook and execution state
- Tool integration: Reads/writes files, creates/modifies cells, executes code
- Multiple LLM providers: Works with OpenRouter, OpenAI, Anthropic, or local models
- Streaming responses: Real-time AI interaction
- Persistent history: Conversation history saved across sessions
- Theme integration: Adapts to JupyterLab's light/dark themes
Installation
Requirements
- JupyterLab 4.0.0 or higher
- Python 3.8 or higher
Install
pip install tqrar
The extension installs automatically. Launch JupyterLab and look for the AI Assistant icon in the left sidebar.
jupyter lab
For Developers
If you want to contribute or modify the extension:
Prerequisites:
- JupyterLab >= 4.0.0
- Node.js >= 20.0.0
- Python >= 3.8
Install from source:
# Clone the repository
git clone https://github.com/tqrar/tqrar.git
cd tqrar

# Install Node dependencies
jlpm install

# Build the extension
jlpm build

# Install as a development extension
jupyter labextension develop . --overwrite

# Build JupyterLab (if needed)
jupyter lab build
Development Mode with Watch:
For active development with auto-rebuild:
# Terminal 1: Watch TypeScript changes
jlpm watch

# Terminal 2: Run JupyterLab
jupyter lab
Refresh your browser after changes to see updates.
Configuration
Setting up your AI provider
- Open JupyterLab and click the AI Assistant icon in the left sidebar
- Click the settings icon in the chat panel
- Choose your provider:
- OpenRouter (recommended): Access 100+ models with one API key
- OpenAI: Direct access to GPT models
- Anthropic: Claude models
- Local: Self-hosted models (Ollama, LM Studio, etc.)
- Enter your API key and select a model
- Save
Supported models
Free/Low-cost options:
- DeepSeek V3.1 (Free)
- Gemini 1.5 Flash (Free)
- Llama 3.1 8B (Free)
- Claude 3 Haiku
- Claude 4.5 Haiku
Premium options:
- Claude 3.5 Sonnet
- GPT-4 Turbo
- GPT-4
- Many more via OpenRouter
Get API keys
- OpenRouter: https://openrouter.ai
- OpenAI: https://platform.openai.com
- Anthropic: https://console.anthropic.com
Usage
Getting started
- Open a notebook in JupyterLab
- Click the AI Assistant icon in the left sidebar
- Start chatting:
- "Create a cell that loads a CSV file and shows the first 5 rows"
- "Explain what this pandas groupby operation does"
- "Why is my model overfitting?"
- "Generate a visualization for this dataset"
Available tools
The AI can interact with your notebooks through these tools:
Notebook operations:
- Create, update, delete, and move cells
- Merge and split cells
- View all cells in a notebook
File system operations:
- List, read, write, and delete files
- Create directories
- Navigate your workspace
Code inspection:
- Get code completions
- Access function and class documentation
- Analyze code structure
Architecture
Built with modern web technologies:
tqrar/
├── src/
│   ├── index.ts              # Extension entry point
│   ├── widget.tsx            # React chat component
│   ├── conversation.ts       # Conversation manager
│   ├── llm/
│   │   └── client.ts         # LLM provider integration
│   ├── tools/
│   │   ├── registry.ts       # Tool management
│   │   ├── notebook.ts       # Notebook manipulation
│   │   ├── file.ts           # File system operations
│   │   └── inspection.ts     # Code inspection
│   ├── context.ts            # Notebook context tracking
│   ├── settings.ts           # Settings management
│   └── types.ts              # TypeScript definitions
├── style/                    # CSS styling
├── schema/                   # Settings schema
└── tqrar/                    # Python package
    └── labextension/         # Built extension
Technology Stack
- Frontend: React 18, TypeScript 5.1
- UI Framework: JupyterLab 4.0, Lumino Widgets
- Build System: Webpack 5, Yarn
- AI Integration: OpenAI SDK, Streaming APIs
- State Management: React Hooks, Context API
Development
Building
# Install dependencies
jlpm install

# Build TypeScript
jlpm build

# Clean build artifacts
jlpm clean

# Watch mode (auto-rebuild)
jlpm watch
Testing
# Check TypeScript types
jlpm build

# Lint code
jlpm lint

# Format code
jlpm format
Making Changes
- Edit source files in
src/ - Build:
jlpm build - Refresh JupyterLab in your browser
- Test your changes
For active development, use jlpm watch to auto-rebuild on file changes.
Contributing
Contributions are welcome. We accept:
- Bug reports
- Feature requests
- Documentation improvements
- Code contributions
To contribute:
- Fork the repository
- Create a feature branch:
git checkout -b feature/your-feature - Make your changes and commit:
git commit -m 'Add your feature' - Push to your fork:
git push origin feature/your-feature - Open a Pull Request
Roadmap
Current (v0.1.0):
- Chat interface with streaming responses
- Context-aware notebook understanding
- Tool calling for files, notebooks, and code inspection
- Multiple LLM provider support
- Persistent conversation history
Planned:
- Cell execution and output analysis
- Variable inspection and debugging
- Enhanced data visualization generation
- Semantic code search
- Multi-agent workflows
Troubleshooting
Extension not showing up
# Rebuild JupyterLab
jupyter lab build

# Check installed extensions
jupyter labextension list
Build errors
# Clean and rebuild
jlpm clean
jlpm install
jlpm build
API key issues
- Verify your API key is correct
- Check you have credits/quota available
- Try a different model (some require payment)
License
This project is licensed under the BSD 3-Clause License - see the LICENSE file for details.
Acknowledgments
Built with JupyterLab, React, TypeScript, and OpenAI-compatible APIs.
Contact
- GitHub: @marsalanjaved1
- Issues: GitHub Issues
- Repository: github.com/marsalanjaved1/tqrar
Made for the data science community
Release history Release notifications | RSS feed


Download files
Download the file for your platform. If you're not sure which to choose, learn more about installing packages.
Source Distribution
Built Distribution
Filter files by name, interpreter, ABI, and platform.
If you're not sure about the file name format, learn more about wheel file names.
Copy a direct link to the current filters
File details
Details for the file tqrar-0.3.0.tar.gz.
File metadata
- Download URL: tqrar-0.3.0.tar.gz
- Upload date:
- Size: 62.3 MB
- Tags: Source
- Uploaded using Trusted Publishing? No
- Uploaded via: twine/6.2.0 CPython/3.13.6
File hashes
| Algorithm | Hash digest | |
|---|---|---|
| SHA256 |
4b51d4cbb1209cc6873f486df07f6b5f8710269e316b24ae9459617c81c938e4
|
|
| MD5 |
985f751b9561e284d351b02d4fe207dc
|
|
| BLAKE2b-256 |
9d785e9790f51cc574e812cc9846a3ec362f23023f4befbae8157aadb059d659
|
File details
Details for the file tqrar-0.3.0-py3-none-any.whl.
File metadata
- Download URL: tqrar-0.3.0-py3-none-any.whl
- Upload date:
- Size: 15.4 MB
- Tags: Python 3
- Uploaded using Trusted Publishing? No
- Uploaded via: twine/6.2.0 CPython/3.13.6
File hashes
| Algorithm | Hash digest | |
|---|---|---|
| SHA256 |
19c0b816ca00e6c95615373b8ede0f73ae7d612419e30aac764be8eacc0c96ae
|
|
| MD5 |
e12044ee26a160d5673db598ce741a47
|
|
| BLAKE2b-256 |
5cd485e99bad5a86cf057795aca4fe11e02507d8140886daac0a2f7ba4a09107
|






