
Trapit python utility for Math Function Unit Test design pattern

Project description
Trapit - Python Unit Testing Module

The Math Function Unit Testing design pattern, implemented in Python
:detective:
This module supports The Math Function Unit Testing Design Pattern, a design pattern that can be applied in any language, and is here implemented in Python. The module name is derived from 'TRansactional API Testing' (TRAPIT), and the 'unit' should be considered to be a transactional unit. The pattern avoids microtesting, is data-driven, and fully supports multi-scenario testing and refactoring.
The Python Trapit module provides a generic driver program for unit testing, with test data read from an input JSON file, results written to an output JSON file, and all specific test code contained in a callback function passed to the driver function.
Unit test results are formatted by a JavaScript program that takes the JSON output results file as its input, Trapit - JavaScript Unit Testing/Formatting Utilities Module, and renders the results in HTML and text formats.
There is also a PowerShell module, Trapit - PowerShell Unit Testing Utilities Module, with a utility to generate a template for the JSON input file used by the design pattern, based on simple input CSV files.
This blog post, Unit Testing, Scenarios and Categories: The SCAN Method provides guidance on effective selection of scenarios for unit testing.
There is an extended Usage section below that illustrates the use of the design pattern for Python unit testing by means of two examples.
In This README...
↓ Background
↓ Usage
↓ API
↓ Installation
↓ Unit Testing
↓ Folder Structure
↓ See Also
Background
I explained the concepts for the unit testing design pattern in relation specifically to database testing in a presentation at the Oracle User Group Ireland Conference in March 2018:
I later named the approach The Math Function Unit Testing Design Pattern when I applied it in Javascript and wrote a JavaScript program to format results both in plain text and as HTML pages:
The module also allowed for the formatting of results obtained from testing in languages other than JavaScript by means of an intermediate output JSON file. In 2021 I developed a powershell module that included a utility to generate a template for the JSON input scenarios file required by the design pattern:
Also in 2021 I developed a systematic approach to the selection of unit test scenarios:
In early 2023 I extended both the the JavaScript results formatter, and the powershell utility to incorporate Category Set as a scenario attribute. Both utilities support use of the design pattern in any language, while the unit testing driver utility is language-specific and is currently available in Powershell, JavaScript, Python and Oracle PL/SQL versions.
Usage
↑ In This README...
↓ General Usage
↓ Example 1 - Hello World
↓ Example 2 - ColGroup
As noted above, the JavaScript module allows for unit testing of JavaScript programs and also the formatting of test results for both JavaScript and non-JavaScript programs. Similarly, the PowerShell module mentioned allows for unit testing of PowerShell programs, and also the generation of the JSON input scenarios file template for testing in any language.
In this section we'll start by describing the steps involved in The Math Function Unit Testing Design Pattern at an overview level. This will show how the generic PowerShell and JavaScript utilities fit in alongside the language-specific driver utilities.
Then we'll show how to use the design pattern in unit testing Python programs by means of two simple examples.
General Usage
↑ Usage
↓ General Description
↓ Unit Testing Process
↓ Unit Test Results
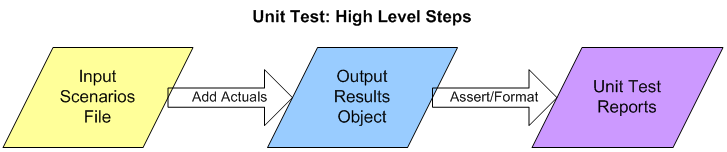
At a high level The Math Function Unit Testing Design Pattern involves three main steps:
- Create an input file containing all test scenarios with input data and expected output data for each scenario
- Create a results object based on the input file, but with actual outputs merged in, based on calls to the unit under test
- Use the results object to generate unit test results files formatted in HTML and/or text
General Description
The first and third of these steps are supported by generic utilities that can be used in unit testing in any language. The second step uses a language-specific unit test driver utility.
For non-JavaScript programs the results object is materialized using a library package in the relevant language. The diagram below shows how the processing from the input JSON file splits into two distinct steps:
- First, the output results object is created using the external library package which is then written to a JSON file
- Second, a script from the Trapit JavaScript library package is run, passing in the name of the output results JSON file
This creates a subfolder with name based on the unit test title within the file, and also outputs a summary of the results. The processing is split between three code units:
- Test Unit: External library function that drives the unit testing with a callback to a specific wrapper function
- Specific Test Package: This has a 1-line main program to call the library driver function, passing in the callback wrapper function
- Unit Under Test (API): Called by the wrapper function, which converts between its specific inputs and outputs and the generic version used by the library package
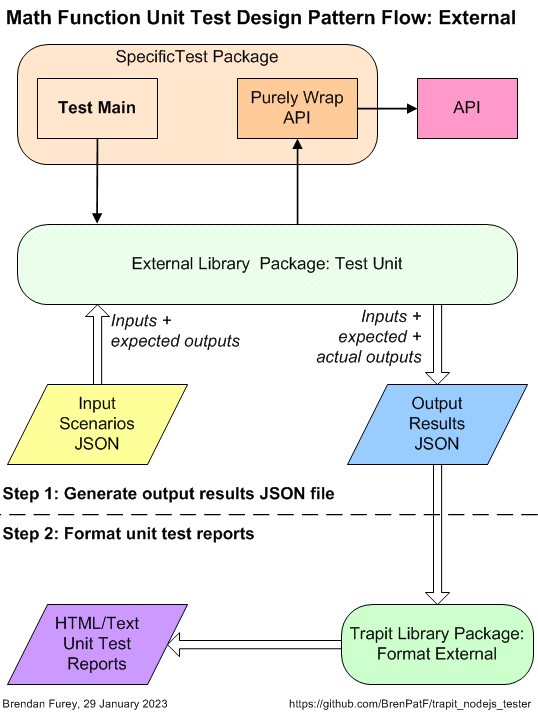
In the first step the external program creates the output results JSON file, while in the second step the file is read into an object by the Trapit library package, which then formats the results.
Unit Testing Process
↑ General Usage
↓ Step 1: Create Input Scenarios File
↓ Step 2: Create Results Object
↓ Step 3: Format Results
This section details the three steps involved in following The Math Function Unit Testing Design Pattern.
Step 1: Create Input Scenarios File
↑ Unit Testing Process
↓ Unit Test Wrapper Function
↓ Scenario Category ANalysis (SCAN)
↓ Creating the Input Scenarios File
Step 1 requires analysis to determine the extended signature for the unit under test, and to determine appropriate scenarios to test.
It may be useful during the analysis phase to create two diagrams, one for the extended signature:
- JSON Structure Diagram: showing the groups with their fields for input and output
and another for the category sets and categories:
- Category Structure Diagram: showing the category sets identified with their categories
You can see examples of these diagrams later in this document: JSON Structure Diagram and Category Structure Diagram, and schematic versions in the next two subsections.
Unit Test Wrapper Function
↑ Step 1: Create Input Scenarios File
Here is a schematic version of a JSON structure diagram, which in a real instance will in general have multiple input and output groups, each with multiple fields:

Each group in the diagram corresponds to a property within the inp_groups input object or out_groups return value object of the wrapper function, and contains an array of the group records stored as delimited strings.
def purely_wrap_unit(inp_groups): # input groups object
    ...
    return out_groups
}
Scenario Category ANalysis (SCAN)
↑ Step 1: Create Input Scenarios File
The art of unit testing lies in choosing a set of scenarios that will produce a high degree of confidence in the functioning of the unit under test across the often very large range of possible inputs.
A useful approach can be to think in terms of categories of inputs, where we reduce large ranges to representative categories, an idea I explore in this article:
Here is a schematic version of a category set diagram, which in a real instance will in general have multiple category sets, each with multiple categories:
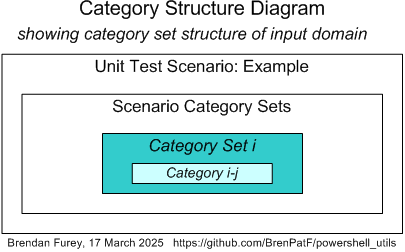
Each category i-j in the diagram corresponds to a scenario j for category set i.
Creating the Input Scenarios File
↑ Step 1: Create Input Scenarios File
The results of the analysis can be summarised in three CSV files which a PowerShell program uses as inputs to create a template for the JSON file.
The PowerShell API, Write-UT_Template creates a template for the JSON file, with the full meta section, and a set of template scenarios having name as scenario key, a category set attribute, and zero or more records with default values for each input and output group. The API takes as inputs three CSV files:
stem_inp.csv: list of group, field, values tuples for inputstem_out.csv: list of group, field, values tuples for outputstem_sce.csv: scenario triplets - (Category set, scenario name, active flag); this file is optional
In the case where a scenarios file is present, each group has zero or more records with field values taken from the group CSV files, with a record for each value column present where at least one value is not null for the group. The template scenario represents a kind of prototype scenario, where records may be manually updated (and added or subtracted) to reflect input and expected output values for the actual scenario being tested.
The API can be run with the following PowerShell in the folder of the CSV files:
Format-JSON-Stem.ps1
Import-Module TrapitUtils
Write-UT_Template 'stem' '|' 'title'
This creates the template JSON file, stem_temp.json based on the CSV files having prefix stem and using the field delimiter '|', and including the unit test title passed. The PowerShell API can be used for testing in any language.
The template file is then updated manually with data appropriate to each scenario.
Step 2: Create Results Object
Step 2 requires the writing of a wrapper function that is passed into a unit test library function, test_unit, via the entry point API, test_format. test_unit reads the input JSON file, calls the wrapper function for each scenario, and writes the output JSON file with the actual results merged in along with the expected results.
purely_wrap_unit
def purely_wrap_unit(inp_groups): # input groups object
    ...
    return out_groups
}
The test driver API, test_format, is language-specific, and this one is for testing Python programs. Equivalents exist under the same GitHub account (BrenPatF) for JavaScript, PowerShell and Oracle PL/SQL at present.
Step 3: Format Results
Step 3 involves formatting the results contained in the JSON output file from step 2, via the JavaScript formatter, and this step can be combined with step 2 for convenience.
-
test_formatis the function from the trapit Python package that calls the main test driver function that contains the wrapper function, then passes the output JSON file name to the JavaScript formatter and outputs a summary of the results. It takes as parameters:ut_root: unit test root foldernpm_root: parent folder of the JavaScript node_modules npm root folderstem_inp_json: input JSON file name stempurely_wrap_unit: function to process unit test for a single scenario
with return value:
- summary of results
teststem.py
import sys, os
sys.path.insert(0, os.path.abspath(os.path.join(os.path.dirname(__file__), '../..')))
import trapit
ROOT = os.path.dirname(__file__)
DELIM = '|'
NPM_ROOT = ROOT + '/../../powershell_utils/TrapitUtils'
def purely_wrap_unit(inp_groups): # input groups object
    ...
    return {
        ...
    }
trapit.test_format(ROOT, NPM_ROOT, 'stem', purely_wrap_unit)
Unit Test Results
↑ General Usage
↓ Unit Test Report - Scenario List
↓ Unit Test Report - Scenario Pages
The script above creates a results subfolder, with results in text and HTML formats, in the script folder, and outputs a summary of the following form:
Results summary for file: [MY_PATH]/stem_out.json
=================================================

File:          stem_out.json
Title:         [Title]
Inp Groups:    [#Inp Groups]
Out Groups:    [#Out Groups]
Tests:         [#Tests]
Fails:         [#Fails]
Folder:        [Folder]
Within the results subfolder there is a text file containing a list of summary results at scenario level, followed by the detailed results for each scenario. In addition there are files providing the results in HTML format.
Unit Test Report - Scenario List
The scenario list page lists, for each scenario:
- # - the scenario index
- Category Set - the category set applying to the scenario
- Scenario - a description of the scenario
- Fails (of N) - the number of groups failing, with N being the total number of groups
- Status - SUCCESS or FAIL
The scenario field is a hyperlink to the individual scenario page.
Unit Test Report - Scenario Pages
The page for each scenario has the following schematic structure:
SCENARIO i: Scenario [Category Set: (category set)]
  INPUTS
    For each input group: [Group name] - a heading line followed by a list of records
      For each field: Field name
      For each record: 1 line per record, with record number followed by:
        For each field: Field value for record
  OUTPUTS
    For each output group: [Group name] - a heading line followed by a list of records
      For each field: Field name
      For each record: 1 line per record, with record number followed by:
        For each field: Field expected value for record
        For each field: Field actual value for record (only if any actual differs from expected)
    Group status - #fails of #records: SUCCESS / FAIL
Scenario status - #fails of #groups: SUCCESS / FAIL
Example 1 - Hello World
↑ Usage
↓ Example Description
↓ Unit Testing Process
↓ Unit Test Results
The first example is a version of the 'Hello World' program traditionally used as a starting point in learning a new programming language. This is useful as it shows the core structures involved in following the design pattern with a minimalist unit under test.
Example Description
This is a pure function form of Hello World program, returning a value rather than writing to screen itself. It is of course trivial, but has some interest as an edge case with no inputs and extremely simple JSON input structure and test code.
helloworld.py
def hello_world():
    return 'Hello World!'
There is a main script that shows how the function might be called outside of unit testing:
mainhelloworld.py
import helloworld as hw
print(hw.hello_world())
This can be called from a command window in the examples folder:
$ py helloworld/mainhelloworld.py
with output to console:
Hello World!
Unit Testing Process
↑ Example 1 - Hello World
↓ Step 1: Create Input Scenarios File
↓ Step 2: Create Results Object
↓ Step 3: Format Results
Step 1: Create Input Scenarios File
↑ Unit Testing Process
↓ Unit Test Wrapper Function
↓ Scenario Category ANalysis (SCAN)
↓ Creating the Input Scenarios File
Unit Test Wrapper Function
↑ Step 1: Create Input Scenarios File
Here is a diagram of the input and output groups for this example:
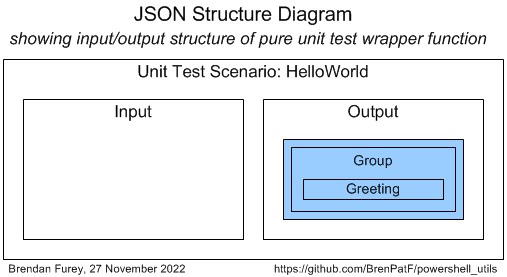
From the input and output groups depicted we can construct CSV files with flattened group/field structures, and default values added, as follows (with helloworld_inp.csv left, helloworld_out.csv right):

Scenario Category ANalysis (SCAN)
↑ Step 1: Create Input Scenarios File
The Category Structure diagram for the Hello World example is of course trivial:
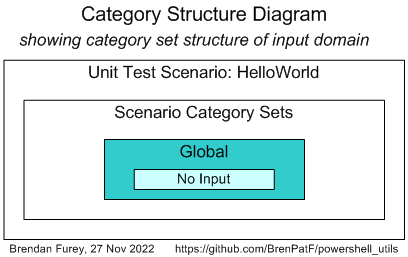
It has just one scenario, with its input being void:
| # | Category Set | Category | Scenario |
|---|---|---|---|
| 1 | Global | No input | No input |
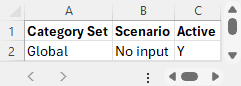
From the scenarios identified we can construct the following CSV file (helloworld_sce.csv), taking the category set and scenario columns, and adding an initial value for the active flag:
Creating the Input Scenarios File
↑ Step 1: Create Input Scenarios File
The PowerShell API to generate a template JSON file can be run with the following PowerShell script in the folder of the CSV files:
Format-JSON-HelloWorld.ps1
Import-Module ..\..\powershell_utils\TrapitUtils\TrapitUtils
Write-UT_Template 'helloworld_py' '|' 'Hello World - Python'
This creates the template JSON file, helloworld_temp.json, which contains an element for each of the scenarios, with the appropriate category set and active flag. In this case there is a single scenario, with empty input, and a single record in the output group with the default value from the output groups CSV file. Here is the complete file:
helloworld_temp.json
{
  "meta": {
    "title": "Hello World - Python",
    "delimiter": "|",
    "inp": {},
    "out": {
      "Group": [
        "Greeting"
      ]
    }
  },
  "scenarios": {
    "No input": {
      "active_yn": "Y",
      "category_set": "Global",
      "inp": {},
      "out": {
        "Group": [
          "Hello World!"
        ]
      }
    }
  }
}
Step 2: Create Results Object
Step 2 requires the writing of a wrapper function that is passed into a unit test library function, test_unit, via the entry point API, test_format. test_unit reads the input JSON file, calls the wrapper function for each scenario, and writes the output JSON file with the actual results merged in along with the expected results.
Here we use a lambda expression as the wrapper function is so simple:
Wrapper Function - Lambda Expression
lambda inp_groups: {'Group': [helloworld.hello_world()]}
This lambda expression is included in the script testhelloworld.py and passed as a parameter to test_format.
Step 3: Format Results
Step 3 involves formatting the results contained in the JSON output file from step 2, via the JavaScript formatter, and this step can be combined with step 2 for convenience.
test_formatis the function from the trapit package that calls the main test driver function, then passes the output JSON file name to the JavaScript formatter and outputs a summary of the results.
testhelloworld.py
import sys, os
sys.path.insert(0, os.path.abspath(os.path.join(os.path.dirname(__file__), '../..')))
import trapit, helloworld

trapit.test_format('./helloworld',  '../powershell_utils/TrapitUtils', 'helloworld', lambda inp_groups: {'Group': [helloworld.hello_world()]})
This script contains the wrapper function (here a lambda expression), passing it in a call to the trapit library function test_format.
Unit Test Results
↑ Example 1 - Hello World
↓ Unit Test Report - Hello World
↓ Scenario 1: No input
The unit test script creates a results subfolder, with results in text and HTML formats, in the script folder, and outputs the following summary:
Results summary for file: [MY_PATH]/trapit_python_tester/examples/helloworld/helloworld_out.json
================================================================================================

File:          helloworld_out.json
Title:         Hello World - Python
Inp Groups:    0
Out Groups:    2
Tests:         1
Fails:         0
Folder:        hello-world---python
Unit Test Report - Hello World
Here we show the scenario-level summary of results for this example, and also show the detail for the only scenario.
You can review the HTML formatted unit test results here:
This is the summary page in text format.
Unit Test Report: Hello World - Python
======================================

      #    Scenario  Fails (of 2)  Status
      ---  --------  ------------  -------
      1    Scenario  0             SUCCESS

Test scenarios: 0 failed of 1: SUCCESS
======================================
Formatted: 7/6/2025, 11:01:46
Scenario 1: No input
This is the scenario page in text format, with only one scenario.
SCENARIO 1: No input [Category Set: Global] {
=============================================
   INPUTS
   ======
   OUTPUTS
   =======
      GROUP 1: Group {
      ================
            #  Greeting
            -  ------------
            1  Hello World!
      } 0 failed of 1: SUCCESS
      ========================
      GROUP 2: Unhandled Exception: Empty as expected: SUCCESS
      ========================================================
} 0 failed of 2: SUCCESS
========================
Note that the second output group, 'Unhandled Exception', is not specified in the CSV file: In fact, this is generated by the test_unit API itself in order to capture any unhandled exception.
Example 2 - ColGroup
↑ Usage
↓ Example Description
↓ Unit Testing Process
↓ Unit Test Results
The second example, 'ColGroup', is larger and intended to show a wider range of features, but without too much extraneous detail.
Example Description
This example involves a class with a constructor function that reads in a CSV file and counts instances of distinct values in a given column. The constructor function appends a timestamp and call details to a log file. The class has methods to list the value/count pairs in several orderings.
colgroup.py (skeleton)
import sys, os
from datetime import datetime
from utils_cg import *
...
class ColGroup {
    ...
}
There is a main script that shows how the class might be called outside of unit testing:
maincolgroup.py
import sys, os
import colgroup as cg

ROOT = os.path.dirname(__file__) + '/'
(input_file, delim, col) = ROOT + 'fantasy_premier_league_player_stats.csv', ',', 6

grp = cg.ColGroup(input_file, delim, col)
grp.pr_list('(as is)', grp.list_as_is())
grp.pr_list('key', grp.sort_by_key())
grp.pr_list('value (lambda)', grp.sort_by_value_lambda())
This can be called from a command window in the examples folder:
$ py colgroup/maincolgroup.py
with output to console:
Counts sorted by (as is)
========================
Team         #apps
-----------  -----
West Brom     1219
Swansea       1180
Blackburn       33
...

Counts sorted by key
====================
Team         #apps
-----------  -----
Arsenal        534
Aston Villa    685
Blackburn       33
...
Counts sorted by value
======================
Team         #apps
-----------  -----
Wolves          31
Blackburn       33
Bolton          37
...
and to log file, fantasy_premier_league_player_stats.csv.log:
2023-04-10 08:02:43: File [MY_PATH]/trapit_python_tester/examples/colgroup/fantasy_premier_league_player_stats.csv, delimiter ',', column team_name
The example illustrates how a wrapper function can handle impure features of the unit under test:
- Reading input from file
- Writing output to file
...and also how the JSON input file can allow for nondeterministic outputs giving rise to deterministic test outcomes:
- By using regex matching for strings including timestamps
- By using number range matching and converting timestamps to epochal offsets (number of units of time since a fixed time)
Unit Testing Process
↑ Example 2 - ColGroup
↓ Step 1: Create Input Scenarios File
↓ Step 2: Create Results Object
↓ Step 3: Format Results
Step 1: Create Input Scenarios File
↑ Unit Testing Process
↓ Unit Test Wrapper Function
↓ Scenario Category ANalysis (SCAN)
↓ Creating the Input Scenarios File
Unit Test Wrapper Function
↑ Step 1: Create Input Scenarios File
Here is a diagram of the input and output groups for this example:
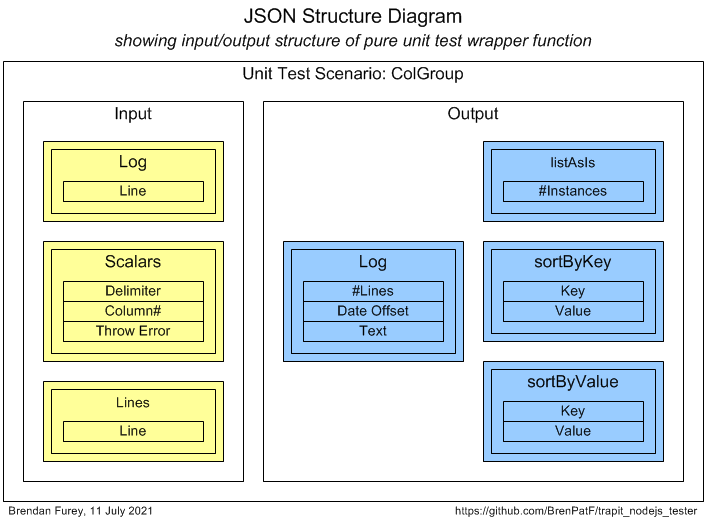
From the input and output groups depicted we can construct CSV files with flattened group/field structures, and default values added, as follows (with colgrp_inp.csv left, colgrp_out.csv right):

The value fields shown correspond to a prototype scenario with records per group:
- Input
- Log: 0
- Scalars: 1
- Lines: 4
- Output
- Log: 1
- Scalars: 1
- listAsIs: 1
- sortByKey: 2
- sortByValue: 2
A PowerShell utility uses these CSV files, together with one for scenarios, discussed next, to generate a template for the JSON unit testing input file. The utility creates a prototype scenario dataset with a record in each group for each populated value column, that is used for each scenario in the template.
Scenario Category ANalysis (SCAN)
↑ Step 1: Create Input Scenarios File
As noted earlier, a useful approach to scenario selection can be to think in terms of categories of inputs, where we reduce large ranges to representative categories.
Generic Category Sets - ColGroup
As explained in the article mentioned earlier, it can be very useful to think in terms of generic category sets that apply in many situations. Multiplicity is relevant here (as it often is):
Multiplicity
There are several entities where the generic category set of multiplicity applies, and we should check each of the None / One / Multiple instance categories.
| Code | Description |
|---|---|
| None | No values |
| One | One value |
| Multiple | Multiple values |
Apply to:
- Lines
- File Columns (one or multiple only)
- Key Instance (one or multiple only)
- Delimiter (one or multiple only)
Categories and Scenarios - ColGroup
After analysis of the possible scenarios in terms of categories and category sets, we can depict them on a Category Structure diagram:
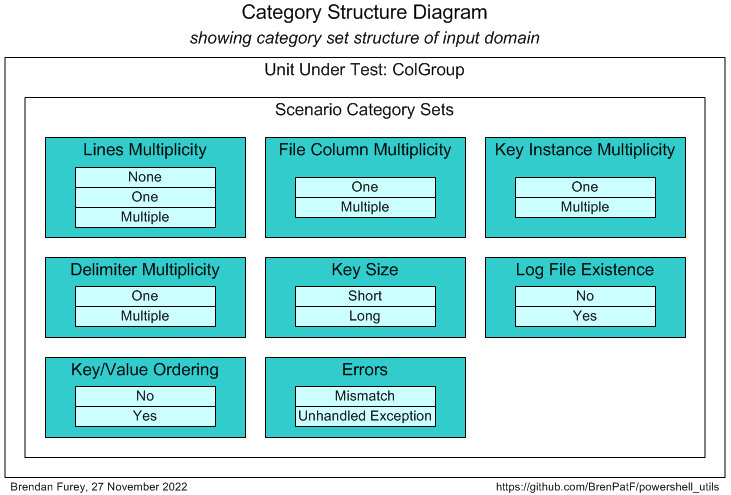
We can tabulate the results of the category analysis, and assign a scenario against each category set/category with a unique description:
| # | Category Set | Category | Scenario |
|---|---|---|---|
| 1 | Lines Multiplicity | None | No lines |
| 2 | Lines Multiplicity | One | One line |
| 3 | Lines Multiplicity | Multiple | Multiple lines |
| 4 | File Column Multiplicity | One | One column in file |
| 5 | File Column Multiplicity | Multiple | Multiple columns in file |
| 6 | Key Instance Multiplicity | One | One key instance |
| 7 | Key Instance Multiplicity | Multiple | Multiple key instances |
| 8 | Delimiter Multiplicity | One | One delimiter character |
| 9 | Delimiter Multiplicity | Multiple | Multiple delimiter characters |
| 10 | Key Size | Short | Short key |
| 11 | Key Size | Long | Long key |
| 12 | Log file existence | No | Log file does not exist at time of call |
| 13 | Log file existence | Yes | Log file exists at time of call |
| 14 | Key/Value Ordering | No | Order by key differs from order by value |
| 15 | Key/Value Ordering | Yes | Order by key same as order by value |
| 16 | Errors | Mismatch | Actual/expected mismatch |
| 17 | Errors | Unhandled Exception | Unhandled Exception |
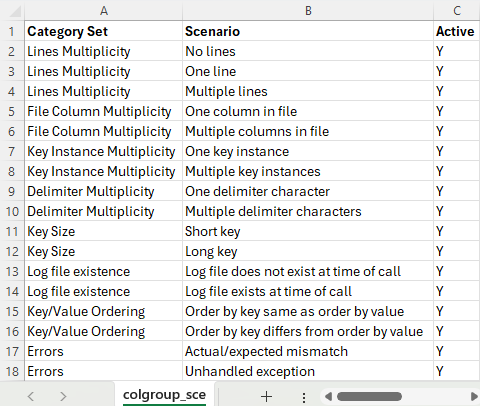
From the scenarios identified we can construct the following CSV file (colgrp_sce.csv), taking the category set and scenario columns, and adding an initial value for the active flag:
Creating the Input Scenarios File
↑ Step 1: Create Input Scenarios File
The API to generate a template JSON file can be run with the following PowerShell in the folder of the CSV files:
Format-JSON-ColGroup.ps1
Import-Module ..\..\powershell_utils\TrapitUtils\TrapitUtils
Write-UT_Template 'colgroup_py' '|' 'ColGroup - Python'
This creates the template JSON file, colgroup_temp.json, which contains an element for each of the scenarios, with the appropriate category set and active flag, with a single record in each group with default values from the groups CSV files. Here is the "Multiple lines" element:
"Multiple lines": {
  "active_yn": "Y",
  "category_set": "Lines Multiplicity",
  "inp": {
    "Log": [],
    "Scalars": [
      ",|1|"
    ],
    "Lines": [
      "col_0,col_1,col_2",
      "val_01,val_11,val_21",
      "val_02,val_12,val_22",
      "val_03,val_11,val_23"
    ]
  },
  "out": {
    "Log": [
      "1|IN [0,2000]|LIKE /.*: File .*ut_group.*.csv, delimiter ',', column 1/"
    ],
    "listAsIs": [
      "2"
    ],
    "sortByKey": [
      "val_11|2",
      "val_12|1"
    ],
    "sortByValue": [
      "val_12|1",
      "val_11|2"
    ]
  }
},
For each scenario element, we need to update the values to reflect the scenario to be tested, in the actual input JSON file, colgroup.json. In the "Multiple lines" scenario above the prototype scenario data can be used as is, but in others it would need to be updated.
Step 2: Create Results Object
Step 2 requires the writing of a wrapper function that is passed into a unit test library function, test_unit, via the entry point API, test_format. test_unit reads the input JSON file, calls the wrapper function for each scenario, and writes the output JSON file with the actual results merged in along with the expected results.
purely_wrap_unit
import sys, os
from datetime import datetime
sys.path.insert(0, os.path.abspath(os.path.join(os.path.dirname(__file__), '../..')))
import trapit, colgroup as cg

ROOT = os.path.dirname(__file__) + '\\'
DELIM = '|'
INPUT_JSON,             OUTPUT_JSON,                INPUT_FILE,            LOG_FILE                  = \
ROOT + 'colgroup.json', ROOT + 'colgroup_out.json', ROOT + 'ut_group.csv', ROOT + 'ut_group.csv.log'
GRP_LOG,   GRP_SCA,   GRP_LIN, GRP_LAI,    GRP_SBK,     GRP_SBV       = \
'Log',     'Scalars', 'Lines', 'listAsIs', 'sortByKey', 'sortByValue'

def from_CSV(csv,  # string of delimited values
             col): # 0-based column index
    return csv.split(DELIM)[col]
def join_tuple(t): # 2-tuple
    return t[0] + DELIM + str(t[1])
def setup(inp): # input groups object
    with open(INPUT_FILE, 'w') as infile:
        infile.write('\n'.join(inp[GRP_LIN]))
    if (len(inp[GRP_LOG]) > 0):
        with open(LOG_FILE, 'w') as logfile:
            logfile.write('\n'.join(inp[GRP_LOG]) + '\n')
    return cg.ColGroup(INPUT_FILE, from_CSV(inp[GRP_SCA][0], 0), from_CSV(inp[GRP_SCA][0], 1))
def teardown():
    os.remove(INPUT_FILE)
    os.remove(LOG_FILE)

def purely_wrap_unit(inp_groups): # input groups object
    if (from_CSV(inp_groups[GRP_SCA][0], 2) == 'Y'):
        raise Exception('Error thrown')
    col_group   = setup(inp_groups)
    with open(LOG_FILE, 'r') as logfile:
        logstr = logfile.read()
    lines_array = logstr.split('\n')
    lastLine   = lines_array[len(lines_array) - 2]
    text       = lastLine
    date       = lastLine[0:19]
    logDate    = datetime.strptime(date, '%Y-%m-%d %H:%M:%S')
    now        = datetime.now()
    diffDate   = (now - logDate).microseconds / 1000
    teardown()
    return {
        GRP_LOG : [str((len(lines_array) - 1)) + DELIM + str(diffDate) + DELIM + text.replace("\\", "-")],
        GRP_LAI : [str(len(col_group.list_as_is()))],
        GRP_SBK : list(map(join_tuple, col_group.sort_by_key())),
        GRP_SBV : list(map(join_tuple, col_group.sort_by_value_lambda()))
    }
Step 3: Format Results
Step 3 involves formatting the results contained in the JSON output file from step 2, via the JavaScript formatter:
test_formatis the function from the trapit Python package that calls the main test driver function, then passes the output JSON file name to the JavaScript formatter and outputs a summary of the results.
testcolgroup.py (skeleton)
import sys, os
from datetime import datetime
sys.path.insert(0, os.path.abspath(os.path.join(os.path.dirname(__file__), '../..')))
import trapit, colgroup as cg
ROOT = os.path.dirname(__file__)
DELIM = '|'
INPUT_FILE,            LOG_FILE,                    NPM_ROOT = \
ROOT + '/ut_group.csv', ROOT + '/ut_group.csv.log', ROOT + '/../../powershell_utils/TrapitUtils'
...
def purely_wrap_unit(inp_groups): # input groups object
    ...
    return {
        ...
    }
trapit.test_format(ROOT, NPM_ROOT, 'colgroup', purely_wrap_unit)
This script contains the wrapper function, passing it in a call to the trapit library function test_format.
Unit Test Results
↑ Example 2 - ColGroup
↓ Unit Test Report - ColGroup
The unit test script creates a results subfolder, with results in text and HTML formats, in the script folder, and outputs the following summary:
Results summary for file: [MY_PATH]/trapit_python_tester/examples/colgroup/colgroup_out.json
============================================================================================

File:          colgroup_out.json
Title:         ColGroup - Python
Inp Groups:    3
Out Groups:    5
Tests:         17
Fails:         2
Folder:        colgroup---python
Unit Test Report - ColGroup
↑ Unit Test Results
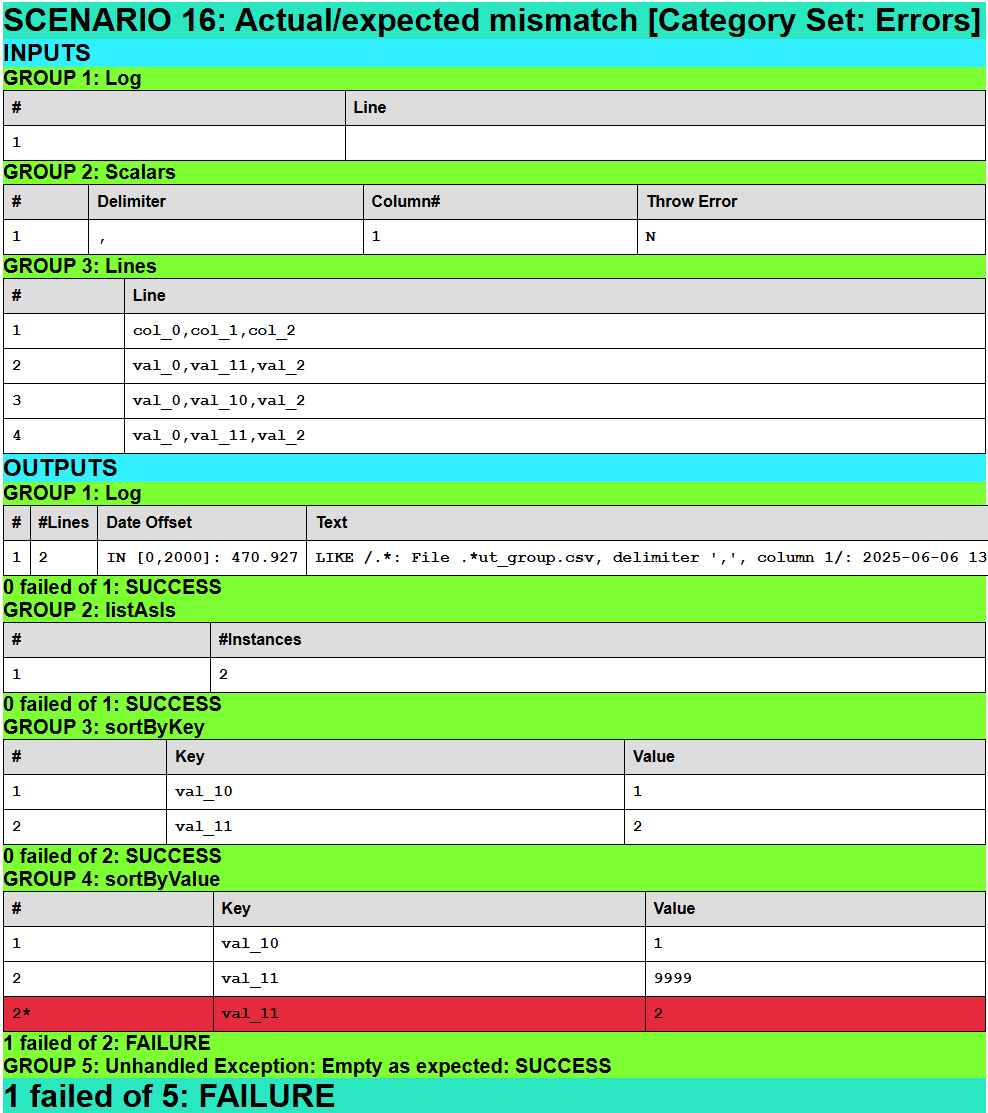
↓ Scenario 16: Actual/expected mismatch [Category Set: Errors]
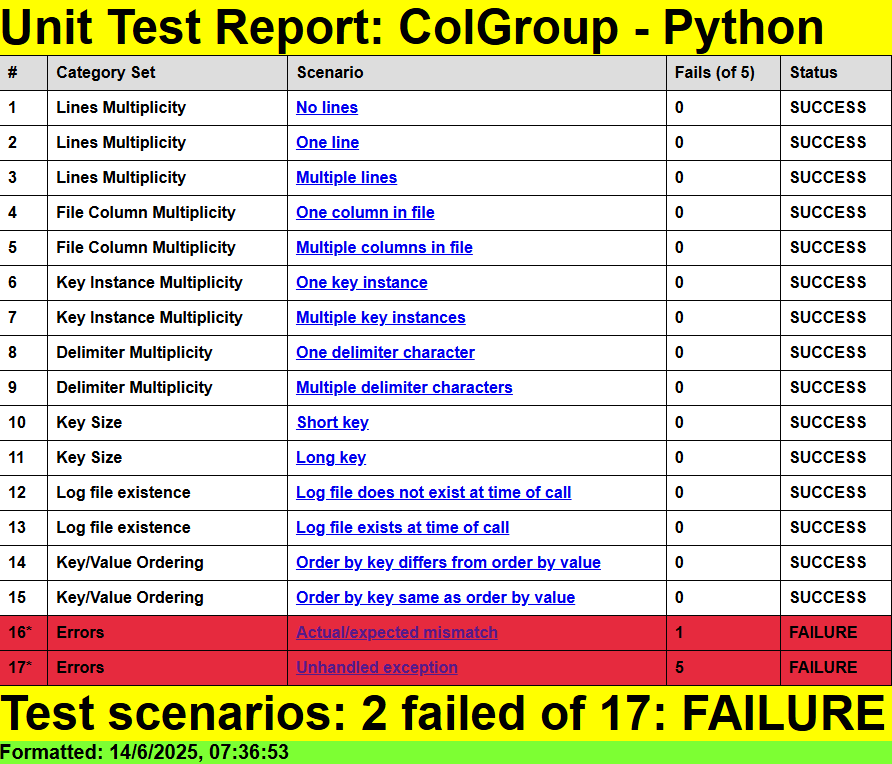
Here we show the scenario-level summary of results for the specific example, and show the detail for one of the failing scenarios.
You can review the HTML formatted unit test results here:
This is a screenshot of the summary page in HTML format.
Scenario 16: Actual/expected mismatch [Category Set: Errors]
This scenario is designed to fail, with one of the expected values in group 4 set to 9999 instead of the correct value of 2, just to show how mismatches are displayed.
API
↑ In This README...
↓ test_unit
↓ test_format
import trapit
test_unit
trapit.test_unit(inp_file, out_file, purely_wrap_unit)
Unit tests a unit using The Math Function Unit Testing Design Pattern with input data read from a JSON file, and output results written to an output JSON file, with parameters:
inp_file: JSON input file, with input and expected output dataout_file: JSON output file, with input, expected and actual output datapurely_wrap_unit: function to process unit test for a single scenario, passed in from test script, described below
purely_wrap_unit
purely_wrap_unit(inp_groups)
Processes unit test for a single scenario, taking inputs as an object with input group data, making calls to the unit under test, and returning the actual outputs as an object with output group data, with parameters:
- object containing input groups with group name as key and list of delimited input records as value, of form:
    {
        inp_group1: [rec1, rec2,...],
        inp_group2: [rec1, rec2,...],
        ...
    }
Return value:
- object containing output groups with group name as key and list of delimited actual output records as value, of form:
    {
        out_group1: [rec1, rec2,...],
        out_group2: [rec1, rec2,...],
        ...
    }
This function acts as a 'pure' wrapper around calls to the unit under test. It is 'externally pure' in the sense that it is deterministic, and interacts externally only via parameters and return value. Where the unit under test reads inputs from file the wrapper writes them based on its parameters, and where the unit under test writes outputs to file the wrapper reads them and passes them out in its return value. Any file writing is reverted before exit.
test_unit is normally called via the test_format function, but is called directly in unit testing.
test_format
trapit.test_format(ut_root, npm_root, stem_inp_json, purely_wrap_unit)
The unit test driver utility function is called as effectively the main function of any specific unit test script. It calls test_unit, then calls the JavaScript formatter, which writes the formatted results files to a subfolder in the script folder, based on the title, returning a summary. It has parameters:
It has the following parameters:
ut_root: unit test root foldernpm_root: parent folder of the JavaScript node_modules npm root folderstem_inp_json: input JSON file name stempurely_wrap_unit: function to process unit test for a single scenario, passed in from test script, described in the section above for test_unit
Return value:
- summary of results
Installation
↑ In This README...
↓ Prerequisite Applications
↓ Python Installation - pip
Prerequisite Applications
↑ Installation
↓ Node.js
↓ Powershell
Node.js
The unit test results are formatted using a JavaScript program, which is included as part of the current project. Running the program requires the Node.js application:
Powershell
Powershell is optional, and is used in the project for generating a template for the JSON input file required by The Math Function Unit Testing Design Pattern:
Python Installation - pip
With python installed, run in a powershell or command window:
$ py -m pip install trapit
Unit Testing
↑ In This README...
↓ Unit Testing Process
↓ Unit Test Results
In this section the unit testing API function trapit.test_unit is itself tested using The Math Function Unit Testing Design Pattern. A 'pure' wrapper function is constructed that takes input parameters and returns a value, and is tested within a loop over scenario records read from a JSON file.
Unit Testing Process
↑ Unit Testing
↓ Step 1: Create Input Scenarios File
↓ Step 2: Create Results Object
↓ Step 3: Format Results
This section details the three steps involved in following The Math Function Unit Testing Design Pattern.
Step 1: Create Input Scenarios File
↑ Unit Testing Process
↓ Unit Test Wrapper Function
↓ Scenario Category ANalysis (SCAN)
↓ Creating the Input Scenarios File
Unit Test Wrapper Function
↑ Step 1: Create Input Scenarios File
The signature of the unit under test is:
test_unit(inp_file, out_file, purely_wrap_unit)
where the parameters are described in the API section above. The diagram below shows the structure of the input and output of the wrapper function.
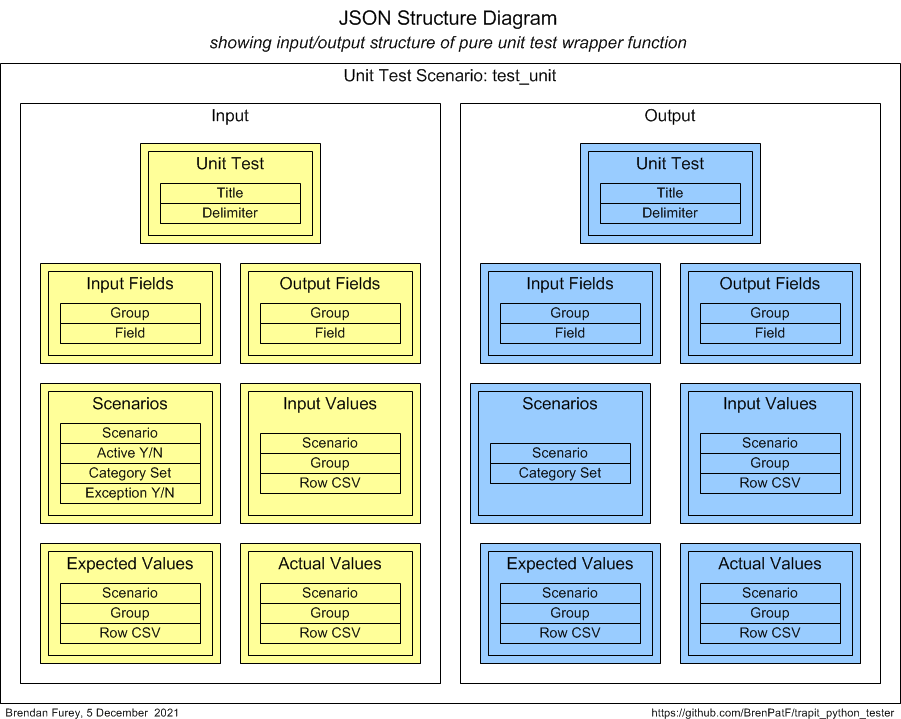
As noted above, the inputs to the unit under test here include a function. This raises the interesting question as to how we can model a function in our test data. In fact the best way to do this seems to be to regard the function as a kind of black box, where we don't care about the interior of the function, but only its behaviour in terms of returning an output from an input. This is why we have the Actual Values group in the input side of the diagram above, as well as on the output side. We can model any deterministic function in our test data simply by specifying input and output sets of values.
As we are using the trapit.test_unit API to test itself, we will have inner and outer levels for the calls and their parameters. The inner-level wrapper function passed in in the call to the unit under test by the outer-level wrapper function therefore needs simply to return the set of Actual Values records for the given scenario. In order for it to know which set to return, the scenarios need to be within readable scope, and we need to know which scenario to use. This is achieved by maintaining arrays containing a list of inner scenarios and a list of inner output groups, along with a nonlocal variable with an index to the current inner scenario that the inner wrapper increments each time it's called. This allows the output array to be extracted from the input parameter from the outer wrapper function.
From the input and output groups depicted we can construct CSV files with flattened group/field structures, and default values added, as follows:
trapit_py_inp.csv
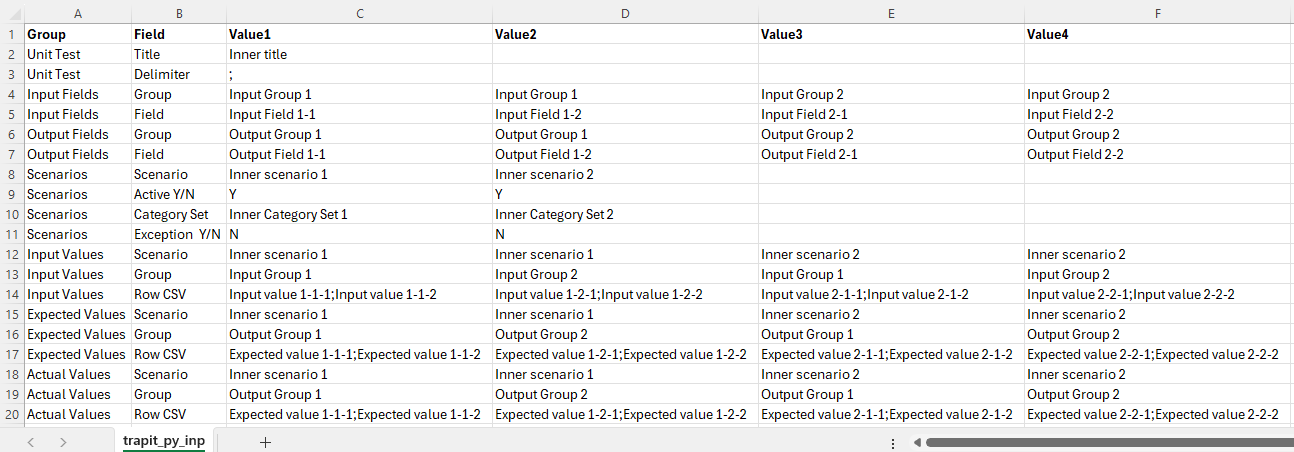
The value fields shown correspond to a prototype scenario with records per input group:
- Unit Test: 1
- Input Fields: 4
- Output Fields: 4
- Scenarios: 2
- Input Values: 4
- Expected Values: 4
- Actual Values: 4
trapit_py_out.csv
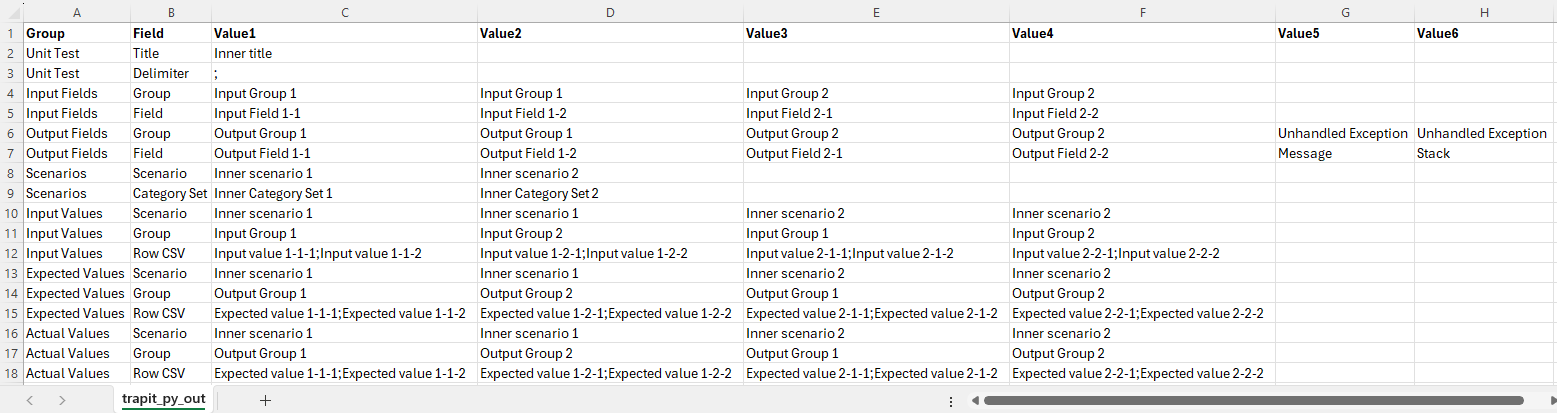
The value fields shown correspond to a prototype scenario with records per output group:
- Unit Test: 1
- Input Fields: 4
- Output Fields: 6
- Scenarios: 2
- Input Values: 4
- Expected Values: 4
- Actual Values: 4
A PowerShell utility uses these CSV files, together with one for scenarios, discussed next, to generate a template for the JSON unit testing input file. The utility creates a prototype scenario dataset with a record in each group for each populated value column, that is used for each scenario in the template.
Scenario Category ANalysis (SCAN)
↑ Step 1: Create Input Scenarios File
↓ Generic Category Sets
↓ Categories and Scenarios
The art of unit testing lies in choosing a set of scenarios that will produce a high degree of confidence in the functioning of the unit under test across the often very large range of possible inputs.
A useful approach can be to think in terms of categories of inputs, where we reduce large ranges to representative categories, an idea I explore in this article:
Generic Category Sets
↑ Scenario Category ANalysis (SCAN)
As explained in the article mentioned above, it can be very useful to think in terms of generic category sets that apply in many situations. Multiplicity is relevant here (as it often is):
Multiplicity
There are several entities where the generic category set of multiplicity applies, and we should check each of the applicable None / One / Multiple instance categories.
| Code | Description |
|---|---|
| None | No values |
| One | One value |
| Multiple | Multiple values |
Apply to:
- Input Groups
- Output Groups
- Input Fields (one or multiple only)
- Output Fields (one or multiple only)
- Input Records
- Output Records
- Delimiter Characters (one or multiple characters only)
- Scenarios (one or multiple only)
Categories and Scenarios
↑ Scenario Category ANalysis (SCAN)
After analysis of the possible scenarios in terms of categories and category sets, we can depict them on a Category Structure diagram:
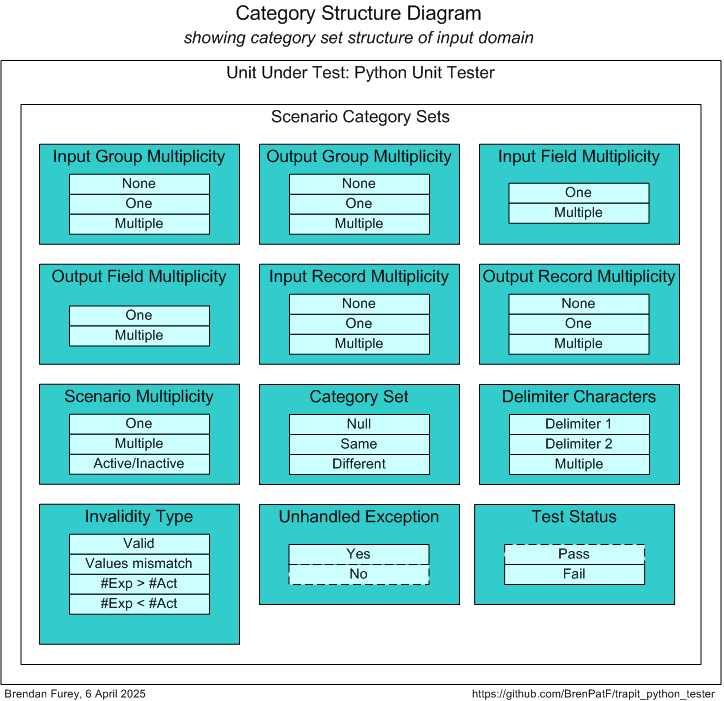
We can tabulate the results of the category analysis, and assign a scenario against each category set/category with a unique description:
| # | Category Set | Category | Scenario |
|---|---|---|---|
| 1 | Input Group Multiplicity | None | No input groups |
| 2 | Input Group Multiplicity | One | One input group |
| 3 | Input Group Multiplicity | Multiple | Multiple input groups |
| 4 | Output Group Multiplicity | None | No output groups |
| 5 | Output Group Multiplicity | One | One output group |
| 6 | Output Group Multiplicity | Multiple | Multiple output groups |
| 7 | Input Field Multiplicity | One | One input group field |
| 8 | Input Field Multiplicity | Multiple | Multiple input fields |
| 9 | Output Field Multiplicity | One | One output group field |
| 10 | Output Field Multiplicity | Multiple | Multiple output fields |
| 11 | Input Record Multiplicity | None | No input group records |
| 12 | Input Record Multiplicity | One | One input group record |
| 13 | Input Record Multiplicity | Multiple | Multiple input group records |
| 14 | Output Record Multiplicity | None | No output group records |
| 15 | Output Record Multiplicity | One | One output group record |
| 16 | Output Record Multiplicity | Multiple | Multiple output group records |
| 17 | Scenario Multiplicity | One | One scenario |
| 18 | Scenario Multiplicity | Multiple | Multiple scenarios |
| 19 | Scenario Multiplicity | Active/Inactive | Active and inactive scenarios |
| 21 | Category Set | Null | Category sets null |
| 21 | Category Set | Same | Multiple category sets with the same value |
| 22 | Category Set | Different | Multiple category sets with null and not null values |
| 23 | Delimiter Characters | Delimiter 1 | Delimiter example 1 |
| 24 | Delimiter Characters | Delimiter 2 | Delimiter example 2 |
| 25 | Delimiter Characters | Multiple | Multicharacter delimiter |
| 26 | Invalidity Type | Valid | All records the same |
| 27 | Invalidity Type | Values mismatch | Same record numbers, value difference |
| 28 | Invalidity Type | #Exp > #Act | More expected than actual records |
| 29 | Invalidity Type | #Exp < #Act | More actual than expected records set |
| 30 | Unhandled Exception | Yes | Unhandled exception |
| * | Unhandled Exception | No | (No unhandled exception)* |
| * | Test Status | Pass | (All scenarios pass)* |
| 31 | Test Status | Fail | At least one scenario fails |
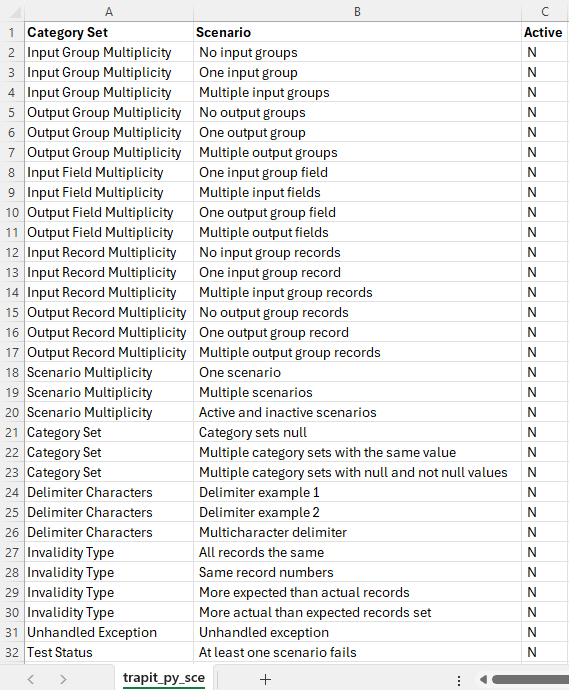
From the scenarios identified we can construct the following CSV file, taking the category set and scenario columns, and adding an initial value for the active flag:
trapit_py_sce.csv
Creating the Input Scenarios File
↑ Step 1: Create Input Scenarios File
The API to generate a template JSON file can be run with the following PowerShell in the folder of the CSV files:
Format-JSON-TrapitPy
Import-Module ..\powershell_utils\TrapitUtils\TrapitUtils.psm1
Write-UT_Template 'trapit_py' '|' 'Trapit Python Tester'
This creates the template JSON file, trapit_py_temp.json, which contains an element for each of the scenarios, with the appropriate category set and active flag, and a prototype set of input and output records.
In the prototype record sets, each group has zero or more records with field values taken from the group CSV files, with a record for each value column present where at least one value is not null for the group. The template scenario records may be manually updated (and added or subtracted) to reflect input and expected output values for the actual scenario being tested.
Step 2: Create Results Object
Step 2 requires the writing of a wrapper function that is passed into a unit test library function, test_unit, via the entry point API, test_format. test_unit reads the input JSON file, calls the wrapper function for each scenario, and writes the output JSON file with the actual results merged in along with the expected results.
The wrapper function has the structure shown in the diagram below, being defined in a driver script followed by a single line calling the test_format API.
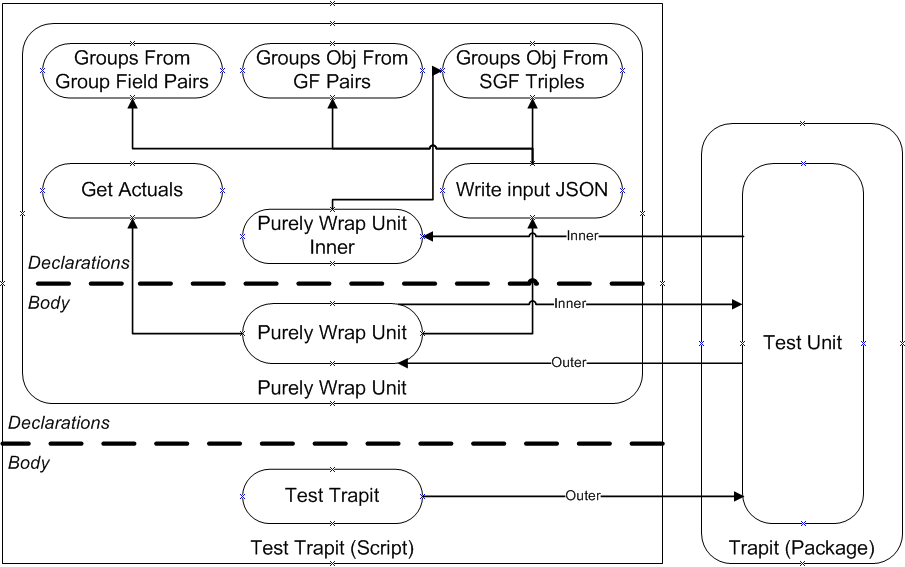
purely_wrap_unit (skeleton)
def purely_wrap_unit(inp_groups): # input groups object
    def groups_from_group_field_pairs(group_field_lis): # group/field pairs list
        return list(dict.fromkeys([gf.split(DELIM)[0] for gf in group_field_lis]))
    def groups_obj_from_gf_pairs(group_lis,        # groups list
                                 group_field_lis): # group/field pairs list
        obj = {}
        for g in group_lis:
            gf_pairs = filter(lambda gf: gf[:len(g)] == g, group_field_lis)
            obj[g] = [gf[len(g) + 1:] for gf in gf_pairs]
        return obj
    def groups_obj_from_sgf_triples(sce,             # scenario
                                    group_lis,       # groups list
                                    sgf_triple_lis): # scenario/group/field triples list
        this_sce_pairs = list(filter(lambda g: g[:len(sce)] == sce, sgf_triple_lis))
        group_field_lis = [p[len(sce) + 1:] for p in this_sce_pairs]
        return groups_obj_from_gf_pairs(group_lis, group_field_lis)
    def purely_wrap_unit_inner(inp_groups_inner): # input groups object (inner level)
        nonlocal sce_inp_ind
        scenario_inner, exception_yn = sce_inp_lis[sce_inp_ind].split(DELIM)
        sce_inp_ind += 1
        if(exception_yn == 'Y'):
            raise Exception('Exception thrown')
        return groups_obj_from_sgf_triples(scenario_inner, out_group_lis, inp_groups[ACT_VALUES])
    def write_input_json():
        ...
    def get_actuals():
        ...

    out_group_lis, sce_inp_lis = write_input_json()
    sce_inp_ind = 0
    trapit.test_unit(INP_JSON_INNER, OUT_JSON_INNER, purely_wrap_unit_inner)
    return get_actuals()
Step 3: Format Results
Step 3 involves formatting the results contained in the JSON output file from step 2, via the JavaScript formatter:
test_formatis the function from the trapit Python package that calls the main test driver function, then passes the output JSON file name to the JavaScript formatter and outputs a summary of the results.
testtrapit.py (skeleton)
import sys, os, json, re
sys.path.insert(0, os.path.abspath(os.path.join(os.path.dirname(__file__), '..')))
import trapit

DELIM = '|'
ROOT = os.path.dirname(__file__)
NPM_ROOT,                                  INP_JSON_INNER,                OUT_JSON_INNER                = \
ROOT + '/../powershell_utils/TrapitUtils', ROOT + 'trapit_py_inner.json', ROOT + 'trapit_py_out_inner.json'
def purely_wrap_unit(inp_groups): # input groups object
    ...

trapit.test_format(ROOT, NPM_ROOT, 'trapit_py', purely_wrap_unit)
This script contains the wrapper function, passing it in a call to the trapit library function test_format.
Unit Test Results
↑ Unit Testing
↓ Unit Test Report - Trapit Python Tester
↓ Results for Scenario 18: Multiple scenarios [Category Set: Scenario Multiplicity]
The unit test script creates a results subfolder, with results in text and HTML formats, in the script folder, and outputs the following summary:
Results summary for file: [MY_PATH]\trapit_python_tester\unit_test/trapit_py_out.json
=====================================================================================
File:          trapit_py_out.json
Title:         Trapit Python Tester
Inp Groups:    7
Out Groups:    8
Tests:         31
Fails:         1
Folder:        trapit-python-tester
Unit Test Report - Trapit Python Tester
Here we show the scenario-level summary of results, and show the detail for one of the scenarios, in HTML format.
You can review the HTML formatted unit test results here:
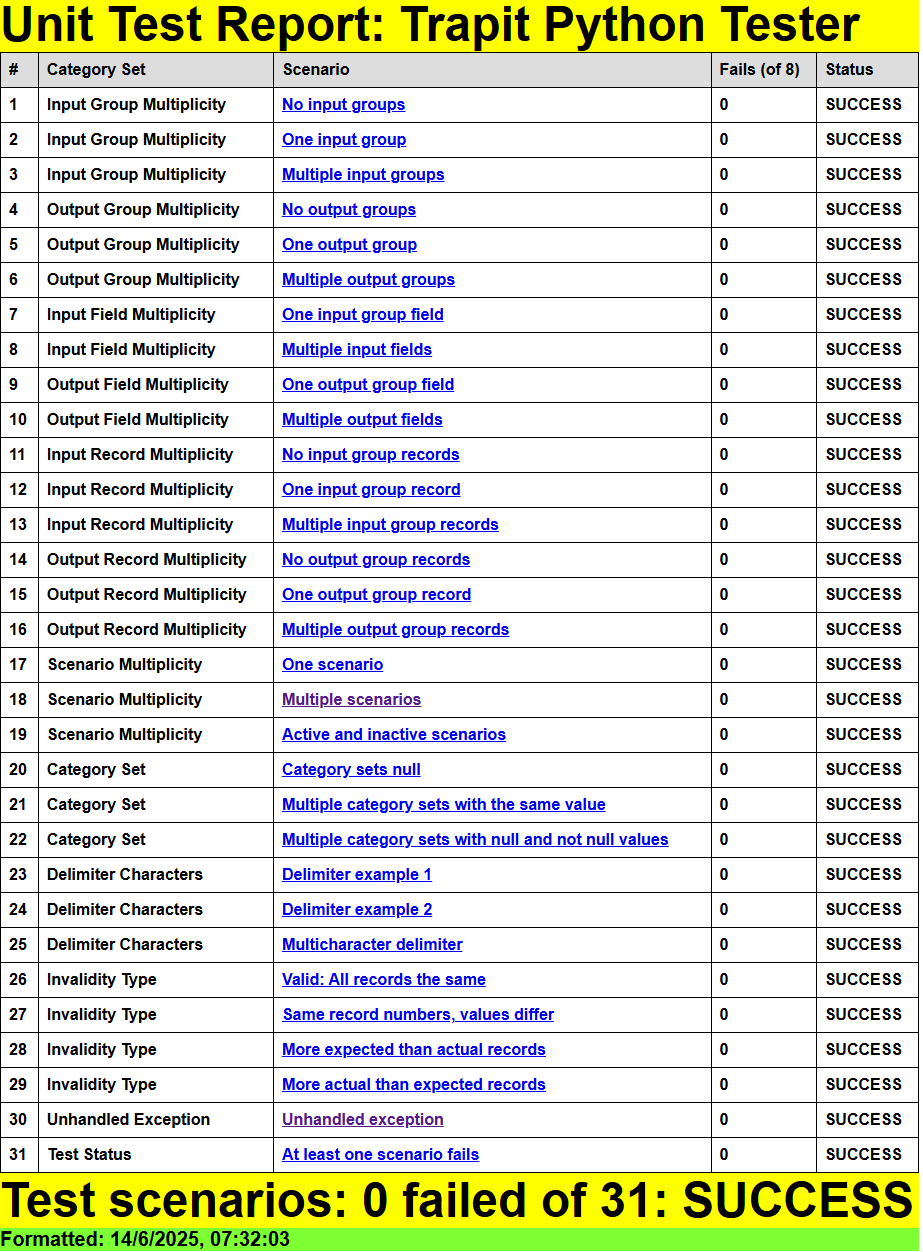
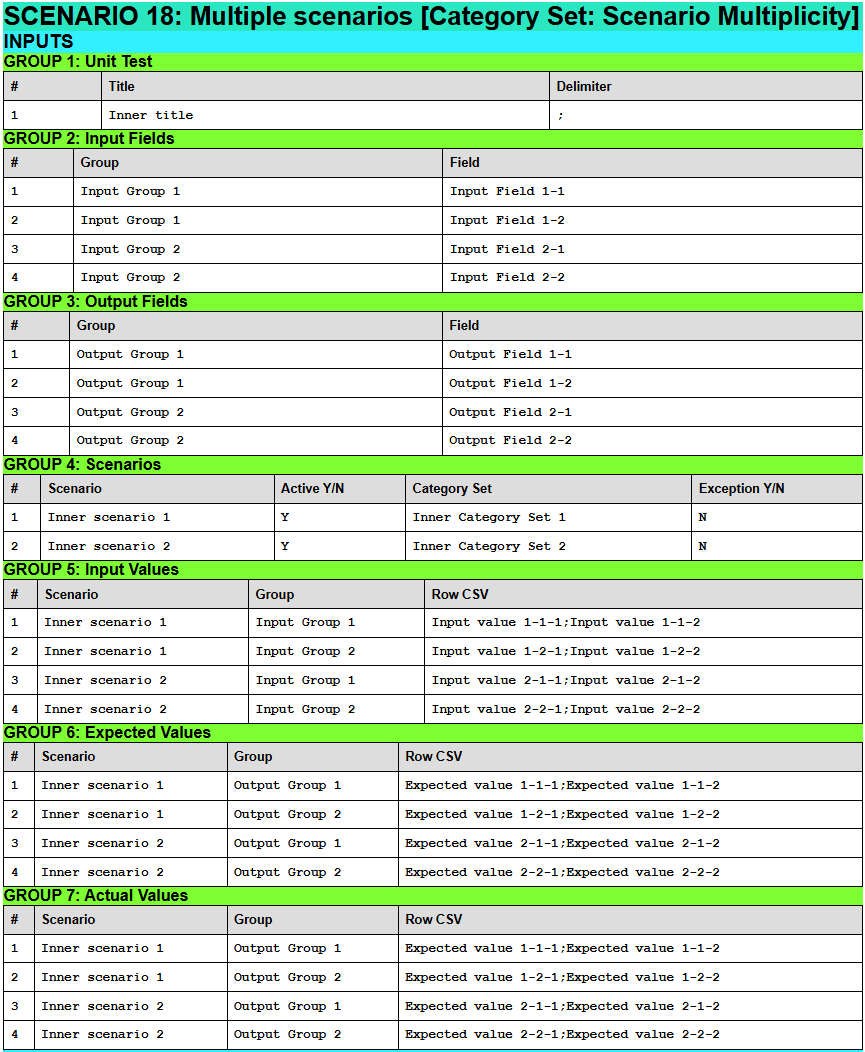
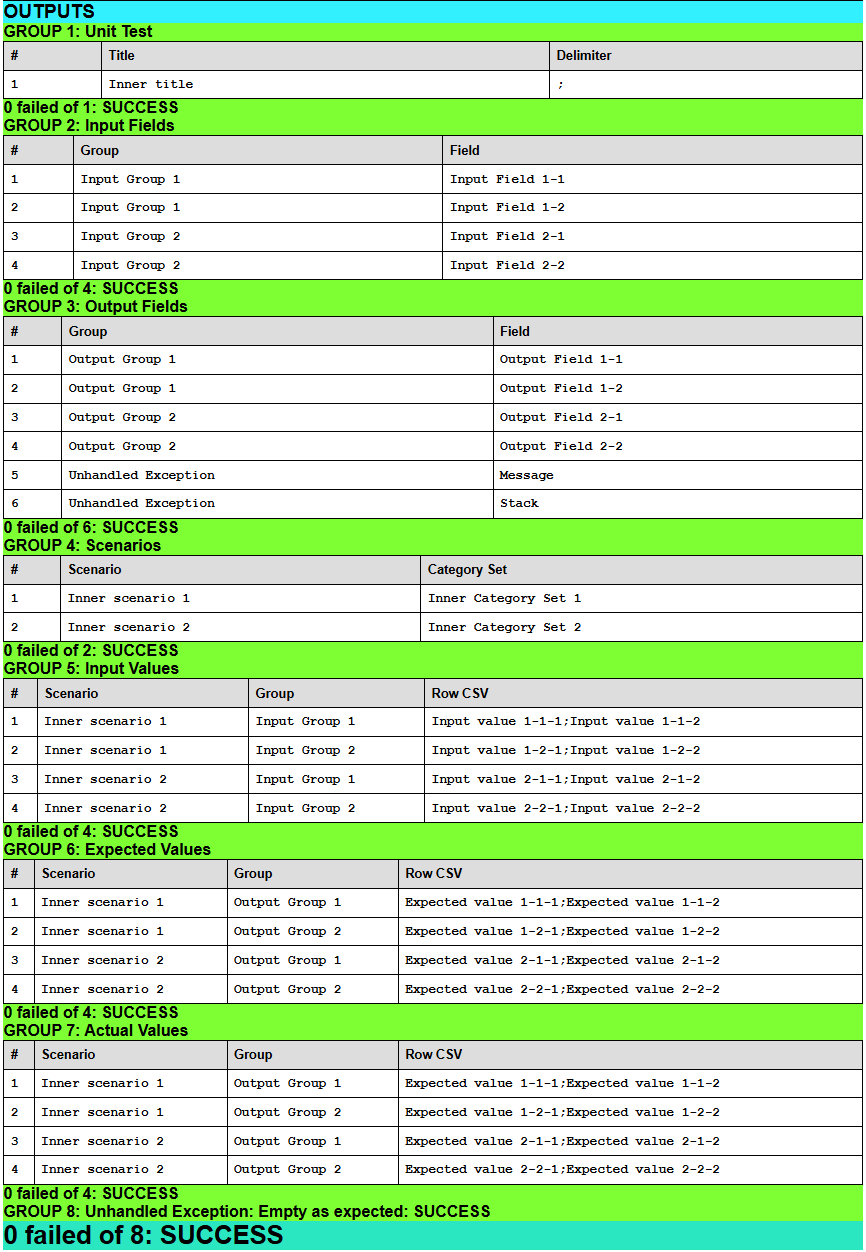
Results for Scenario 18: Multiple scenarios [Category Set: Scenario Multiplicity]
↑ Unit Test Results
↓ Input Groups
↓ Output Groups
Input Groups
↑ Results for Scenario 18: Multiple scenarios [Category Set: Scenario Multiplicity]
Output Groups
↑ Results for Scenario 18: Multiple scenarios [Category Set: Scenario Multiplicity]
Folder Structure
The project folder structure is shown below.
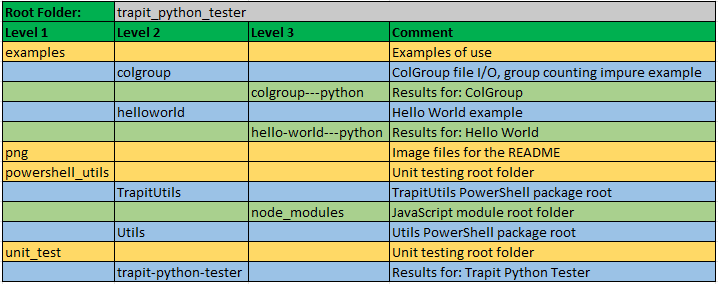
There are four subfolders below the trapit root folder, which has README and module:
examples: Two working Python examples are included in their own subfolders, with both test scripts and a main script that shows how the unit under test would normally be calledpng: This holds the image files for the READMEpowershell_utils: PowerShell packages, with JavaScript Trapit module included in TrapitUtilsunit_test: Root folder for unit testing, with subfolder having the results files
See Also
- The Math Function Unit Testing Design Pattern
- Unit Testing, Scenarios and Categories: The SCAN Method
- Node.js Downloads
- Trapit - JavaScript Unit Testing/Formatting Utilities Module
- Trapit - PowerShell Unit Testing Utilities Module
- Trapit - Python Unit Testing Module - Python Package Index
- Trapit - Python Unit Testing Module - GitHub
Software Versions
- Windows 11
- Powershell 7
- npm 6.13.4
- Node.js v12.16.1
- Python 3.13.2
License
MIT


Download files
Download the file for your platform. If you're not sure which to choose, learn more about installing packages.
Source Distribution
Built Distribution
Filter files by name, interpreter, ABI, and platform.
If you're not sure about the file name format, learn more about wheel file names.
Copy a direct link to the current filters
File details
Details for the file trapit-1.2.1.tar.gz.
File metadata
- Download URL: trapit-1.2.1.tar.gz
- Upload date:
- Size: 483.3 kB
- Tags: Source
- Uploaded using Trusted Publishing? No
- Uploaded via: twine/6.1.0 CPython/3.13.2
File hashes
| Algorithm | Hash digest | |
|---|---|---|
| SHA256 |
2804bde68ee2b2ce33ea863be85c2d3a107af24b04b8f4414e2667d7cec39fb0
|
|
| MD5 |
98e8ef06f84926b8bbee4e1302f88f65
|
|
| BLAKE2b-256 |
941f9aa9e0d204bf63bb7b15976e4bb34ca27718e20d6e31aca05308ec881b6b
|
File details
Details for the file trapit-1.2.1-py3-none-any.whl.
File metadata
- Download URL: trapit-1.2.1-py3-none-any.whl
- Upload date:
- Size: 563.4 kB
- Tags: Python 3
- Uploaded using Trusted Publishing? No
- Uploaded via: twine/6.1.0 CPython/3.13.2
File hashes
| Algorithm | Hash digest | |
|---|---|---|
| SHA256 |
aa3357eab5650c0480c024b953c44857dc8d28d9e8f41d39ba15fce6d6e5235a
|
|
| MD5 |
55d208e730dd2148cf763691efd8a842
|
|
| BLAKE2b-256 |
54607d714cf327965caee8e86d86369a8f5a902cd6739a3ce816927031e76a62
|






