Fast tcp/https/websocket/socks4/ssh tunnel serving as unified proxy server.

Project description
 _____            _          _____                        _
/__   \_   _ _ __| |__   ___/__   \_   _ _ __  _ __   ___| |
  / /\/ | | | '__| '_ \ / _ \ / /\/ | | | '_ \| '_ \ / _ \ |
 / /  | |_| | |  | |_) | (_) / /  | |_| | | | | | | |  __/ |
 \/    \__,_|_|  |_.__/ \___/\/    \__,_|_| |_|_| |_|\___|_|


Runtime Environment
- Operating System:
Windows、Linux、MacOS - Python:
>=3.5
Primary Function
- Provide access to various tunnel / proxy services
- Supported tunnel / proxy service types:
https/socks4/socks5/websocket/ssh/icmp/k8s - The types of tunnel / proxy services supported to create:
https/socks4/socks5/websocket/ssh - Support TCP port forwarding and SSL port forwarding
- It supports specifying different policies through configuration file, allowing access different services through different tunnel / proxy services
Installation
python3 -m pip install turbo-tunnel
Basic Functions
Detail in Document
Port Forwarding
turbo-tunnel -l tcp://127.0.0.1:8080 -t tcp://www.qq.com:443
This command can forward www.qq.com:443 to local 8080 port.
turbo-tunnel -l tcp://127.0.0.1:8080 -t http://web-proxy.com:8080 -t tcp://www.qq.com:443
This command can forward www.qq.com:443 to local 8080 port through https proxy web-proxy.com:8080.
If address is not specified, default is 0.0.0.0.
Create Tunnel Server
Use -l or --listen parameter to create a tunnel server.
- Create https proxy tunnel server
turbo-tunnel -l http://username:password@:8080
The variable username and password is used for authentication. If username and password not specified, authentication will be disabled. If the password include special characters, it should be encoded by urlencode. For example, pwd@123 should be encoded to pwd%40123.
- Create socks4 proxy tunnel server
turbo-tunnel -l socks4://userid@127.0.0.1:1080
socks4:// can also replaced by socks://,because socks4 is the default socks protocol.
userid is used for authentication.
- Create WebSocket proxy tunnel server
turbo-tunnel -l ws://username:password@127.0.0.1/proxy/{addr}/{port}
{addr}and {port} are variable placeholders here, which are used to indicate the parameters of target address and target port. This is due to the WebSocket protocol is not a native proxy protocol, which need specil fields to indicate these information. For example, if the user want to visit 1.1.1.1:8888, turbo-tunnel will create request path /proxy/1.1.1.1/8888 dynamically.
User can change the path to different formats, such as /proxy-{addr}-{port}.
The client and server
MUSTuse the same format.
The wss protocol is not supported currently, user can run wss server with nginx.
Config Tunnel Client
With -t or --tunnel param, turbo-tunnel process can access target server through specified tunnel, default is direct connection.
- Config single tunnel
turbo-tunnel -l http://127.0.0.1:8080 -t wss://username:password@proxy.com/{addr}/{port}
All requests to the https proxy server will be forwarded to the WebSocket tunnel server.
This method can be used to convert tunnel protocol.
- Config multiple tunnels
turbo-tunnel -l http://127.0.0.1:8080 -t socks://10.1.1.1:1080 -t ssh://username:password@10.2.2.2:22
When multiple channels configured, the tunnel will be nested. So data packet can cross all tunnels in turn and access the target service.
Config global transparent proxy
When proxy server is created, program is expected to access network through proxy automatically. This problem can bed solved by configing global transparent proxy.
-
Windows & MacOS can use
Proxifiertool to config various rules, different rule will be selected to access different server. -
Linux can use
proxychainstool, which is likeProxifier, but can't config rule, and need to addproxychainsbefore cmdline.
Advanced Usage
Config file
The user can use -c or --config param to specify a yaml format config file, which can config access rules.
Config file example:
version: 1.0

listen: http://127.0.0.1:6666 # Listen address

hosts:
  - domain: www.test.com
    ip: 1.2.3.4

tunnels:
  - id: direct
    url: tcp://
    default: true # Default is direct connect

  - id: block
    url: block:// # Forbidden rule

  - id: web
    url: http://web-proxy.com:8080

  - id: private
    url: wss://test:mypassword@ws-proxy.com/proxy/{addr}/{port}
    dependency: web # Depend web tunnel

rules:
  - id: local
    priority: 100 # Priority, 1-100, highest priority rule will be selected when rule conflict
    addr: 127.0.0.1
    tunnel: direct

  - id: internal
    priority: 99
    addr: "192.168.*"
    port: 1-65535
    tunnel: direct

  - id: public
    priority: 90
    addr: "*"
    port: 80;443;8080
    tunnel: web # Access public network with web tunnel

  - id: private
    priority: 95
    addr: "*.private.com"
    port: 1-65535
    tunnel: private

  - id: test
    priority: 90
    addr: "*.baidu.com"
    port: 80;443
    tunnel: block # Connection will be blocked
Extend plugin
turbo-tunnel is allowing users to develop their own plugins, which can support new proxy server or tunnel. They can also perform special operations, such as dynamically modify sending and receiving data.
Built-in plugins:
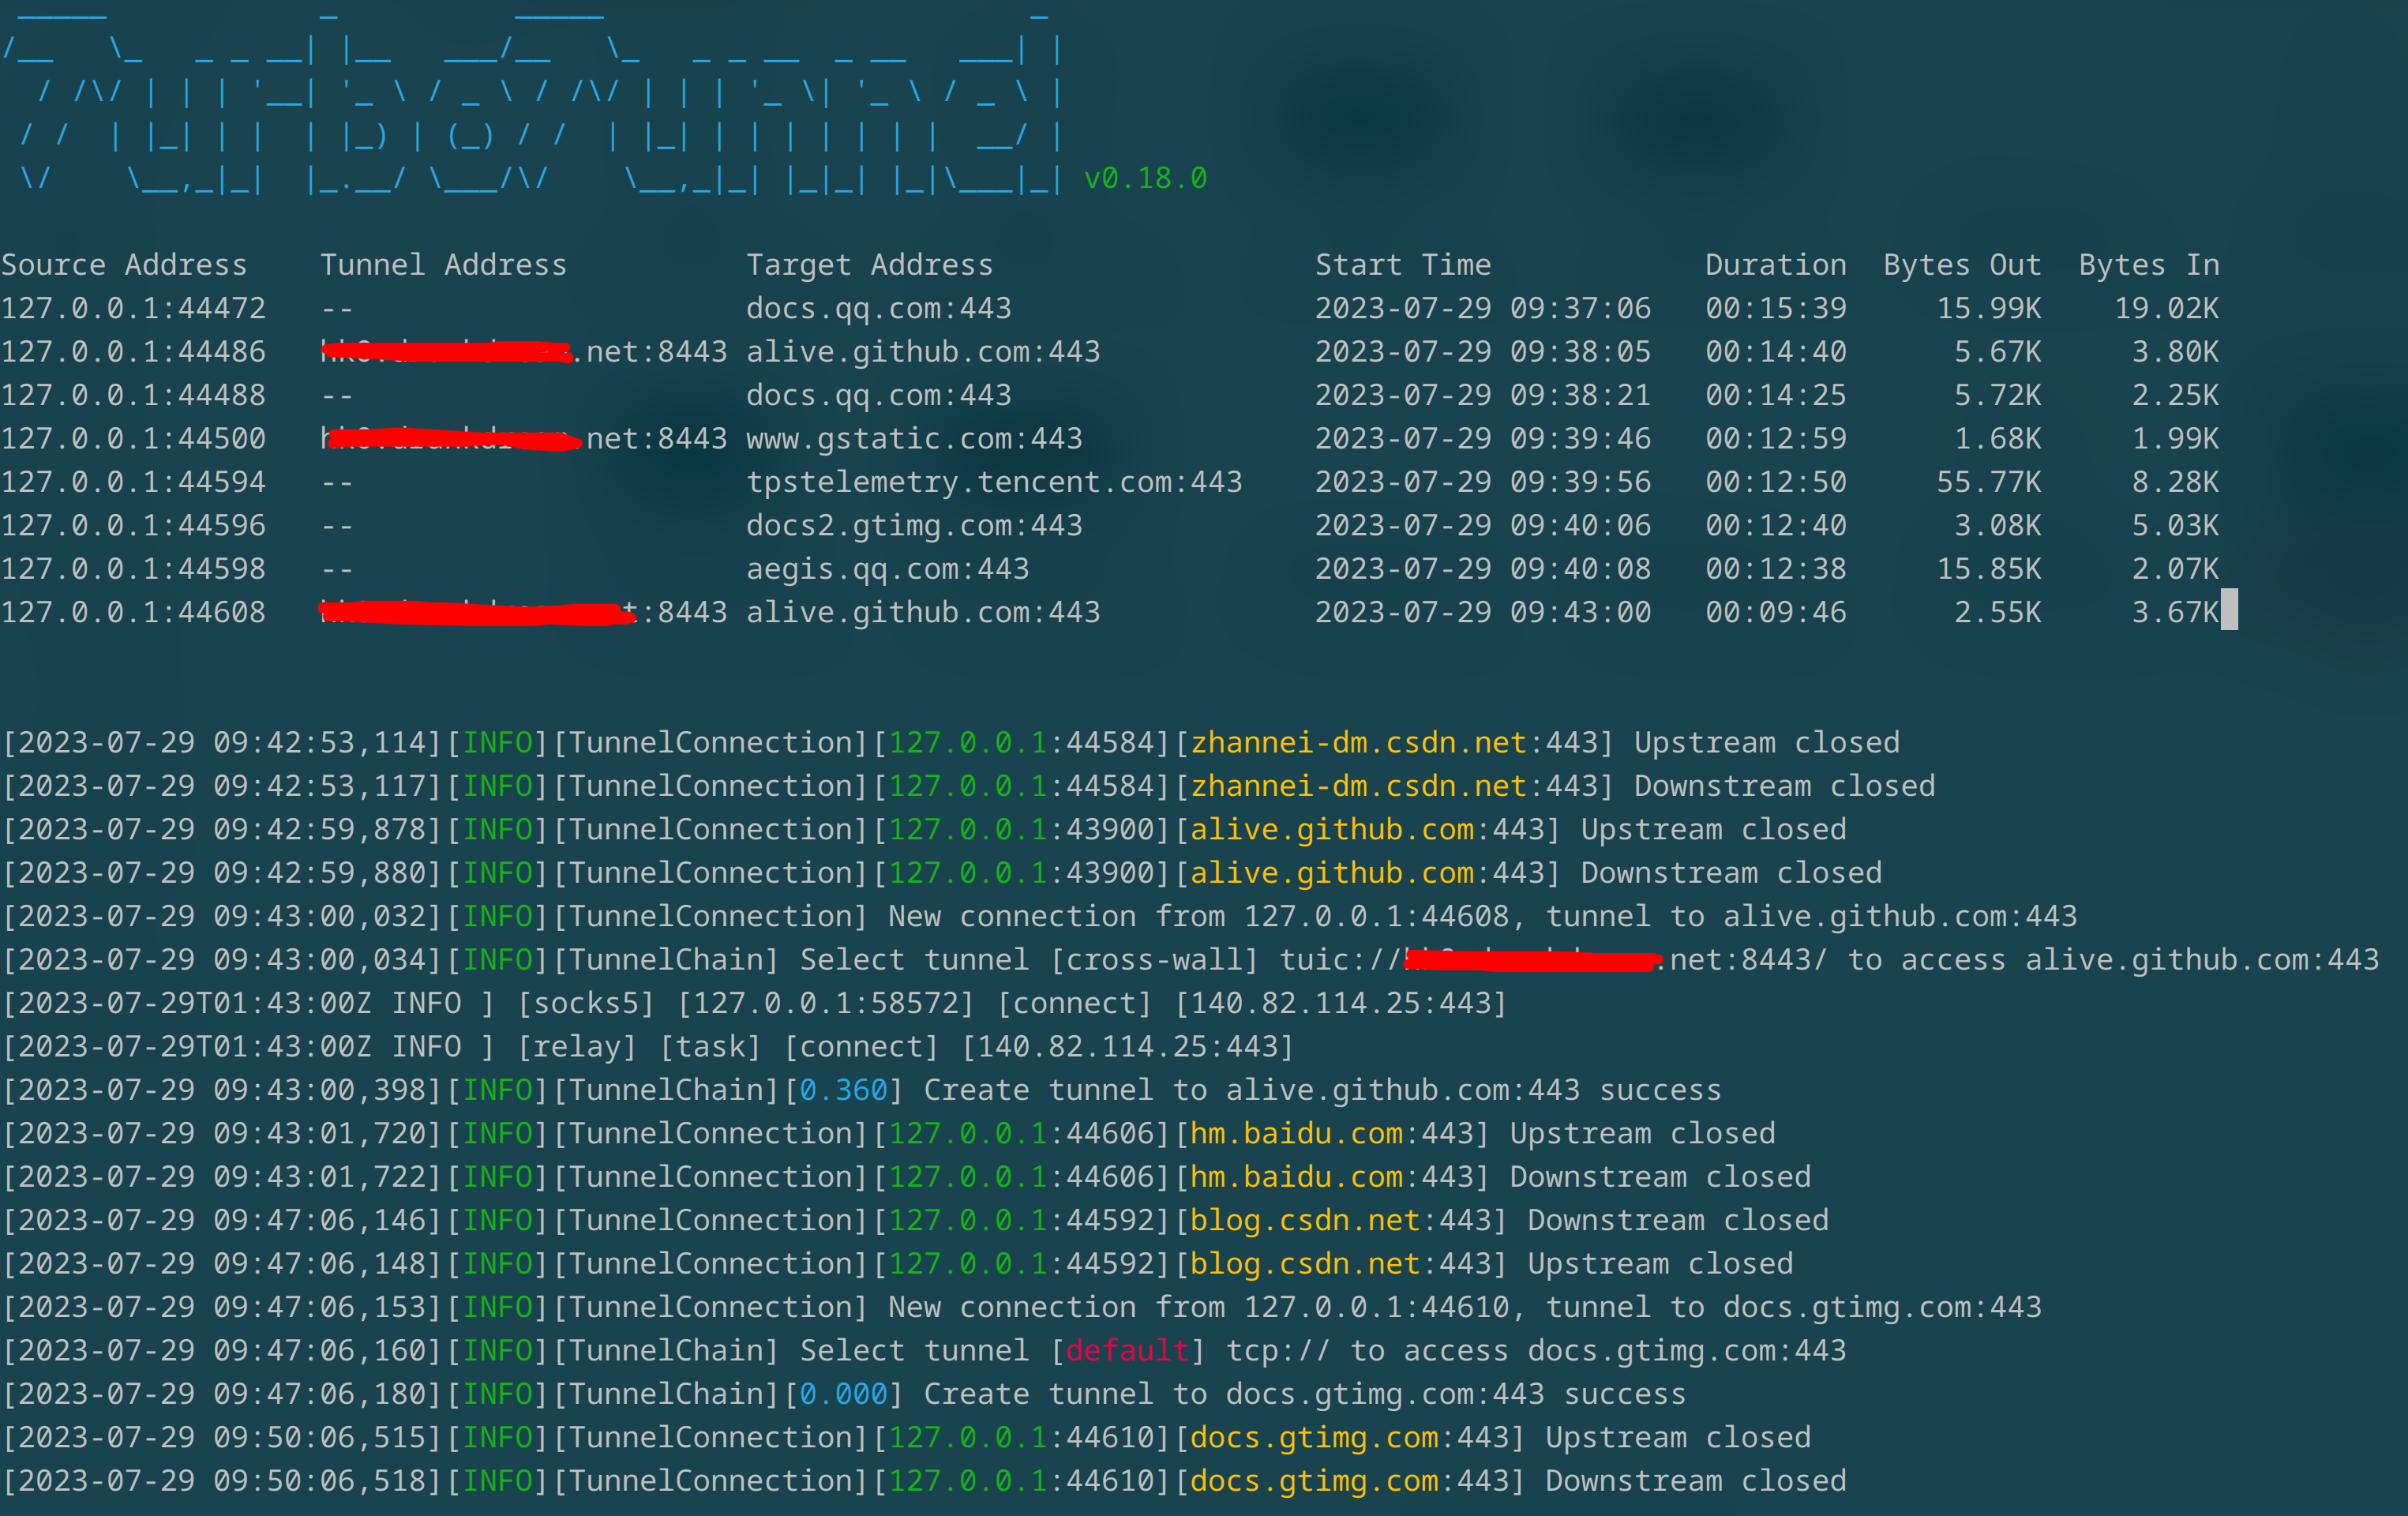
- terminal: Show current active connections
turbo-tunnel -l http://127.0.0.1:8080 -p terminal -p xxx
User can use -p or --plugin params to specify 1-N plugins. Plugin load order is decided by -p params order.
Docker
- build
# AMD64
docker buildx build --platform 'linux/amd64' -t turbo-tunnel:amd64 .

# ARM64
docker buildx build --platform 'linux/arm64' -t turbo-tunnel:arm64 .

# Multi
docker buildx create --use --platform=linux/arm64,linux/amd64 --name multi-platform-builder
docker buildx inspect --bootstrap
docker buildx build --platform 'linux/amd64,linux/arm64' -t turbo-tunnel:latest .
Release history Release notifications | RSS feed


Download files
Download the file for your platform. If you're not sure which to choose, learn more about installing packages.
Source Distribution
Built Distribution
Filter files by name, interpreter, ABI, and platform.
If you're not sure about the file name format, learn more about wheel file names.
Copy a direct link to the current filters
File details
Details for the file turbo_tunnel-0.19.0.tar.gz.
File metadata
- Download URL: turbo_tunnel-0.19.0.tar.gz
- Upload date:
- Size: 68.7 kB
- Tags: Source
- Uploaded using Trusted Publishing? No
- Uploaded via: twine/6.2.0 CPython/3.14.3
File hashes
| Algorithm | Hash digest | |
|---|---|---|
| SHA256 |
d2a12bc9545244c25ae62056df789a590ef8ae741556a8c146a36d2ed2aee55d
|
|
| MD5 |
4eb6c187c19c6da33dc9bb39b8925b27
|
|
| BLAKE2b-256 |
9deee40fe05df8336eec3ccdac65185fd23eede201f27d113e8d28aa1ac79aa0
|
File details
Details for the file turbo_tunnel-0.19.0-py3-none-any.whl.
File metadata
- Download URL: turbo_tunnel-0.19.0-py3-none-any.whl
- Upload date:
- Size: 68.4 kB
- Tags: Python 3
- Uploaded using Trusted Publishing? No
- Uploaded via: twine/6.2.0 CPython/3.14.3
File hashes
| Algorithm | Hash digest | |
|---|---|---|
| SHA256 |
ffcb25f0abe1494083c2adf79166873d31b2a10aff3e0de29c74b312747ae2c7
|
|
| MD5 |
242ff9ac4869ebfc6f7e9ae1fccf57c6
|
|
| BLAKE2b-256 |
9104d9e3eb86b6f31c027390d9082759ce114b4a7f4d2f4cc28276d1aa5f3005
|


