UDMT: Unsupervised Multi-animal Tracking for Quantitative Ethology

Project description
UDMT: Unsupervised Multi-animal Tracking for Quantitative Ethology
Project page | Paper
Contents
Overview
Animal behavior is closely related to their internal state and external environment. Quantifying animal behavior is a fundamental step in ecology, neuroscience, psychology, and various other fields. However, there exist enduring challenges impeding multi-animal tracking advancing towards higher accuracy, larger scale, and more complex scenarios, especially the similar appearance and frequent interactions of animals of the same species.
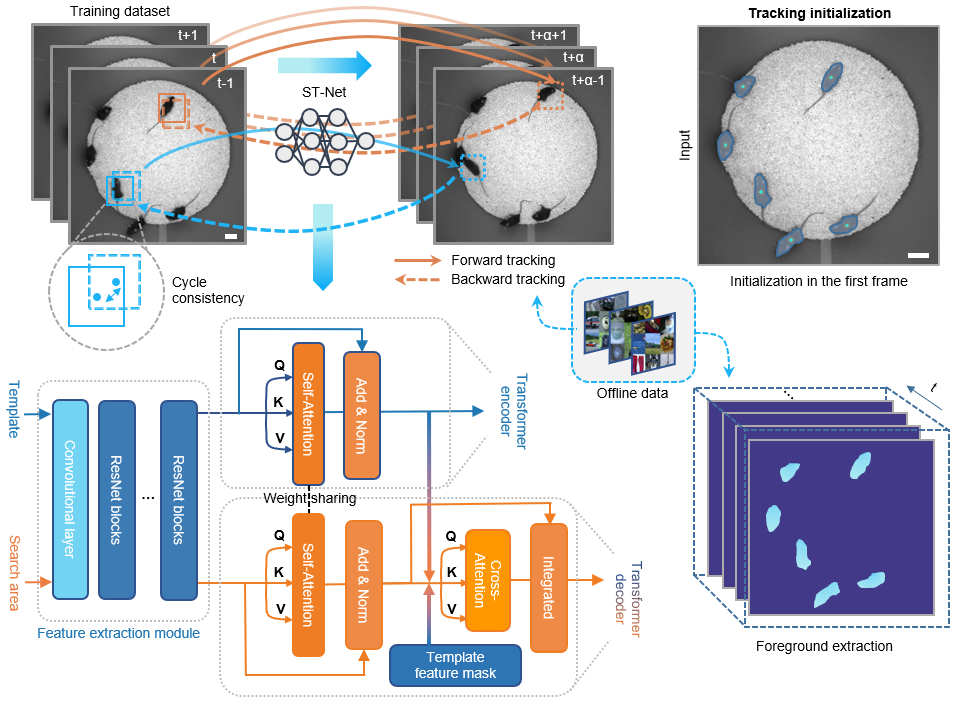
Growing demands in quantitative ethology have motivated concerted efforts to develop high-accuracy and generalized tracking methods. Here, we present UDMT, the first unsupervised multi-animal tracking method that achieves state-of-the-art performance without requiring any human annotations. The only thing users need to do is to click the animals in the first frame to specify the individuals they want to track.
We demonstrate the state-of-the-art performance of UDMT on five different kinds of model animals, including mice, rats, Drosophila, C. elegans, and Betta splendens. Combined with a head-mounted miniaturized microscope, we recorded the calcium transients synchronized with mouse locomotion to decipher the correlations between animal locomotion and neural activity.
For more details, please see the companion paper where the method first appeared: "Unsupervised multi-animal tracking for quantitative ethology".
Directory structure
Click to unfold the directory tree
UDMT-main-pypt #Python GUI of UDMT
|---udmt
|-----gui
- DeepCAD_RT_GUI contains all files for the implementation of UDMT
Installation
1. For Windows
Our environment
- Windows 10
- Python 3.8
- Pytorch 1.7.1
- NVIDIA GPU (GeForce RTX 3090) + CUDA (11.0)
Environment configuration
-
Create a virtual environment and install PyTorch. In the 3rd step, please select the correct Pytorch version that matches your CUDA version from https://pytorch.org/get-started/previous-versions/.
$ conda create -n udmt python=3.8
$ conda activate udmt
$ pip install torch==1.7.1+cu110 torchvision==0.8.2+cu110 torchaudio==0.7.2 -f https://download.pytorch.org/whl/torch_stable.html
Note:
pip installcommand is required for Pytorch installation. -
We made a installable pip release of UDMT [pypi]. You can install it by entering the following command:
$ pip install udmt-pip -
compile .pyd file
-
You can download installer from the official libjpeg-turbo Sourceforge repository, install it and copy turbojpeg.dll to the directory from the system PATH.
2. For Linux
Our environment
- Ubuntu 16.04
- Python 3.8
- Pytorch 1.8.0
- NVIDIA GPU (GeForce RTX 3090) + CUDA (11.1)
Environment configuration
-
Create a virtual environment and install PyTorch. In the 3rd step, please select the correct Pytorch version that matches your CUDA version from https://pytorch.org/get-started/previous-versions/.
$ conda create -n udmt python=3.8
$ conda activate udmt
$ pip install torch==1.8.0+cu111 torchvision==0.9.0+cu111 torchaudio==0.8.0 -f https://download.pytorch.org/whl/torch_stable.html
$ sudo apt-get install ninja-build
$ sudo apt-get install libturbojpeg
Note:
pip installcommand is required for Pytorch installation. -
We made a installable pip release of UDMT [pypi]. You can install it by entering the following command:
$ pip install udmt-pip
Download the source code
$ git clone https://github.com/cabooster/UDMT
$ cd UDMT/UDMT_pytorch/
Demos
To try out the Python code, please activate the udmt environment first:
$ source activate udmt
$ cd DeepCAD-RT/DeepCAD_RT_pytorch/
Example training
To train a DeepCAD-RT model, we recommend starting with the demo script demo_train_pipeline.py. One demo dataset will be downloaded to the DeepCAD_RT_pytorch/datasets folder automatically. You can also download other data from the companion webpage or use your own data by changing the training parameter datasets_path.
python demo_train_pipeline.py
Example testing
To test the denoising performance with pre-trained models, you can run the demo script demo_test_pipeline.py . A demo dataset and its denoising model will be automatically downloaded to DeepCAD_RT_pytorch/datasets and DeepCAD_RT_pytorch/pth, respectively. You can change the dataset and the model by changing the parameters datasets_path and denoise_model.
python demo_test_pipeline.py
Jupyter notebook
We provide simple and user-friendly Jupyter notebooks to implement DeepCAD-RT. They are in the DeepCAD_RT_pytorch/notebooks folder. Before you launch the notebooks, please configure an environment following the instruction in Environment configuration . And then, you can launch the notebooks through the following commands:
$ source activate deepcadrt
$ cd DeepCAD-RT/DeepCAD_RT_pytorch/notebooks
$ jupyter notebook
Colab notebook
We also provide a cloud-based notebook implemented with Google Colab. You can run DeepCAD-RT directly in your browser using a cloud GPU without configuring the environment.

Note: The Colab notebook needs much longer time to train and test because of the limited GPU performance offered by Colab.

GUI
To achieve real-time denoising, DeepCAD-RT was optimally deployed on GPU using TensorRT (Nvidia) for further acceleration and memory reduction. We also designed a sophisticated time schedule for multi-thread processing. Based on a two-photon microscope, real-time denoising has been achieved with our Matlab GUI of DeepCAD-RT (tested on a Windows desktop with Intel i9 CPU and 128 GB RAM). Tutorials on installing and using the GUI has been moved to this page.
Results
1. Tracking the movement of 10 mice simultaneously with UDMT.

2. Neuroethology analysis of multiple mice combined with a head-mounted microscope.

3. Analyzing the aggressive behavior of betta fish with UDMT.

More demo videos are presented on our website.
Citation
If you use this code, please cite the companion paper where the original method appeared:
- Xinyang Li, Yixin Li, Yiliang Zhou, et al. Real-time denoising enables high-sensitivity fluorescence time-lapse imaging beyond the shot-noise limit. Nat. Biotechnol. (2022). https://doi.org/10.1038/s41587-022-01450-8
@article {li2022realtime,
  title = {Real-time denoising enables high-sensitivity fluorescence time-lapse imaging beyond the shot-noise limit},
  author = {Li, Xinyang and Li, Yixin and Zhou, Yiliang and Wu, Jiamin and Zhao, Zhifeng and Fan, Jiaqi and Deng, Fei and Wu, Zhaofa and Xiao, Guihua and He, Jing and Zhang, Yuanlong and Zhang, Guoxun and Hu, Xiaowan and Chen, Xingye and Zhang, Yi and Qiao, Hui and Xie, Hao and Li, Yulong and Wang, Haoqian and Fang, Lu and Dai, Qionghai},
  journal={Nature Biotechnology},
  year={2022},
  publisher={Nature Publishing Group}
}


Download files
Download the file for your platform. If you're not sure which to choose, learn more about installing packages.
Source Distribution
File details
Details for the file udmt_pip-0.0.8.tar.gz.
File metadata
- Download URL: udmt_pip-0.0.8.tar.gz
- Upload date:
- Size: 5.4 kB
- Tags: Source
- Uploaded using Trusted Publishing? No
- Uploaded via: twine/3.7.1 importlib_metadata/4.8.3 pkginfo/1.8.2 requests/2.26.0 requests-toolbelt/0.9.1 tqdm/4.62.3 CPython/3.6.13
File hashes
| Algorithm | Hash digest | |
|---|---|---|
| SHA256 |
332eb4c8035571e2ffadb6436ea454b2a53371d2648f751603a8a979f71cbc4b
|
|
| MD5 |
24e4bb65ccd9a01245e9f21ce15cf394
|
|
| BLAKE2b-256 |
6e3fec096202fc4969523ef6d1e734133fe8b3ae5422b26e4c567a9fbabfbe09
|


