
About Unray
Framework for communication between Unreal Engine and RLlib.
This package contains the tools to connect the framework to Unreal Engine envs.
Setting up
We recommend conda for creating a virtualenv and installing the dependendencies. Currently, Ray is available in Python 3.10 or less, so we recommend creating a virtualenv with version 3.10. To make sure the package works correctly, use with ray[rllib]==2.10.
RL Environment for simple training
NOTE: We recommend reading this documentation with a basic RLlib knowledge. You can read the RLlib documentation here: https://docs.ray.io/en/latest/rllib/index.html
Single Agent
In order to define a custom environment, you have to create an action and observation dictionary. This is called a env_config dict.
# Define the env_config dict for each agent.
env_config = {
  "observation": <Space>,
  "action" :<Space>
}
Each Space is taken from BridgeSpace
from unray.envs.spaces import BridgeSpaces
To use unray, import the following modules:
from unray.envs.base_env import SingleAgentEnv
from unray.unray_config import UnrayConfig
Once you have your env_config dict ready, we'll create the Unray object, which will allow us to train our environment with Unray.
#Create Unray object

unray_config = UnrayConfig()
This will allow us to configure our algorithm to be ready for the communication with Unreal Eninge.
Next, we'll need to create an instance of a Single Agent Environment, which takes our env_config as an argument and a name for our env:
#Create Instance of Single Agent Environment

env = SingleAgentEnv(env_config, 'env_name')
Now, we can use unray without problem.
Next, we'll make use of some of RLlib tools. You neet to create a config object for an algorithm (like PPO) using RLlib. Like in the example:
from ray.rllib.algorithms.ppo import PPOConfig

algo_config = PPOConfig()

algo_config = algo_config.training(gamma=0.9, lr=0.01, kl_coeff=0.3)
algo_config = algo_config.resources(num_gpus=0)
algo_config = algo_config.rollouts(num_rollout_workers=0)
Once you've create the config, we'll create our algorithm instance using the configure_algo function from our Unray object, which takes in two arguments: our algorithm config and the single agent environment instance
#Create Algo Instance
algo = unray_config.configure_algo(algo_config, env)
Now, Unray is ready to train your Single Agent Environment.
Single Agent Example: Cartpole
We'll take the classic cartpole example to start with unray.
First, let's create the action and observation dictionary. We are using the cartpole problem definition used in Gymnausium: https://gymnasium.farama.org/environments/classic_control/cart_pole/
from unray.envs.spaces import BridgeSpaces
high = np.array(
                [
                    1000,
                    np.finfo(np.float32).max,
                    140,
                    np.finfo(np.float32).max,
                ],
                dtype=np.float32,
            )

## Configurations Dictionaries
# Define all the observation/actions spaces to be used in the Custom environment
# BridgeSpaces area based from gym.spaces. Check the docs for more information on how to use then.

# for this example we are using a a BoxSpace for our observations and a
# Discrete space for our action space.


env_config = {
        "observation": BridgeSpaces.Box(-high, high),
            "action": BridgeSpaces.Discrete(2)
        }
Configure the environment
    from unray.envs.base_env import SingleAgentEnv
    from unray.unray_config import UnrayConfig
    from ray.rllib.algorithms.ppo import PPOConfig

    ppo_config = PPOConfig()

    ppo_config = ppo_config.training(gamma=0.9, lr=0.01, kl_coeff=0.3)
    ppo_config = ppo_config.resources(num_gpus=0)
    ppo_config = ppo_config.rollouts(num_rollout_workers=0)

    unray_config = UnrayConfig()

    cartpole = SingleAgentEnv(env_config, "cartpole")
    algo = unray_config.configure_algo(ppo_config, cartpole)
Multiagent
In order to define a custom environment, you have to create an action and observation dictionary. This is called a env_config dict.
# Define the env_config dict for each agent.
env_config = {
  "agent-1": {
    "observation": <Space>,
    "action": <Space>,
    "can_show": int,
    "can_see": int,
    "obs_order":{
         "agent-1": i,
         "agent-2": j,
         ....
      }
    },
  "agent-2": {
    "observation": <Space>,
    "action": <Space>,
    "can_show": int,
    "can_see": int,
    "obs_order":{
         "agent-1": i,
         "agent-2": j,
         ....
      }
    },
    ...
}
Each Space is taken from BridgeSpace
from unray.envs.spaces import BridgeSpaces
This dictionary defines the independent spaces for each of the agents. You will also notice that for each agent there are three new parameters: can_show, can_see and obs_order. This parameters will help us define how each agent will see the other agents in the environment.
| Parameter | Description |
|---|---|
can_show |
The observations which will be available during training |
can_see |
How many observations can this agent see from other agents |
obs_order |
The order of the observations of this agent |
Once you have your env_config dict ready, we'll create the Unray object, which will allow us to train our environment with Unray.
To use unray for multiagent envs, import the following modules:
from unray.envs.base_env import MultiAgentEnv
from unray.unray_config import UnrayConfig
#Create Unray object

unray_config = UnrayConfig()
This will allow us to configure our algorithm to be ready for the communication with Unreal Eninge.
Next, we'll need to create an instance of a MultiAgent Environment, which takes our env_config as an argument and a name for our env:
#Create Instance of MultiAgent Environment

env = MultiAgentEnv(env_config, 'env_name')
Now, we can use unray without problem.
Next, we'll make use of some of RLlib tools. You neet to create a config object for an algorithm (like PPO) using RLlib. Like in the example:
from ray.rllib.algorithms.ppo import PPOConfig

algo_config = PPOConfig()

algo_config = algo_config.training(gamma=0.9, lr=0.01, kl_coeff=0.3)
algo_config = algo_config.resources(num_gpus=0)
algo_config = algo_config.rollouts(num_rollout_workers=0)
Once you've create the config, we'll create our algorithm instance using the configure_algo function from our Unray object, which takes in two arguments: our algorithm config and the multiagent environment instance.
#Create Algo Instance
algo = unray_config.configure_algo(algo_config, env)
Now, Unray is ready to train your MultiAgent Environment.
Multiagent Workflow
As well as in the single-agent case, the environment dynamics are defined externally in the UE5 Scenario. Unray lets RLlib comunicate with the enviornment via TPC/IP connection, sending the agent actions defined by ray algorithms and reciving the observation vectors from the environment for the trainer to train.
Multiagent Example: Multiagent-Arena
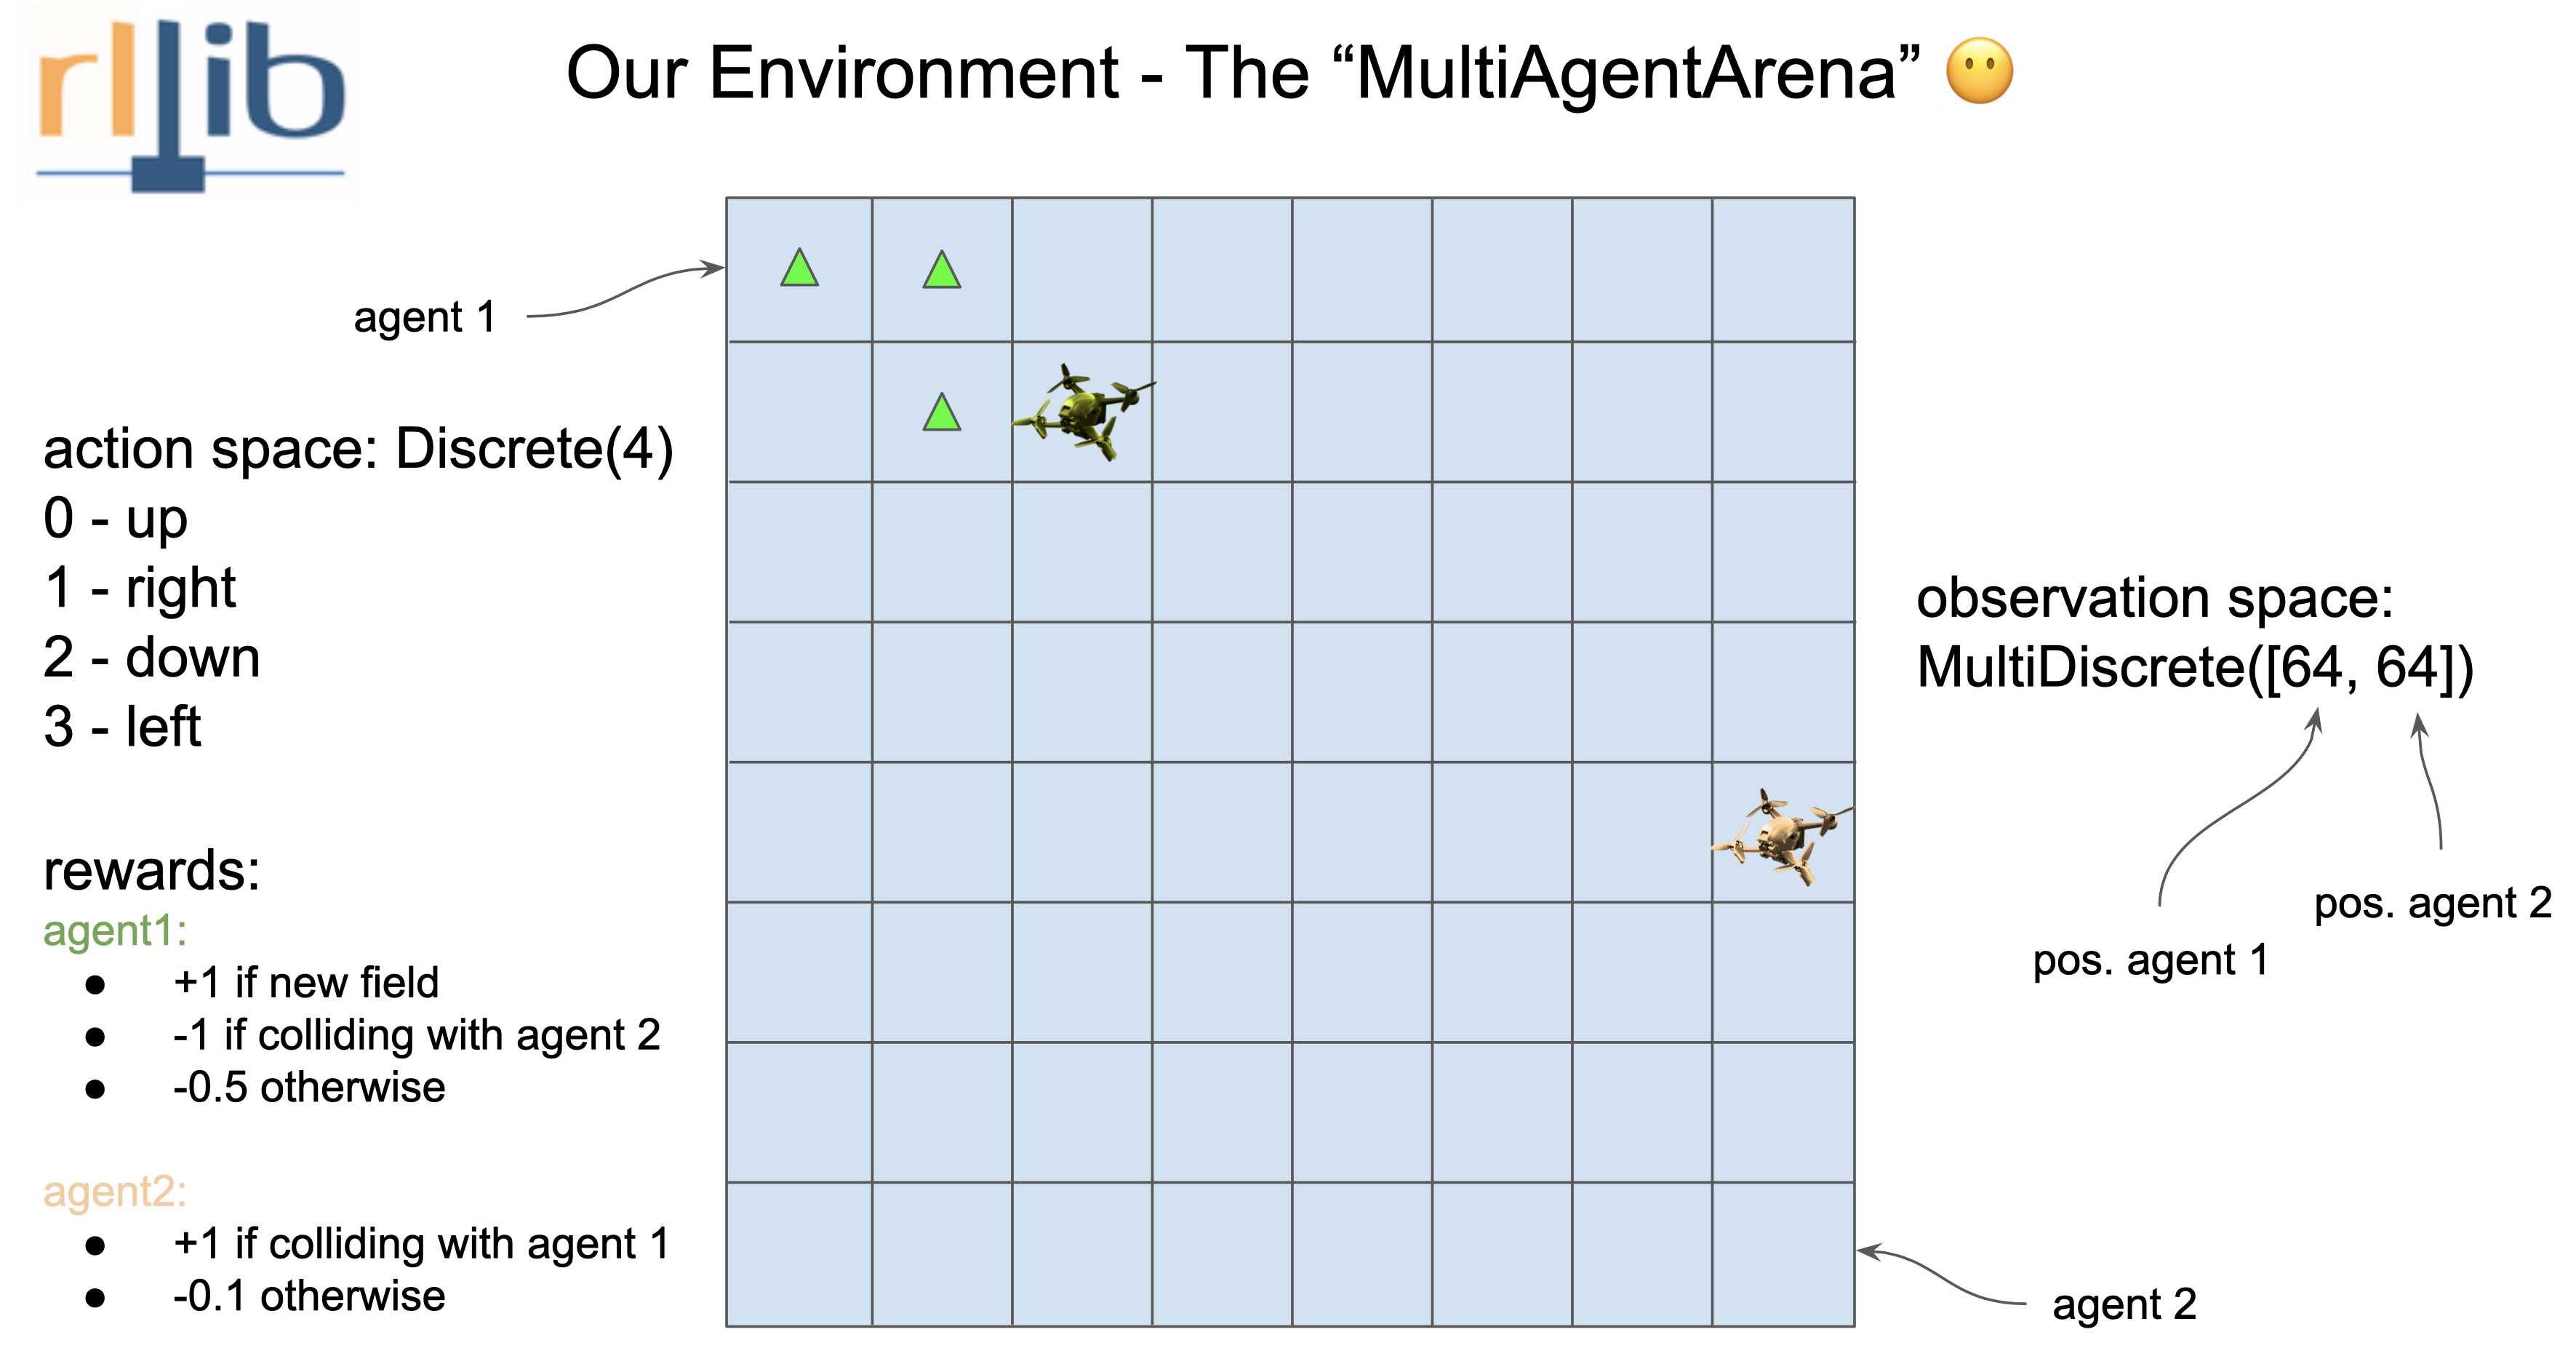
As a simple example we will build a Multiagent-Arena environment in UE5 an train it in ray using the unray-bridge framework.
Understanding the environment
As a Unray-bridge philosophy first we have to break down what the environment need. We have two agents that move in the same scenario, given by a 8x8 square grid. They can only move one no-diagonal square for each episode. (The reward system is defined in the image).
Hence we got:
- Agent 1 and 2 Observation: MultiDiscrete([64])
- Agent 1 and 2 Action: Discrete([4])
Defining the env_config as follows:
from unray.envs.spaces import BridgeSpaces
env_config  = {
        "agent-1":{
            "observation": BridgeSpaces.MultiDiscrete([64, 64]),
            "action": BridgeSpaces.Discrete(4),
            "can_show": 1,
            "can_see": 2,
            "obs_order": {
                "agent-1": [0],
                "agent-2": [0]
            }
        },
        "agent-2":{
            "observation": BridgeSpaces.MultiDiscrete([64, 64]),
            "action": BridgeSpaces.Discrete(4),
            "can_show": 1,
            "can_see": 2,
            "obs_order": {
                "agent-2": [0],
                "agent-1": [0]
            }
        }
    }
Configure the environment
    from unray.envs.base_env import MultiAgentEnv
    from unray.unray_config import UnrayConfig
    from ray.rllib.algorithms.ppo import PPOConfig

    ppo_config = PPOConfig()

    ppo_config = ppo_config.training(gamma=0.9, lr=0.01, kl_coeff=0.3)
    ppo_config = ppo_config.resources(num_gpus=0)
    ppo_config = ppo_config.rollouts(num_rollout_workers=0)
    unray_config = UnrayConfig()

    arena = MultiAgentEnv(env_config, "multiagents-arena")
    algo = unray_config.configure_algo(ppo_config, arena)
1 maintainer

Metadata
1 maintainer
Release files for unray 1.0.9
For a detailed explanation of source distributions (sdists) and built distributions (wheels), please see the package formats documentation.
Source distribution (sdist)
| File | Size | Uploaded | |
|---|---|---|---|
| unray-1.0.9.tar.gz | 14.8 kB | Details |
Built distribution (wheel)
| File | Interpreter | ABI | Platform | Reset |
|---|---|---|---|---|
| unray-1.0.9-py3-none-any.whl | Python 3 | none | any | Details |
Total release size: 28.6 kB
Release files / unray-1.0.9.tar.gz
| Download URL | unray-1.0.9.tar.gz |
|---|---|
| Size | 14.8 kB |
| Tags | Source |
|
SHA-256 checksum How to use checksums |
e1492205d808b04740f1f3e31f194d33f73b5d5b7463cb211db7a6db3f921b33
|
|
BLAKE2b-256 checksum How to use checksums |
49be305e0e5f4bcaac197e3d72f3d3b224fcb60237586a97474041397487fa9c
|
| Upload date | |
|
Uploaded using Trusted Publishing? What is trusted publishing? |
No |
| Uploaded via |
twine/5.1.1 CPython/3.10.14
|
Release files / unray-1.0.9-py3-none-any.whl
| Download URL | unray-1.0.9-py3-none-any.whl |
|---|---|
| Size | 13.8 kB |
| Tags | Python 3 |
|
SHA-256 checksum How to use checksums |
03c3964b01d94505750b1971c355afd07eef7e8e770193b60f072d5d595d8ffa
|
|
BLAKE2b-256 checksum How to use checksums |
77ff85555013eac16602a866b42dabb0d26dc7109a533794505ec559e23a4983
|
| Upload date | |
|
Uploaded using Trusted Publishing? What is trusted publishing? |
No |
| Uploaded via |
twine/5.1.1 CPython/3.10.14
|














