
A lightweight Python module for managing Unreal projects across space, time, and platforms.

Project description
Unreal Project Manager (UPM)
A lightweight Python module for managing Unreal projects across space, time, and platforms.
Intended for use by less-than-professional teams working with Git and VS Code.
Features
-
Platform-aware generation of VS Code tasks to build, launch, cook, and package your Unreal 5+ project without having to open the editor.
-
Projects can be set up for Windows, Mac, and Linux environments from a single config file with sane defaults.
-
Central management of project/package versioning and patch notes.
-
CLI for managing all build dependencies and tools.
-
UPM can self-copy itself into existing repositories so there's no need to mess with submodules.
Contents
Prerequisites
Quickstart
-
Download and install prerequisites.
-
Install UPM:
python3 -m pip install unreal-project-manager -
Use UPM to configure your project:
python3 -m upm config --dir [project-path] --project-name [project-name] -
Use UPM to install build tools.
-
For Windows, install Visual Studio Community with
python3 -m upm install-vs. This will prompt for privilege escalation. -
For MacOS, install XCode with
python3 -m upm install-xcode(STILL TESTING)
Additionally, if you don't have VS Code installed, you can do:
python3 -m upm install-vscode -
-
Navigate to your project directory and use UPM to perform project setup and generate project files:
python3 -m upm setup -
With your new .code-workspace file open in VS Code, use Ctrl+Shift+B to open the build menu and build your project.
To fully cook, build, and package a development version of your project, choose the Development Package option. This is required before launching the Development configuration for your game from the Run and Debug menu (Ctrl+Shift+D), as building and launching a Development target directly will result in shaders not being compiled.
To work on your project in the editor, first select the Select-A-Build option from the build menu, selecting the Development and Editor options when prompted.
-
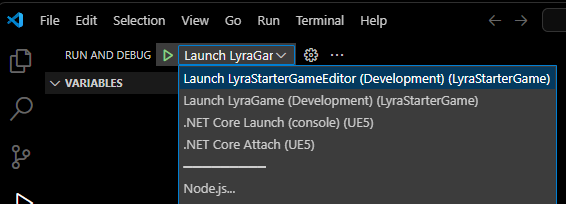
Once your chosen target is built, navigate to the Run and Debug menu (Ctrl+Shift+D), select the target to launch from the dropdown menu, and click Start Debugging (green arrow). If this is your first time launching the Editor for your project, be prepared for it to hang a while as it compiles shaders.
UPM Config
Adds scripts and configuration files to your project you'll probably want to keep under source control for use by collaborators.
Generate Configuration Files
NOTE: Here we're using Epic's Lyra Starter Game sample as an example project.
-
Install UPM:
python3 -m pip install unreal-project-manager -
Use UPM to copy configuration files into your project directory:
python3 -m upm config --gitignore --dir ../LyraStarterGameThis creates several items in your target directory:
-
config.upm: Contains UPM project configuration values
upm setupuses to generate UPM project files and VS Code tasks. -
Changelog.json: Used by
upm changelogto centralize patch notes (initialized with version 0.0.0-Alpha; modify this as you see fit). -
upm/: Directory containing UPM scripts used by generated VS Code tasks for build/cook/launch/package/deploy/change automation.
-
.gitignore: Default .gitignore file for use with Unreal 5+, C++, Python 3.10+, and UPM. Omit this argument if you already have a suitable .gitignore file in the target directory.
-
Configuration Options
If config.upm already exists in your project directory, UPM won't overwrite it. This allows you to keep a default config.upm under version control for your project. If you choose to do this but end up occasionally requiring a non-default config.upm, you can copy you custom config.upm into the .vscode directory of your project (which is ignored by the default .gitignore); upm setup will look here first for a config file.
To remove items created by upm config, do upm config --clean --dir your-project-dir/.
Do upm config -h to see options for modifying the default behavior of upm config, e.g. changing the default location of Unreal Engine or specifying a project name different from the project directory.
UPM Setup
Generates files required for project automation, including Python dependencies (installed to .venv by default), environment variables (.env by default), VS Code workspace configuration files, build/launch tasks, and Unreal project files. These are all excluded via the default .gitignore file added by upm config.
To set up your project with UPM:
-
Ensure you've configured it using
upm configas discussed in previous sections. -
Ensure build tools are installed for your platform, e.g. by doing
python3 -m upm install-vs. -
Navigate to your project directory and do:
python3 -m upm setup
The files and directories generated by upm setup are not intended to be placed under source control. When sharing your project for collaboration, you should include instructions for generating them with UPM.
You can remove UPM files generated by upm setup with upm setup --clean; this does not remove Unreal project files or the .code-workspace file.
Usage
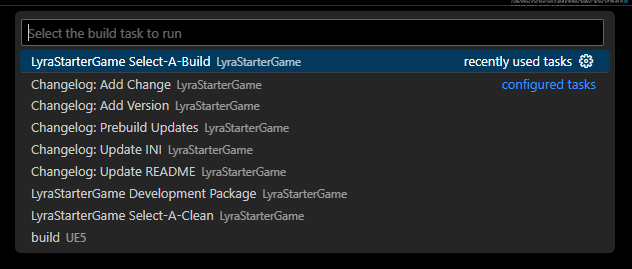
UPM adds several platform-specific tasks to .vscode/launch.json and .vscode/tasks.json, which are wrappers for the various upm build commands:
usage: upm build [-h] --project-dir PROJECT_DIR --build-type BUILD_TYPE --target-name TARGET_NAME [--clean] [--build] [--package]

options:
  -h, --help            show this help message and exit
  --project-dir PROJECT_DIR
                        Path to the project directory
  --build-type BUILD_TYPE
                        Type of build (debug, development, testing. release)
  --target-name TARGET_NAME
                        Name of target to build.
  --clean               Clean selected targets
  --build               Build selected targets
  --package             Package selected target for deployment
You can access the launch configurations from the Run and Debug menu (Ctrl+Shift+D) and the build tasks from the Build menu (Ctrl+Shift+B). You must build a target before launching it, i.e. use Select-A-Build from the Build menu before launching from the Run and Debug menu.
Collaboration Guide
Also Maybe Helpful
Installing Python
Windows
To initiate Python 3 installation on Windows, open Powershell and do:
python3
This opens the Microsoft Store and prompts you install Python 3.12.
Installing Unreal
Starting an Unreal Project


Download files
Download the file for your platform. If you're not sure which to choose, learn more about installing packages.
Source Distribution
Built Distribution
Filter files by name, interpreter, ABI, and platform.
If you're not sure about the file name format, learn more about wheel file names.
Copy a direct link to the current filters
File details
Details for the file unreal_project_manager-0.1.3.tar.gz.
File metadata
- Download URL: unreal_project_manager-0.1.3.tar.gz
- Upload date:
- Size: 17.4 kB
- Tags: Source
- Uploaded using Trusted Publishing? No
- Uploaded via: twine/5.1.1 CPython/3.12.5
File hashes
| Algorithm | Hash digest | |
|---|---|---|
| SHA256 |
3a5852dfcfd96ca8046c0b3da9f5dae033619df5b782354ac372b7fb52d8b0bb
|
|
| MD5 |
a722b151997f7f9ef7054733ecd6129e
|
|
| BLAKE2b-256 |
4a73956a0300e37b703c49d618654b2c5370285a7f7765c4a2d67ffe1e069541
|
File details
Details for the file unreal_project_manager-0.1.3-py3-none-any.whl.
File metadata
- Download URL: unreal_project_manager-0.1.3-py3-none-any.whl
- Upload date:
- Size: 21.5 kB
- Tags: Python 3
- Uploaded using Trusted Publishing? No
- Uploaded via: twine/5.1.1 CPython/3.12.5
File hashes
| Algorithm | Hash digest | |
|---|---|---|
| SHA256 |
1a26269dae79574c93d834ee1200f285f0750ff7776601b8c5c5bbea4987c091
|
|
| MD5 |
101362bb65317f13383356366ade7106
|
|
| BLAKE2b-256 |
c27d1fb18e91912b9bf687492f656169afc8b676dfd753fe2b431987701a13cd
|






