
Valens
/ˈva.lens/ [ˈväːlɛns] lat. strong, vigorous, healthy
Plan your training, follow it and see what it does to your body. A web app you host yourself, for you and anyone you share it with.
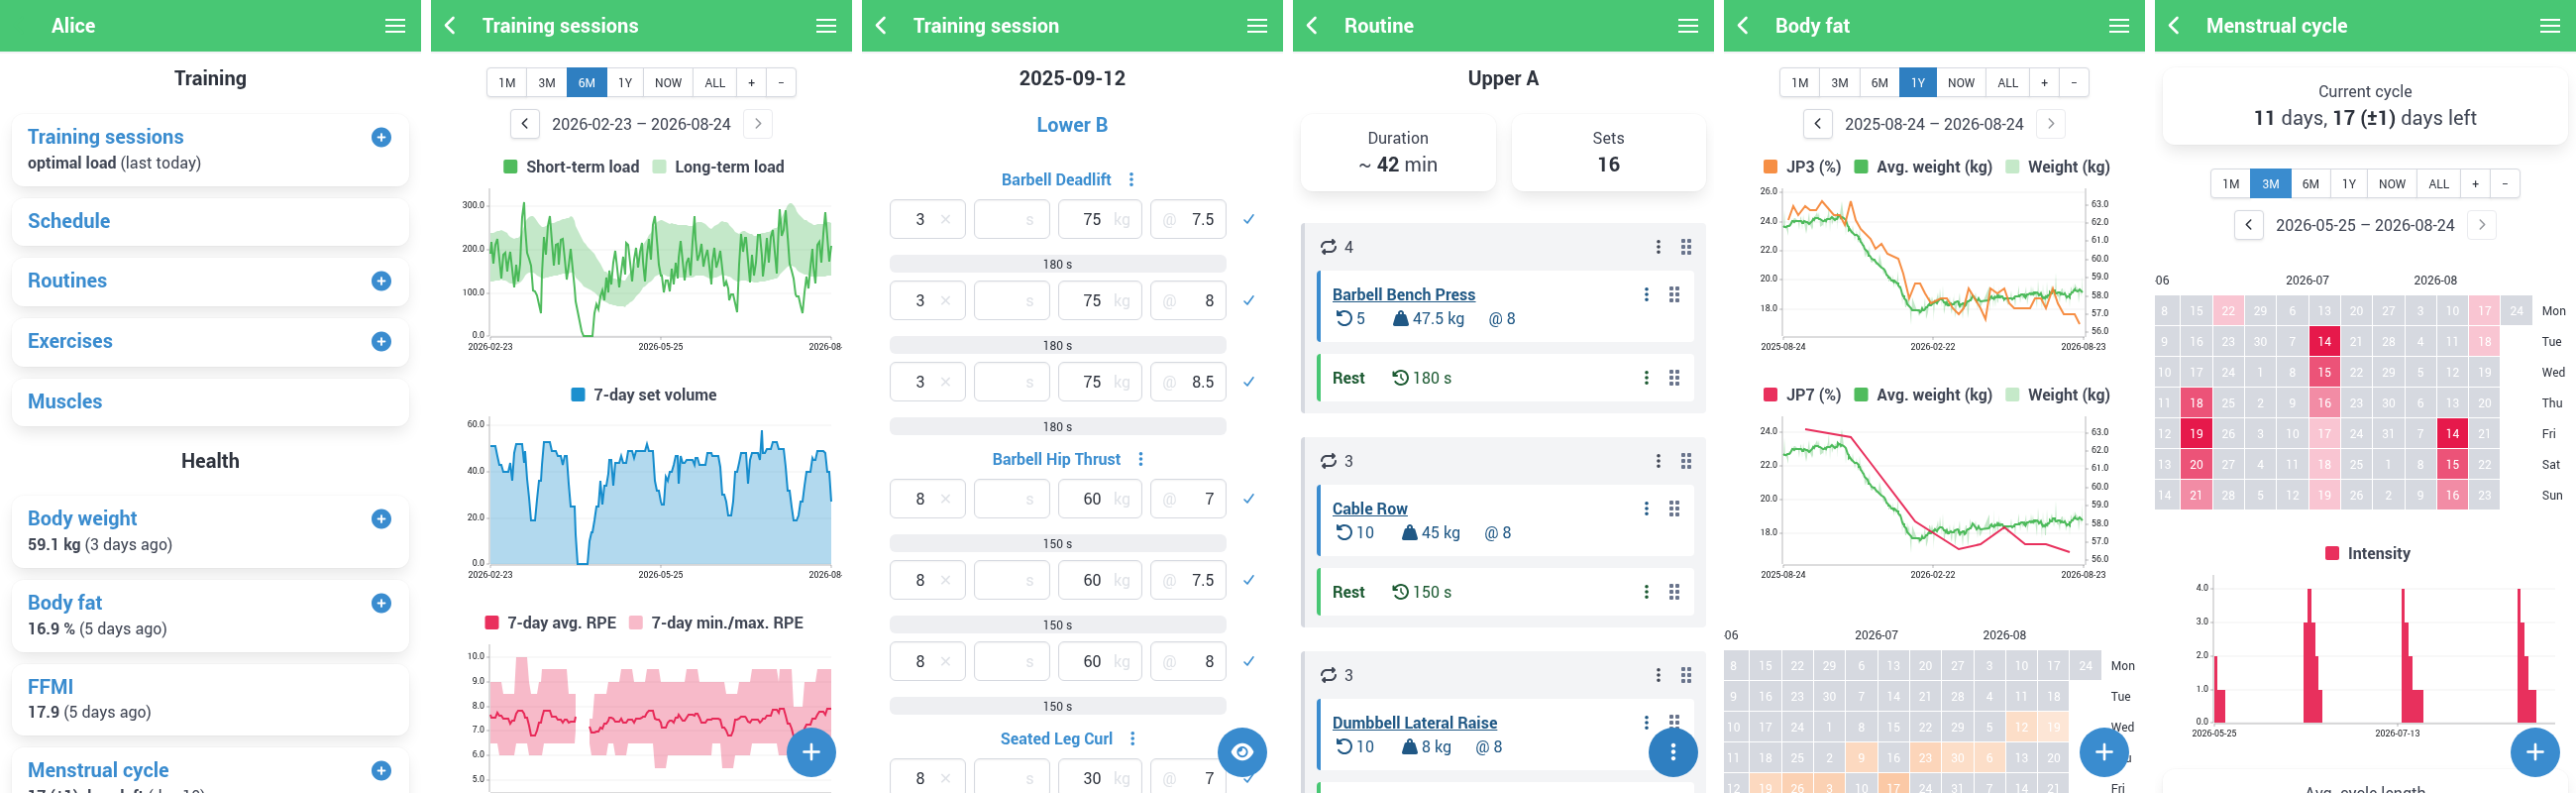
Features
- Define training routines
- Choose from more than 150 exercises or create your own
- Plan your training days
- Log repetitions, weight, time and rating of perceived exertion (RPE) for each set
- Measure your training execution using a stopwatch, timer or metronome
- Follow the current exercise and rest time in notifications
- Calculate a one-repetition maximum (1RM) or the weights of a drop set
- Assess the progress for each routine, exercise and muscle
- Keep track of your body weight
- Calculate and log your body fat based on the 3-site or 7-site caliper method
- Follow your fat-free mass index (FFMI)
- Monitor your menstrual cycle
- Choose a light or dark theme, following your system by default
- Install the app on your device and browse your data without a connection to the server
- Share the app with several users, each with their own data
- Protect accounts with passkeys, with one-time login links for recovery
Valens runs in current versions of Chromium-based browsers, Firefox and Safari.
Installation
Valens is available as a Python package and as a container image. The package uses the Python installation of the machine it runs on, the container brings everything with it.
Python Package
Valens requires Python 3.10 or newer. Install it into a virtual environment, as many distributions do not permit installing packages into the system Python. On Debian and Ubuntu, the python3-venv package is needed to create one.
python3 -m venv ~/.venvs/valens
source ~/.venvs/valens/bin/activate
The latest release can be installed from PyPI.
pip install valens
The latest development version can be installed from TestPyPI.
pip install --pre --index-url https://test.pypi.org/simple/ --extra-index-url https://pypi.org/simple/ valens
Activate the environment in every shell session that runs valens, or call the commands by their path, ~/.venvs/valens/bin/valens.
Container
The latest release is available as a container image on the GitHub Container Registry as ghcr.io/treiher/valens:latest. The latest development version is available under the dev tag as ghcr.io/treiher/valens:dev. The image is downloaded automatically when the container is started for the first time.
Running
Python Package
Demo mode runs without any setup. Regular use requires a config file, a user and a server.
Demo Mode
To get a first impression of Valens, the app can be run in demo mode.
valens demo
The app can be accessed on http://localhost:5000/. The names of the example users to sign in with are printed on startup. A temporary database with generated example data is used, containing training logs that cover every page of the app. All changes are non-persistent. Adding --public to the command line makes the app available to other devices on the network. It should only be used on a network you trust. A different port can be selected with --port.
Setup
A config file must be created before running the app for the first time.
valens config
By default, the config file is created in the current directory and the database at ~/.local/share/valens/valens.db. A different directory for the config file can be selected with -d, a different path for the database with --database. The database file is created automatically when the app or a CLI command accesses it for the first time. The preset PUBLIC_URL must be changed if the app is reachable under a different URL, as described under Public URL.
The environment variable VALENS_CONFIG must be set to the absolute path of the config file. All following commands expect it to be set, in every shell session and in the definition of a service running the app.
export VALENS_CONFIG=$PWD/config.py
A user must be created before signing in for the first time. Users sign in by entering their name, unless username login is disabled. Only users with the admin role are able to manage users in the app.
valens user create <name> <female|male> --role admin
The biological sex is used for the body fat calculation, the optional body height (--height) for the FFMI.
Users can also be listed, updated and deleted on the command line. See valens user --help for all available commands.
Local Use (Development Server)
The development server can be used to provide the app for the local computer or local network.
valens run
By default, the app is only accessible on the local computer at http://localhost:5000/. Adding --public to the command line makes the app available to other devices on the network:
valens run --public
It should only be used on a network you trust. A different port can be selected with --port.
The development server serves plain HTTP only, so the app is subject to the limitations described under Plain HTTP. It is not intended for use in a public network. See Deployment for providing the app there.
Container
The container image uses Gunicorn and listens on port 8000. A volume mounted at /app provides persistent storage for the database and configuration.
Docker / Podman
mkdir -p ~/valens
podman run -d --name valens -p 8000:8000 -v ~/valens:/app:Z,U ghcr.io/treiher/valens:latest
The app can be accessed on http://localhost:8000/. The database and the config file are stored in ~/valens.
The Z option of the volume relabels the directory for SELinux and can be omitted on systems without it. The U option adjusts the ownership of the directory to the user running the app in the container. When using Docker, replace podman with docker, omit :Z,U and make the directory writable for uid 1000.
A container created this way is not started again after a reboot. See Systemd (Quadlet) for starting it automatically. Continue with First Start.
Systemd (Quadlet)
The container can be managed as a systemd service using Podman Quadlet.
/etc/containers/systemd/valens.container
[Unit]
Description=Valens

[Container]
ContainerName=valens
Image=ghcr.io/treiher/valens:latest
PublishPort=8000:8000
Volume=/var/lib/valens:/app:Z,U
NoNewPrivileges=true
DropCapability=ALL

[Service]
Restart=on-failure

[Install]
WantedBy=multi-user.target
The app runs as an unprivileged user in the container and needs no capabilities. The volume options are described under Docker / Podman.
mkdir -p /var/lib/valens
systemctl daemon-reload
systemctl enable --now valens
First Start
A config file is created in the volume when the container is started for the first time. Its PUBLIC_URL must be changed as described under Public URL. For local use, this is the address of the published port.
PUBLIC_URL = 'http://localhost:8000'
The container must be restarted afterwards.
podman restart valens
When the container is managed by Quadlet, use systemctl restart valens instead.
A user must be created before signing in for the first time. Users sign in by entering their name, unless username login is disabled. Only users with the admin role are able to manage users in the app.
podman exec valens valens user create <name> <female|male> --role admin
All other CLI commands are run in the container in the same way, for example podman exec valens valens user login-link <name>. A container managed by systemd requires root privileges for these commands.
See Deployment for providing the app in a public network.
Gunicorn Settings
Gunicorn can be configured with the following environment variables:
GUNICORN_WORKERS: Number of worker processes (default:2)GUNICORN_THREADS: Number of threads per worker process (default:1)GUNICORN_TIMEOUT: Time in seconds after which an unresponsive worker process is restarted (default:120)
Configuration
Valens is configured by a Python file. It is read when the server starts, so the server must be restarted after a change.
Public URL
PUBLIC_URL must be set to the URL under which the app is reachable by its users (e.g. https://valens.example.com), otherwise passkeys and one-time login links do not work. Passkeys additionally require HTTPS, unless the app is accessed via localhost. Behind a reverse proxy, it is the URL of the proxy, not the address of the server behind it.
The config file presets PUBLIC_URL to http://localhost:5000, which matches the port of the development server. As the container listens on port 8000, the preset must be adapted for it even if the app is only used locally.
With PUBLIC_URL set and the app served over HTTPS or accessed via localhost, users add a passkey to their account under Profile in the menu.
Additional Settings
PERMANENT_SESSION_LIFETIME: How long a user stays signed in, counted from the sign-in and not from the last request, so an active user is signed out at the deadline as well (default:timedelta(weeks=52)).USERNAME_LOGIN_ENABLED: Whether signing in by entering a username without any credential is possible (default:True). If set toFalse, users sign in with a passkey andPUBLIC_URLmust be set. The initial sign-in and the recovery of an account without a passkey is done via a one-time login link created by an admin in the app or withvalens user login-link <name>on the command line.
Database
The database file holds the data of all users and is the only file that needs to be backed up to preserve them. It is located at ~/.local/share/valens/valens.db by default, or in the mounted volume when using the container. Copy the file while the server is stopped, or use sqlite3 valens.db ".backup backup.db" for a consistent copy of a database in use. In a rootless container, the files belong to a subordinate user ID and are reached with podman unshare.
The config file holds the secret key that signs the session cookies. Losing it signs out all users, but no data is lost.
Deployment
A production-grade server should be used for providing the app in a public network. See the deployment options for the alternatives. The Python package requires a config file and a user as described under Setup, created as shown below. PUBLIC_URL must be set as described under Public URL.
Serving the app over HTTPS is recommended. It is required for passkeys and for installing the app on a device, as described under Plain HTTP. The examples below show only the parts specific to Valens. TLS is configured in the surrounding server block.
Python Package
One option for an installation of the Python package is using NGINX and uWSGI. The package must be importable by uWSGI, which is achieved by installing it into a dedicated virtual environment.
python3 -m venv /opt/valens/venv
/opt/valens/venv/bin/pip install valens
The service user needs to read the config file and write the database. Both must be located outside the web root, as files below it are served directly.
mkdir -p /var/lib/valens
chown http:http /var/lib/valens
/opt/valens/venv/bin/valens config -d /var/lib/valens --database /var/lib/valens/valens.db
chown root:http /var/lib/valens/config.py
chmod 640 /var/lib/valens/config.py
This replaces the valens config command of the Setup. The other CLI commands must be run as the service user, so that the files they create stay accessible to it.
sudo -u http env VALENS_CONFIG=/var/lib/valens/config.py /opt/valens/venv/bin/valens user create <name> <female|male> --role admin
/etc/uwsgi/valens.ini
[uwsgi]
master = true
plugins = python
socket = /run/uwsgi/%n.sock
manage-script-name = true
mount = /=valens:app
uid = http
gid = http
virtualenv = /opt/valens/venv
env = VALENS_CONFIG=/var/lib/valens/config.py
/etc/nginx/nginx.conf
[...]

http {

    [...]

    server {

        [...]

        gzip on;
        gzip_types text/plain text/css text/javascript application/json application/wasm;

        location / { try_files $uri @valens; }
        location @valens {
            include uwsgi_params;
            uwsgi_pass unix:/run/uwsgi/valens.sock;
        }

    }

}
Container
A reverse proxy such as NGINX can be used to expose the container in a public network.
/etc/nginx/nginx.conf
[...]

http {

    [...]

    server {

        [...]

        gzip on;
        gzip_types text/plain text/css text/javascript application/json application/wasm;

        location / {
            proxy_pass http://127.0.0.1:8000;
        }

    }

}
NGINX Compression
Compression is disabled in NGINX by default and is enabled by the gzip directives in the examples above. With compression enabled, the amount of data transferred can be significantly reduced, resulting in a reduction in transfer time, especially on slow networks. Brotli offers better compression ratios than gzip and is supported as an optional NGINX module.
Upgrading
The database schema is upgraded automatically when the app is used for the first time after an update. A copy of the database is created next to it beforehand, named after the revision it is upgraded from and the time of the upgrade. The schema can also be upgraded explicitly, so that the upgrade does not happen during the first use of the app.
Python Package
Install the new version in the activated virtual environment and restart the server.
pip install --upgrade valens
The schema is upgraded explicitly with valens upgrade.
For a deployment as described under Deployment, use the pip and valens commands of its virtual environment and run the latter as the service user.
Container
Pull the new image, remove the container and create it again with the command that was used before.
podman pull ghcr.io/treiher/valens:latest
podman stop valens
podman rm valens
podman run -d --name valens -p 8000:8000 -v ~/valens:/app:Z,U ghcr.io/treiher/valens:latest
When the container is managed by Quadlet, restarting the service recreates it.
systemctl restart valens
The schema is upgraded explicitly with podman exec valens valens upgrade.
Limitations
Offline Use
Recording data requires a connection to the server. Every change is sent there first, and a change made while it is unreachable is reported as an error instead of being stored for later.
Plain HTTP
Browsers withhold a number of features from pages that are not served over HTTPS. Valens is usable over plain HTTP, but the following are not:
- Installing the app on the device and starting it without a connection, which need a service worker
- Signing in with a passkey, unless the app is accessed via
localhost - Notifications outside the app, which are shown by the service worker
- Copying a routine or a login link to the clipboard
- Keeping the screen on while a timer is running
Serving the app over HTTPS enables all of them.
Background Use
The beeps of the timer and the metronome are produced in the browser, and notifications are triggered by the app while it runs. With the screen turned off or Valens in the background, they can be late, distorted or absent, depending on how aggressively the browser suspends a page that is not visible.
Documentation
License
This project is licensed under the terms of the AGPL-3.0 license and includes third-party software.
1 maintainer

Metadata
1 maintainer
Release files for valens 0.8.0
For a detailed explanation of source distributions (sdists) and built distributions (wheels), please see the package formats documentation.
Source distribution (sdist)
| File | Size | Uploaded | |
|---|---|---|---|
| valens-0.8.0.tar.gz | 1.9 MB | Details |
Built distribution (wheel)
| File | Interpreter | ABI | Platform | Reset |
|---|---|---|---|---|
| valens-0.8.0-py3-none-any.whl | Python 3 | none | any | Details |
Total release size: 3.7 MB
Release files / valens-0.8.0.tar.gz
| Download URL | valens-0.8.0.tar.gz |
|---|---|
| Size | 1.9 MB |
| Tags | Source |
|
SHA-256 checksum How to use checksums |
f2cbc6a1916f06d7a7d9d38338185fb77113c7ab57695025ba1ebdbf53bb9a29
|
|
BLAKE2b-256 checksum How to use checksums |
e1c0396f1c75dff1eb4c5458a3d9f3e46ff99e82ed0ad0298d683c10371067cf
|
| Upload date | |
|
Uploaded using Trusted Publishing? What is trusted publishing? |
Yes |
| Uploaded via |
twine/7.0.0 CPython/3.13.14
|
Provenance
Provenance describes where a file came from. On PyPI, provenance is shared via attestations, which provide a verifiable record of the build or publishing details. View details, limitations and caveats.


PyPI Publish Attestation
PyPI verified that this artifact, at this checksum, originated from the publisher listed below.
Signed by GitHub Actions, verified by PyPI on Aug 24, 2026.
Transparency logRelease files / valens-0.8.0-py3-none-any.whl
| Download URL | valens-0.8.0-py3-none-any.whl |
|---|---|
| Size | 1.9 MB |
| Tags | Python 3 |
|
SHA-256 checksum How to use checksums |
53f39d6df78a62963e7a8f70ce687df492a14d4e697431fd0c22cd76badf76e0
|
|
BLAKE2b-256 checksum How to use checksums |
3181c9563ddf1079eccc338c17dd7304e89b6d0efacc5a2e3f81b701a4d46322
|
| Upload date | |
|
Uploaded using Trusted Publishing? What is trusted publishing? |
Yes |
| Uploaded via |
twine/7.0.0 CPython/3.13.14
|
Provenance
Provenance describes where a file came from. On PyPI, provenance is shared via attestations, which provide a verifiable record of the build or publishing details. View details, limitations and caveats.
PyPI Publish Attestation
PyPI verified that this artifact, at this checksum, originated from the publisher listed below.
Signed by GitHub Actions, verified by PyPI on Aug 24, 2026.
Transparency log













