
Control your PC mouse using hand gestures via webcam

Project description
Virtual Input Suite (Launcher + Virtual Mouse + Multi‑Hand Keyboard)
A modern set of Python tools to control your PC with hand gestures using your webcam:
- Launcher.py — GUI launcher to start one tool at a time
- virtual_mouse.py — Virtual Mouse (OpenCV + MediaPipe + PyAutoGUI)
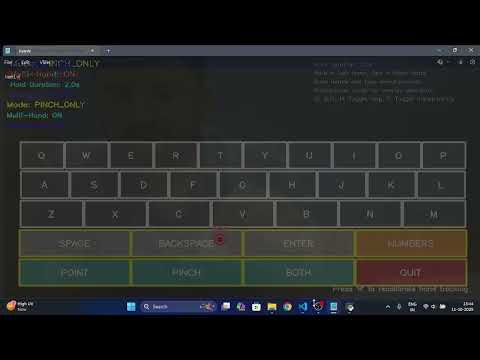
- multi_hand_overlay_keyboard.py — Multi-Hand Overlay Keyboard (OpenCV + MediaPipe + pynput + Tk controls)
This document covers setup, running, controls/usage, packaging into a Windows .exe, and how to add screenshots and a YouTube demo.
1) Project Structure
Keep all three scripts in the same folder:
``` gesture-Control/ ├─ scripts/ │ ├─ Launcher.py │ ├─ virtual_mouse.py │ ├─ multi_hand_overlay_keyboard.py │ └─ (optional) other helpers… ├─ README.md └─ images/ └─ (place your screenshots here) ```
- The launcher expects the other two .py files to be in the same folder for simplest usage.
- If you move things, update your launcher accordingly.
2) Requirements
- Windows 10 or 11
- Python 3.8–3.10 recommended (best compatibility for MediaPipe/OpenCV)
- A working webcam and camera permission enabled
- Dependencies (install inside a virtual environment):
- mediapipe
- opencv-python
- numpy
- customtkinter
- pyautogui (Virtual Mouse)
- pynput (Keyboard typing)
Create a clean virtual environment and install:
``` py -m venv .venv .venv\Scripts\activate python -m pip install --upgrade pip setuptools wheel python -m pip install mediapipe opencv-python numpy customtkinter pyautogui pynput ```
Tip: If a package isn’t used, it won’t hurt to keep it installed during development.
3) Running (Development)
From the folder containing the scripts:
-
Run the Launcher (recommended): ``` .venv\Scripts\activate cd scripts python Launcher.py ```
-
Run the tools directly (for debugging): ``` python virtual_mouse.py
python multi_hand_overlay_keyboard.py.py ```
If you need console logs for errors, run the tools directly as shown above.
4) Using the Apps (Controls)
4.1 Virtual Mouse (virtual_mouse.py)
Detected gestures and behavior:
- Index finger pointing: Move cursor
- Thumb + Index pinch: Left click
- Quick pinch = single click
- Hold pinch longer = start drag/select (mouseDown); release ends drag (mouseUp)
- Thumb + Middle pinch: Right click
- Thumb + Pinky pinch: Double click
- Index + Middle finger up: Scroll mode (move finger up/down to scroll)
- Fist: Stop actions (resets states)
- Quit: Press q in the camera window
Visuals:
- On-screen text shows current gesture and distances (debug)
- A green/blue/red text overlay indicates gesture types
- “HAND DETECTED” indicator appears when a hand is in view
Notes:
- Cursor movement uses smoothing and dead zone to reduce jitter
- If drag mode starts, it’s released when gesture stops or you press q
4.2 Multi-Hand Overlay Keyboard (multi_hand_overlay_keyboard.py)
Features:
- Tracks both hands (left/right) with separate colors (Blue = Left, Red = Right)
- POINT gesture: Hold over a key to select (default 2.0 seconds)
- PINCH gesture: Instant selection of the key under your finger
- Adjustable input mode: POINT only, PINCH only, or BOTH
- Multi-hand typing: Optional simultaneous typing from both hands
- Control window (Tk) for settings with live toggles
Controls (hotkeys in the camera/overlay window):
- Q: Quit
- H: Toggle help text
- K: Toggle keyboard visibility
- T: Toggle transparency
- R: Recalibrate hand tracking
- B: Toggle background (transparent overlay) mode
- C: Toggle camera display on/off
- M: Toggle multi-hand mode
- D: Toggle debug mode
Control window settings:
- Multi-hand enable, simultaneous typing, hand priority (left/right/both)
- Input mode: point only, pinch only, both
- Display settings: camera on/off, transparency, keyboard size, window alpha
- Layout switch keys on overlay keyboard: NUMBERS / LETTERS
- Special keys: SPACE, BACKSPACE, ENTER, QUIT
Tip:
- If a hand disappears briefly, the overlay keeps a faded indicator; selections reset if not confirmed within a few seconds.
5) Packaging to Windows EXE
Recommended: one-dir build (no code changes, simplest path)
- Produces a folder (dist/VirtualInputAll) with the exe and all needed files together so the launcher can find the other two scripts by name.
Run from the project root (adjust path if needed):
``` .venv\Scripts\activate python -m pip install pyinstaller pyinstaller --onedir --noconsole --name VirtualInputAll ^ --collect-all mediapipe --collect-all cv2 --collect-all customtkinter ^ --add-data "scripts\virtual_mouse.py;." ^ --add-data "scripts\multi_hand_overlay_keyboard.py;." ^ scripts\Launcher.py ```
Where to find and how to run:
- Open:
dist\VirtualInputAll\VirtualInputAll.exe - Distribute the entire
dist\VirtualInputAll\folder (don’t just send the .exe)
Notes:
- Remove
--noconsoleif you want a console window for debugging. --collect-all mediapipe,cv2, andcustomtkinterensures their binaries/resources are included.--add-data "…;."copies your mouse/keyboard scripts next to the exe within the output folder, so your unchanged launcher can run them by filename.
Optional: one-file build (advanced)
-
Packs everything into a single exe, but your unchanged code may not find the two scripts because PyInstaller extracts to a temp folder at runtime.
-
Command (if you still want to try): ```
-
pyinstaller ^ --onefile ^ --collect-all mediapipe ^ --collect-all cv2 ^ virtual_mouse.py
-
pyinstaller ^ --onefile ^ --collect-all mediapipe ^ --collect-all cv2 ^ --collect-all customtkinter ^ --hidden-import mediapipe.python.solutions.hands ^ --hidden-import mediapipe.python.solutions.drawing_utils ^ multi_hand_overlay_keyboard.py
-
Copy two file in main Folder of your project and then
-
pyinstaller ^ --onefile ^ --collect-all customtkinter ^ --add-data "dist/virtual_mouse.exe;." ^ --add-data "dist/multi_hand_overlay_keyboard.exe;." ^ l.py ```
-
Caveat: Supporting true “one-file” typically requires a small code change or a PyInstaller runtime hook to resolve paths via
sys._MEIPASS. If you want this, I can provide a hook without changing your main logic.
6) Troubleshooting
- ERROR: Script file 'scripts/launcher_combined.py' does not exist.
- Use your actual launcher path:
scripts\Launcher.py
- Use your actual launcher path:
- “More?” shows in terminal:
- That’s a Windows shell continuation prompt. Prefer single-line commands, or ensure the caret (^) is the last character on the line.
- Missing DLLs / OpenCV / MediaPipe issues:
- Use a clean venv with Python 3.8–3.10.
- Ensure you used
--collect-all mediapipe --collect-all cv2. - Antivirus can block fresh .exe files; add an exception or sign builds.
- Module not found (customtkinter, pyautogui, pynput):
- Install them in the same venv you’re building with.
- If PyInstaller misses them, add hidden imports:
--hidden-import pyautogui,--hidden-import pynput
- Camera not opening:
- Close other apps using the webcam and check Windows privacy permissions for Camera.
7) Performance & Tips
- Lighting: Good lighting improves detection reliability and reduces jitter.
- Distance thresholds: If clicks are too sensitive, increase the pinch threshold in the mouse script or slow selection duration in the keyboard control window.
- Frame size: Reducing camera resolution can improve FPS on slower machines.
- Transparency/always-on-top: The keyboard overlay supports transparent modes and topmost windows (Windows only via ctypes).
8) Add Screenshots and a YouTube Demo
Add images:
```

Add a YouTube link with a clickable thumbnail:
```
9) Quick Start (Checklist)
- Put these three files in the same folder:
scripts\Launcher.pyscripts\virtual_mouse.pyscripts\multi_hand_virtual_keyboard.py.py
- Create venv, install deps (mediapipe, opencv-python, numpy, customtkinter, pyautogui, pynput).
- Run for development: ``` .venv\Scripts\activate python scripts\Launcher.py ```
- Build Windows app (recommended one-dir): ``` pyinstaller --onedir --noconsole --name VirtualInputAll ^ --collect-all mediapipe --collect-all cv2 --collect-all customtkinter ^ --add-data "scripts\calculate-distance-sADZP.py;." ^ --add-data "scripts\multi-hand-overlay-keyboard-3jZFq.py;." ^ scripts\Launcher.py ```
- Open
dist\VirtualInputAll\VirtualInputAll.exeand enjoy.
10) License / Credits
- Uses MediaPipe, OpenCV, pynput, and PyAutoGUI (see their licenses).
- For questions or improvements, open an issue or ask for help with a one-file build hook if you need a single exe.
Release history Release notifications | RSS feed

Download files
Download the file for your platform. If you're not sure which to choose, learn more about installing packages.
Source Distribution
Built Distribution
Filter files by name, interpreter, ABI, and platform.
If you're not sure about the file name format, learn more about wheel file names.
Copy a direct link to the current filters
File details
Details for the file virtual_mouse_yax_hackberry-0.1.0.tar.gz.
File metadata
- Download URL: virtual_mouse_yax_hackberry-0.1.0.tar.gz
- Upload date:
- Size: 5.2 kB
- Tags: Source
- Uploaded using Trusted Publishing? No
- Uploaded via: twine/6.1.0 CPython/3.8.0
File hashes
| Algorithm | Hash digest | |
|---|---|---|
| SHA256 |
7a856b0beb67c3c5b1b435c645a9510749dae900b0eaa01b1efd965622435fe8
|
|
| MD5 |
1dadd31039bf581f0cd4deaab2cc38a2
|
|
| BLAKE2b-256 |
85cab58419401bbe3e04e494e06e3590d05042d88245eb7701913894c495d282
|
File details
Details for the file virtual_mouse_yax_hackberry-0.1.0-py3-none-any.whl.
File metadata
- Download URL: virtual_mouse_yax_hackberry-0.1.0-py3-none-any.whl
- Upload date:
- Size: 5.1 kB
- Tags: Python 3
- Uploaded using Trusted Publishing? No
- Uploaded via: twine/6.1.0 CPython/3.8.0
File hashes
| Algorithm | Hash digest | |
|---|---|---|
| SHA256 |
7c4fc1fe344df5f52a6ad2b80e3f7a04149d610a874d9668abb736259d64eae7
|
|
| MD5 |
ba5ced00ca0dcfaf8535243597345039
|
|
| BLAKE2b-256 |
892394da0c98ce562da51b825cc09a0cf2bf6606131cf456cda55ca4dc666a02
|






