
VisionForge


Train, compare and defend computer-vision models on your own GPU. Five task families, one interface, no cloud and no notebooks.
🇧🇷 Este README também está em português — role até a versão em português.
Install
You need Python 3.13+ and about five minutes. Nothing else — the published package already carries the built interface.
mkdir my-research && cd my-research
python -m venv .venv
.venv\Scripts\activate
On Linux or macOS the last line is source .venv/bin/activate instead.
pip install visionforge-studio
Now let VisionForge look at your machine and install the matching PyTorch build
— it reads your GPU driver, names the wheel you need, and installs it after you
answer y:
visionforge doctor --fix
That is the whole install. Start the interface:
visionforge gui
It opens on http://127.0.0.1:8000. The first screen asks your name and offers a short guided tour of the interface.
Why PyTorch is installed separately
Its build has to match your hardware, and no dependency resolver can choose
between the CPU and CUDA wheels for you. doctor makes that choice from what
it actually finds on the machine. To pick by hand, install the extra directly:
pip install "visionforge-studio[cu128]"
Available: cu118 · cu121 · cu124 · cu126 · cu128 · cpu. cu128 is
the broadest — it spans Turing (sm_75) through Blackwell, and is the only one
that runs on an RTX 50-series card at all.
On PyPI the distribution is visionforge-studio — the bare visionforge
name belongs to an unrelated project. The import name, the CLI command and the
project itself are still visionforge.
What comes with it
Everything the five tasks need is in that one install — the YOLO and RT-DETR
detection backends, the extra timm backbones, Optuna-guided sweeps,
TensorBoard scalars, and the Roboflow / Kaggle / Hugging Face dataset
downloaders. They used to be optional extras; the split cost more than it
saved, and they add about 83 MB against the gigabytes PyTorch already pulls.
The only thing chosen separately is PyTorch itself, because its build has to match your hardware.
First run
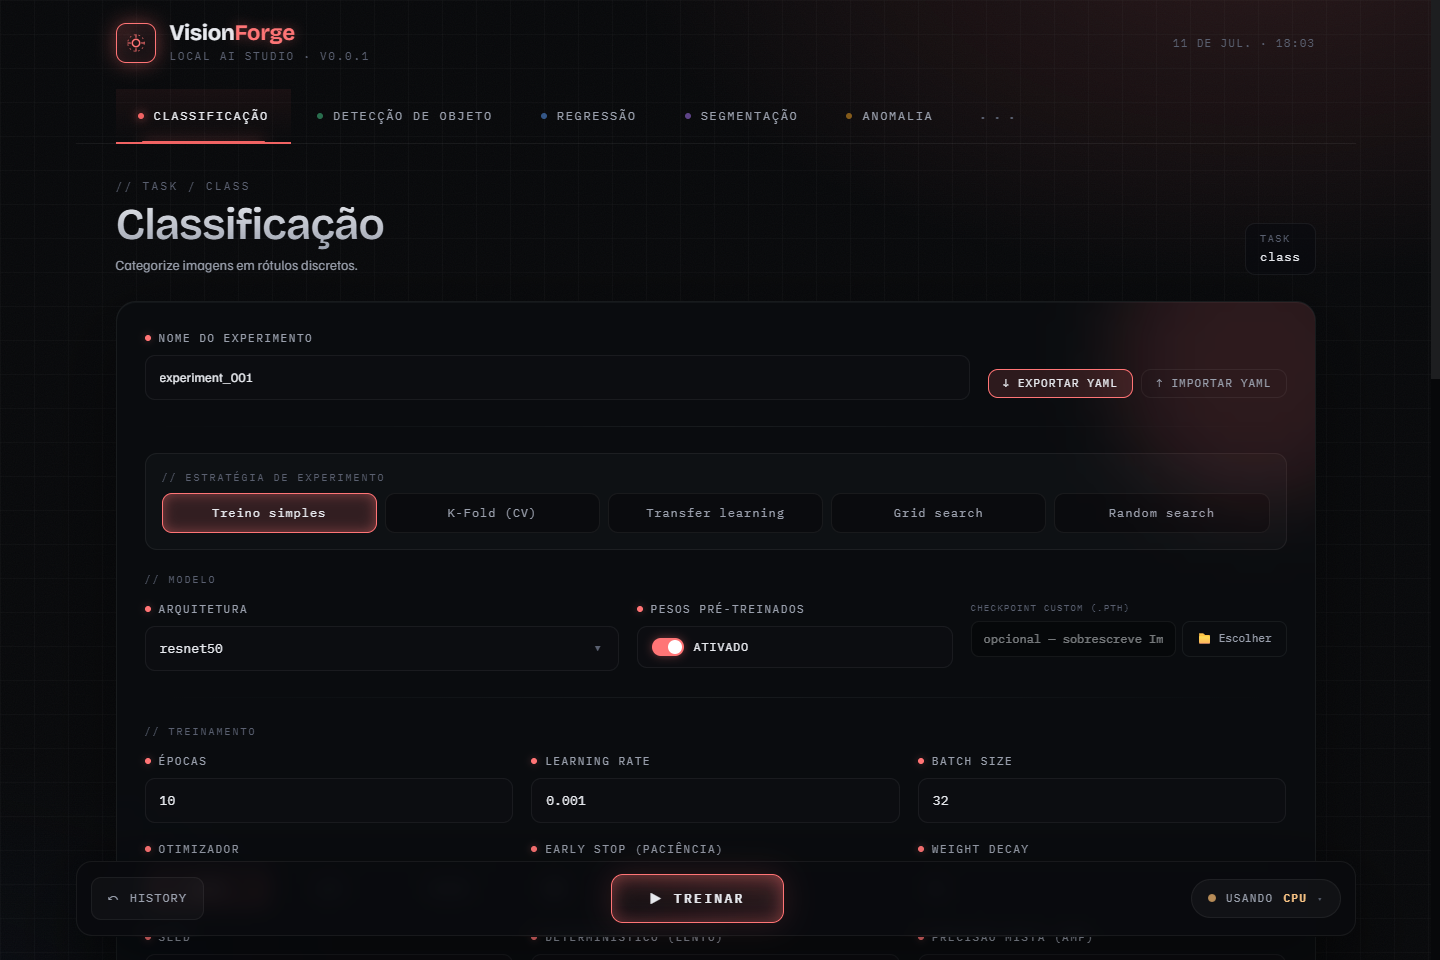
Point the dataset picker at a folder, pick a task tab, press Treinar. If you have no dataset yet, the ⤓ datasets button downloads one (CIFAR-10, for example) already in the layout the task expects.
The step-by-step walkthrough — dataset download, first run, confidence
intervals, re-running from YAML — is in
docs/QUICKSTART.md.
For automation, the CLI runs the same configs the GUI exports:
visionforge run configs/baseline.yaml
The five tasks
| Task | Models | Main metrics |
|---|---|---|
| Classification | ResNet, EfficientNet, ViT, Swin, ConvNeXt, VGG, AlexNet, timm | Accuracy, F1, AUC-ROC, confusion matrix |
| Object detection | YOLOv8–v26, RT-DETR, Faster R-CNN, SSD, RetinaNet | mAP@50, mAP@50-95 |
| Image regression | CNN backbones + linear head (CSV manifests) | MSE, RMSE, MAE, R² |
| Semantic segmentation | DeepLabV3, FCN, LR-ASPP, U-Net | mean IoU, Dice, pixel accuracy |
| Anomaly detection | Convolutional autoencoder, PatchCore | image AUROC, F1, threshold |
Every panel has the same shape: experiment name, strategy, model, training, dataset, preprocessing. Learning what one task looks like teaches you all five.
Need something else? You can add your own models and whole task families without touching the package.
Results you can defend
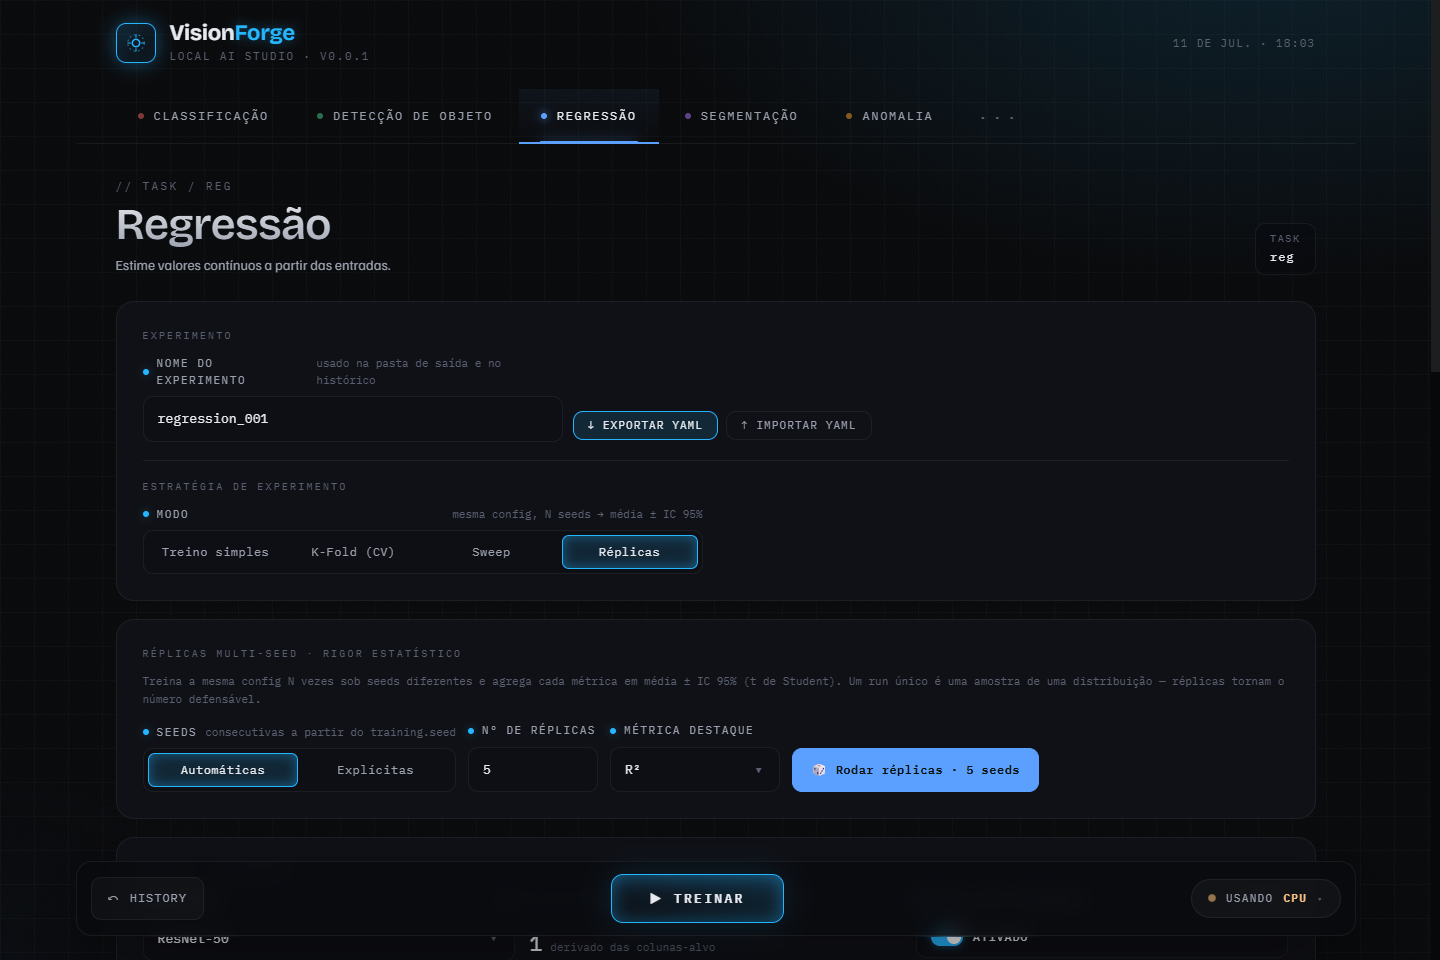
- Replicates — the same config over N seeds, reported as
mean ± 95% CIinstead of one lucky number. - K-fold cross-validation — per-fold metrics plus mean ± std, with fold-safe transforms.
- Sweeps — grid, random or Optuna over any config field.
- Paired significance tests — compare configurations over the same seeds,
with bootstrap CIs, a paired t or Wilcoxon test, Cohen's
d_zand Holm-Bonferroni correction. It refuses to compare runs whose seeds do not line up, and says when the seed count makes significance unreachable — so "not significant" is never mistaken for "no effect". - Full provenance — every run writes a
run.jsonwith the config, the seed, the per-epoch history, the environment (torch, CUDA, GPU model) and a dataset fingerprint, so "same data" is a checkable claim. - Paper-ready output — every report is also written as a
booktabsLaTeX table, with notes stating what each interval covers.
After training: run history with config diffs, per-checkpoint testing on new data, batch prediction to CSV, Grad-CAM, ONNX export, TensorBoard.
Your workspace
VisionForge reads your own code from folders next to wherever you run it — no repository needed, nothing to edit inside the package:
my-research/            ← run `visionforge gui` from here
├── user_models/        ← your architectures
├── user_tasks/         ← your task families
├── datasets/           ← whatever you point the picker at
└── outputs/            ← runs, checkpoints, reports, run.json
Run it from a different folder and it looks there instead — so keep one folder
per project. visionforge doctor always prints the paths it resolved.
Checking the install
visionforge doctor               # environment: driver, torch, workspace
visionforge selftest --quick     # trains every task on synthetic data, ~15s
selftest starts the real API and trains through the same endpoints the
browser uses. It checks that the pipeline works, not that a model is good — one
epoch on synthetic data says nothing about accuracy.
Documentation
docs/QUICKSTART.md— first run, start to finishdocs/DATASETS.md— dataset layouts and the download providersdocs/custom/— your own models and task familiesCHANGELOG.md— what shipped in each release
Working on VisionForge itself?
CONTRIBUTING.md
has the dev setup, and
docs/dev/
has the architecture, the decision log and the validation record.
Status
Under active development and usable for real work. Below 1.0 the config schema
and the HTTP API may change between minor releases — configs carry a
schema_version and are migrated on load, so an exported YAML keeps working.
Worth knowing before you start:
- One training at a time, but submissions queue and start on their own. A job already training cannot be cancelled.
- One-click dataset download covers classification only. The other tasks need a dataset already in their layout.
- No K-fold for detection or anomaly, by design: Ultralytics owns its training loop, and an unsupervised fold without anomalies measures nothing.
- Dark theme only.
Found something? Open an issue.
Citing
If VisionForge is useful in your research, please cite it — see
CITATION.cff.
License
Português (pt-BR)
Treine, compare e defenda modelos de visão computacional na sua própria GPU. Cinco tipos de tarefa, uma interface só, sem nuvem e sem notebooks.
Instalação
Você precisa de Python 3.13+ e uns cinco minutos. Nada além disso — o pacote publicado já vem com a interface pronta.
mkdir minha-pesquisa && cd minha-pesquisa
python -m venv .venv
.venv\Scripts\activate
No Linux ou no macOS a última linha vira source .venv/bin/activate.
pip install visionforge-studio
Agora deixe o VisionForge olhar a sua máquina e instalar o PyTorch certo — ele
lê o driver da sua GPU, diz qual wheel você precisa e instala depois que você
responder y:
visionforge doctor --fix
A instalação acaba aqui. Para abrir a interface:
visionforge gui
Ela abre em http://127.0.0.1:8000. A primeira tela pergunta o seu nome e oferece um guia rápido da interface.
Por que o PyTorch é instalado à parte
Porque a build dele precisa combinar com o seu hardware, e nenhum resolvedor de
dependências consegue escolher entre a wheel de CPU e a de CUDA por você. O
doctor faz essa escolha a partir do que ele realmente encontra na máquina.
Para escolher na mão, instale o extra direto:
pip install "visionforge-studio[cu128]"
Disponíveis: cu118 · cu121 · cu124 · cu126 · cu128 · cpu. O cu128
é o mais abrangente — vai de Turing (sm_75) até Blackwell, e é o único que roda
numa RTX série 50.
No PyPI a distribuição chama visionforge-studio — o nome visionforge
puro pertence a um projeto sem relação com este. O nome de import, o comando e
o projeto continuam sendo visionforge.
O que já vem junto
Tudo que as cinco tarefas precisam está naquela instalação: os backends de
detecção YOLO e RT-DETR, os backbones extras do timm, as buscas guiadas por
Optuna, os escalares do TensorBoard e os downloaders de dataset do Roboflow,
Kaggle e Hugging Face. Eram extras opcionais; a separação custava mais do que
economizava, e eles somam uns 83 MB contra os gigabytes que o PyTorch já baixa.
A única coisa escolhida à parte é o próprio PyTorch, porque a build dele precisa combinar com o seu hardware.
Primeiro treino
Aponte o seletor de dataset para uma pasta, escolha a aba da tarefa e clique em Treinar. Se você ainda não tem dataset, o botão ⤓ datasets baixa um (CIFAR-10, por exemplo) já no formato que a tarefa espera.
O passo a passo completo — baixar dataset, primeiro treino, intervalos de
confiança, repetir a partir do YAML — está em
docs/QUICKSTART.md.
Para automação, o CLI roda os mesmos configs que a interface exporta:
visionforge run configs/baseline.yaml
As cinco tarefas
| Tarefa | Modelos | Métricas principais |
|---|---|---|
| Classificação | ResNet, EfficientNet, ViT, Swin, ConvNeXt, VGG, AlexNet, timm | Acurácia, F1, AUC-ROC, matriz de confusão |
| Detecção de objetos | YOLOv8–v26, RT-DETR, Faster R-CNN, SSD, RetinaNet | mAP@50, mAP@50-95 |
| Regressão em imagens | Backbones CNN + cabeça linear (manifesto CSV) | MSE, RMSE, MAE, R² |
| Segmentação semântica | DeepLabV3, FCN, LR-ASPP, U-Net | IoU médio, Dice, acurácia por pixel |
| Detecção de anomalias | Autoencoder convolucional, PatchCore | AUROC por imagem, F1, limiar |
Todos os painéis têm a mesma forma: nome do experimento, estratégia, modelo, treinamento, dataset, pré-processamento. Aprender uma tarefa ensina as cinco.
Precisa de outra coisa? Dá para adicionar seus próprios modelos e até tarefas inteiras sem tocar no pacote.
Resultados que você consegue defender
- Réplicas — o mesmo config em N sementes, reportado como
média ± IC 95%em vez de um número de sorte. - Validação cruzada K-fold — métrica por fold mais média ± desvio, com transformações que não vazam entre folds.
- Buscas — grid, aleatória ou Optuna sobre qualquer campo do config.
- Testes de significância pareados — compare configurações nas mesmas
sementes, com IC por bootstrap, teste t pareado ou Wilcoxon,
d_zde Cohen e correção de Holm-Bonferroni. Ele se recusa a comparar execuções cujas sementes não batem, e avisa quando o número de sementes torna a significância inalcançável — para que "não significativo" nunca seja lido como "sem efeito". - Procedência completa — toda execução escreve um
run.jsoncom o config, a semente, o histórico por época, o ambiente (torch, CUDA, modelo da GPU) e uma impressão digital do dataset, para que "mesmos dados" seja uma afirmação verificável. - Saída pronta para artigo — todo relatório sai também como tabela LaTeX
booktabs, com notas dizendo o que cada intervalo cobre.
Depois do treino: histórico com diff de config, teste de checkpoints em dados novos, predição em lote para CSV, Grad-CAM, exportação ONNX, TensorBoard.
Sua pasta de trabalho
O VisionForge lê o seu código de pastas ao lado de onde você o executa — sem repositório, sem editar nada dentro do pacote:
minha-pesquisa/         ← rode `visionforge gui` daqui
├── user_models/        ← suas arquiteturas
├── user_tasks/         ← suas tarefas
├── datasets/           ← o que você apontar no seletor
└── outputs/            ← execuções, checkpoints, relatórios, run.json
Se rodar de outra pasta, ele procura lá — então mantenha uma pasta por projeto.
O visionforge doctor sempre imprime os caminhos que resolveu.
Conferindo a instalação
visionforge doctor               # ambiente: driver, torch, pastas
visionforge selftest --quick     # treina todas as tarefas em dados sintéticos, ~15s
O selftest sobe a API de verdade e treina pelos mesmos endpoints que o
navegador usa. Ele confere que o caminho funciona, não que o modelo é bom — uma
época em dado sintético não diz nada sobre acurácia.
Documentação
docs/QUICKSTART.md— o primeiro treino, do início ao fimdocs/DATASETS.md— formatos de dataset e os provedores de downloaddocs/custom/— seus próprios modelos e tarefasCHANGELOG.md— o que entrou em cada versão
Situação atual
Em desenvolvimento ativo e já utilizável para trabalho de verdade. Abaixo da
1.0 o schema de config e a API HTTP podem mudar entre versões menores — os
configs carregam schema_version e são migrados ao abrir, então um YAML
exportado antes continua funcionando.
Vale saber antes de começar:
- Um treino por vez, mas os envios entram numa fila e começam sozinhos. Um treino já em andamento não pode ser cancelado.
- O download em um clique cobre só classificação. As outras tarefas precisam de um dataset já no formato delas.
- Sem K-fold em detecção e anomalia, de propósito: o Ultralytics é dono do próprio laço de treino, e um fold de validação sem anomalias não mede nada.
- Só tema escuro.
Achou algum problema? Abra uma issue.
Licença
1 maintainer

Metadata
1 maintainer
Release files for visionforge-studio 0.10.0
For a detailed explanation of source distributions (sdists) and built distributions (wheels), please see the package formats documentation.
Source distribution (sdist)
| File | Size | Uploaded | |
|---|---|---|---|
| visionforge_studio-0.10.0.tar.gz | 820.4 kB | Details |
Built distribution (wheel)
| File | Interpreter | ABI | Platform | Reset |
|---|---|---|---|---|
| visionforge_studio-0.10.0-py3-none-any.whl | Python 3 | none | any | Details |
Total release size: 1.7 MB
Release files / visionforge_studio-0.10.0.tar.gz
| Download URL | visionforge_studio-0.10.0.tar.gz |
|---|---|
| Size | 820.4 kB |
| Tags | Source |
|
SHA-256 checksum How to use checksums |
18f62f6a419f9619daebb86d3bf1acf0138131a2b905a23788044e3d5d9d1da2
|
|
BLAKE2b-256 checksum How to use checksums |
56f186d99070133e325e103d66faa9899ff64d87e9292925c3a370cb944a719e
|
| Upload date | |
|
Uploaded using Trusted Publishing? What is trusted publishing? |
Yes |
| Uploaded via |
twine/7.0.0 CPython/3.13.14
|
Provenance
Provenance describes where a file came from. On PyPI, provenance is shared via attestations, which provide a verifiable record of the build or publishing details. View details, limitations and caveats.


PyPI Publish Attestation
PyPI verified that this artifact, at this checksum, originated from the publisher listed below.
Signed by GitHub Actions, verified by PyPI on Aug 29, 2026.
Transparency logRelease files / visionforge_studio-0.10.0-py3-none-any.whl
| Download URL | visionforge_studio-0.10.0-py3-none-any.whl |
|---|---|
| Size | 887.0 kB |
| Tags | Python 3 |
|
SHA-256 checksum How to use checksums |
8c486e4ec47d9974b532700f6f600b18af399addd4872910d8b6c61395aa94b7
|
|
BLAKE2b-256 checksum How to use checksums |
7e7641a83f96ed08c0ada87cb63e7cdd64c4fe30094e0075ed4b28afbf03df2e
|
| Upload date | |
|
Uploaded using Trusted Publishing? What is trusted publishing? |
Yes |
| Uploaded via |
twine/7.0.0 CPython/3.13.14
|
Provenance
Provenance describes where a file came from. On PyPI, provenance is shared via attestations, which provide a verifiable record of the build or publishing details. View details, limitations and caveats.
PyPI Publish Attestation
PyPI verified that this artifact, at this checksum, originated from the publisher listed below.
Signed by GitHub Actions, verified by PyPI on Aug 29, 2026.
Transparency log













