Add your description here


Project description
wadoh_raccoon
A Python package for transforming and linking pathogen sequencing/subtyping metadata.
See our github page for function references and docs https://nw-page.github.io/wadoh_raccoon/
How to install the package
Open PowerShell terminal (or Ubuntu bash terminal)
- Make a new folder
pip install uvuv venv --python 3.11.\.venv\Scripts\activateuv pip install git+https://github.com/NW-PaGe/wadoh_raccoon.git#egg=wadoh_raccoon
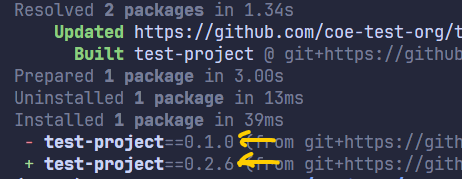
To install a specific version, find the git tag noted in the GitHub Release section (something like v0.2.5) and then put it in the install statement like .git@v0.2.5:
uv pip install git+https://github.com/NW-PaGe/wadoh_raccoon.git@v0.2.5#egg=wadoh_raccoon
here's what it looks like when updating the install version:
How to test it
create a script called main.py in your folder and run this code:
from wadoh_raccoon.utils import helpers
import polars as pl


df = pl.DataFrame({
    'date': [
        '2022-01-03',
        '01-02-2020',
        '44115',
        None,
        "2022-12-27 08:26:49",
        # "2022-12-27T08:26:49",
        '01/02/1995',
        '2/3/2022',
        '2/16/2022'
    ]
})

df_output = (
    df
    .with_columns(
        output_date = helpers.date_format('date')
    )
    .select('output_date')
)

print(df_output)
it should give you this output
>>> print(df_output)
shape: (8, 1)
┌─────────────┐
│ output_date │
│ ---         │
│ date        │
╞═════════════╡
│ 2022-01-03  │
│ 2020-01-02  │
│ null        │
│ null        │
│ 2022-12-27  │
│ 1995-01-02  │
│ 2022-02-03  │
│ 2022-02-16  │
└─────────────┘
For Devs
how to create a package with uv
- In a new repo, run
uv init --package <package_name>It gives you this:
.
├── LICENSE
├── README.md
└── test_package
    ├── README.md
    ├── pyproject.toml
    └── src
        └── test_package
            └── __init__.py

3 directories, 5 files
-
Create a venv with
uv venva. This creates a venv you can activate (called your package name) b. Creates auv.lockfile c.Uv syncto install and update your venv -
Run
uv buildand it will build your package, adding adist/folder with a.tar.gzfile of the package. a. Amazing b. follow these docs to publish it to pypi or somewhere else privately -
To install from github:
uv pip install git+https://github.com/NW-PaGe/wadoh_raccoon.git#egg=wadoh_raccoonIf you get python version error, add python version to your .venv withuv python install 3.11or rebuild the venv withuv venv --python 3.11 -
for dev packages that you need but aren't package dependencies, like
pytest, you can add them to the project with development dependencies like this:
uv add --dev pytest
and that will add pytest to the uv.lock and pyproject.toml but as a separate dependency from the actual packages. In other words, the package won't be dependent on pytest, but it will be installed for devs that want to run the unit tests.
how to build the package automatically with CI/CD
this repo has a github action that automatically runs unit tests, builds the package, and outputs a changelog for a github release.
The github action has two steps:
1. unit-tests
This step will install uv, install python, and then run the unit tests in the tests folder.
unit-tests:
    name: Build and Test Python Package
    runs-on: ubuntu-latest

    steps:
      - uses: actions/checkout@v4

      - name: Install uv
        uses: astral-sh/setup-uv@v5
        with:
          version: "0.6.5" # pin a specific version is best practice
          enable-cache: true

      # install python in
      - name: "Set up Python"
        uses: actions/setup-python@v5
        with:
          python-version-file: "pyproject.toml"

      - name: Run tests
        # For example, using `pytest`
        run: uv run pytest tests
2. build-and-release
This step is dependent on the first step above. If any unit-tests fail, then this build/release will not run.
The build step works like this:
- Scan the code for conventional commit messages (like
fix:,feat:, etc) and render a changelog based on the commits - Create a GitHub Release (git tags) that bump up the version of the codebase (like
v1.0.0tov1.1.0) - Build the python package and have its version match the git tag version.
uvcurrently doesn't have a built in way to do this, but they are currently working on it. In the meantime, that link has a way to link the python package version to the git release like this:
# install uv
- name: Set up uv
  run: curl -LsSf https://astral.sh/uv/install.sh | sh

- name: Build package
  if: ${{ steps.changelog.outputs.skipped == 'false' }}
  run: |
    VERSION=$(uvx dunamai from any --no-metadata --style pep440) # find the version of the git tag for the python package
    echo $VERSION
    uvx --from=toml-cli toml set --toml-path=pyproject.toml project.version $VERSION # update the version in the pyproject.toml
    uv build # build the package
so it will update the pyproject.toml to have the most up to date version that matches the git tag version and then build the package with uv build. The build function builds the package and outputs a dist/ folder with a .tar.gz file and a .whl file, both of which are source files for installing the package.
I also wanted to take the .tar.gz and .whl files and add them to the Assets in the changelog for GitHub. That way we can always save copies of our package whenever we make a new release, just to be safe.
# Attach the build assets to the GitHub release (only if changelog creation was successful)
- name: Upload sdist to GitHub release
  run: gh release upload $TAG $FILES --clobber
  env:
    GITHUB_TOKEN: ${{ secrets.GITHUB_TOKEN }}
    TAG: ${{ steps.changelog.outputs.tag }} # this is pulled from the changelog step where it creates the git tag
    FILES: dist/*.tar.gz dist/*.whl # these files are created in the build step
Release history Release notifications | RSS feed


Download files
Download the file for your platform. If you're not sure which to choose, learn more about installing packages.
Source Distribution
Built Distribution
Filter files by name, interpreter, ABI, and platform.
If you're not sure about the file name format, learn more about wheel file names.
Copy a direct link to the current filters
File details
Details for the file wadoh_raccoon-0.1.1.tar.gz.
File metadata
- Download URL: wadoh_raccoon-0.1.1.tar.gz
- Upload date:
- Size: 1.9 MB
- Tags: Source
- Uploaded using Trusted Publishing? No
- Uploaded via: uv/0.6.6
File hashes
| Algorithm | Hash digest | |
|---|---|---|
| SHA256 |
b6eacdea7678ed944d056efdb37e27d3e831733f5b0e530057742313b2b4abe1
|
|
| MD5 |
a75a9c287f9f68c3029e3c76bf330997
|
|
| BLAKE2b-256 |
f1e32ab05feed95360c3c535fc220fe06af31ebc9f68500167949a6b7706d3fb
|
File details
Details for the file wadoh_raccoon-0.1.1-py3-none-any.whl.
File metadata
- Download URL: wadoh_raccoon-0.1.1-py3-none-any.whl
- Upload date:
- Size: 7.5 kB
- Tags: Python 3
- Uploaded using Trusted Publishing? No
- Uploaded via: uv/0.6.6
File hashes
| Algorithm | Hash digest | |
|---|---|---|
| SHA256 |
bfbb9b949ee467c6a76c33fecc4958b9c7f37eac410bedb9ba98649848db2010
|
|
| MD5 |
f46ed19485db0a89f3f75de4722818a9
|
|
| BLAKE2b-256 |
b8aa55cb73008f31914574b2aaf94deefe7b00587d11a4cc6c7f28635c533cdf
|


