Python module/program to control Watts Clever switch

Project description
WCCONTROL - Watts Clever Switch Control

This is a Raspberry Pi command line program and Python module to switch
on and off a Watts Clever RF Switch via a cheap 433 MHz transmitter
module. I also have a higher level program
wcscheduler which imports
this module and can be used to schedule one or more switches on/off at
specified times and days of week.
The wccontrol module implements the protocol which was reverse
engineered in the excellent posts
here
and
here.
The latest version of this document and code is available at https://github.com/bulletmark/wccontrol.
Watts Clever Switch
You need one or more of these:
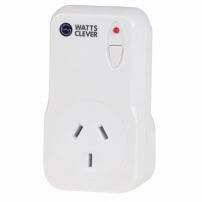
Often this is purchased in a pack with 2, 3, or 4 such switches, and an IR (infra-red) receiver box which allows you to operate the remote switches using a standard TV remote which talks IR to the receiver, then the receiver talks RF 433 MHz to the switches. E.g the pack is:

The wccontrol module allows your Raspberry Pi to talk directly via RF
to the switches. You do not need the IR receiver box at all (i.e. you do
not need the blue box in above image), neither to operate or initially
program the switches. wccontrol can be used to fully program
switch group and addresses, and then to operate the switches on and off.
RF Transmitter
You also need a 433 MHz RF transmitter to connect to your Raspberry Pi.
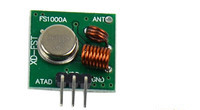
RF modules like the above for Raspberry Pi and similar devices are
purchased for only a few bucks on ebay etc, usually as a transmitter and
receiver pair. To use wccontrol, we only need the transmitter which is
the smaller board as shown above.
The transmitter has 3 pins which you directly connect to the RPi header pins using push-on female to female jumper wires as follows.
| Tx pin | Description | Raspberry Pi GPIO header |
|---|---|---|
| Left | Data | GPIO4 (board pin 7) |
| Middle | VCC | 5V power (e.g. board pin 4 or 2) |
| Right | GND | Ground (e.g. board pin 6 or 9 or etc) |
You can significantly increase the range of the transmitter by soldering a 17.3 cm copper wire to the ANT pad in the corner of the PCB. Ideally, orientate the wire parallel to the switches, i.e. if you plug the RF switch unit directly into a wall socket then orientate the antenna wire vertically.
Note that wccontrol uses GPIO4 by default to drive the transmitter but
you can easily set it to use any of the other Raspberry Pi GPIO pins by
passing the pin argument.
Installation
Requires Python 3.6 or later. Does not work with Python 2.
wccontrol is available on PyPI
so install the usual way, e.g:
$ pipx install -U wccontrol
Or explicitly from github:
$ git clone https://github.com/bulletmark/wccontrol.git
$ cd wccontrol
$ pipx install .
Make GPIO Device Accessible
To be able to run this utility/module as your normal user you need to
install a udev rule and assign yourself to the gpio group.
As root, create gpio group:
$ sudo groupadd -f -r gpio
Add your user to that group:
$ sudo usermod -aG gpio $USER
Fetch gpio.rules from this repo and copy it to the appropriate place
on your system:
$ sudo curl -L https://raw.githubusercontent.com/bulletmark/wccontrol/master/gpio.rules -o /etc/udev/rules.d/99-gpio.rules
Reboot your RPi and log back in again.
Groups and Addresses
Before you can operate a switch on/off you must first program it to respond to a specific group and address.
A group is a number 0 to 1023. An address is a number 0 to 7 within a group that you allocate to specific switches. Address number 6 is special as it means "all addresses in same group", i.e. you can switch all devices together in the same group by using address 6. So there are actually only 7 unique addresses which you can use per group, 0->5 and 7. Thus there are potentially 1024 x 7 individually addressable devices you can control.
Program Group and Address to Device
E.g. say you want to assign your first switch as address 0 in group 0.
- Ensure power is applied to the switch.
- Ensure switch is OFF, i.e. press button to turn LED OFF.
- Press and hold the switch button until the LED fast flashes, then slow flashes, then release.
- Execute the ON command
wccontrol 0 0 1to program ON. - Execute the OFF command
wccontrol 0 0 0to program OFF. - The LED will go OFF and the switch is now programmed.
- Test using
wccontrol 0 0 1to confirm the switch goes ON thenwccontrol 0 0 0to confirm the switch goes OFF. - Repeat the above steps for your other switches using a different group/address.
Example Commands to Switch On and Off
Switch group 0, device 2 to ON:
$ wccontrol 0 2 1
Switch group 0, device 2 to OFF:
$ wccontrol 0 2 0
Switch group 0, device 3 to ON:
$ wccontrol 0 3 1
Switch group 0, device 3 to OFF:
$ wccontrol 0 3 0
Switch both (i.e. all) devices in group 0 to ON:
$ wccontrol 0 6 1
Switch both (i.e. all) devices in group 0 to OFF:
$ wccontrol 0 6 0
Command Line Options
Type wccontrol -h to view the usage summary:
usage: wccontrol [-h] [-p PIN] [-r RETRIES] group address {0,1}

Module/program to set a Watts Clever Smart switch on or off.

positional arguments:
  group                 group, 0 to 1023
  address               switch address to write to, 0 to 7 (6=all in same
                        group)
  {0,1}                 value 0=off, 1=on

options:
  -h, --help            show this help message and exit
  -p PIN, --pin PIN     RPi BCM GPIO pin to output (default: 4)
  -r RETRIES, --retries RETRIES
                        number of retries to send (default: 15)
Using as a Python Module
from wccontrol import WCcontrol

# Create instance on given "pin"
wc = WCcontrol(pin)

# Use this instance
wc.set(0, 2, 1)
See the stub code in
wccontrol.py
or my scheduler
application
for more complete examples using the python module.
IFTTT Integration
Another example of how this module can be used is to call it from a tiny web service application you can run on your Raspberry Pi and which can receive IFTTT web-hook messages from the internet to turn devices on and off. Usually you would just forward a port from your home firewall/router to the RPi. The web-hooks can be triggered by the Google Assistant service. So you can say "Hey Google, turn the Living Room lights on" and it happens! Quite simple and cheap to implement given the hardware described here. My scheduler application for wccontrol has IFTTT integration.
Release history Release notifications | RSS feed


Download files
Download the file for your platform. If you're not sure which to choose, learn more about installing packages.
Source Distribution
Built Distribution
Filter files by name, interpreter, ABI, and platform.
If you're not sure about the file name format, learn more about wheel file names.
Copy a direct link to the current filters
File details
Details for the file wccontrol-2.1.1.tar.gz.
File metadata
- Download URL: wccontrol-2.1.1.tar.gz
- Upload date:
- Size: 6.5 kB
- Tags: Source
- Uploaded using Trusted Publishing? No
- Uploaded via: uv/0.7.18
File hashes
| Algorithm | Hash digest | |
|---|---|---|
| SHA256 |
2a97daa01aa4428197f0e0fdbcd4a44c80fef170361ff0774b6aa2d4e6eebdf7
|
|
| MD5 |
d45b7999ea4c9124d33abd35a195f68f
|
|
| BLAKE2b-256 |
f2d7f5408d78ca79bca018f3aa8caede5b6334b3d9dac0b683071617ddb287a4
|
File details
Details for the file wccontrol-2.1.1-py3-none-any.whl.
File metadata
- Download URL: wccontrol-2.1.1-py3-none-any.whl
- Upload date:
- Size: 6.0 kB
- Tags: Python 3
- Uploaded using Trusted Publishing? No
- Uploaded via: uv/0.7.18
File hashes
| Algorithm | Hash digest | |
|---|---|---|
| SHA256 |
86e3645e4a231e7762feaf18eed21bbed6a11d0e72a266b9e96b23d2316a579f
|
|
| MD5 |
ab1ba85ae9f5e96590e813ad4c0afe6c
|
|
| BLAKE2b-256 |
52370a8efb795f6c899945fb8ce1f9b2778d9553f787ee03b1c7f3dbf15d97b9
|


