
A simple, extensible, and hackable AI agent for the Linux and macOS terminal

Project description

Wisemonkey - A dead simple CLI agent for Linux and macOS



Wisemonkey is a simple, open, and hackable AI agent for the Linux and macOS terminal. It connects to any service providing an OpenAI, Anthropic, or Ollama-compatible endpoint. It features session management, persistent memory management, vector store for document embedding, native and MCP tools, skills, and much more.
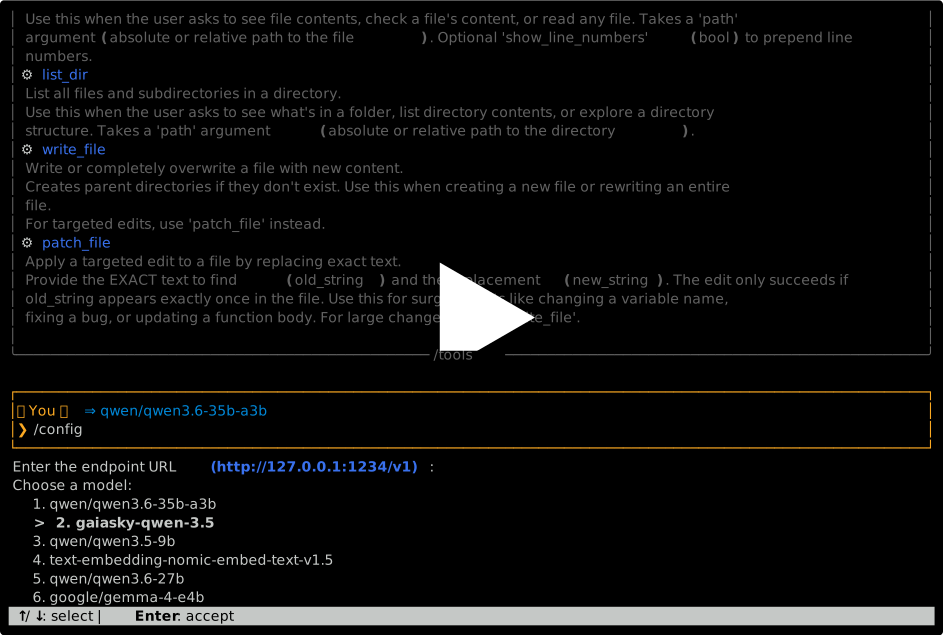
The sections of this document are:
- Quickstart
- Run from source
- Configuration
- Usage and commands
- Global memory
- Rolling chat memory
- Extend agent
Quickstart
Wisemonkey has been tested to work on Linux and macOS.
Requirements
- Python 3.13+
uvfor dependency management
Installation
On Linux or macOS, install uv and run the agent:
# Install uv
curl -LsSf https://astral.sh/uv/install.sh | sh
# Run wisemonkey
uvx wisemonkey
You can also install it with our script:
curl -fsSL https://codeberg.org/langurmonkey/wisemonkey/raw/branch/master/install.sh | bash
This installs wisemonkey to ~/.local/share/wisemonkey/repository. It adds a wisemonkey binary to ~/.local/bin/wisemonkey. If you have ~/.local/bin in your $PATH, you can launch the onboarding process to configure the agent interactively:
wisemonkey --onboard
Running
Run the agent with the default session:
# Using uvx
uvx wisemonkey
# If installed, simply do
wisemonkey
For the rest of this document, we assume that wisemonkey is in your path. You can substitute it with uvx wisemonkey if you use the uvx method.
If you need an API key to access the endpoint, put it in the .env file. Wisemonkey looks for the .env file in the following locations, in order:
- Current directory,
./.env - Config directory,
$XDG_CONFIG_HOME/wisemonkey/.env - Home directory,
$HOME/.env
Create the .env file with the API key:
echo "OPENAI_API_KEY=your-api-key-here" > .env
echo "ANTHROPIC_API_KEY=your-api-key-here" > .env
echo "OLLAMA_API_KEY=your-api-key-here" > .env
The agent uses
python-dotenvto load.envat startup. Theopenaipackage readsOPENAI_API_KEYfrom the environment automatically. You can also setOPENAI_API_KEYin your shell profile. Same goes forANTHROPIC_API_KEYandOLLAMA_API_KEY.
Run from source
# Clone the repo, then build the project:
uv build
# Set API key:
export OPENAI_API_KEY=your-api-key
# Run the agent with the default session:
uv run wisemonkey
Configuration
You can configure the agent interactively before the first run with wisemonkey --onboard. On first run, the configuration file is created in $XDG_CONFIG_HOME/wisemonkey/config.yaml from the default configuration (config.yaml) in the root of this repository.
Additionally, the configuration directory holds the mcp.json (see next section), and the .updates.yml, which holds information about the last update time and status.
Model Context Protocol (MCP)
Wisemonkey also supports MCP. Use the following commands to manage the MCP integration:
/mcp: Show the current MCP configuration/mcp edit: Edit the MCP configuration file (~/.config/wisemonkey/mcp.json)/mcp tools: List all MCP tools available. Alias:/tools mcp
MCP servers are started when the agent boots. You need to restart the agent if you add new servers.
Usage and commands
Run the agent, and then you can enter your prompt. You can use the following key bindings during input:
- Alt + Enter: add a new line
- Enter: submit the prompt
- Ctrl + q: quit
During inference, you can cancel the turn and return to the input prompt with Ctrl + c
Sessions
Internally, Wisemonkey uses sessions to separate different memory histories. Sessions are named by the user. By default, the agent uses the default session. You can start in a different session (either create a new one, or restore it if it exists) by passing its name as a positional argument:
# Start in a specific session named 'my-project'
wisemonkey my-project
The default session's name is default, so the following two commands are equivalent:
# These two commands start the 'default' session
wisemonkey
wisemonkey default
You can also list the existing sessions with -ls:
# List sessions
wisemonkey --ls
Sessions:
- my-project - ~/.local/share/wisemonkey/sessions/my-project
- default - ~/.local/share/wisemonkey/sessions/default
Sessions contain:
- The input history
- Chat memory (see chat memory)
- Vector store (see document embedding)
- Notes (see session memory)
- User profile (see session memory)
For now, the configuration file is the same for all sessions.
Sessions are matched by the directory name in the sessions location (
~/.local/share/wisemonkey/sessions). You can rename a session by just renaming the directory!
vi mode
You can enable vi mode for the current session with the command /vi on, or permanently in the configuration.
External editor---In vi mode, exit INSERT mode (Esc), then press v to edit your prompt in an external editor (uses your $VISUAL or $EDITOR variable).
Slash commands
There are a few commands available to use in the agent loop. You can list them with /help. Also, use /[command-name] help (e.g. /config help) to show additional help for a command.
Session memory
Persistent memory follows XDG Base Directory spec in ~/.local/share/wisemonkey/session/$SESSION_NAME:
user_profile.json---User informationnotes.json---Persistent notes (added viasave_notetool)
Lifecycle:
- Memory is loaded into the system prompt each turn
save_notetool adds notes during a sessionsave_memorytool explicitly persists memory to disk- Memory is auto-saved when the agent exits (interactive mode)
Document embedding
Wisemonkey can embed documents into a per-session vector store, allowing the agent to search and reference their contents during conversation. Use /embed to add a document:
/embed ~/documents/research_paper.pdf
/embed ./notes.md
The agent uses the search_knowledge tool to query embedded documents when answering questions about previously indexed files. Supported formats include PDF, Markdown, and plain text. Embeddings are powered by the configured embedding model and stored in the session directory under vectordb/.
Chat memory
In addition to persistent memory, the agent maintains a chat history of recent user input and assistant output pairs. This provides context that survives beyond the LLM's context window. Here is how it works:
- Each user message and assistant response is stored in memory
- Reasoning is omitted from chat memory
- Automatically compacted when exceeding the configured character limit
- The user can trigger the compaction any time with
/memory compact - Chat memory is attached to the system prompt on each turn
- The agent displays the last 10 exchanges, with long messages truncated
Persistence:
- Chat history is persisted to
~/.local/share/wisemonkey/session/$SESSION_NAME/chat_history.json - Automatically loaded on startup
- Saved after every exchange (user input or assistant response)
- Compacted history is also persisted to disk
Configuration:
agent:
  max_chat_history: 128000  # Maximum history characters to keep for context
Structure
Wisemonkey is built to be modular and hackable. Here is an overview of the main parts and their mapping to the file system.
wisemonkey/
├── agent/                  # Core agent code.
│   ├── agent.py            # Main agent loop, prompt handling, key bindings.
│   ├── commands.py         # Slash commands (e.g. /embed, /quit).
│   ├── config.py           # Configuration loading and handling.
│   ├── console.py          # Rich console output with themed formatting.
│   ├── core.py             # Core agent functions, like API connection and tool calls.
│   ├── mcp.py              # MCP server support.
│   ├── memory.py           # Session memory, paste file creation.
│   ├── router.py           # API router implementation for OpenAI, Ollama, and Anthropic.
│   ├── skills.py           # Skill loading and management.
│   ├── tools.py            # Tool definitions.
│   ├── update.py           # Update management.
│   ├── utils.py            # Utility functions.
│   └── vectorstore.py      # Vector store wrapper.
├── tools/                  # Tool implementations available to the model.
│   ├── basic.py            # Basic and example tools.
│   ├── files.py            # File read/write tools.
│   ├── memory.py            # search_knowledge tool.
│   ├── network.py          # URL fetching.
│   ├── terminal.py         # Shell command execution.
│   └── vectorstore.py      # Vector store tool handler.
├── skills/                 # Skill definitions. Add new skills here.
│   ├── example.md
│   └── rolldice.md
├── tests/                  # Contains all `unittest` tests.
│   └── [...]
├── config.yaml             # Default config file.
├── README.md
├── pyproject.toml
├── install.sh              # Installer script.
└── .env.example
Extend the agent
This agent is simple enough that it can be easily customized and extended by adding new tools, commands, and skills.
If you create a cool new tool, skill, or slash command, consider contributing it via a merge request!
Adding tools
Create a file in tools/ or use one of the existing ones. To create a tool,
create a method and decorate it with @tool(name, description, params):
from agent.tools import tool

@tool(
    name="my_tool",
    description="Does something useful. Be exhaustive here, as it is what the LLM will read to know about your tool.",
    parameters={
        "type": "object",
        "properties": {
            "input": {
                "type": "string",
                "description": "The input parameter."
            }
        },
        "required": ["input"],
    },
)
def my_handler(args):
    input = args.get("input", "no input provided")
    return {"result": f"{input}"}
Tools are auto-discovered on startup.
Adding slash commands
The process is very similar to tools. You need to create your method, preferably in agent/commands.py, and decorate it with @cmd(name, description, aliases, examples, can_complete).
A slash command must return, in that order, ok:bool, msg:str, content:str, markdown:str:
ok: aboolindicating if the command succeeded or failed.msg: an optional short status message. It is printed withOKorERROR.content: an optionalstrwith the Python Rich-formatted content, it is printed to the output.markdown: an optionalstrformatted in Markdown, it is printed to the output.
@cmd(
    "/my-command",
    "This is the description",
    aliases=["/mycmd"],
)
def _cmd_my_command(agent, params) -> (bool, str, str, str):
    """This command returns a message but no content"""
    return True, "This is awesome!", None, None
Decorated commands are automatically registered, and auto-completed in the input prompt.
Adding skills
Add a .md file in skills/ with YAML front matter, following the agentskills.io standard:
---
name: my-skill
description: What this skill does
---

# My skill

## When to use

...

## Steps

1. ...
The front matter name and description are parsed and shown in the
skills list. The body is injected into the system prompt.
Release history Release notifications | RSS feed


Download files
Download the file for your platform. If you're not sure which to choose, learn more about installing packages.
Source Distribution
Built Distribution
Filter files by name, interpreter, ABI, and platform.
If you're not sure about the file name format, learn more about wheel file names.
Copy a direct link to the current filters
File details
Details for the file wisemonkey-2026.6.19.tar.gz.
File metadata
- Download URL: wisemonkey-2026.6.19.tar.gz
- Upload date:
- Size: 768.7 kB
- Tags: Source
- Uploaded using Trusted Publishing? No
- Uploaded via: uv/0.11.21 {"installer":{"name":"uv","version":"0.11.21","subcommand":["publish"]},"python":null,"implementation":{"name":null,"version":null},"distro":{"name":"Arch Linux","version":null,"id":null,"libc":null},"system":{"name":null,"release":null},"cpu":null,"openssl_version":null,"setuptools_version":null,"rustc_version":null,"ci":null}
File hashes
| Algorithm | Hash digest | |
|---|---|---|
| SHA256 |
becd33198f20fcb03b3950cb06a9173548e896af2e78beae84566664ae1c03e7
|
|
| MD5 |
b6b3514c9fd2744511a2188e46caeec7
|
|
| BLAKE2b-256 |
23bc2fb31ffa3cd425f489fd291bece2c10884d2f1178984217284b206398782
|
File details
Details for the file wisemonkey-2026.6.19-py3-none-any.whl.
File metadata
- Download URL: wisemonkey-2026.6.19-py3-none-any.whl
- Upload date:
- Size: 69.1 kB
- Tags: Python 3
- Uploaded using Trusted Publishing? No
- Uploaded via: uv/0.11.26 {"installer":{"name":"uv","version":"0.11.26","subcommand":["publish"]},"python":null,"implementation":{"name":null,"version":null},"distro":{"name":"Arch Linux","version":null,"id":null,"libc":null},"system":{"name":null,"release":null},"cpu":null,"openssl_version":null,"setuptools_version":null,"rustc_version":null,"ci":null}
File hashes
| Algorithm | Hash digest | |
|---|---|---|
| SHA256 |
b880ee542b9ac15296dd97440480b532f8811ce86b0d9acefb5c50d69f0ae5a8
|
|
| MD5 |
cd41fdda6b25b3fde3f976581be4147b
|
|
| BLAKE2b-256 |
838ca4292ecab82a0d9ab824945379ae160335d85eabf4bf17a9f17e502c4d19
|






