Well-known-text and shapely object visualiation library


Project description
WKTPlot
Wrapper around the Bokeh library for plotting well-known-text strings and shapely geometries!
Badges


Installation
pip install wktplot
Description
The well-known-text standard is very common for working with and representing geospatial data, however it is painful to visualize them programatically. The Shapely library extends the functionality of the well-known-text standard with a rich assortment of geometry objects and operations, but it doesn't make it any easier to visualize.
WKTPlot is a library that provides an easy-to-use API for visualizing well-known-text strings and shapely objects programatically. This library wraps around the Bokeh library, which is a powerful plotting library for generating interactive visualizations. Bokeh also provides a rich assortment of stylizing options which are all usable through WKTPlot's add_shape method.
Supported datatypes
WKTPlot supports the majority of well-known-text primitives, including:
-
Point
-
MultiPoint
-
LineString
-
MultiLineString
-
LinearRing
-
Polygon
-
MultiPolygon
-
GeometryCollection
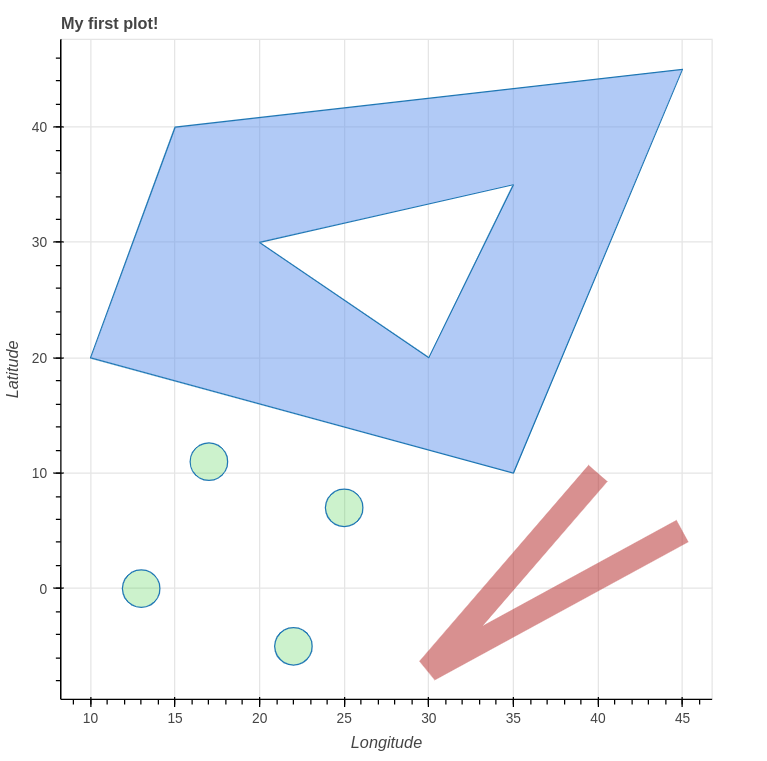
Basic Usage
from shapely.geometry import LineString

from wktplot import WKTPlot


# Create plot object

plot = WKTPlot(title="My first plot!", save_dir="/path/to/directory")


# Define shapes either through well-known-text (WKT) string, or shapely object

line_string = LineString([[45, 5], [30, -7], [40, 10]])

polygon = "POLYGON ((35 10, 45 45, 15 40, 10 20, 35 10),(20 30, 35 35, 30 20, 20 30))"

points = "MULTIPOINT (17 11, 13 0, 22 -5, 25 7)"


# Add shapes to the plot with style args

plot.add_shape(line_string, line_color="firebrick", line_alpha=0.5, line_width=20)

plot.add_shape(polygon, fill_color="#6495ED", fill_alpha=0.5)

plot.add_shape(points, fill_color=(50, 205, 50, 0.25), fill_alpha=0.7, size=30)


# Save plot to disk [/path/to/directory/my_first_plot.html]

plot.save()
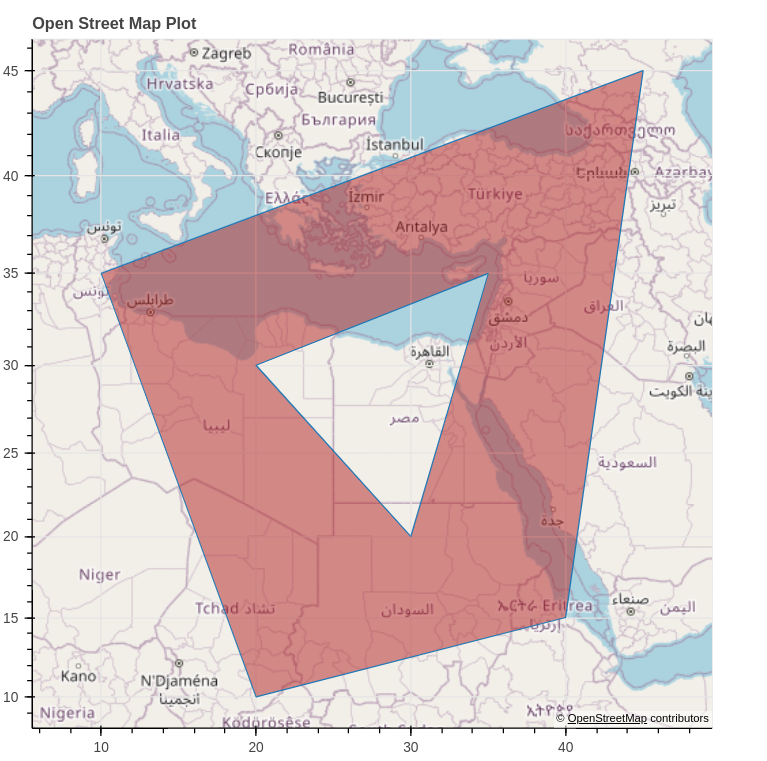
OpenStreetMaps
WKTPlot now supports the ability to integrate with OpenStreetMaps. Shape coordinates will be projected to the Mercator coordinate system, which appear to distort shape proportions compared to standard geometric projection.
If your shape data has already been projected, you can disable the Mercator calculation by setting the disable_mercator parameter when creating the plot object. See Advanced Usage for an example.
# Import OpenStreetMaps plotting class

from wktplot.plots.osm import OpenStreetMapsPlot


# Create plot object just like standard WKTPlot class

plot = OpenStreetMapsPlot("Open Street Map Plot", save_dir="/path/to/directory")


shape = "POLYGON ((35 10, 45 45, 15 40, 10 20, 35 10), (20 30, 35 35, 30 20, 20 30))"

plot.add_shape(shape, fill_alpha=0.5, fill_color="firebrick")


plot.save()
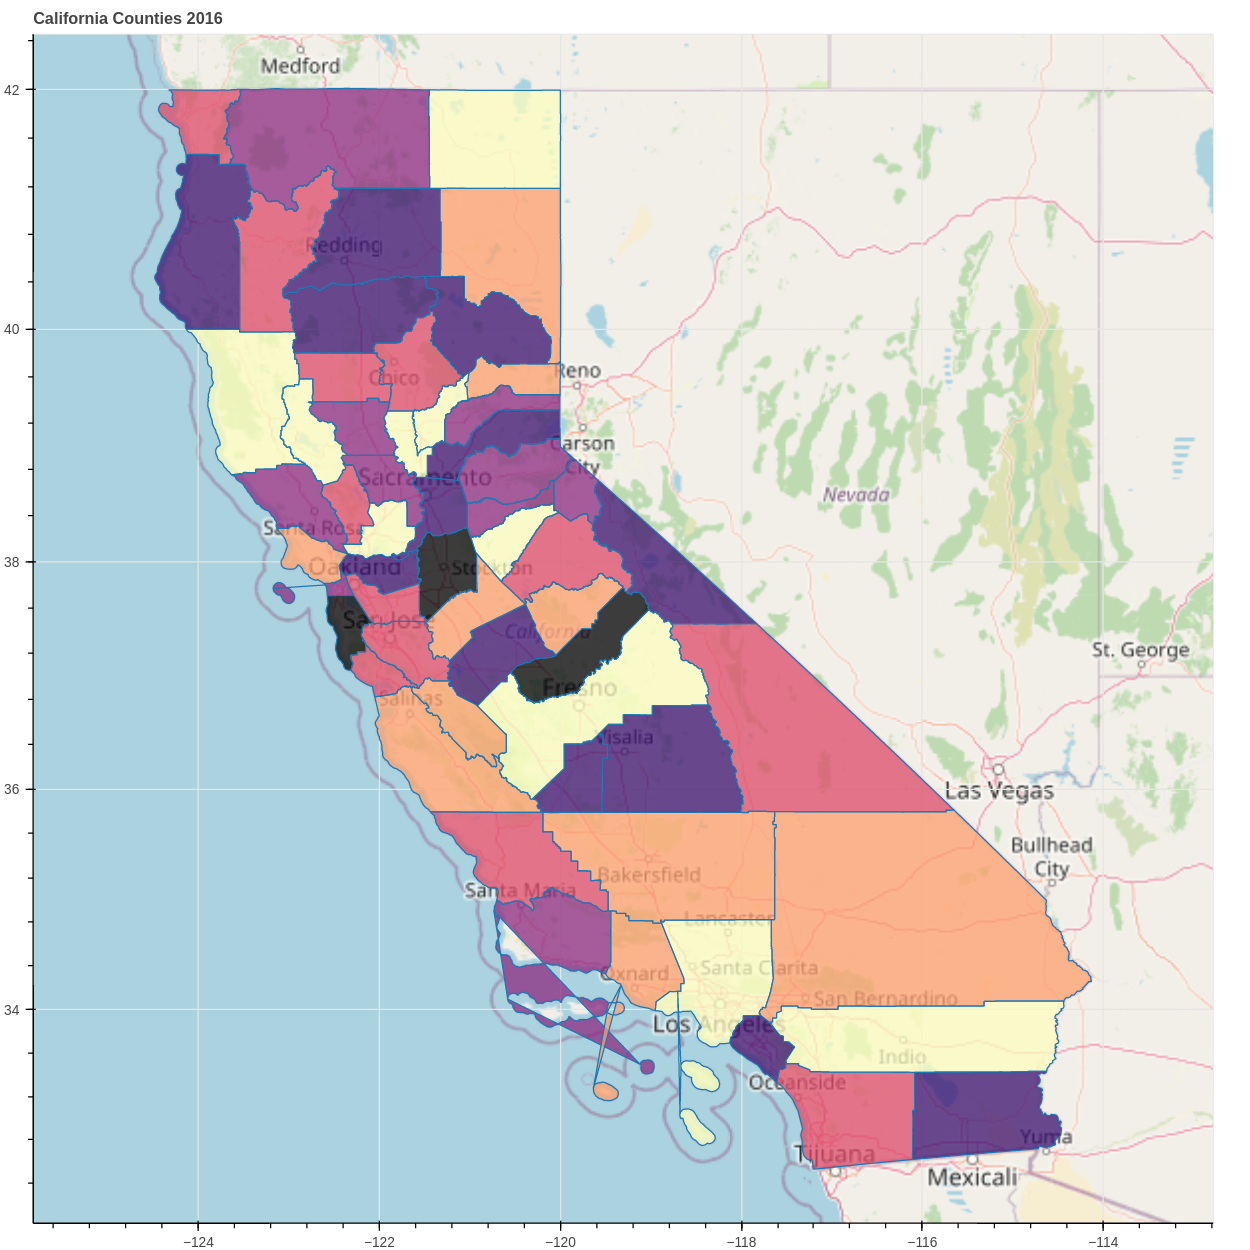
Advanced Usage
Example for plotting from shapefile. Shapefile is of California's county boundaries, download from here.
import shapefile  # pyshp module


from bokeh.palettes import Magma6

from pathlib import Path

from random import choice

from shapely.geometry import Polygon

from wktplot.plots.osm import OpenStreetMapsPlot


COUNTIES_PATH = Path("/path/to/CA_Counties_TIGER2016.shp")


# Create plot and disable mercator calculation

# because data has already been projected

plot = OpenStreetMapsPlot(

    title="California Counties 2016",

    height=1000,

    width=1000,

    disable_mercator=True,

)


# Read shapefile data points from file

with shapefile.Reader(COUNTIES_PATH) as shp:

    for shape in shp.shapes():

        plot.add_shape(

            shape=Polygon(shape.points),

            fill_color=choice(Magma6),

            fill_alpha=0.75,

        )


# Save plot to disk [./california_counties_2016.html]

plot.save()
Which will result in this output:
Development
Bugs / Feature Requests
Please open an Issue in Github with any bugs found or feature requests, and follow the prompts so that developers can reproduce or implement the necessary changes.
Local development
Development of this model is centered around the Makefile. All you need to spin up a working environment to build and test this module can be done with the Makefile.
-
Clone the repository onto your machine.
git clone https://github.com/FuzzFoundation/WKTPlot.git
-
Create the Python virtual environment and install module's development / testing dependencies. This will also install WKTPlot in develop mode.
make develop -
Activate virtual environment
source venv/bin/activate
-
Run linting and unittests.
make test
-
When you want to remove the virtual environment and clean up after development.
deactivate

make clean  # This will remove all generated files, like .coverage and build/

make sparkling  # This will remove all generate files and the virtual env.
Release history Release notifications | RSS feed


Download files
Download the file for your platform. If you're not sure which to choose, learn more about installing packages.
Source Distributions
Built Distribution
Filter files by name, interpreter, ABI, and platform.
If you're not sure about the file name format, learn more about wheel file names.
Copy a direct link to the current filters
File details
Details for the file wktplot-2.3.2-py2.py3-none-any.whl.
File metadata
- Download URL: wktplot-2.3.2-py2.py3-none-any.whl
- Upload date:
- Size: 12.0 kB
- Tags: Python 2, Python 3
- Uploaded using Trusted Publishing? No
- Uploaded via: twine/4.0.1 CPython/3.9.15
File hashes
| Algorithm | Hash digest | |
|---|---|---|
| SHA256 |
08040287cbdc9c0355a3e8ce3e47d70561a2f0bbcc2614f7a2a133a097f35656
|
|
| MD5 |
c3a5ac5947c173b12f30e07a290c2e7e
|
|
| BLAKE2b-256 |
f51ef6df6002b31c95b27a770aa771d3148f536d313f897f06e1ac7aa8d8370d
|


