Tools for diffraction simulation of s3dxrd type experiments.

Project description


Simulate X-ray Diffraction from Polycrystals in 3D.

The X-R ay D iffraction SIMULATOR package defines polycrystals as a mesh of tetrahedral single crystals and simulates diffraction as collected by a 2D discretized detector array while the sample is rocked around an arbitrary rotation axis.
xrd_simulator was originally developed with the hope to answer questions about measurement optimization in scanning x-ray diffraction experiments. However, xrd_simulator can simulate a wide range of experimental diffraction setups. The essential idea is that the sample and beam topology can be arbitrarily specified, and their interaction simulated as the sample is rocked. This means that standard “non-powder” experiments such as scanning-3dxrd and full-field 3dxrd (or HEDM if you like) can be simulated as well as more advanced measurement sequences such as helical scans for instance. It is also possible to simulate powder like scenarios using orientation density functions as input.
Introduction
Before reading all the boring documentation (which is hosted here) let’s dive into some end to end examples to get us started on a good flavour.
The xrd_simulator is built around four python objects which reflect a diffraction experiment:
A beam of x-rays (using the xrd_simulator.beam module)
A 2D area detector (using the xrd_simulator.detector module)
A 3D polycrystal sample (using the xrd_simulator.polycrystal module)
A rigid body sample motion (using the xrd_simulator.motion module)
Once these objects are defined it is possible to let the detector collect scattering of the polycrystal as the sample undergoes the prescribed rigid body motion while being illuminated by the xray beam.
Let’s go ahead and build ourselves some x-rays:
import numpy as np
from xrd_simulator.beam import Beam
# The beam of xrays is represented as a convex polyhedron
# We specify the vertices in a numpy array.
beam_vertices = np.array([
    [-1e6, -500., -500.],
    [-1e6, 500., -500.],
    [-1e6, 500., 500.],
    [-1e6, -500., 500.],
    [1e6, -500., -500.],
    [1e6, 500., -500.],
    [1e6, 500., 500.],
    [1e6, -500., 500.]])

beam = Beam(
    beam_vertices,
    xray_propagation_direction=np.array([1., 0., 0.]),
    wavelength=0.28523,
    polarization_vector=np.array([0., 1., 0.]))
We will also need to define a detector:
from xrd_simulator.detector import Detector
# The detector plane is defined by it's corner coordinates det_corner_0,det_corner_1,det_corner_2
detector = Detector(pixel_size_z=75.0,
                    pixel_size_y=55.0,
                    det_corner_0=np.array([142938.3, -38400., -38400.]),
                    det_corner_1=np.array([142938.3, 38400., -38400.]),
                    det_corner_2=np.array([142938.3, -38400., 38400.]))
Next we go ahead and produce a sample, to do this we need to first define a mesh that describes the topology of the sample, in this example we make the sample shaped as a ball:
from xrd_simulator.mesh import TetraMesh
# xrd_simulator supports several ways to generate a mesh, here we
# generate meshed solid sphere using a level set.
mesh = TetraMesh.generate_mesh_from_levelset(
    level_set=lambda x: np.linalg.norm(x) - 768.0,
    bounding_radius=769.0,
    max_cell_circumradius=450.)
Every element in the sample is composed of some material, or “phase”, we define the present phases in a list of xrd_simulator.phase.Phase objects, in this example only a single phase is present:
from xrd_simulator.phase import Phase
quartz = Phase(unit_cell=[4.926, 4.926, 5.4189, 90., 90., 120.],
               sgname='P3221',  # (Quartz)
               path_to_cif_file=None  # phases can be defined from crystalographic information files
               )
The polycrystal sample can now be created. In this example the crystal elements have random orientations and the strain is uniformly zero in the sample:
from scipy.spatial.transform import Rotation as R
from xrd_simulator.polycrystal import Polycrystal
orientation = R.random(mesh.number_of_elements).as_matrix()
polycrystal = Polycrystal(mesh,
                          orientation,
                          strain=np.zeros((3, 3)),
                          phases=quartz,
                          element_phase_map=None)
We may save the polycrystal to disc by using the builtin save() command as
polycrystal.save('my_polycrystal', save_mesh_as_xdmf=True)
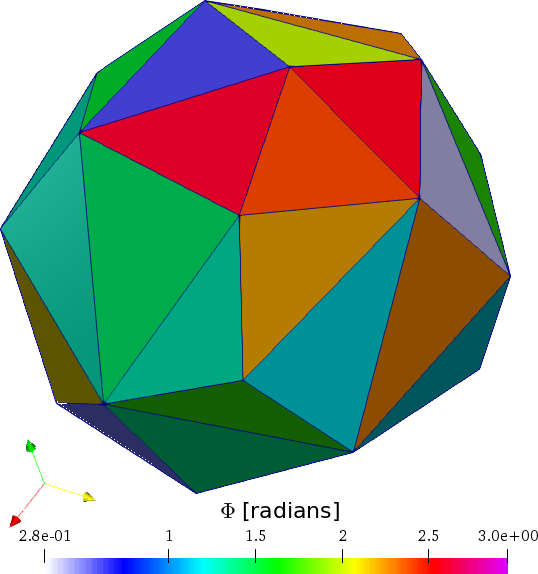
We can visualize the sample by loading the .xdmf file into your favorite 3D rendering program. In paraview the sampled colored by one of its Euler angles looks like this:
We can now define some motion of the sample over which to integrate the diffraction signal:
from xrd_simulator.motion import RigidBodyMotion
motion = RigidBodyMotion(rotation_axis=np.array([0, 1/np.sqrt(2), -1/np.sqrt(2)]),
                         rotation_angle=np.radians(1.0),
                         translation=np.array([123, -153.3, 3.42]))
Now that we have an experimental setup we may collect diffraction by letting the beam and detector interact with the sample:
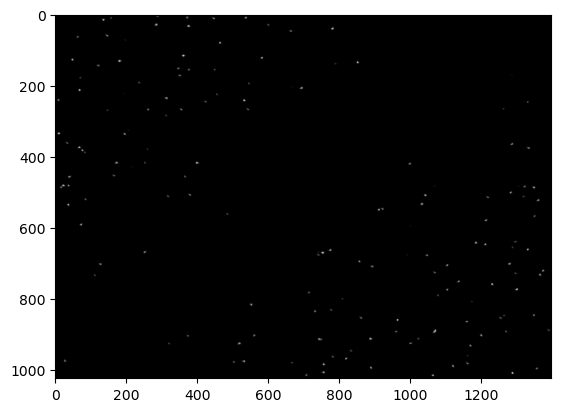
polycrystal.diffract(beam, detector, motion)
diffraction_pattern = detector.render(frames_to_render=0,
                                        lorentz=False,
                                        polarization=False,
                                        structure_factor=False,
                                        method="project")
The resulting rendered detector frame will look something like the below. Note that the positions of the diffraction spots may vary as the crystal orientations were randomly generated!:
import matplotlib.pyplot as plt
fig,ax = plt.subplots(1,1)
ax.imshow(diffraction_pattern, cmap='gray')
plt.show()
To compute several frames simply change the motion and collect the diffraction again. The sample may be moved before each computation using the same or another motion.
polycrystal.transform(motion, time=1.0)
polycrystal.diffract(beam, detector, motion)
Many more options for experimental setups and intensity rendering exist, have fun experimenting! The above example code can be found as a single .py file here.
Installation
Anaconda installation (Linux and Macos)
xrd_simulator is distributed on the conda-forge channel and the preferred way to install the xrd_simulator package is via Anaconda:
conda install -c conda-forge xrd_simulator
conda create -n xrd_simulator
conda activate xrd_simulator
This is meant to work across OS-systems and requires an Anaconda installation.
(The conda-forge feedstock of xrd_simulator can be found here.)
Anaconda installation (Windows)
To install with anaconda on windows you must make sure that external dependencies of pygalmesh are preinstalled on your system. Documentation on installing these package can be found elsewhere.
Pip Installation
Pip installation is possible, however, external dependencies of pygalmesh must the be preinstalled on your system. Installation of these will be OS dependent and documentation can be found elsewhere.:
pip install xrd-simulator
Source installation
Naturally one may also install from the sources:
git clone https://github.com/FABLE-3DXRD/xrd_simulator.git
cd xrd_simulator
python setup.py install
This will then again require the pygalmesh dependencies to be resolved beforehand.
Credits
xrd_simulator makes good use of xfab and pygalmesh. The source code of these repos can be found here:
Release history Release notifications | RSS feed


Download files
Download the file for your platform. If you're not sure which to choose, learn more about installing packages.
Source Distribution
Built Distribution
Filter files by name, interpreter, ABI, and platform.
If you're not sure about the file name format, learn more about wheel file names.
Copy a direct link to the current filters
File details
Details for the file xrd_simulator-0.4.1.tar.gz.
File metadata
- Download URL: xrd_simulator-0.4.1.tar.gz
- Upload date:
- Size: 52.5 kB
- Tags: Source
- Uploaded using Trusted Publishing? No
- Uploaded via: twine/3.7.1 importlib_metadata/4.11.4 pkginfo/1.8.2 requests/2.28.1 requests-toolbelt/0.9.1 tqdm/4.62.3 CPython/3.8.13
File hashes
| Algorithm | Hash digest | |
|---|---|---|
| SHA256 |
25a3ebdc215d74bc1cccb626b61e3ad5a7bcc2de8f6a0e796bd0a42d371a8a42
|
|
| MD5 |
abe5a2d25c5c3872e94ec90b1674ccb4
|
|
| BLAKE2b-256 |
b94c3a3b87b3a74b71921b9f1bf628a483b62dc69c727fa262550e7e741daa0f
|
File details
Details for the file xrd_simulator-0.4.1-py3-none-any.whl.
File metadata
- Download URL: xrd_simulator-0.4.1-py3-none-any.whl
- Upload date:
- Size: 60.2 kB
- Tags: Python 3
- Uploaded using Trusted Publishing? No
- Uploaded via: twine/3.7.1 importlib_metadata/4.11.4 pkginfo/1.8.2 requests/2.28.1 requests-toolbelt/0.9.1 tqdm/4.62.3 CPython/3.8.13
File hashes
| Algorithm | Hash digest | |
|---|---|---|
| SHA256 |
b3449f86af526786915f23897a3790fdebe372813a010cca253ce1b4a5cb4848
|
|
| MD5 |
6442cc9e464ba82fb881d06969bdbe9b
|
|
| BLAKE2b-256 |
ac45993324e43026a39ac6f2cef7538f88a8a681f20f9b24dc399cd8d076c8c9
|


