xtop, a command line xpu hardware monitoring tool that supports CPU, GPU, and NPU.

Project description
xtop


xtop is a pure user-space command-line hardware monitoring tool for CPU, GPU, and NPU devices.
Its primary goal is to give cluster users an nvtop-like terminal experience that can be installed from a Python environment with pip or pipx, without requiring sudo or a system package manager.
0. Why this project
There are many command-line based resource monitors, such as htop and nvtop, but they are usually distributed through the system's package manager, which means that administrator privileges are required to install them. However, in most cases, asking administrators to install these programs is not a pleasant process. So a program implemented in Python and distributed using pip should be more useful (at least to me).
1. Install
1.1 Install by pipx
pipx is an amazing tool to help you install and run applications written in Python. It is more like brew or apt. You can find more information about it here pipx. pipx is available on almost all major platforms and is usually provided by the corresponding package manager. If you haven't used pipx before, you can refer to this document to install it.
You can install xtop by the following command:
pipx install xtop
1.2 Install by pip
In any case, pip is always available, so if you can't install this program using pipx, you can install xtop by the following command:
pip install xtop
To upgrade xtop:
pip install xtop -U
# or
pip install xtop --upgrade
Please note that the command line entry for xtop is created by pip, and depending on the user, this entry may not in the system PATH. If you encounter this problem, pip will give you a prompt, follow the prompts to add entry to the system PATH.
2. Usage
Use as a command line tool
You can use this tool directly from the command line with the following command, just like other programs.
xtop [Options]
For example, use -n to open the NPU view:
xtop -n
Use the default Textual TUI:
xtop
Use the GPU view explicitly:
xtop -g
--tui is still accepted as a compatibility alias for the default interface:
xtop --tui
Use the legacy curses UI explicitly:
xtop --legacy -g
Enable legacy CSV logging:
xtop --legacy -g --log
Use simulated Nvidia GPU data for local UI development or demos:
xtop --mock-gpu
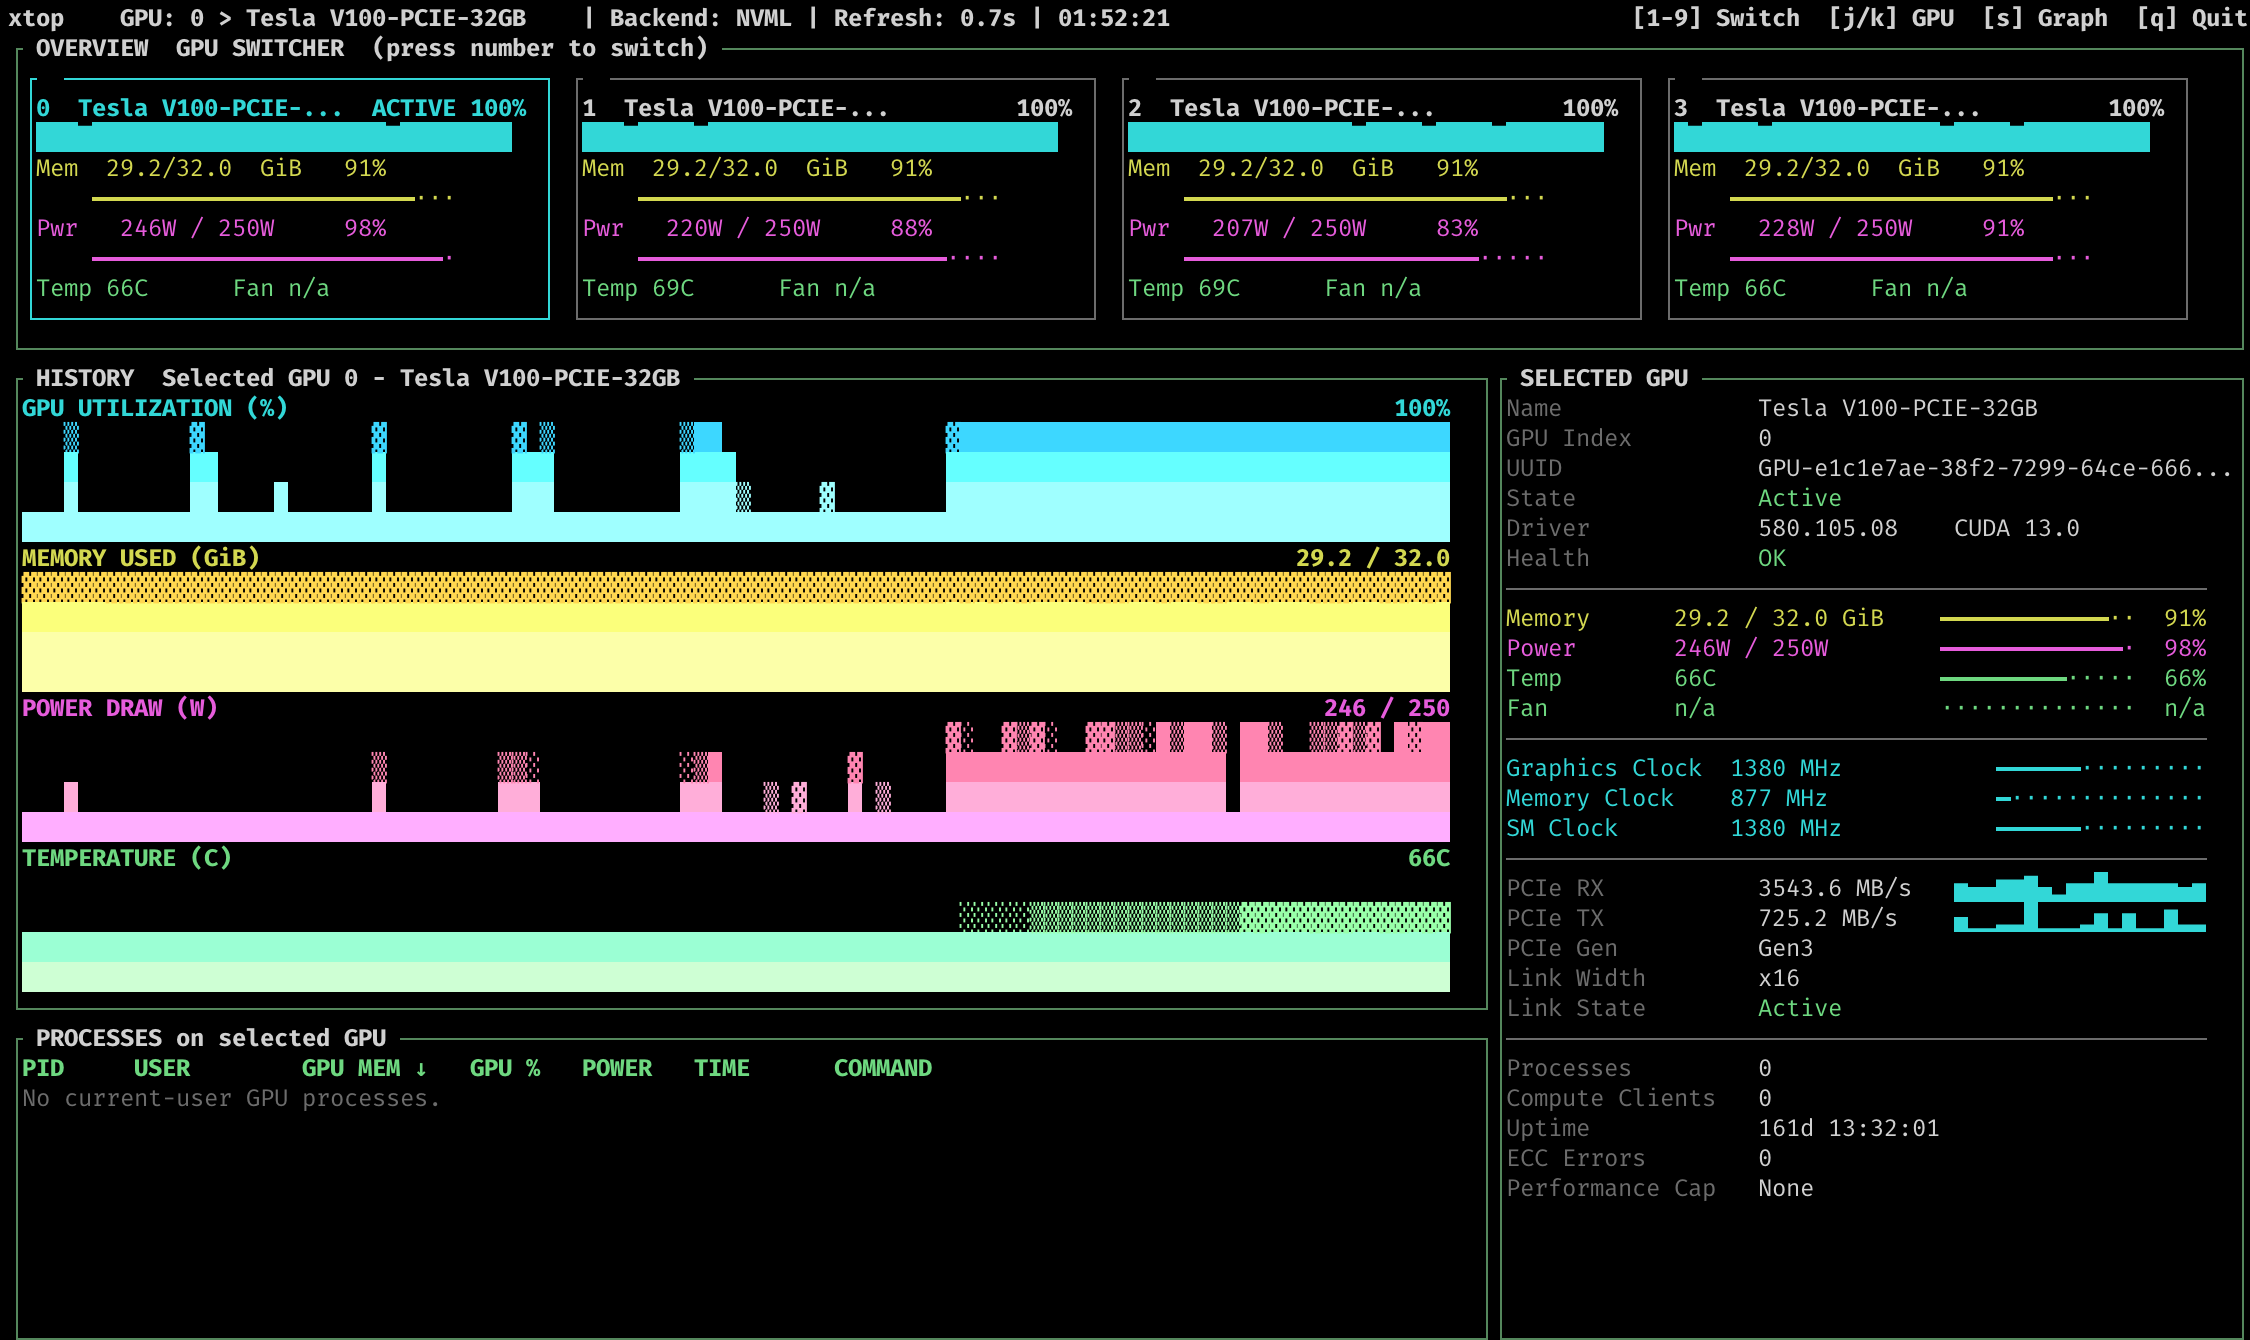
The Textual UI loads hardware backends lazily, so a missing GPU or NPU dependency will not block unrelated startup paths. On Linux and Windows with Nvidia GPUs, the Textual TUI prioritizes the main deep-learning workflow:
- current-user GPU processes
- GPU clocks, P-State and PCIe throughput
- a multi-GPU overview with selected-device details
- terminal-size-aware layout that compresses or expands sections automatically
For more command line flags, see:
xtop -h
Please note that the command line entry for xtop is created by pip, and depending on the user, this entry may not in the system PATH. If you encounter this problem, pip will give you a prompt, follow the prompts to add entry to the system PATH.
More functionalities are under development.
3. Supported (Tested) OS
- Linux (GPU and Intel NPU)
- Windows (Only Nvidia GPU)
- NVIDIA Jetson devices (Linux-based)
- Apple Silicon Devices (application startup supported; CPU telemetry pending)
4. Supported Hardware
- GPU: NVIDIA GPUs (via NVML), NVIDIA Jetson devices (direct sysfs for JetPack 6 and older, NVML for JetPack 7 and newer)
- NPU: Intel NPUs
4.1 Nvidia Textual TUI focus
The main Textual TUI path is optimized around Linux / Windows + Nvidia GPU monitoring in normal user space. In that path, xtop focuses on:
- device-level status such as utilization, memory, power, temperature, clocks and PCIe throughput
- current-user GPU process visibility for training and inference workloads
- a multi-GPU overview plus selected-device details
- responsive layouts that adapt to narrow and wide terminals
The Textual UI is the default interface. The older curses UI remains available with --legacy for compatibility.
5. Build from source
5.1 Build tools
Make sure the following Python build tools are already installed.
- setuptools
- build
- twine
5.2 Build package
clone the project, and run:
python -m build
After the build process, the source package and the binary whl package can be found in the dist folder.
6. Important Note
6.1 Important note about Windows
Python standard package curses does not support Windows, so we need windows-curses to run xtop on Windows. This package should be installed automatically when you install xtop. If you encounter any problems, you can install it manually by the following command:
pip install windows-curses
6.2 Important note about debian 12:
If you use system pip to install xtop, you will encounter this problem on debian12 and some related distributions (like Ubuntu 24.04):
error: externally-managed-environment

× This environment is externally managed
╰─> To install Python packages system-wide, try apt install
    python3-xyz, where xyz is the package you are trying to
    install.

    If you wish to install a non-Debian-packaged Python package,
    create a virtual environment using python3 -m venv path/to/venv.
    Then use path/to/venv/bin/python and path/to/venv/bin/pip. Make
    sure you have python3-full installed.

    For more information visit http://rptl.io/venv

note: If you believe this is a mistake, please contact your Python installation or OS distribution provider. You can override this, at the risk of breaking your Python installation or OS, by passing --break-system-packages.
hint: See PEP 668 for the detailed specification.
This is due to the fact that system Python is not supposed to be managed by pip. You can simply use pipx to install xtop. Or you can use a virtual environment (venv), conda environment or force remove this restriction (not recommended).
Release history Release notifications | RSS feed


Download files
Download the file for your platform. If you're not sure which to choose, learn more about installing packages.
Source Distribution
Built Distribution
Filter files by name, interpreter, ABI, and platform.
If you're not sure about the file name format, learn more about wheel file names.
Copy a direct link to the current filters
File details
Details for the file xtop-0.6.1.tar.gz.
File metadata
- Download URL: xtop-0.6.1.tar.gz
- Upload date:
- Size: 55.9 kB
- Tags: Source
- Uploaded using Trusted Publishing? No
- Uploaded via: twine/6.2.0 CPython/3.9.24
File hashes
| Algorithm | Hash digest | |
|---|---|---|
| SHA256 |
c22206766ba332aceb81af432c4d8b0b1d793e46fe102bd49f83806ba2440d41
|
|
| MD5 |
e6f54dcdd25d4463fd8440caff6e34b8
|
|
| BLAKE2b-256 |
105f7f61cb483032ef7d00dd98925a08097a2dca8ff571eae0447d5adad36ab6
|
File details
Details for the file xtop-0.6.1-py3-none-any.whl.
File metadata
- Download URL: xtop-0.6.1-py3-none-any.whl
- Upload date:
- Size: 53.0 kB
- Tags: Python 3
- Uploaded using Trusted Publishing? No
- Uploaded via: twine/6.2.0 CPython/3.9.24
File hashes
| Algorithm | Hash digest | |
|---|---|---|
| SHA256 |
d55f80da7dc5f93ef382641d9f9760f24af6b92e0596e3a08e784c2115d347c5
|
|
| MD5 |
624c7ed4cf7beac407f282bd8f0d4834
|
|
| BLAKE2b-256 |
d0e9616fc913460404b58a3b30b550ecd4176fb7eef098f8f660c11f2b132daf
|


