
Blur Generator





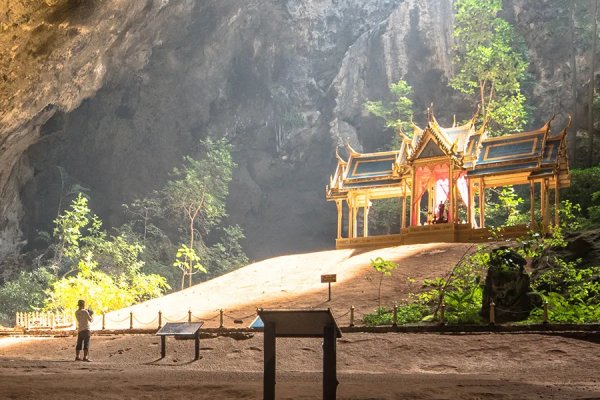
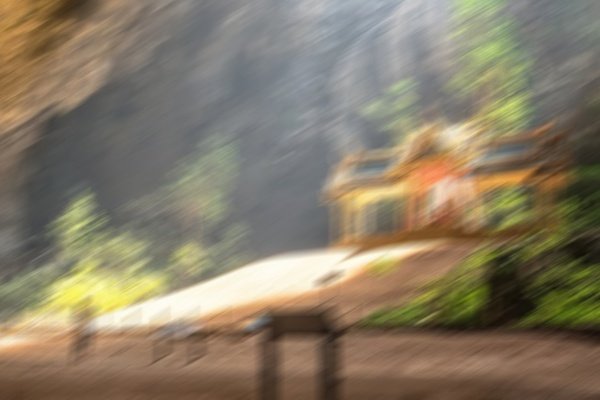
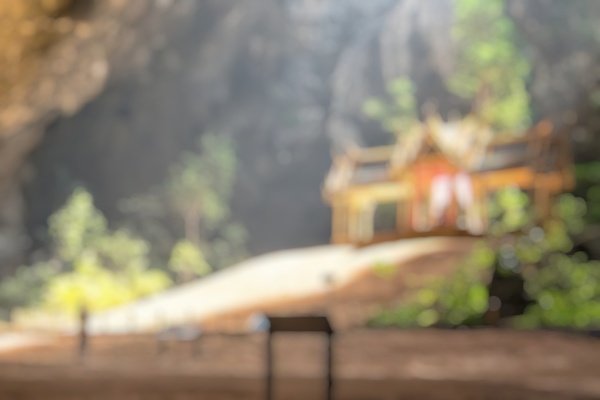
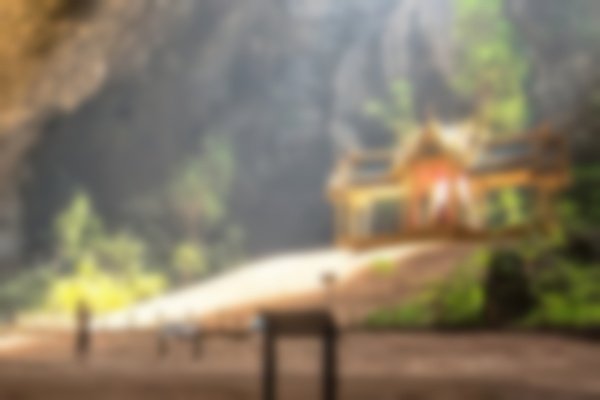
Blur Generator adds motion, lens (bokeh) or Gaussian blur to images, from Python or from the command line. Give it a depth map and it blurs every part of a photo by how far away it is, including a camera-like depth of field that keeps one distance sharp and blurs what lies in front of and behind it. Use it to make training data for blur detection or deblurring models (see simply-blur-detector), or just to fake a portrait mode.
| Original | Motion |
|---|---|
 |
 |
| Lens | Gaussian |
 |
 |
Installation
pip install BlurGenerator
It needs Python 3.7 or newer and installs OpenCV (opencv-python) and NumPy.
On a server or in a slim Docker image (for example python:3.12-slim), import cv2 can fail with
libxcb.so.1: cannot open shared object file or libGL.so.1: cannot open shared object file. OpenCV needs
a few system libraries there; on Debian or Ubuntu install them with:
apt-get install -y libgl1 libglib2.0-0
Quick start
The examples use the sample images in doc/.
Run them from the root of a clone of this repository, or point them at your own images.
From the command line:
blurgenerator --type lens --input ./doc/readme/sample.jpg --output lens.jpg
From Python:
import cv2
from blurgenerator import lens_blur

img = cv2.imread('./doc/readme/sample.jpg')
result = lens_blur(img, radius=5, components=4, exposure_gamma=2)
cv2.imwrite('./lens.jpg', result)
Both write the same picture: the Python call spells out the defaults the command uses.
The three blur types
The pictures at the top were made with these commands:
blurgenerator --type motion --motion_blur_size 25 --input ./doc/readme/sample.jpg --output motion.jpg
blurgenerator --type lens --lens_radius 8 --lens_exposure_gamma 5 --input ./doc/readme/sample.jpg --output lens.jpg
blurgenerator --type gaussian --gaussian_kernel 31 --input ./doc/readme/sample.jpg --output gaussian.jpg
The same in Python:
import cv2
from blurgenerator import motion_blur, lens_blur, gaussian_blur

img = cv2.imread('./doc/readme/sample.jpg')
cv2.imwrite('./motion.jpg', motion_blur(img, size=25, angle=30))
cv2.imwrite('./lens.jpg', lens_blur(img, radius=8, components=4, exposure_gamma=5))
cv2.imwrite('./gaussian.jpg', gaussian_blur(img, 31))
- Motion blur smears the image along a straight line, as if the camera moved:
sizeis the length in pixels andanglethe direction in degrees. - Lens blur imitates an out-of-focus lens: bright spots turn into round discs.
radiusis the size of the disc andexposure_gammahow much highlights bloom. It follows Circularly symmetric convolution and lens blur. - Gaussian blur is a plain soft blur. With the default
sigma=5, kernels wider than about 31 pixels look the same; passsigma=0to let the kernel size set the strength.
Blur by depth
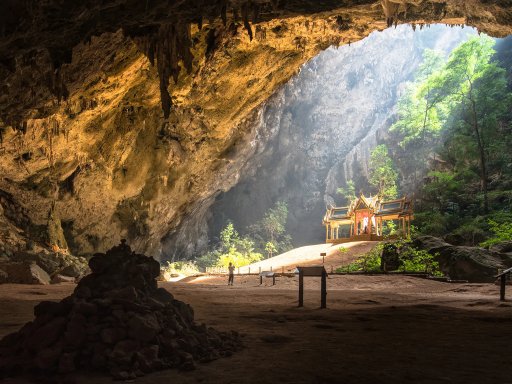
A depth map is a grayscale image, the same size as the photo, whose values (0-255) say how far away each
pixel is. The depth map tells Blur Generator how much to blur each part of the image: it splits the depth
values into layers (num_layers) and blurs each layer by its own amount, from min_blur at depth 0 to
max_blur at depth 255. This feature started with
issue #1.
| Photo | Depth map (brighter is nearer) |
|---|---|
 |
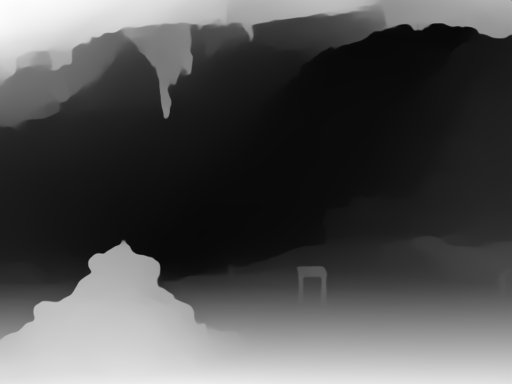 |
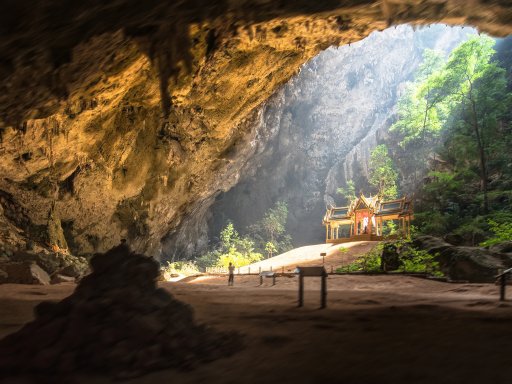
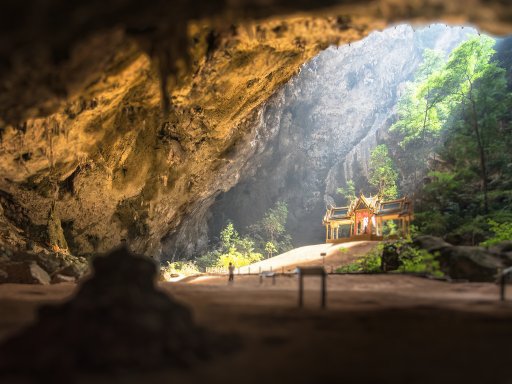
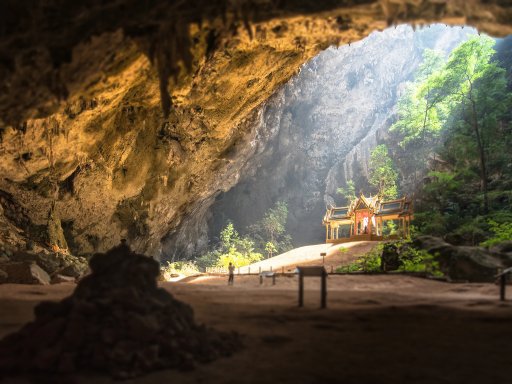
In this depth map nearer things are brighter, so the blur grows towards the camera: the rocks in front get blurry and the far end of the cave stays sharp.
| Motion | Lens | Gaussian |
|---|---|---|
 |
 |
 |
blurgenerator --type motion --input ./doc/depth-test.jpg --input_depth_map ./doc/depth-map-test.png --depth_max_blur 50 --output depth-motion.png
blurgenerator --type lens --input ./doc/depth-test.jpg --input_depth_map ./doc/depth-map-test.png --depth_max_blur 40 --output depth-lens.png
blurgenerator --type gaussian --input ./doc/depth-test.jpg --input_depth_map ./doc/depth-map-test.png --depth_max_blur 50 --output depth-gaussian.png
import cv2
from blurgenerator import lens_blur_with_depth_map

img = cv2.imread('./doc/depth-test.jpg')
depth_map = cv2.imread('./doc/depth-map-test.png')
result = lens_blur_with_depth_map(img, depth_map, components=4, exposure_gamma=2, max_blur=40)
cv2.imwrite('./depth-lens.png', result)
motion_blur_with_depth_map and gaussian_blur_with_depth_map work the same way. Want it the other way
round, sharp in front and blurry behind? Swap the two values (min_blur=40, max_blur=1) or invert the depth
map (255 - depth_map).
Focus on a depth (depth of field)
A real camera keeps one distance sharp and blurs both what is closer and what is farther away. Pick that
distance with focus (a depth value from 0 to 255) or with focus_point (a pixel of the depth map whose
depth you want sharp), and optionally keep a whole band of depths sharp with focus_range.
This answers issue #5.
| Default: blur grows with depth | focus_point=(480, 1150), focus_range=20 |
|---|---|
|
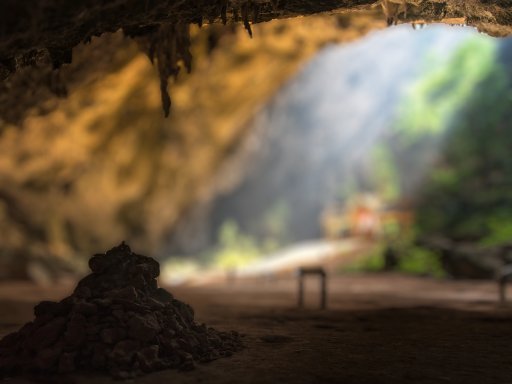 |
On the right the pile of rocks (depth 179 at pixel 480, 1150) is sharp. The cave behind it and the floor and ceiling in front of it are blurred, more the further their depth is from 179.
blurgenerator --type lens --input ./doc/depth-test.jpg --input_depth_map ./doc/depth-map-test.png --depth_max_blur 40 --depth_focus_point 480 1150 --depth_focus_range 20 --output focus.png
import cv2
from blurgenerator import lens_blur_with_depth_map

img = cv2.imread('./doc/depth-test.jpg')
depth_map = cv2.imread('./doc/depth-map-test.png')
result = lens_blur_with_depth_map(img, depth_map, components=4, exposure_gamma=2, max_blur=40,
                                  focus_point=(480, 1150), focus_range=20)
# Same as focus=179, the depth of that pixel.
cv2.imwrite('./focus.png', result)
How much each depth is blurred, on a checkerboard with a depth map that goes from 0 on the left to 255 on the right:
| Depth 0 on the left, 255 on the right | |
|---|---|
| Depth map |  |
| Default |  |
focus=128, focus_range=40 |
 |
The rules with a focus:
- Depths within
focus_range / 2offocusare not blurred at all (focus_range=10around 50 keeps 45-55 sharp). - Just outside that band the blur is about
min_blur. It grows with the distance from the band and reachesmax_blurat whichever end of the 0-255 scale is farther away. - A depth in front of the band and one behind it at the same distance get the same blur.
- Without
focus,focus_pointandfocus_rangethe result is exactly what it was before these options existed.
Command line
usage: blurgenerator [-h] [--input INPUT] [--input_depth_map INPUT_DEPTH_MAP]
                     [--output OUTPUT] [--type TYPE]
                     [--motion_blur_size MOTION_BLUR_SIZE]
                     [--motion_blur_angle MOTION_BLUR_ANGLE]
                     [--lens_radius LENS_RADIUS]
                     [--lens_components LENS_COMPONENTS]
                     [--lens_exposure_gamma LENS_EXPOSURE_GAMMA]
                     [--gaussian_kernel GAUSSIAN_KERNEL]
                     [--depth_num_layers DEPTH_NUM_LAYERS]
                     [--depth_min_blur DEPTH_MIN_BLUR]
                     [--depth_max_blur DEPTH_MAX_BLUR]
                     [--depth_focus DEPTH_FOCUS]
                     [--depth_focus_range DEPTH_FOCUS_RANGE]
                     [--depth_focus_point X Y]

Add motion, lens or gaussian blur to an image, optionally guided by a depth
map.

options:
  -h, --help            show this help message and exit
  --input INPUT         Image to blur (.jpg, .jpeg or .png). Required.
  --input_depth_map INPUT_DEPTH_MAP
                        Depth map (.jpg, .jpeg or .png, same size as the
                        input) that decides how much each part of the image is
                        blurred. Optional.
  --output OUTPUT       Where to save the result. Default is `./result.png`.
  --type TYPE           Blur type: `motion`, `lens` or `gaussian`. Default is
                        `motion`.
  --motion_blur_size MOTION_BLUR_SIZE
                        Length of the motion blur in pixels. Default is 100.
  --motion_blur_angle MOTION_BLUR_ANGLE
                        Direction of the motion blur in degrees. Default is
                        30.
  --lens_radius LENS_RADIUS
                        Radius of the lens blur in pixels. Default is 5.0.
  --lens_components LENS_COMPONENTS
                        Kernel components of the lens blur, 1 to 6; more is
                        rounder and slower. Default is 4.
  --lens_exposure_gamma LENS_EXPOSURE_GAMMA
                        How much bright spots bloom in the lens blur; 1 turns
                        it off. Default is 2.
  --gaussian_kernel GAUSSIAN_KERNEL
                        Kernel size of the gaussian blur in pixels (sigma is
                        5). Default is 100.
  --depth_num_layers DEPTH_NUM_LAYERS
                        Number of depth layers; more layers give smoother
                        transitions but take longer. Default is 10.
  --depth_min_blur DEPTH_MIN_BLUR
                        Blur at depth 0, or right next to the focus. Default
                        is 1.
  --depth_max_blur DEPTH_MAX_BLUR
                        Blur at depth 255, or farthest from the focus. Default
                        is 100.
  --depth_focus DEPTH_FOCUS
                        Depth (0-255) to keep sharp; the blur then grows with
                        the distance from it, towards both 0 and 255. Default
                        is off: the blur grows with the depth.
  --depth_focus_range DEPTH_FOCUS_RANGE
                        Width of the depth band around the focus that stays
                        sharp: 10 keeps focus-5 to focus+5 sharp. Default is
                        0.
  --depth_focus_point X Y
                        Focus on the depth of this pixel of the depth map (X =
                        column, Y = row), instead of --depth_focus.
- Without
--input_depth_map, the--depth_*options are ignored. With it,--motion_blur_size,--lens_radiusand--gaussian_kernelare ignored, because the depth map decides the strength. --gaussian_kernelalways uses sigma 5, so values above about 31 look the same. The Python function takes asigmaargument.- When a check fails (no
--input, a missing file, an unsupported file type or blur type), the command prints a line starting with-----and exits with code 0. If you call it from a script, check that the output file exists. Invalid settings, such as--depth_focus 300, exit with code 1.
Python API
All functions take an image as a NumPy array (for example from cv2.imread) and return a new image; the
input is not modified. Invalid arguments raise ValueError with a message that says what to fix. The
depth functions also raise TypeError when an image is None, which is what cv2.imread returns for a
wrong path.
motion_blur(img, size=None, angle=None)
| Argument | Default | Meaning |
|---|---|---|
size |
random 20-80 | Length of the motion in pixels, at least 1. |
angle |
random 15-30 | Direction in degrees, counter-clockwise; 0 is horizontal. |
lens_blur(img, radius=3.0, components=5, exposure_gamma=5.0)
| Argument | Default | Meaning |
|---|---|---|
radius |
3.0 | Radius of the blur disc in pixels, above 0. |
components |
5 | Kernel components, 1 to 6 (higher values use 6). More is rounder and slower. |
exposure_gamma |
5.0 | How much highlights bloom into discs; 1 turns it off. |
gaussian_blur(img, kernel, sigma=5)
| Argument | Default | Meaning |
|---|---|---|
kernel |
required | Size of the filter window in pixels; even values are rounded up to odd. |
sigma |
5 | Strength of the blur in pixels; 0 derives it from kernel. |
Blur by depth
motion_blur_with_depth_map(img, depth_map, angle=30, num_layers=10, min_blur=1, max_blur=100,
                           *, focus=None, focus_range=0, focus_point=None)
lens_blur_with_depth_map(img, depth_map, components=5, exposure_gamma=5, num_layers=10, min_blur=1,
                         max_blur=100, *, focus=None, focus_range=0, focus_point=None)
gaussian_blur_with_depth_map(img, depth_map, sigma=5, num_layers=10, min_blur=1, max_blur=100,
                             *, focus=None, focus_range=0, focus_point=None)
angle, components, exposure_gamma and sigma work as in the functions above. The blur amount (the
motion size, the lens radius or the Gaussian kernel) comes from the depth map:
| Argument | Default | Meaning |
|---|---|---|
depth_map |
required | 8-bit depth map, grayscale or BGR, the same size as img. |
num_layers |
10 | Number of depth layers; more layers give smoother transitions but take longer. |
min_blur |
1 | Blur at depth 0, or right next to the focus. 0 means sharp. |
max_blur |
100 | Blur at depth 255, or farthest from the focus. |
focus |
off | Depth (0-255) to keep sharp; the blur grows with the distance from it in both directions. |
focus_range |
0 | Width of the band around the focus that stays sharp. |
focus_point |
off | (x, y) pixel of the depth map whose depth becomes the focus; instead of focus. |
The focus options are keyword-only. The command line has its own defaults, listed in --help.
Development
git clone https://github.com/NatLee/blur-generator.git
cd blur-generator
pip install -e . pytest
pytest tests
tox -e py runs the same tests and also checks that the source package contains every file.
GitHub Actions runs them on Python 3.7 to 3.14 on Linux, and on Python 3.14 on Windows and macOS.
The pictures in this README are real output of the tool. To make them again after a change, run
python scripts/make_readme_images.py from the root of the repository.
Contributor
 Nat Lee |
Reference
License
1 maintainer

Metadata
1 maintainer
Release files for BlurGenerator 1.2.0
For a detailed explanation of source distributions (sdists) and built distributions (wheels), please see the package formats documentation.
Source distribution (sdist)
| File | Size | Uploaded | Provenance | Actions |
|---|---|---|---|---|
| blurgenerator-1.2.0.tar.gz | 19.5 MB | Without provenance | Details for blurgenerator-1.2.0.tar.gz |
Built distribution (wheel)
| File | Interpreter | ABI | Platform | Actions Reset |
|---|---|---|---|---|
| blurgenerator-1.2.0-py3-none-any.whl | Python 3 | none | any | Details for blurgenerator-1.2.0-py3-none-any.whl |
Total release size: 19.6 MB
Release files / blurgenerator-1.2.0.tar.gz
| Download URL | blurgenerator-1.2.0.tar.gz |
|---|---|
| Size | 19.5 MB |
| Tags | Source |
|
SHA-256 checksum How to use checksums |
1bd03e61bfd1ba05d444a617f59ab4147ca132adedc67775d10fec18a95fa077
|
|
BLAKE2b-256 checksum How to use checksums |
951f83dab93254274208f1bce5b726907a15fcf7a9131f4b77ad2db61791f359
|
| Upload date | |
|
Uploaded using Trusted Publishing? What is trusted publishing? |
No |
| Uploaded via |
twine/7.0.0 CPython/3.15.1
|
Release files / blurgenerator-1.2.0-py3-none-any.whl
| Download URL | blurgenerator-1.2.0-py3-none-any.whl |
|---|---|
| Size | 20.1 kB |
| Tags | Python 3 |
|
SHA-256 checksum How to use checksums |
9a4665cf388aa588499bc9cb28bfc7571f00c0b88186a7b35a43d14636146ec4
|
|
BLAKE2b-256 checksum How to use checksums |
764c47436f131065c5a6336982298a76f2bf633f8c4dbed5f246095689da46e5
|
| Upload date | |
|
Uploaded using Trusted Publishing? What is trusted publishing? |
No |
| Uploaded via |
twine/7.0.0 CPython/3.15.1
|
Security for BlurGenerator 1.2.0
Provenance
Provenance describes where a file came from. On PyPI, provenance is shared via attestations, which provide a verifiable record of the build or publishing details. View details, limitations and caveats.
No provenance found
None of the files in this release were uploaded with provenance metadata.
A note on package security
PyPI is a repository for distributing packages, not a service for auditing them. While third-party security researchers and our staff do their best to detect and remove malicious packages, PyPI cannot guarantee the quality, security or suitability of any given package.
To learn more about protecting yourself from malicious actors, visit our package security documentation.














