
FedGWAS: a lightweight federated pipeline for privacy-preserving GWAS screening




Overview
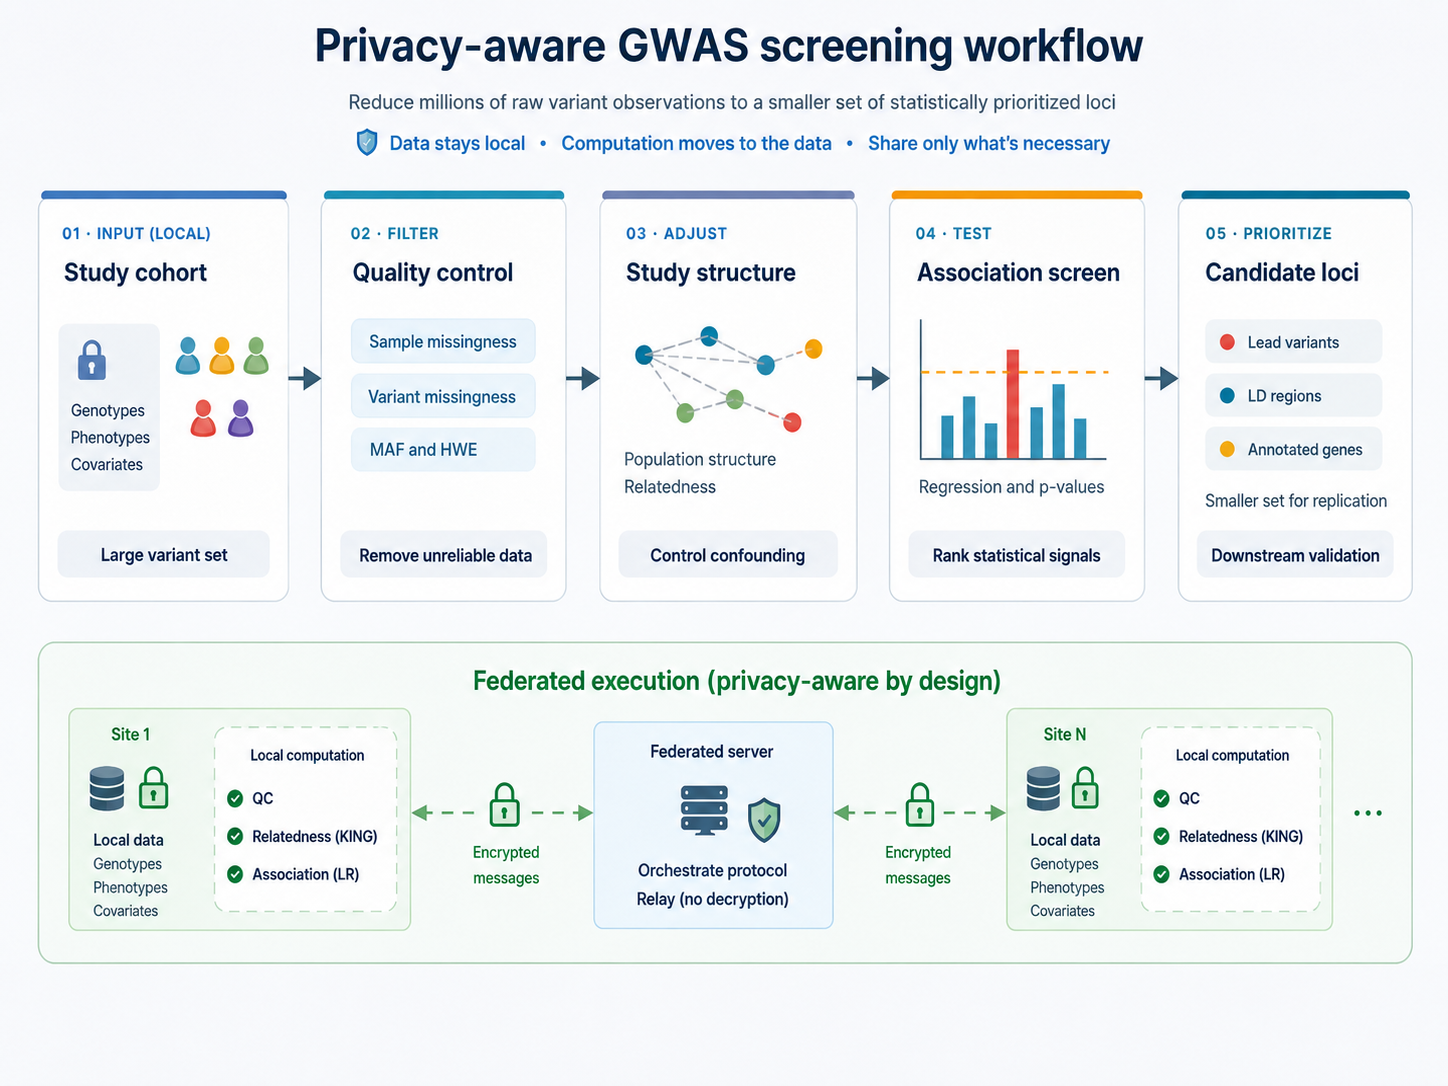
FedGWAS is a lightweight federated pipeline for privacy-preserving GWAS screening across distributed genomic datasets. It coordinates federated quality control, KING-based relatedness screening, and logistic-regression association screening under a client–server architecture, while keeping genotype-level computations local to participating clients. FedGWAS uses Flower for federated coordination, PLINK for genetics operations, and encryption, shuffling, anonymization, and lightweight secret-sharing so that the server can relay selected protocol messages without decrypting them.
Use FedGWAS when multiple participating institutions need a shared GWAS screening lifecycle and cannot pool individual-level genotype data.
To get started and learn how to use FedGWAS, use the following resources:
- Documentation site: Documentation
- Examples gallery: Examples
- API reference: API Reference
- Technical details: Technical Details
Prerequisites
FedGWAS requires Python 3.11 or later, Flower, and PLINK. Input genotypes use PLINK 1.9 binary format (plink on PATH or configured per client). KING-based relatedness screening also needs PLINK 2 available as plink2. VCF input is supported via conversion to PLINK-compatible representations where configured.
plink --version
plink2 --version
For repository-based runs, you can also set the PLINK path in each client config if your environment does not expose plink globally.
FedGWAS Local Simulation Guide
Local simulation mode runs the full FedGWAS screening workflow on one machine by launching multiple simulated clients and a federated server through Flower. Use it to validate an installation, create simulation experiments from preset settings and generated data, prototype client (center) configs, and compare federated outputs against a centralized baseline without setting up a real federated deployment.
You can start local simulation in either of two ways:
- Recommended: install from PyPI and use
fedgwas-simcommand line interface (CLI) - Repository/local workflow: clone this repository and run the old scripts directly
Both workflows require:
- Python 3.11 or later
- PLINK 1.9 (
plink) and PLINK 2 (plink2) available onPATHor configured locally - Flower installed through the package or local environment
Recommended: PyPI CLI Workflow
Install the package:
python -m pip install FedGWAS
Verify that the simulation CLI is available:
fedgwas-sim --help
Create a standalone study directory and run the tiny two-client simulation:
mkdir my_study
cd my_study

# initialize study project directory
fedgwas-sim init
# setup data and configurations
fedgwas-sim setup-experiment syn-tiny --seed 42
# validation and run simulation
fedgwas-sim check
fedgwas-sim run --rounds 100
# evaluation and results collection
fedgwas-sim baseline generate --output data/centralized_baseline
fedgwas-sim evaluate results --baseline data/centralized_baseline --king
fedgwas-sim results collect --label tiny_run
The usage of the CLI can be found in the documentation site.
Repository/Local Script Workflow
Clone the repository if you want the old direct script workflow, bundled experiment files, cluster deployment scripts, documentation source, or developer tooling:
git clone https://github.com/idsla/Fed-GWAS.git
cd Fed-GWAS
python -m pip install -e .
With uv, you can install the local environment with:
git clone https://github.com/idsla/Fed-GWAS.git
cd Fed-GWAS
uv sync --python 3.11
Generate synthetic data:
python pipeline/simulation/simulated_data/generate_synthetic_data.py \
  --scale tiny \
  --partition-strategy even \
  --seed 42 \
  --output-dir experiments/correctness/tiny_even/data
Generate the centralized baseline:
python experiments/tools/generate_baseline.py \
  experiments/correctness/tiny_even/config.yaml
Run the federated simulation:
flwr run . local-simulation --stream
Or run with explicit release-smoke settings:
flwr run . local-simulation --stream --run-config \
  'simulation=true num-server-rounds=100 config_path="experiments/correctness/tiny_even/configs"'
Evaluate the run:
python experiments/tools/evaluation/evaluate_all.py \
  experiments/correctness/tiny_even/results_2 \
  --baseline experiments/correctness/tiny_even/data/tiny/centralized_baseline \
  --king
If you changed the active config output paths, pass the results directory from those config files instead.
Example Simulation Experiments
We have a few preset experiments with generated data and configs in the repository for testing and demonstration. You can find the details of these example experiments in the documentation and the experiment directories:
-
Tiny experiment details: experiments/correctness/tiny_even/README.md
-
Small experiment details: experiments/performance/small_even/README.md
-
Real-world data experiment details: experiments/real_world/1000genomes/README.md
FedGWAS Cluster Deployment Guide
Use federated deployment when the server and clients should run as separate Flower processes, usually on separate machines. One coordinating server runs SuperLink and submits the app. Each participating client runs a SuperNode with its own center config and local PLINK data.
FedGWAS provides two equivalent deployment modes. Both wrap flower-superlink, flower-supernode, and flwr run . local-deployment. Use Flower 1.19.x on every node. Pick one mode for a given run; do not mix them.
CLI
fedgwas-deploy server start --host 0.0.0.0 --daemon --log-file /tmp/superlink.log

fedgwas-deploy client start \
  --server <server-ip> \
  --center-id <k> \
  --config configs/center_k.yaml \
  --daemon

fedgwas-deploy server run --server <server-ip> --rounds 20 --scale tiny
Stop on each node separately: fedgwas-deploy server stop on the server, fedgwas-deploy client stop on each client.
Script deployment
Clone this repository on each node and run the wrappers from the repository root:
nohup cluster_deployment/scripts/cluster-start-server.sh --server-ip 0.0.0.0 \
  > /tmp/superlink.log 2>&1 &

cluster_deployment/scripts/cluster-start-client.sh \
  --server-ip <server-ip> \
  --client-id <k> \
  --config configs/center_k.yaml

cluster_deployment/scripts/cluster-run-app.sh \
  --server-ip <server-ip> \
  --rounds 20 \
  --scale tiny
Stop on each node separately: cluster_deployment/scripts/cluster-stop-all.sh.
Guides:
- Get Started: Federated Deployment
- CLI Deployment
- Script Deployment
- Worked example: examples/04three-node-deployment
Federated Protocol Summary
FedGWAS implements a four-stage GWAS screening lifecycle. These conceptual stages are realized as coordinated federated rounds (including initialization, chunking, and aggregation):
- Privacy-preserving initialization: clients exchange encrypted seed shares via the server, which acts only as a message relay, and derive a shared global seed
- Federated quality control: local sample-level missingness filtering, then encrypted variant-level summaries for harmonized MAF, missingness, and Hardy–Weinberg filters
- KING-based relatedness screening: chunked, anonymized kinship estimation
- Federated association screening: privacy-preserving tokens for local logistic-regression filtering, then federated logistic regression
The current implementation uses encryption, shuffling, anonymization, and lightweight secret-sharing. The server relays encrypted client-to-client payloads for selected stages and does not decrypt those payloads. Logging, metrics, and production- versus research-oriented output retention are configured separately and are not screening stages. See CURRENT_VERSION.md for the current privacy model, stage contracts, and limitations.
Population stratification handling, continuous traits, and association models other than case–control logistic regression are not part of the current screening protocol.
Troubleshooting (Common Issues)
plinkorplink2not found: install PLINK 1.9 and PLINK 2, and make sure both are onPATHor set in the client config.- Flower uses the wrong config: pass
--run-config 'config_path="..."'. - Empty or missing results: generate the tiny synthetic data and baseline before running.
- TestPyPI or PyPI install fails for a new release: check that the version in
pyproject.tomlhas been published and that dependency resolution can reach normal PyPI.
License
FedGWAS is distributed under the MIT License. See LICENSE.
Contributors and Creator
Software development is hosted at the Rutgers Institute in Data Science, Learning, and Application. The accompanying paper authors are Xinyue Wang (Renmin University of China), Sitao Min, and Jaideep Vaidya (Rutgers University).
Contributors:
1 maintainer

Release files for FedGWAS 0.0.1
For a detailed explanation of source distributions (sdists) and built distributions (wheels), please see the package formats documentation.
Source distribution (sdist)
| File | Size | Uploaded | |
|---|---|---|---|
| fedgwas-0.0.1.tar.gz | 37.9 MB | Details |
Built distribution (wheel)
| File | Interpreter | ABI | Platform | Reset |
|---|---|---|---|---|
| fedgwas-0.0.1-py3-none-any.whl | Python 3 | none | any | Details |
Total release size: 38.1 MB
Release files / fedgwas-0.0.1.tar.gz
| Download URL | fedgwas-0.0.1.tar.gz |
|---|---|
| Size | 37.9 MB |
| Tags | Source |
|
SHA-256 checksum How to use checksums |
34daae374f30563a48629de7878915f598a0bdf98a8e2b7a6a6c5a4b7585574e
|
|
BLAKE2b-256 checksum How to use checksums |
8e4d7df3930337c7b8505f70d3aa3ebc427d29d9aabdbe6ca62bd071ec5e4b07
|
| Upload date | |
|
Uploaded using Trusted Publishing? What is trusted publishing? |
Yes |
| Uploaded via |
twine/7.0.0 CPython/3.13.14
|
Provenance
Provenance describes where a file came from. On PyPI, provenance is shared via attestations, which provide a verifiable record of the build or publishing details. View details, limitations and caveats.


PyPI Publish Attestation
PyPI verified that this artifact, at this checksum, originated from the publisher listed below.
Signed by GitHub Actions, verified by PyPI on Aug 18, 2026.
Transparency logRelease files / fedgwas-0.0.1-py3-none-any.whl
| Download URL | fedgwas-0.0.1-py3-none-any.whl |
|---|---|
| Size | 218.2 kB |
| Tags | Python 3 |
|
SHA-256 checksum How to use checksums |
6fef3fb874a0fcdc282252fe19d97cae0cb8dd93ee568a41730de67084c91032
|
|
BLAKE2b-256 checksum How to use checksums |
3b7e5ca7a01a3214f122ab8624765195c2795b6ba3a035c3a1c1e38def6b6627
|
| Upload date | |
|
Uploaded using Trusted Publishing? What is trusted publishing? |
Yes |
| Uploaded via |
twine/7.0.0 CPython/3.13.14
|
Provenance
Provenance describes where a file came from. On PyPI, provenance is shared via attestations, which provide a verifiable record of the build or publishing details. View details, limitations and caveats.
PyPI Publish Attestation
PyPI verified that this artifact, at this checksum, originated from the publisher listed below.
Signed by GitHub Actions, verified by PyPI on Aug 18, 2026.
Transparency log












