JarvisAI is python library to build your own AI virtual assistant with natural language processing.

Project description
JarvisAI
Last Updated: 24 Oct, 2021
- What is Jarvis AI?
- Prerequisite
- Getting Started- How to use it?
- How to contribute?
- Future?
1. What is Jarvis AI-
Jarvis AI is a Python Module which is able to perform task like Chatbot, Assistant etc. It provides base functionality for any assistant application. This JarvisAI is built using Tensorflow, Pytorch, Transformers and other opensource libraries and frameworks. Well, you can contribute on this project to make it more powerful.
This project is crated only for those who is having interest in building Virtual Assistant. Generally it took lots of time to write code from scratch to build Virtual Assistant. So, I have build an Library called "JarvisAI", which gives you easy functionality to build your own Virtual Assistant.
Check more details here: https://github.com/Dipeshpal/Jarvis_AI
Check official website here: https://jarvis-ai-api.herokuapp.com/
API Documentations: https://jarvis-ai-api.herokuapp.com/api_docs/
🆕 [BETA] Rapid API Usages (Do everything with API no need to run heavy task on your system): https://rapidapi.com/dipeshpal17/api/jarvisai-api
2. Prerequisite-
- To use it only Python (> 3.6) is required.
- To contribute in project: Python is the only prerequisite for basic scripting, Machine Learning and Deep Learning knowledge will help this model to do task like AI-ML. Read How to contribute section of this page.
3. Getting Started (How to use it)-
Install the latest version-
pip install JarvisAI
It will install all the required package automatically.
If anything not install then you can install requirements manually.
pip install -r requirements.txt
The requirementx.txt can be found here.
https://pypi.org/project/JarvisAI/
Usage and Features-
After installing the library you can import the module-
Example-
-
Basic Usages: https://github.com/Dipeshpal/Jarvis-Assisant/blob/master/scripts/main.py
-
Advance Usages (Wake up using Hand Gesture): https://github.com/Dipeshpal/Jarvis-Assisant/blob/master/scripts/main_advance_usages.py
import JarvisAI

obj = JarvisAI.JarvisAssistant(sync=True, token='5ec64be7ff718ac25917c198f3d7a4', disable_msg=False, load_chatbot_model=True, high_accuracy_chatbot_model=False,
chatbot_large=False)  # or JarvisAI.JarvisAssistant(sync=False)

response = obj.mic_input_ai() # or mic_input() can be also used print(response) ```
Check this script for more examples- https://github.com/Dipeshpal/Jarvis-Assisant/blob/master/scripts/main.py
Available Methods-
The functionality is cleared by methods name. You can check the code for example. These are the names of available functions you can use after creating JarvisAI's object-
import JarvisAI

obj = JarvisAI.JarvisAssistant(sync=True, token='5ec64be7ff718ac25917c198f3d7a4', disable_msg=False, load_chatbot_model=True, high_accuracy_chatbot_model=False,
chatbot_large=False) # or JarvisAI.JarvisAssistant(sync=False) response =

obj.mic_input_ai()  # mic_input() can be also used ```
Available Parameters-
-
sync (bool): It is used to sync your JarvisAI setting with server. We don't use this information for any purpose, it's just for better user experience. If you enable this you need to add your token also. You can get your token from JarvisAI's official website.
-
Token (str): It is the token which you can obtain from the JarvisAI's official website. This features help to sync your setting each time run the assistant.
-
disable_msg (bool): It enables/disable the JarvisAI's initialization message.
-
load_chatbot_model (bool): If you want to use our AI based ChatBot model then you need to enable this. Without enabling this you can't use 'chatbot_base' or 'chatbot_large' functions. Disable this if you don't want to use JarvisAI's chatbot feature.
-
high_accuracy_chatbot_model (bool): All the AI's models will use some amount of bandwidth while downloading the models from Transformers Hub. Higher accuracy model will give you high accuracy, and size of these model is also high which required lot's or memory (RAM) while loading for the inference. If you have low memory system or less internet data then set this option to False. If it is false, it will load small model, which is around 1GB - 2GB and it has pretty much good accuracy.
-
chatbot_large (bool): If it is True it means, In case chatbot can't answer, or it recognizes the intent of your query is different from normal conversation then it will use Wikipedia/Internet to resolve your query, and it will analyze (summarize) extracted data from internet before response. You can use 'chatbot_large' with 'high_accuracy_chatbot_model=False' for better experience and lower RAM (internet data). Well, 'chatbot_large=False' only answer you queries based on it's AI model knowledge base, it doesn't use Wikipedia/Internet.
-
backend_tts_api (str): Male Voice Added (if your system support pyttsx3 module and your system have multiple voices inbuilt)
You can try different voices. This is one time setup. You can reset your voice by deleting 'configs/JarvisAI-Voice.txt' file in your working directory. This file will be created during first run of the program only if you are using pyttsx3.
Usages-
import JarvisAI
# backend_tts_api='pyttsx3' for different voices options
 # backend_tts_api='gtts' for female voice by google text to speech library
obj = JarvisAI.JarvisAssistant(sync=True, token='5ec64be7ff718ac25917c198f3d7a4', disable_msg=False,
                           load_chatbot_model=False, high_accuracy_chatbot_model=False,
                           chatbot_large=False, backend_tts_api='pyttsx3')
What is 'configs/JarvisAI-Voice.txt' file contains?
- Voice information in plain text (do not modify this file manually)
Note: First of all setup initial settings of the project by calling setup function.
res = obj.setup()
-
res = obj.mic_input(lang='en')
-
res = obj.mic_input_ai(record_seconds=5, debug=False)
-
res = obj.website_opener("facebook")
-
res = obj.send_mail(sender_email=None, sender_password=None, receiver_email=None, msg="Hello")
-
res = obj.launch_app("edge")
-
res = obj.weather(city='Mumbai')
-
res = obj.news()
-
res = obj.tell_me(topic='tell me about Taj Mahal')
-
res = obj.tell_me_time()
-
res = obj.tell_me_date()
-
res = obj.shutdown()
-
res = obj.text2speech(text='Hello, how are you?', lang='en')
-
res = obj.datasetcreate(dataset_path='datasets', class_name='Demo',
haarcascade_path='haarcascade/haarcascade_frontalface_default.xml',
eyecascade_path='haarcascade/haarcascade_eye.xml', eye_detect=False,
save_face_only=True, no_of_samples=100,
width=128, height=128, color_mode=False) -
res = obj.face_recognition_train(data_dir='datasets', batch_size=32, img_height=128, img_width=128, epochs=10,
model_path='model', pretrained=None, base_model_trainable=False) -
res = obj.predict_faces(class_name=None, img_height=128, img_width=128,
haarcascade_path='haarcascade/haarcascade_frontalface_default.xml',
eyecascade_path='haarcascade/haarcascade_eye.xml', model_path='model',
color_mode=False) -
res = obj.setup()
-
res = obj.show_me_my_images()
-
res= obj.show_google_photos()
-
res = obj.tell_me_joke(language='en', category='neutral')
-
res = obj.hot_word_detect(lang='en')
-
status, response = obj.get_user_data(token="436c57eab581dbb2253cfa77c41574f6") # get your token from https://jarvis-ai-api.herokuapp.com/
-
obj.set_user_data()
-
obj.jarvisai_configure_hand_detector(camera=0, detectionCon=0.7, maxHands=2, cam_display=True, cam_height=480,
cam_width=888) -
obj.jarvisai_detect_hands(self, message="")
-
obj.chatbot_base(input_text='how are you') # You must set obj=JarvisAI.JarvisAssistant(load_chatbot_model=True)
-
obj.chatbot_large(input_text='how are you') # You must set obj=JarvisAI.JarvisAssistant(load_chatbot_model=True)
-
obj.create_new_list('add milk in my shopping list')
-
obj.delete_particular_list('delete my shopping list')
-
obj.show_me_my_list()
-
obj.show_me_some_tech_news() # It will show tech news in your browser
-
obj.show_me_some_tech_videos() # It will show tech videos in your browser
-
obj = JarvisAI.JarvisAssistant(sync=True, token='5ec64be7ff718ac25917c198f3d7a4', disable_msg=False, load_chatbot_model=False, high_accuracy_chatbot_model=False, chatbot_large=False, backend_tts_api='pyttsx3') # you must set backend_tts_api='pyttsx3' for different voices options (Read 'What's new' of '20 Dec, 2021' update section of this page for more details.)
-
obj = JarvisAI.get_weather(text='What is the weather in Mumbai?') # Return weather by auto-detecting city just pass text.
------
4. How to contribute?
- Clone this reop
- Create virtual environment in python.
- Install requirements from requirements.txt.
pip install requirements.txt4. Now run, __ init__.py
python __init__.pyand understand the working.
Guidelines to add your own scripts / modules-
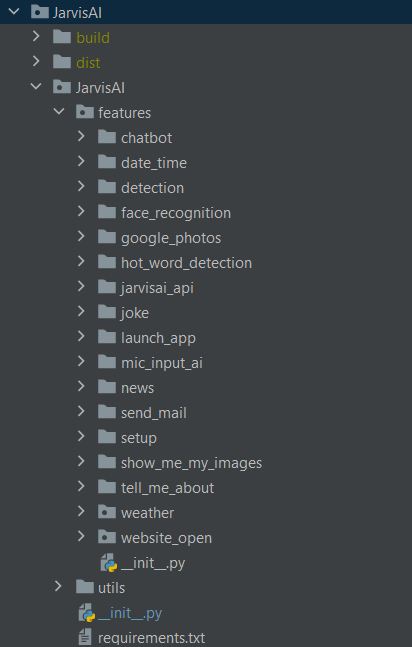
Lets understand the projects structure first-
-
JarvisAI: Root folder containing all the files
-
features: All the features supported by JarvisAI. This 'features' folder contains the different modules, you can create your own modules. Example of modules- "weather", "setup". These are the two folders inside 'features' directory.
-
__ init__.py: You can code here and add call your functions from here. User will be able to directly access functions listed in this file.
4.2. You can create your own modules in this 'features' directory. Call you function in init file.
4.3. Let's create a module and you can learn by example-
-
4.3.1. We will create a module which will tell us a date and time.
-
4.3.2. Create a folder (module) name- 'date_time' in features directory.
-
4.3.3. Create a python script name- 'date_time.py' in 'date_time' folder.
-
4.3.4. Write this kind of script (you can modify according to your own script). Read comments in script below to understand format-
'features/date_time/date_time.py' file-Make sure to add docs / comments. Also return value if necessary.import datetime def date(): """ Just return date as string :return: date if success, False if fail """ try: date = datetime.datetime.now().strftime("%b %d %Y") except Exception as e: print(e) date = False return date def time(): """ Just return date as string :return: time if success, False if fail """ try: time = datetime.datetime.now().strftime("%H:%M") except Exception as e: print(e) time = False return time*** you can run and test your script by calling from main-***
if __name__ == '__main__': response = date() print(response) response = time() print(response) -
4.3.4. Integrate your module to Jarvis AI-
-
Open
JarvisAI\JarvisAI\__init__.py -
Format of this py file-
 # import custom features
 try:
     import features.date_time.date_time
 except:
     from JarvisAI.features.date_time import date_time  # integrate your features

 class JarvisAssistant:
     def __init__(self):
         pass

     def tell_me_date(self):
         return date_time.date()

     def tell_me_time(self):
         return date_time.time()

 # test your features from main
 if __name__ == '__main__':
     obj = JarvisAssistant()
      res = obj.tell_me_time()
      print(res)
      res = obj.tell_me_date()
      print(res)
-
4.4. That's it, if you applied all the things as per as guidelines then now just run __ init__.py it should works fine.
4.5. Push the repo, we will test it. If found working and good then it will be added to next PyPi version.
Next time you can import your created function from JarvisAI
Example: import JarvisAI.tell_me_date
5. Future?
Lots of possibilities, GUI, Integrate with GPT-3, support for android, IOT, Home Automation, APIs, as pip package etc.
Todo list-
5.1. More API features
5.2. You tell me
FAQs for Contributors-
-
What I can install?
Ans: You can install any library you want in your module, make sure it is opensource and compatible with win/linux/mac. -
Code format?
Ans: Read the example above. And make sure your code is compatible with win/linux/mac. -
What should I not change?
Ans: Existing code. -
Credits-
Ans: You will definitely get credit for your contribution. -
Note-
Ans: Once you created your module, test it with different environment (windows / linux). Make sure the quality of code because your features will get added to the JarvisAI and publish as PyPi project. -
Help / Contact?
Ans. Contact me on any of my social media or Email.
Let's make it big.
What's new?-
-
13 Jan, 2022-
Version: JarvisAI==3.7
-
Now it can automatically find your city name and return weather information.
obj = JarvisAI.get_weather(text='What is the weather in Mumbai?') # Return weather by auto-detecting city just pass text. -
🆕 Rapid API Usages (Do everything with API no need to run heavy task on your system):** https://rapidapi.com/dipeshpal17/api/jarvisai-api
All AI-ML models will run on our servers. So you don't need to install heavy library. Just use API key and get the result. WIP for optimization.
-
-
20 Dec, 2021-
Male Voice Added (if your system support pyttsx3 module and your system have multiple voices inbuilt)
You can try different voices. This is one time setup. You can reset your voice by deleting 'configs/JarvisAI-Voice.txt' file in your working directory. This file will be created during first run of the program only if you are using pyttsx3.
Usages-
import JarvisAI
# backend_tts_api='pyttsx3' for different voices options
 # backend_tts_api='gtts' for female voice by google text to speech library
obj = JarvisAI.JarvisAssistant(sync=True, token='5ec64be7ff718ac25917c198f3d7a4', disable_msg=False,
                           load_chatbot_model=False, high_accuracy_chatbot_model=False,
                           chatbot_large=False, backend_tts_api='pyttsx3')
What is 'configs/JarvisAI-Voice.txt' file contains?
- Voice information in plain text (do not modify this file manually)
-
22 Nov, 2021-
-
Now you can add and delete items in list.
Example: you can say- "add milk in my shopping list".
It will create list name with "Shopping", and you can delete or show this list with following options- It uses deep learning models to identify list name and list items, so there might be some inaccuracy in results.
obj.create_new_list('add milk in my shopping list') obj.delete_particular_list('delete my shopping list') obj.show_me_my_list() -
Show tech news and Videos- ``` obj.show_me_some_tech_news() # It will show tech news in your browser
obj.show_me_some_tech_videos() # It will show tech videos in your browser
-
-
24 Oct, 2021-
New features added, features number 27, 28 and 29.
-
17 Oct, 2021-
- Bug Fixes - Docs Update -
19 Sep, 2021-
Chatbot features added. Two new methods added (25, 26 check 'Usage and Features').
It used Transformers based AI models to response users general queries.Below answers depends on the type of chatbot you choose and type of accuracy you have choosen.
-
Example (chatbot_small) [Directly answered from chatbot model's knowledge base]-
user >> How are you?AI >> I am good, how are you?
-
Example (chatbot_large) [Fetched data from internet and answered it after analyzing the gathered data]-
user >> Who is president of India? AI >> Ram Nath Kovind -
Example (chatbot_large) [Fetched some of the URL from Internet]-
  user >> who is the captain of team India?
  AI >> URL1, URL2, URL3
- Before 19 Sep, 2021-
Features 1-25 added. Check 'Usage and Features'
Feel free to use my code, don't forget to mention credit.
All the contributors will get credits in this repo.
Release history Release notifications | RSS feed


Download files
Download the file for your platform. If you're not sure which to choose, learn more about installing packages.
Source Distribution
Built Distribution
Filter files by name, interpreter, ABI, and platform.
If you're not sure about the file name format, learn more about wheel file names.
Copy a direct link to the current filters
File details
Details for the file JarvisAI-3.7.1.tar.gz.
File metadata
- Download URL: JarvisAI-3.7.1.tar.gz
- Upload date:
- Size: 31.9 kB
- Tags: Source
- Uploaded using Trusted Publishing? No
- Uploaded via: twine/3.7.1 importlib_metadata/4.8.2 pkginfo/1.8.2 requests/2.26.0 requests-toolbelt/0.9.1 tqdm/4.62.3 CPython/3.9.7
File hashes
| Algorithm | Hash digest | |
|---|---|---|
| SHA256 |
9af6ee557e2810d51f28122c999df1fc3812202fe4f478396738e027f0e4c890
|
|
| MD5 |
1de1cc280f9b0505b26df097138bf60b
|
|
| BLAKE2b-256 |
d01ba8c0e94cfd91ce653b726d873aeb5857f0e5adc4122af78edd1a83f35a15
|
File details
Details for the file JarvisAI-3.7.1-py3-none-any.whl.
File metadata
- Download URL: JarvisAI-3.7.1-py3-none-any.whl
- Upload date:
- Size: 33.0 kB
- Tags: Python 3
- Uploaded using Trusted Publishing? No
- Uploaded via: twine/3.7.1 importlib_metadata/4.8.2 pkginfo/1.8.2 requests/2.26.0 requests-toolbelt/0.9.1 tqdm/4.62.3 CPython/3.9.7
File hashes
| Algorithm | Hash digest | |
|---|---|---|
| SHA256 |
b4d69fa1fb49e43d28cd6f5e189bfc4c6c392f9a683374d820bc2b56141b8325
|
|
| MD5 |
161970c67c3ff57928b6cdf38bf42b18
|
|
| BLAKE2b-256 |
f6bf2e73a7c4ced56f254b9ba91d4aef964df1ec2075218d42251fce5e27928f
|


