Abraia Python SDK

Project description


Abraia Vision SDK
The Abraia Vision SDK is a Python package which provides a set of tools to develop and deploy advanced Machine Learning image applications on the edge. Moreover, with Abraia DeepLab you can easily annotate and train, your own versions of some of the best state of the art deep learning models, and get them ready to deploy with this Python SDK.
Just install the Abraia SDK and CLI on Windows, Mac, or Linux:
python -m pip install -U abraia
And start using deep learning models ready to work on your local devices.
Deep learning custom models and applications
Consult your problem or directly try to annotate your images and train a state-of-the-art model for classification, detection, or segmentation using DeepLab. You can directly load and run the model on the edge using the browser or this Python SDK.
Object detection and tracking
Identify and track multiple objects with a custom detection model on videos and camera streams, enabling real-time counting applications. You just need to use the Video class to process every frame as is done for images, and use the tracker to follow each object through every frame.
from abraia.inference import Model, Tracker
from abraia.utils import Video, render_results

model = Model("multiple/models/yolov8n.onnx")

video = Video('images/people-walking.mp4')
tracker = Tracker(frame_rate=video.frame_rate)
for frame in video:
    results = model.run(frame, conf_threshold=0.5, iou_threshold=0.5)
    results = tracker.update(results)
    frame = render_results(frame, results)
    video.show(frame)

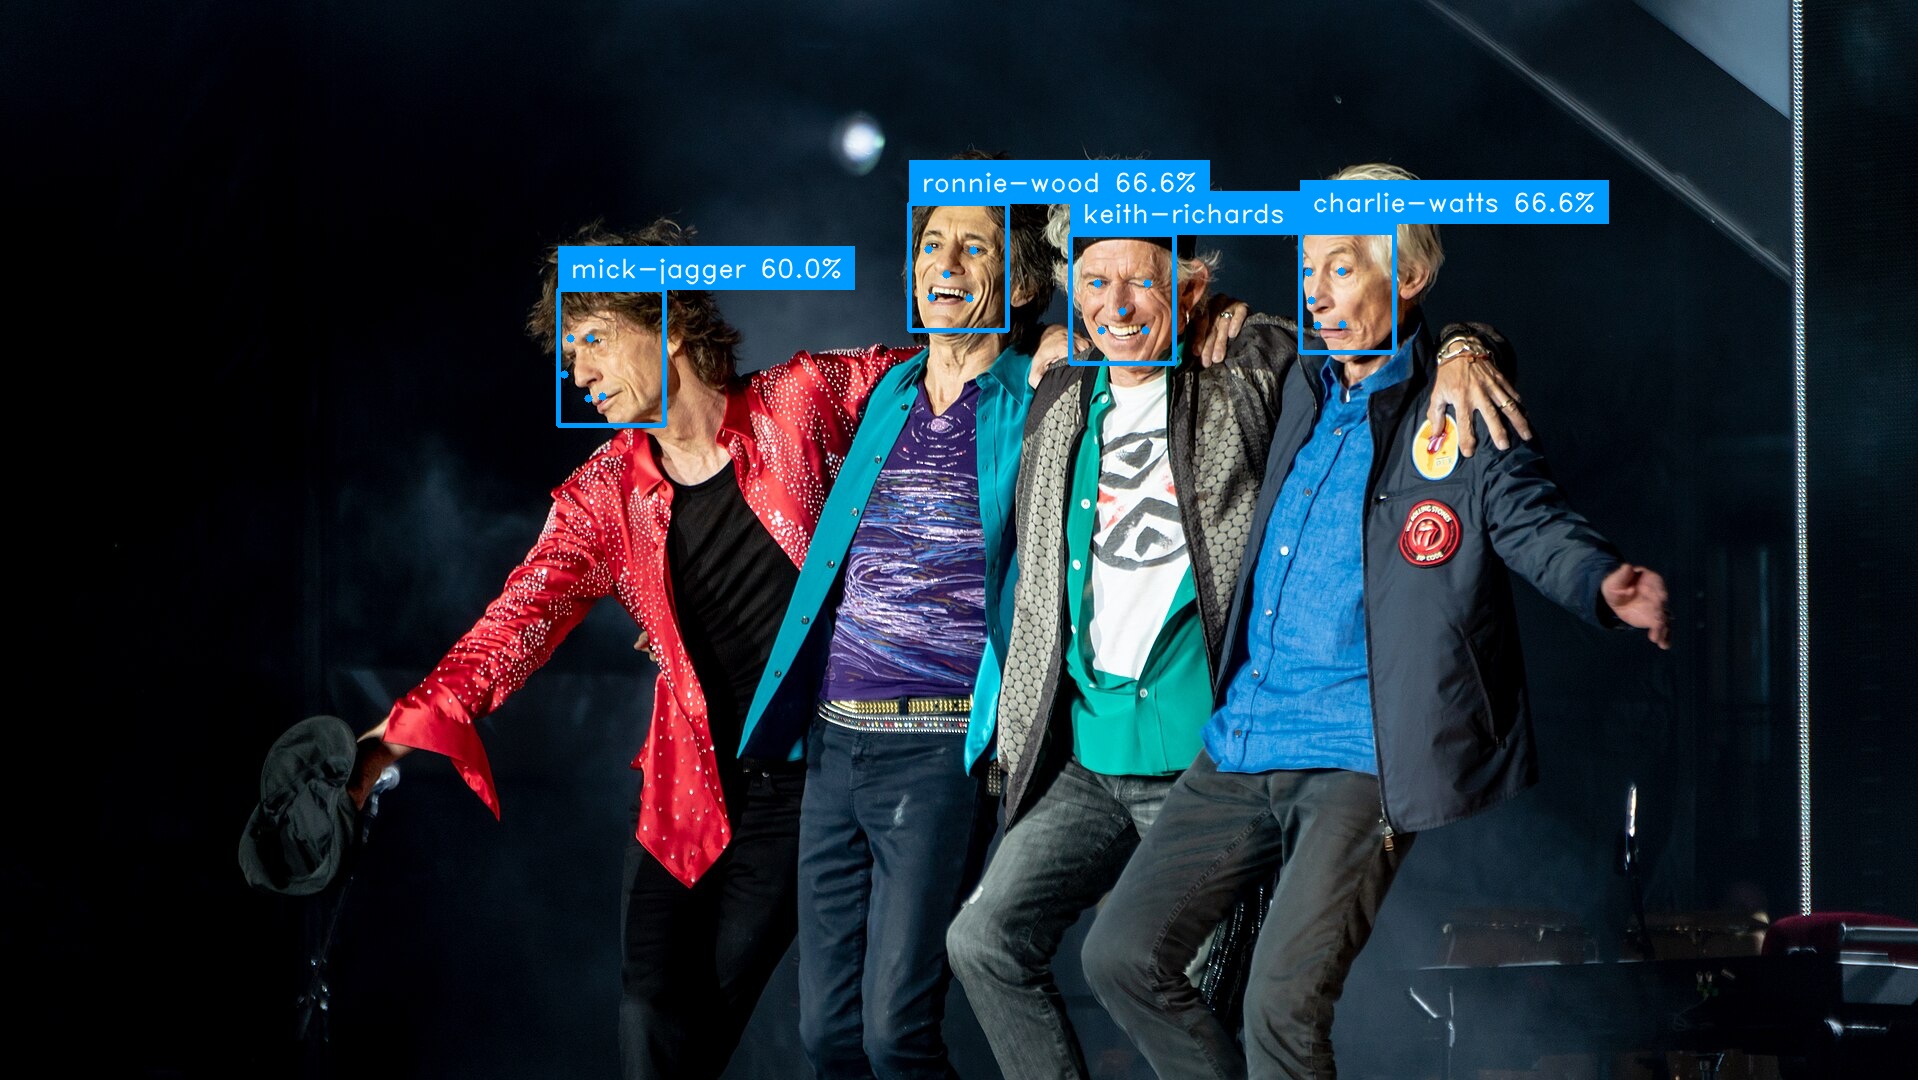
Face recognition
Identify people on images with face recognition as shown bellow.
import os

from abraia.inference import FaceRecognizer
from abraia.utils import load_image, save_image, render_results

img = load_image('images/rolling-stones.jpg')
out = img.copy()

recognition = FaceRecognizer()

index = []
for src in ['mick-jagger.jpg', 'keith-richards.jpg', 'ronnie-wood.jpg', 'charlie-watts.jpg']:
    img = load_image(f"images/{src}")
    rslt = recognition.identify_faces(img)[0]
    index.append({'name': os.path.splitext(src)[0], 'vector': rslt['vector']})

results = recognition.identify_faces(results, index)
render_results(out, results)
save_image(out, 'images/rolling-stones-identified.jpg')
License plates recognition
Automatically recognize car license plates in images and video streams.
from abraia.inference import PlateRecognizer
from abraia.utils import load_image, show_image, render_results

alpr = PlateRecognizer()

img = load_image('images/car.jpg')
results = alpr.detect(img)
results = alpr.recognize(img, results)
results = [result for result in results if len(result['lines'])]
for result in results:
    result['label'] = '\n'.join([line.get('text', '') for line in result['lines']])
    del result['score']
frame = render_results(img, results)
show_image(img)

Gender Age model
Model to predict gender and age. It can be useful to anonymize minors faces.
from abraia.inference import FaceRecognizer, FaceAttribute
from abraia.utils import load_image, show_image, render_results

recognition = FaceRecognizer()
attribute = FaceAttribute()

img = load_image('images/image.jpg')
results = recognition.detect_faces(img)
faces = recognition.extract_faces(img, results)
for face, result in zip(faces, results):
    gender, age, score = attribute.predict(face)
    result['label'] = f"{gender} {age}"
    result['score'] = score
img = render_results(img, results)
show_image(img)
Blur license plate
Anonymize images automatically bluring car license plates.
from abraia.utils import load_image, save_image
from abraia.inference import PlateDetector
from abraia.editing import build_mask
from abraia.utils.draw import draw_blurred_mask

src = 'images/car.jpg'
img = load_image(src)

detector = PlateDetector()
plates = detector.detect(img)
mask = build_mask(img, plates, [])
out = draw_blurred_mask(img, mask)

save_image(out, 'blur-car.jpg')

Semantic search
Search on images with embeddings.
from tqdm import tqdm
from glob import glob
from abraia.utils import load_image
from abraia.inference.clip import Clip
from abraia.inference.ops import search_vector

clip_model = Clip()

image_paths = glob('images/*.jpg')
image_index = [{'vector': clip_model.get_image_embeddings([load_image(image_path)])[0]} for image_path in tqdm(image_paths)]

text_query = "full body person"
vector = clip_model.get_text_embeddings([text_query])[0]

idxs, scores = search_vector(vector, image_index)
print(f"Similarity score is {scores[0]} for image {image_paths[idxs[0]]}")
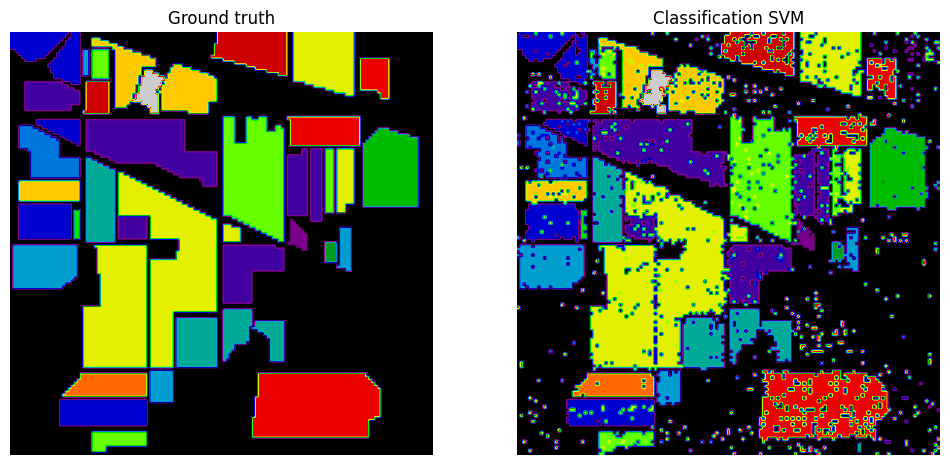
Hyperspectral image analysis toolbox
The Multiple extension provides seamless integration of multispectral and hyperspectral images, providing support for straightforward HyperSpectral Image (HSI) analysis and classification.
Just click on one of the available Colab's notebooks to directly start testing the multispectral capabilities:
-
Hyperspectral image analysis
-
To install the multiple extension use the command bellow:
python -m pip install -U "abraia[multiple]"
To use the SDK you have to configure your Id and Key as environment variables:
export ABRAIA_ID=user_id
export ABRAIA_KEY=user_key
On Windows you need to use set instead of export:
set ABRAIA_ID=user_id
set ABRAIA_KEY=user_key
Then, you will be able to directly load and save ENVI files, and their metadata.
from abraia.multiple import Multiple

multiple = Multiple()

img = multiple.load_image('test.hdr')
meta = multiple.load_metadata('test.hdr')
multiple.save_image('test.hdr', img, metadata=meta)
Upload and load HSI data
To start with, we may upload some data directly using the graphical interface, or using the multiple api:
multiple.upload_file('PaviaU.mat')
Now, we can load the hyperspectral image data (HSI cube) directly from the cloud:
img = multiple.load_image('PaviaU.mat')
Basic HSI visualization
Hyperspectral images cannot be directly visualized, so we can get some random bands from our HSI cube, and visualize these bands as like any other monochannel image.
from abraia.multiple import hsi

imgs, indexes = hsi.random(img)
hsi.plot_images(imgs, cmap='jet')
Or, we can reduce the dimensionality applying principal components analysis (PCA). We can get the first three principal components into a three bands pseudoimage, and visualize this pseudoimage.
pc_img = hsi.principal_components(img)
hsi.plot_image(pc_img, 'Principal components')
License
This software is licensed under the MIT License. View the license.
Release history Release notifications | RSS feed


Download files
Download the file for your platform. If you're not sure which to choose, learn more about installing packages.
Source Distribution
Built Distribution
Filter files by name, interpreter, ABI, and platform.
If you're not sure about the file name format, learn more about wheel file names.
Copy a direct link to the current filters
File details
Details for the file abraia-0.25.4.tar.gz.
File metadata
- Download URL: abraia-0.25.4.tar.gz
- Upload date:
- Size: 64.0 kB
- Tags: Source
- Uploaded using Trusted Publishing? No
- Uploaded via: twine/6.1.0 CPython/3.13.7
File hashes
| Algorithm | Hash digest | |
|---|---|---|
| SHA256 |
281b4f5f51eb0c618252cf6f1c04e8f9a48f089dbae79ca053818baecbd00ba5
|
|
| MD5 |
59a6449bb2b0f0f37b73d11426797ead
|
|
| BLAKE2b-256 |
87fd6ae14e80f7b978d31404bed5db4e784da43c407fe3678fe6e84ff376e30f
|
File details
Details for the file abraia-0.25.4-py3-none-any.whl.
File metadata
- Download URL: abraia-0.25.4-py3-none-any.whl
- Upload date:
- Size: 1.4 MB
- Tags: Python 3
- Uploaded using Trusted Publishing? No
- Uploaded via: twine/6.1.0 CPython/3.13.7
File hashes
| Algorithm | Hash digest | |
|---|---|---|
| SHA256 |
85a6179290b65f7c6b4bd058ef9bf848e54aad9b7b35eb04123d45e4bb1e14da
|
|
| MD5 |
7ceae30c9f671c523c97628e0d1a3644
|
|
| BLAKE2b-256 |
e8a6bf25ac298087c3cb3a55a145fad7f315156600f6adbcf3bd4345f6d1ff64
|


