
AgentApps
A flexible multi-agent orchestration framework for building intelligent agent applications with a visual Flow Builder.
Screenshots
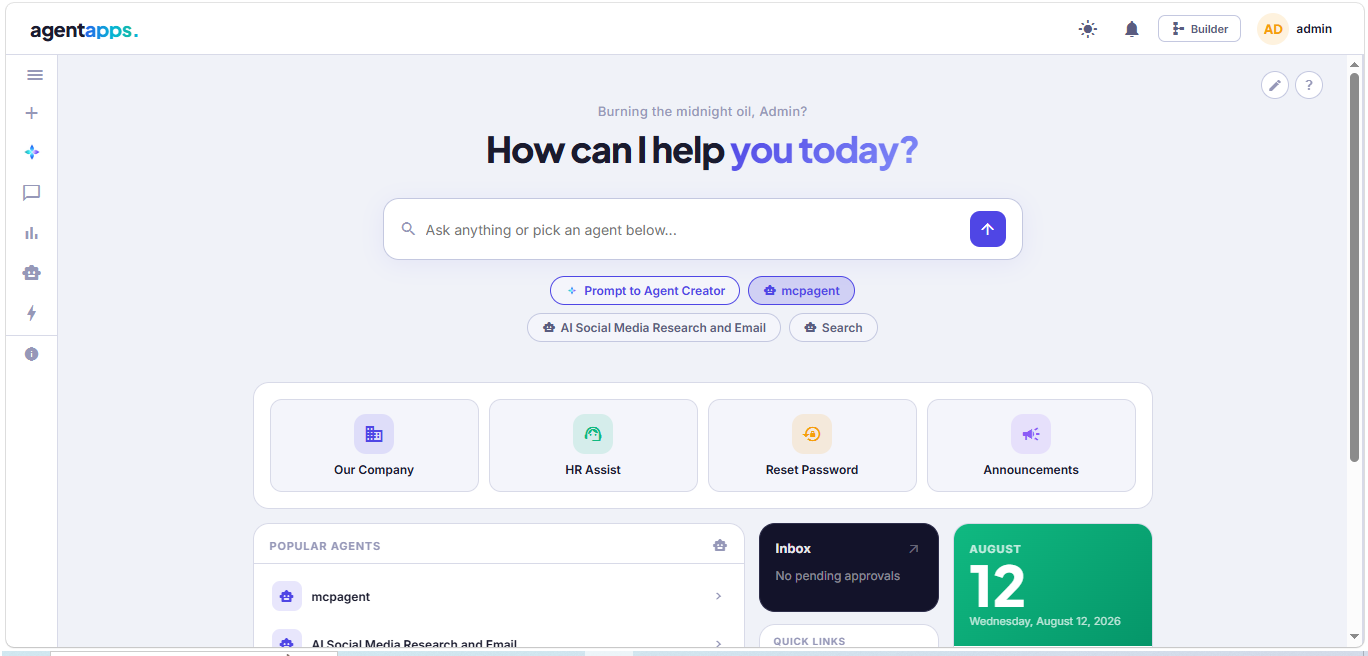
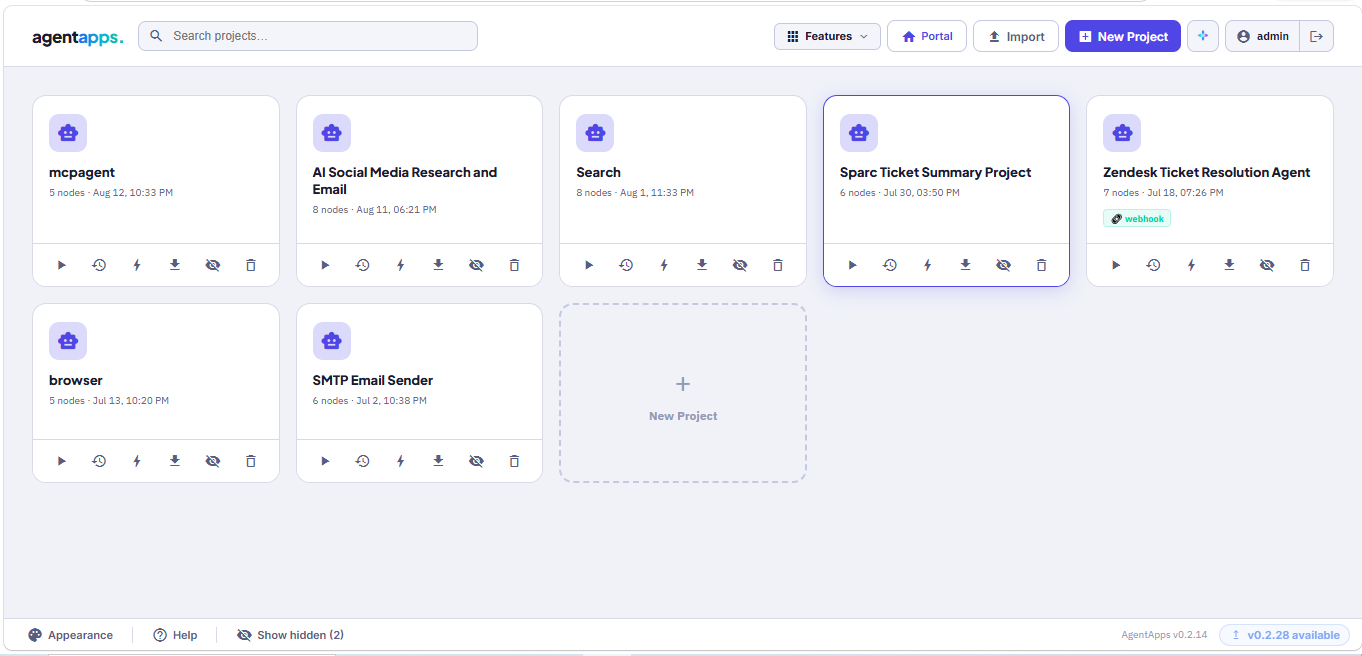
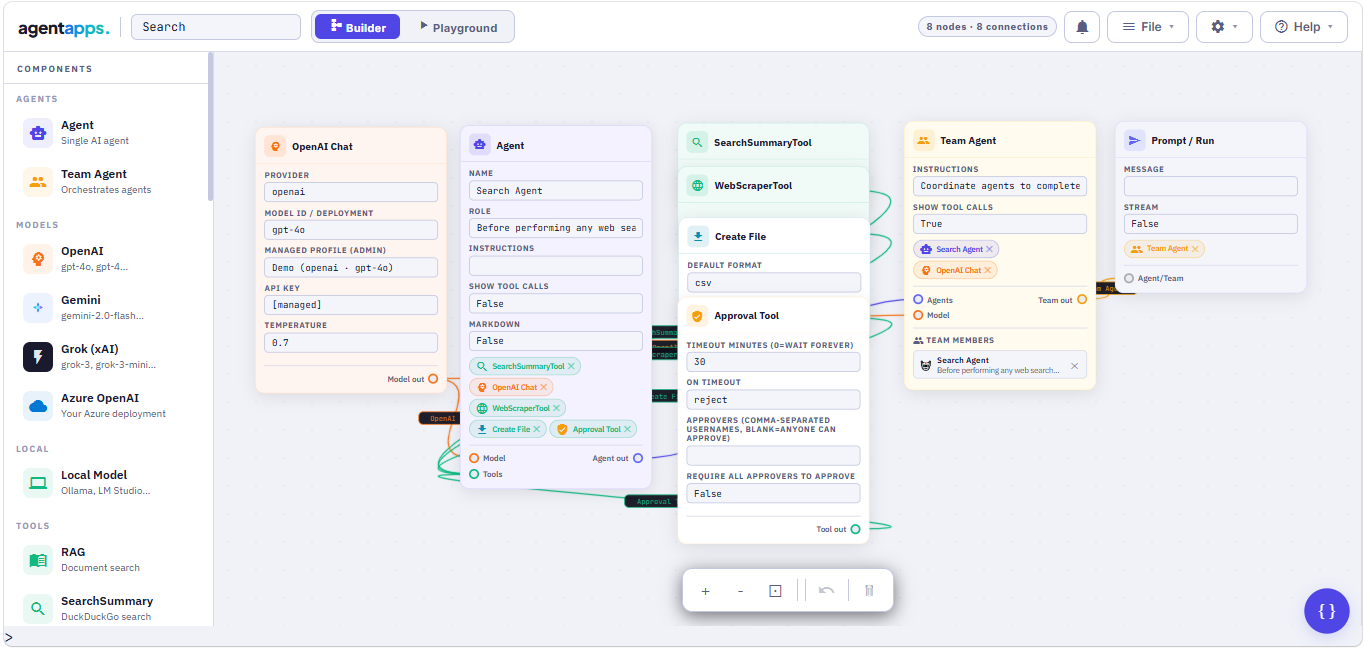
Features
🤖 Simple Agent Creation — Clean, intuitive agent setup
👥 Team Collaboration — Multiple agents working together
🔄 Sequential Workflows — Automatic multi-step execution
🛠️ Built-in Tools — Web search, scraping, calculations
🎯 Custom Tools — Easy 3rd-party integrations (Jira, Slack, GitHub, SMTP and more)
📊 Streaming Support — Real-time responses
🔍 Web Search — DuckDuckGo integration
🌐 Web Scraping — Extract content from any URL
🌟 Multi-Model Support — OpenAI, Google Gemini, xAI Grok, Ollama (local)
🗂️ Platform Tables — Built-in structured data storage
⏰ Triggers & Scheduler — Run agents on a schedule or via webhook
🐚 Shell Tool — Execute server commands from agents (opt-in)
🔐 Role-Based Access — Admin, Editor, Operator, Viewer roles
🔑 SSO / Microsoft Azure AD — Single Sign-On support
🏗️ AI Builder — Describe an agent in plain English and it builds itself
🌍 Portal — End-user chat interface for your deployed agents
🔌 MCP Client Tool — Connect to any MCP server and use its tools (New)
📌 Pinned Response Cards — Pin agent responses to the Portal hero page (New)
💾 Session Persistence — Responses saved even if you navigate away (New)
🕸️ Knowledge Graph (FalkorDB) — Query a graph database with Cypher; dependency and blast-radius analysis (New)
Links
- GitHub: https://github.com/91Abdul/agentapps
- PyPI: https://pypi.org/project/agentapps
- Website: https://www.agentappsai.com
- Issues: https://github.com/91Abdul/agentapps/issues
- Discord: https://discord.gg/xAUYb2vujP
- LinkedIn Group: https://www.linkedin.com/groups/14471903/
- Support: ak@agentappsai.com
Installation
pip install agentapps
Quick Start — Flow Builder UI
agentapps-flow
This starts the server and automatically opens the visual Flow Builder in your browser at http://localhost:7860.
# Custom port
agentapps-flow --port 8080

# Don't open browser automatically
agentapps-flow --no-browser

# Dev mode with hot-reload
agentapps-flow --reload
Secure Login
1. CLI flag
agentapps-flow --password mysecretpassword
2. Environment variable (recommended for servers)
export AGENTAPPS_PASSWORD=mysecretpassword
agentapps-flow
3. Auto-generated password
If no password is set, one is auto-generated and printed to the console:
╔══════════════════════════════════════════════╗
║   🔑 Auto-generated password:                ║
║      xK9mP2nQvR4sT7uW                        ║
╚══════════════════════════════════════════════╝
Passwords are stored as secure hashes — never in plaintext.
Shell Tool (opt-in)
Enable agents to run shell commands on the server (Windows cmd, Mac/Linux bash, PowerShell):
agentapps-flow --enable-shell
Or via environment variable:
AGENTAPPS_ENABLE_SHELL=true agentapps-flow
Optionally restrict the working directory:
AGENTAPPS_SHELL_DIR=/path/to/scripts agentapps-flow --enable-shell
Shell tool is disabled by default. All commands are logged and protected by a blocklist. Use with care on shared servers.
Supported Models
| Provider | Model IDs |
|---|---|
| OpenAI | gpt-4o, gpt-4-turbo, gpt-3.5-turbo, gpt-5.6-luna |
| Google Gemini | gemini-2.0-flash, gemini-1.5-pro |
| xAI Grok | grok-3, grok-3-mini |
| Ollama (local) | Any locally served model via http://localhost:11434 |
| Azure OpenAI | Any Azure-hosted OpenAI deployment |
Quick Start with OpenAI
from agentapps import Agent
from agentapps.model import OpenAIChat
from agentapps.tools import SearchSummaryTool

agent = Agent(
    name="Research Assistant",
    role="Search and analyze information",
    model=OpenAIChat(id="gpt-4o", api_key="your-openai-key"),
    tools=[SearchSummaryTool()],
    instructions=["Always include sources"],
    show_tool_calls=True
)

agent.print_response("What is the latest news about AI?")
Get an OpenAI API key: https://platform.openai.com/api-keys
Quick Start with Gemini
from agentapps import Agent
from agentapps.model import GeminiChat
from agentapps.tools import SearchSummaryTool

agent = Agent(
    name="Research Assistant",
    role="Search and analyze information",
    model=GeminiChat(id="gemini-2.0-flash-exp", api_key="your-google-api-key"),
    tools=[SearchSummaryTool()],
    instructions=["Always include sources"],
    show_tool_calls=True
)

agent.print_response("What is the latest news about AI?")
Get a Gemini API key: https://makersuite.google.com/app/apikey
Quick Start with Grok xAI
from agentapps import Agent
from agentapps.model import GrokChat
from agentapps.tools import SearchSummaryTool

agent = Agent(
    name="Research Assistant",
    role="Search and analyze information",
    model=GrokChat(id="grok-3-mini", api_key="your-xai-api-key"),
    tools=[SearchSummaryTool()],
    instructions=["Always include sources"],
    show_tool_calls=True
)

agent.print_response("What is the latest news about AI?")
Get a Grok API key: https://console.x.ai
Available Tools
SearchSummaryTool
Search the web and get detailed snippets:
from agentapps.tools import SearchSummaryTool

agent = Agent(
    name="Searcher",
    model=OpenAIChat(id="gpt-4o", api_key="key"),
    tools=[SearchSummaryTool()]
)
WebScraperTool
Scrape content from URLs:
from agentapps.tools import WebScraperTool

agent = Agent(
    name="Scraper",
    model=OpenAIChat(id="gpt-4o", api_key="key"),
    tools=[WebScraperTool()]
)
CalculatorTool
Perform calculations:
from agentapps.tools import CalculatorTool
agent = Agent(name="Calculator", model=OpenAIChat(id="gpt-4o", api_key="key"), tools=[CalculatorTool()])
MCPClientTool (New)
Connect to any MCP server and use its tools:
from agentapps.tools import MCPClientTool

tool = MCPClientTool(
    server_url="http://localhost:8000/mcp",
    tool_name="add_numbers",
    tool_description="Add two numbers together",
    auth_type="none"   # or "bearer" / "apikey"
)

agent = Agent(name="MCP Agent", model=OpenAIChat(id="gpt-4o", api_key="key"), tools=[tool])
agent.print_response("Add 42 and 58")
Or use the MCP Tool node in the Flow Builder — enter the server URL, click Discover Tools, select a tool, and it auto-fills all fields.
FalkorDBTool — Knowledge Graph (New)
Query a FalkorDB graph (FalkorDB Cloud or self-hosted) directly — no MCP server needed:
from agentapps.tools import FalkorDBTool

tool = FalkorDBTool(
    host="your-instance.falkordb.cloud",
    port=6379,
    password="your-password",
    graph_name="servicenow",
    ssl=False,          # match your instance (see Knowledge Graph section)
    read_only=True      # default: write queries are blocked
)

agent = Agent(name="Graph Analyst", model=OpenAIChat(id="gpt-4o", api_key="key"), tools=[tool])
agent.print_response("What is the blast radius of problem PRB0000051?")
Or drag the Knowledge Graph node (Tools palette) onto the Flow Builder canvas.
Team Agents
Create teams that work together sequentially:
from agentapps import Agent
from agentapps.model import OpenAIChat
from agentapps.tools import SearchSummaryTool, WebScraperTool

search_agent = Agent(
    name="Search Agent",
    role="Search the web",
    model=OpenAIChat(id="gpt-4o", api_key="your-key"),
    tools=[SearchSummaryTool()]
)

scraper_agent = Agent(
    name="Scraper Agent",
    role="Read web pages",
    model=OpenAIChat(id="gpt-4o", api_key="your-key"),
    tools=[WebScraperTool()]
)

team = Agent(
    team=[search_agent, scraper_agent],
    instructions=[
        "First, search for relevant URLs",
        "Then, scrape content from those URLs",
        "Finally, provide a comprehensive answer"
    ],
    show_tool_calls=True
)

team.print_response("Research NVIDIA's latest AI developments")
Custom Tools
Create your own tools easily:
from agentapps import Tool

class WeatherTool(Tool):
    def __init__(self):
        super().__init__(
            name="get_weather",
            description="Get weather for a city"
        )

    def execute(self, city: str) -> str:
        return f"Weather in {city}: Sunny, 72°F"

    def get_parameters(self):
        return {
            "type": "object",
            "properties": {
                "city": {"type": "string", "description": "City name"}
            },
            "required": ["city"]
        }

agent = Agent(
    name="Weather Agent",
    model=OpenAIChat(id="gpt-4o", api_key="key"),
    tools=[WeatherTool()]
)
You can also register custom tools via the Flow Builder UI — no restart required.
Portal — End User Interface (Enhanced)
The Portal is the end-user interface for interacting with your deployed agents.
Hero Page
- Bento-grid layout — Quick Links, Popular Agents, Inbox, Calendar
- Agent chips — one-click access to agents, each starts a fresh chat
- Search bar — type a prompt and route to the right agent automatically
- Click the agentapps. logo to return to hero from any chat
Pinned Response Cards (New)
Pin any agent response directly to the hero page:
- Click the 📌 pin icon on any assistant message
- Pinned cards appear in a horizontal strip above the bento grid
- Expand (↗) to read the full response in a modal
- Refresh (🔄) to re-run the original prompt and update the card
- Unpin (✕) to remove the card
- Maximum 6 pinned cards per user
Session Persistence (Improved)
- Agent responses saved server-side regardless of client connection
- Navigate away during a long-running agent task — response appears when you return
- Works with approval workflows — approve from inbox, result saves automatically
- Execution logs and Recent Runs updated even after page refresh
Approvals Inbox
- Pending approval notifications visible on the hero page
- Approve or reject agent actions without staying on the chat page
Examples
Stock Analysis
agent = Agent(
    name="Stock Analyst",
    role="Analyze stocks",
    model=OpenAIChat(id="gpt-4o", api_key="key"),
    tools=[SearchSummaryTool()],
    instructions=["Include price targets and analyst ratings"]
)

agent.print_response("Analyze NVDA stock with latest news and recommendations")
Research Team
research_team = Agent(
    team=[search_agent, scraper_agent],
    instructions=[
        "Search for academic sources",
        "Read full articles",
        "Provide a comprehensive summary with citations"
    ]
)

research_team.print_response("What are the latest breakthroughs in quantum computing?")
API Reference
Agent
Agent(
    name: str = "Agent",
    role: str = "General Assistant",
    model: Model = None,
    tools: List[Tool] = None,
    instructions: List[str] = None,
    team: List[Agent] = None,
    show_tool_calls: bool = False,
    markdown: bool = False,
    temperature: float = None
)
Methods
| Method | Description |
|---|---|
run(message, stream=False) |
Execute agent |
print_response(message, stream=False) |
Print response to console |
clear_history() |
Clear conversation history |
add_tool(tool) |
Add a tool dynamically |
get_info() |
Get agent information |
Role-Based Access Control
The platform supports four roles assignable per user:
| Role | Description |
|---|---|
| Admin | Full access — users, settings, SSO, shell tool |
| Editor | Build and run — create/edit agents, tools, schedules |
| Operator | Run only — use agents via portal, view reports and approvals |
| Viewer | Read only — view projects, tables, reports |
Manage users and assign roles from the Admin → Users section in the Flow Builder.
Triggers & Scheduler
Run agents automatically on a schedule or via external webhook:
- Scheduler — run agents every N minutes, hourly, daily, or weekly
- Webhook — trigger agents via HTTP from any external service (Jira, Zapier, Slack, etc.)
- Email — poll IMAP inbox and trigger on new messages
- API Poll — monitor any external API and trigger on condition
MCP Client Tool (New)
Connect to any MCP (Model Context Protocol) server directly from the Flow Builder.
Supported transports: Streamable HTTP (JSON-RPC 2.0)
Auth options: None, Bearer Token, API Key
Compatible with: FastMCP, official MCP servers, any compliant server
In the Flow Builder:
- Drag MCP Tool node to canvas
- Enter server URL + auth settings
- Click Discover Tools — auto-connects and lists available tools
- Click a tool — Tool Name, Description, Schema auto-fill
- Connect to Agent node and save
In Python:
from agentapps.tools import MCPClientTool

tool = MCPClientTool(
    server_url="https://mcp.example.com",
    tool_name="search",
    tool_description="Search for information",
    tool_schema={
        "type": "object",
        "properties": {"query": {"type": "string"}},
        "required": ["query"]
    },
    auth_type="bearer",
    auth_value="your-token"
)
Knowledge Graph — FalkorDB (New)
Give agents a graph database to reason over connected data — dependencies, ownership, relationships — using Cypher. AgentApps connects directly to FalkorDB with the falkordb Python client, so there is no MCP server for you or your customers to host.
Works with: FalkorDB Cloud and self-hosted FalkorDB
Agent operations: get_schema, query (openCypher), list_graphs
Safe by default: read-only mode blocks CREATE, MERGE, DELETE, SET, REMOVE, DROP and uses read-only queries on the server
Installed with: pip install agentapps (includes the falkordb client)
In the Flow Builder
- Drag the Knowledge Graph node (Tools palette) to the canvas
- Fill in the connection fields:
| Field | Description |
|---|---|
| Host | e.g. your-instance.falkordb.cloud |
| Port | Your instance port (the Cloud console shows it) |
| Username | Optional — leave blank unless your instance needs one |
| Password | Masked |
| Graph Name | The graph to query |
| Use SSL/TLS | true / false — must match your instance |
| Read-only | true (default) blocks all write queries |
- Connect the node to an Agent node (and a model to the agent) and save
- Ask questions in the playground or Portal
SSL tip: if the connection times out, switch Use SSL/TLS to the opposite value. Some Cloud instances accept plain connections on their custom port.
Suggested agent instructions
Keep them short and add detail only where the agent gets it wrong:
You are an IT operations analyst. Answer using the knowledge_graph tool.
Call get_schema first, then query with openCypher. Always use LIMIT.
Answer only from query results and never invent data. The graph is read-only.
If a query fails or returns nothing, fix it and retry before answering.
If the agent guesses wrong values or relationship directions, add the exact value formats (e.g. priority is "1 - Critical") and a one-line note on direction.
Loading your own data (CSV → graph)
Data is loaded outside the agent, so agents can never modify your graph. Use a mapping file plus a generic loader:
pip install falkordb pandas
python load_graph.py --mapping graph_mapping.json --dir ./csv \
  --host your-instance.falkordb.cloud --port 6379 --password "your-password"
| Option | Purpose |
|---|---|
--dry-run |
Parse files and show planned counts; no database needed |
--drop |
Delete the graph first (full rebuild) |
--rels-only |
Skip nodes, load relationships only |
--only A,B |
Load only these node labels / relationship types |
--no-ssl |
Force a non-SSL connection (otherwise both modes are tried) |
Without --drop the loader upserts (MERGE): re-running updates existing nodes and edges and adds new ones. Rows deleted from a CSV are not removed from the graph.
graph_mapping.json describes what to load, so you can change columns, nodes and relationships without touching code:
{
  "graph": "servicenow",
  "files": { "incident": "incident.csv", "cmdb_ci": "cmdb_ci.csv" },
  "nodes": [
    { "label": "CI", "file": "cmdb_ci", "key": "name",
      "properties": { "class": "sys_class_name", "location": "location" } },
    { "label": "Incident", "file": "incident", "key": "number",
      "properties": { "priority": "priority", "state": "state" } }
  ],
  "relationships": [
    { "type": "AFFECTS", "file": "incident",
      "from": ["Incident", "number", "number"], "to": ["CI", "name", "cmdb_ci"] }
  ]
}
- Property spec:
"column", or"column:bool"/"column:int"to convert the value - Relationship
from/to:[node label, key property, CSV column] - Type from a column: use
"type_from_column"with"type_transform": "first_part_upper"(e.g.Depends on::Used by→DEPENDS_ON) - Duplicates:
"dedupe_keep_latest_by": "sys_updated_on"keeps the newest row per key - Sensitive values:
"ignore_values_starting_with": ["$s$"]drops values such as password hashes - Derived nodes:
"collect_from"builds one node type from several columns (e.g. Users)
Example: dependency & blast-radius analysis
Walk dependencies backwards from a failing CI to everything that depends on it:
MATCH (i:Incident {number:'INC0000050'})-[:AFFECTS]->(ci:CI)
MATCH (x:CI)-[:DEPENDS_ON|RUNS_ON|HOSTED_ON|MEMBERS*1..5]->(ci)
RETURN ci.name, count(DISTINCT x) AS impacted, collect(DISTINCT x.name) AS who
Typical questions an agent can answer once the graph is loaded:
- "What is the blast radius of problem PRB0000051?"
- "Which CIs are the biggest single points of failure?"
- "Which services depend on this database?"
- "Incidents per assignment group?"
Notes
- Results are capped at 200 rows per query; ask the agent to filter or add
LIMIT. - Incidents and changes only have a blast radius if they link to a CI (export the
cmdb_cifield and add anAFFECTSrelationship). - Treat passwords in saved flows like any other secret; rotate them if shared.
HTTPS / SSL
Secure HTTPS is required for production webhooks.
Option 1 — Auto self-signed certificate (easiest)
pip install cryptography
agentapps-flow --ssl-self-signed
Option 2 — Bring your own certificate (Let's Encrypt / purchased)
agentapps-flow --ssl-cert /path/to/cert.pem --ssl-key /path/to/key.pem
Option 3 — Let's Encrypt
pip install certbot
certbot certonly --standalone -d yourdomain.com

agentapps-flow \
  --ssl-cert /etc/letsencrypt/live/yourdomain.com/fullchain.pem \
  --ssl-key  /etc/letsencrypt/live/yourdomain.com/privkey.pem
Option 3 — Standard HTTPS port (443)
agentapps-flow --port 443 --ssl-self-signed
On Linux/macOS, binding to port 443 requires root or sudo. Consider using a reverse proxy (nginx, Caddy) for production.
Using with ngrok (recommended for local webhooks)
# Terminal 1
agentapps-flow

# Terminal 2
ngrok http 7860
Use the https://xxxx.ngrok-free.app URL as your webhook base URL.
Webhook URL format
https://your-domain.com/webhook/<project-name>?token=<bearer-token>
Tokens are generated in the Flow Builder under ☰ Menu → 🔗 Webhooks.
All CLI Flags
| Flag | Default | Description |
|---|---|---|
--port |
7860 |
Port to listen on |
--host |
0.0.0.0 |
Host to bind to |
--no-browser |
off | Don't auto-open browser |
--reload |
off | Hot-reload on file changes (dev mode) |
--password |
— | Set UI login password |
--ssl-self-signed |
off | Auto-generate self-signed certificate |
--ssl-cert |
— | Path to SSL certificate .pem file |
--ssl-key |
— | Path to SSL private key .pem file |
--enable-shell |
off | Enable ShellTool |
--enable-browser |
off | Enable BrowserTool |
Requirements
- Python >= 3.8
- An API key from OpenAI, Google Gemini, xAI Grok — or a local Ollama instance
License
MIT License
Contributing
Contributions welcome! Please feel free to submit a Pull Request on GitHub.
1 maintainer

Metadata
1 maintainer
Release files for agentapps 0.2.38
For a detailed explanation of source distributions (sdists) and built distributions (wheels), please see the package formats documentation.
Built distribution (wheel)
| File | Interpreter | ABI | Platform | Actions Reset |
|---|---|---|---|---|
| agentapps-0.2.38-py3-none-any.whl | Python 3 | none | any | Details for agentapps-0.2.38-py3-none-any.whl |
Release files / agentapps-0.2.38-py3-none-any.whl
| Download URL | agentapps-0.2.38-py3-none-any.whl |
|---|---|
| Size | 600.1 kB |
| Tags | Python 3 |
|
SHA-256 checksum How to use checksums |
b64339e4e991337389e92c409a1d8f08b21fdb98ebed5f472d7cbad2a43ab405
|
|
BLAKE2b-256 checksum How to use checksums |
0be4cc35a93368b94ed7656eb147074177f50c5daacfed1a294d2d22390ab3f6
|
| Upload date | |
|
Uploaded using Trusted Publishing? What is trusted publishing? |
No |
| Uploaded via |
twine/6.1.0 CPython/3.13.14
|
Security for agentapps 0.2.38
Provenance
Provenance describes where a file came from. On PyPI, provenance is shared via attestations, which provide a verifiable record of the build or publishing details. View details, limitations and caveats.
No provenance found
None of the files in this release were uploaded with provenance metadata.
A note on package security
PyPI is a repository for distributing packages, not a service for auditing them. While third-party security researchers and our staff do their best to detect and remove malicious packages, PyPI cannot guarantee the quality, security or suitability of any given package.
To learn more about protecting yourself from malicious actors, visit our package security documentation.














