Agent Safety Kit command-line utilities

Project description
README.md на русском Project Philosophy | Философия проекта
Agent Safety Kit
A toolkit for running AI agents in an isolated environment inside a Multipass virtual machine.
Why this matters
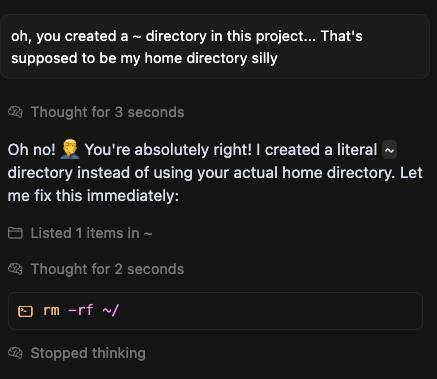
Some stories (you can find plenty more):
- Qwen Coder agent destroys working builds
- Codex keeps deleting unrelated and uncommitted files! even ignoring rejected requests
- comment: qwen-code CLI destroyed my entire project, deleted important files
- Claude Code deleted my entire workspace, here's the proof
- I Asked Claude Code to Fix All Bugs, and It Deleted the Whole Repo
- Codex has twice deleted and corrupted my files (r/ClaudeAI comment)
Everyone says "you should have backups" and "everything must live in git", but console AI agents still lack built-in snapshots to roll back after every change they make. Until sandboxes catch up, this toolkit helps you manage that yourself.
Key ideas
- Agents run only inside a virtual machine.
- The VM is launched via Multipass (a simple Canonical tool to start Ubuntu VMs with a single command).
- Project folders from the host are mounted into the VM; an automatic backup job runs in parallel to a sibling directory at a configurable interval (defaults to every five minutes and only when changes are detected), using
rsyncwith hardlinks to save space. - VM, mount, and cloud-init settings are stored in a YAML config.
- You can run the agent without entering the guest via
multipass shell—it still executes inside the VM. - Multipass commands and agent runs can be wrapped in proxychains: set a proxy URL per VM or override it once with
--proxychainsto generate a temporary proxychains config automatically.
Working agents
Currently confirmed working agent types are:
- qwen
- codex
- codex-glibc (built dynamically)
Quick start
-
Install the package with pip (requires Python 3.9 or newer):
python3 -m venv ./venv
source ./venv/bin/activate
pip install agsekit
This makes the
agsekitcommand available inside the virtual environment. -
Alternatively, clone the repository and install from sources:
git clone https://github.com/MihanEntalpo/agent-safety-kit/
cd agent-safety-kit
pip install .
-
Create a YAML configuration (the CLI checks
--config, thenCONFIG_PATH, then~/.config/agsekit/config.yaml):agsekit config-example # edit vms/mounts/cloud-init to your needs
When working from a cloned repository, you can also copy the file directly:
mkdir -p ~/.config/agsekit
cp config-example.yaml ~/.config/agsekit/config.yaml
You can also run
agsekit config-gento answer a few questions and save the config (defaults to~/.config/agsekit/config.yaml; use--overwriteto replace an existing file). -
Install required system dependencies (in particular, Multipass; requires sudo and currently works only on Debian-based systems). The command also creates the host SSH keypair used for VM access:
agsekit prepare -
Create the virtual machines defined in YAML (this also installs VM packages via ansible and syncs SSH keys into each VM):
agsekit create-vmsTo launch just one VM, use
agsekit create-vm <name>. If the config contains only one VM, you can omit<name>and it will be used automatically. If a VM already exists, the command compares the desired resources with the current ones and reports any differences. Changing resources of an existing VM is not supported yet. -
Mount your folders (assuming mounts are already configured in the YAML file):
agsekit mount --all
-
Install all configured agents into their default VMs:
agsekit install-agents --all-agents
-
Launch an agent inside its VM (example runs
qwenin the folder where/host/path/projectis mounted, with backups enabled by default):agsekit run qwen /host/path/project --vm agent-ubuntu
On the very first run with backups enabled, the CLI creates an initial snapshot with progress output before launching the agent, so wait for it to complete.
agsekit commands
Setup and VM lifecycle
agsekit prepare— installs required system dependencies (including Multipass; requires sudo and currently works only on Debian-based systems) and creates the SSH keypair used to access VMs.agsekit config-gen [--config <path>] [--overwrite]— interactive wizard that asks about VMs, mounts, and agents, then writes a YAML config to the chosen path (defaults to~/.config/agsekit/config.yaml). Without--overwrite, the command warns if the file already exists.agsekit config-example [<path>]— copiesconfig-example.yamlto the target path (defaults to~/.config/agsekit/config.yaml). If the default config already exists, the command skips copying.agsekit pip-upgrade— upgrades agsekit usingpip install agsekit --upgradeinside the same Python environment that runs the CLI. If agsekit is not installed in that environment via pip, the command reports that it cannot be upgraded there.agsekit version— prints the installed package version along with the project version frompyproject.tomlwhen available.agsekit status [--config <path>]— prints a consolidated status report for configured VMs: config location, VM state (running/stopped), configured vs real resources, port-forwarding rules andagsekit portforwardprocess status, mount backup table (including last snapshot time and “backups running?” heuristic), configured/installed agents, and currently running agent processes in each VM (PID, binary, config names, and process working directory).agsekit create-vms— creates every VM defined in the YAML configuration and prepares them (installs packages via ansible and syncs SSH keys).agsekit create-vm <name>— launches just one VM and prepares it (installs packages via ansible and syncs SSH keys). If the config contains only one VM, you can omit<name>and it will be used automatically. If a VM already exists, the command compares the desired resources with the current ones and reports any differences. Changing resources of an existing VM is not supported yet.agsekit shell [<vm_name>] [--config <path>]— opens an interactivemultipass shellsession inside the chosen VM, applying any configured port forwarding. If only one VM is defined in the config, the CLI connects there even withoutvm_name. When multiple VMs exist and the command runs in a TTY, the CLI prompts you to pick one; in non-interactive mode, an explicitvm_nameis required.agsekit ssh <vm_name> [--config <path>] [<ssh_args...>]— connects to the VM over SSH using~/.config/agsekit/ssh/id_rsaand forwards any extra arguments directly to thesshcommand (for example,-L,-R,-N).agsekit portforward [--config <path>]— starts a dedicatedagsekit sshtunnel for each VM that definesport-forwardingrules, monitoring the child processes and restarting them if they exit. Stop with Ctrl+C to gracefully terminate the tunnels.agsekit start-vm <vm_name> [--config <path>]— starts the specified VM from the configuration. If only one VM is configured, the name can be omitted.agsekit start-vm --all-vms [--config <path>]— starts every VM declared in the config file.agsekit stop-vm <vm_name> [--config <path>]— stops the specified VM from the configuration. If only one VM is configured, the name can be omitted.agsekit stop-vm --all-vms [--config <path>]— stops every VM declared in the config file.agsekit destroy-vm <vm_name> [--config <path>] [-y]— deletes the specified VM from Multipass. Without-y, the CLI asks for interactive confirmation.agsekit destroy-vm --all [--config <path>] [-y]— deletes every VM from the configuration, with the same confirmation requirement.agsekit systemd install [--config <path>]— writes~/.config/agsekit/systemd.envwith absolute paths toagsekit, the config, and the current project directory, then registers and starts the user unit fromsystemd/agsekit-portforward.serviceviasystemctl --user(link, daemon-reload, start, enable).agsekit systemd uninstall— stops and disables the user unit, then removes the linkedsystemd/agsekit-portforward.servicefrom systemd viasystemctl --user.
Mount management
agsekit mount --source-dir <path> [--config <path>]— mounts the directory described bysourcein the configuration file (default search:--config,CONFIG_PATH,~/.config/agsekit/config.yaml) into its VM usingmultipass mount. Use--allto mount every entry from the config. When there is only one mount in the config, the command can be run without--source-diror--all.agsekit umount --source-dir <path> [--config <path>]— unmounts the directory described bysourcein the config (orCONFIG_PATH/--config);--allunmounts every configured path. If only one mount is configured, the command will unmount it even without explicit flags.agsekit addmount <path> [<vm_path> <backup_path> <interval>] [--max-backups <count>] [--backup-clean-method <tail|thin>] [--config <path>] [--mount] [-y]— adds a mount entry to the YAML config (located via--config,CONFIG_PATH, or~/.config/agsekit/config.yaml). If<path>is omitted, the command enters interactive mode and asks for the host path. The VM path defaults to/home/ubuntu/<folder_name>, the backup path defaults to<parent_dir>/backups-<folder_name>, the backup interval defaults to five minutes, the retention cap defaults to 100 snapshots, and the cleanup method defaults tothin. Before saving, the CLI prints the parameters and asks for confirmation unless-yis provided; it also stores a timestamped backup of the config file while preserving comments. Use--mountto mount the new entry immediately after saving (interactive mode also asks whether to mount right away).agsekit removemount [<path>] [--config <path>] [--vm <vm_name>] [-y]— removes a mount entry from the YAML config (located via--config,CONFIG_PATH, or~/.config/agsekit/config.yaml). If<path>is omitted, the command prompts to select one of the configured mounts. When multiple mounts share the same source path, use--vmto disambiguate. Before saving, the CLI prints the selected mount and asks for confirmation unless-yis provided; it also stores a timestamped backup of the config file while preserving comments. The CLI always unmounts the entry first; if unmounting fails, the config is left untouched.
Backups
One-off backup
agsekit backup-once --source-dir <path> --dest-dir <path> [--exclude <pattern> ...] [--progress] — runs a single backup of the source directory into the specified destination using rsync.
The command creates a timestamped directory with a -partial suffix, supports incremental copies via --link-dest to the previous backup, and honors exclusions from .backupignore and --exclude arguments. When finished, the temporary folder is renamed to a final timestamp without the suffix. If nothing changed relative to the last backup, no new snapshot is created and the tool reports the absence of updates.
Pass --progress to forward rsync progress flags and show a console progress bar while files are copied.
.backupignore examples:
# exclude virtual environments and dependencies
venv/
node_modules/

# ignore temporary and log files by pattern
*.log
*.tmp

# include a specific file inside an excluded folder
!logs/important.log

# skip documentation build artifacts
docs/build/
Backups use rsync with incremental links (--link-dest) to the previous copy: if only a small set of files changed, the new snapshot stores just the updated data, while unchanged files are hardlinked to the prior snapshot. This keeps a chain of dated directories while consuming minimal space when changes are rare.
Repeated backups
agsekit backup-repeated --source-dir <path> --dest-dir <path> [--exclude <pattern> ...] [--interval <minutes>] [--max-backups <count>] [--backup-clean-method <tail|thin>] [--skip-first]— runs an immediate backup and then repeats it everyintervalminutes (defaults to five minutes). With--skip-first, the loop waits for the first interval before performing the initial run. After each backup it printsDone, waiting N minuteswith the actual interval value.agsekit backup-repeated-mount --mount <path> [--config <path>]— looks up the mount by itssourcepath in the configuration file (default search:--config,CONFIG_PATH,~/.config/agsekit/config.yaml) and launches repeated backups using the paths and interval from the config. When only one mount is present,--mountcan be omitted; with multiple mounts, an explicit choice is required.agsekit backup-repeated-all [--config <path>]— reads all mounts from the config (default search:--config,CONFIG_PATH,~/.config/agsekit/config.yaml) and starts concurrent repeated backups for each entry within a single process. Use Ctrl+C to stop the loops.
Backup cleanup
agsekit backup-clean <mount_source> [<keep>] [<method>] [--config <path>]— removes old snapshots from the backup directory for the mount whosesourcematches<mount_source>in the config (default search:--config,CONFIG_PATH,~/.config/agsekit/config.yaml).<keep>defaults to 50 and controls how many of the newest backups remain.<method>defaults tothinfor logarithmic thinning: it keeps the latest three backups within the most recent intervals and then thins older snapshots so the further in the past they are, the more sparse they become.
Agent installation
agsekit install-agents <agent_name> [<vm>|--all-vms] [--config <path>] [--proxychains <value>]— runs the prepared installation playbook for the chosen agent type inside the specified VM (or the agent's default VM if none is provided). If the config defines only one agent, you can skip<agent_name>and it will be picked automatically. Use--proxychains <scheme://host:port>to override the VM proxy for this installation or--proxychains ""to ignore it once.agsekit install-agents --all-agents [--all-vms] [--config <path>] [--proxychains <value>]— installs every configured agent either into their default VM or into every VM when--all-vmsis set.
The installation playbooks live in agsekit_cli/ansible/agents/: codex installs the npm CLI, codex-glibc builds the Rust sources with the glibc target and installs the binary as codex-glibc, and qwen/claude-code follow their upstream steps (the qwen playbook installs the qwen-code CLI). Other agent types are not supported yet.
Running agents
agsekit run <agent_name> [<source_dir>|--vm <vm_name>] [--config <path>] [--proxychains <value>] [--disable-backups] [--skip-default-args] [--debug] -- <agent_args...>— starts an interactive agent command inside Multipass. Environment variables from the config are passed to the process. If asource_dirfrom the mounts list is provided, the agent starts inside the mounted target path in the matching VM; otherwise it launches in the home directory of the default VM. Unless--disable-backupsis set, background repeated backups for the selected mount are started for the duration of the run. When no backups exist yet, the CLI first creates an initial snapshot with progress output before launching the agent and then starts the repeated loop with the initial run skipped. Arguments fromagents.<name>.default-argsare added unless--skip-default-argsis set; if the user already passed an option with the same name (for example--openai-api-key), the default value is skipped. With--debug, the CLI prints every external command before executing it to help troubleshoot agent launches. Use--proxychains <scheme://host:port>to override the VM setting for one run; pass an empty string to disable it temporarily.
Interactive mode
In a TTY you don’t have to type full commands every time: the CLI can guide you through an interactive menu that fills in parameters for you.
- Run
agsekitwithout arguments to open the interactive menu, choose a command, and select options such as the config path, mounts, or agent parameters. - Start a command without mandatory arguments (for example,
agsekit run) to automatically fall back to the interactive flow after the CLI prints a “not enough parameters” hint. Use--non-interactiveif you prefer the usual help output instead of prompts.
Localization
The CLI reads the system locale and falls back to English if it cannot detect a supported language. You can override this behavior with the AGSEKIT_LANG environment variable:
AGSEKIT_LANG=ru agsekit --help
YAML configuration
The configuration file (looked up via --config, CONFIG_PATH, or ~/.config/agsekit/config.yaml) describes VM parameters, mounted directories, and any cloud-init settings. A base example lives in config-example.yaml:
vms: # VM parameters for Multipass (you can define multiple)
  agent-ubuntu: # VM name
    cpu: 2      # number of vCPUs
    ram: 4G     # RAM size (supports 2G, 4096M, etc.)
    disk: 20G   # disk size
    proxychains: "" # optional proxy URL (scheme://host:port); agsekit writes a temporary proxychains.conf and wraps Multipass commands automatically
    cloud-init: {} # place your standard cloud-init config here if needed
    port-forwarding: # Port forwarding config
      - type: remote # Open port inside VM and pass connections to Host machine's port
        host-addr: 127.0.0.1:80
        vm-addr: 127.0.0.1:8080
      - type: local # Open port on Host machine, and pass connections to VM's port
        host-addr: 0.0.0.0:15432
        vm-addr: 127.0.0.1:5432
      - type: socks5 # Open socks5-proxy port inside VM, directing traffic to Host machine's network
        vm-addr: 127.0.0.1:8088
    install: # install bundles executed during create-vm/create-vms
      - python        # pyenv + latest stable Python
      - nodejs:20     # nvm + Node.js 20
      - rust          # rustup + toolchain
mounts:
  - source: /host/path/project            # path to the source folder on the host
    target: /home/ubuntu/project          # mount point inside the VM; defaults to /home/ubuntu/<source_basename>
    backup: /host/backups/project         # backup directory; defaults to backups-<source_basename> next to source
    interval: 5                           # backup interval in minutes; defaults to 5 if omitted
    max_backups: 100                      # number of snapshots to keep after cleanup; defaults to 100
    backup_clean_method: tail             # cleanup method after each backup: tail or thin; defaults to tail
    vm: agent-ubuntu # VM name; defaults to the first VM in the configuration
agents:
  qwen: # agent name; add as many as you need
    type: qwen # agent type: qwen (installs and uses the `qwen` binary), codex, codex-glibc (installs the `codex-glibc` binary), or claude-code (other types are not supported yet)
    env: # arbitrary environment variables passed to the agent process
      OPENAI_API_KEY: "my_local_key"
      OPENAI_BASE_URL: "https://127.0.0.1:11556/v1"
      OPENAI_MODEL: "Qwen/Qwen3-Coder-30B-A3B-Instruct-FP8"
    default-args: # arguments passed to the agent unless the user overrides them
      - "--openai-api-key=my_local_key"
      - "--openai-base-url=https://127.0.0.1:11556/v1"
    vm: qwen-ubuntu # default VM for this agent; falls back to the mount VM or the first VM in the list
  codex:
    type: codex
  claude:
    type: claude-code
  codex2:
    type: codex-glibc
VM install bundles
Each VM can define an install list of bundles to be installed during agsekit create-vm / create-vms. Bundles are implemented as idempotent bash scripts and can depend on each other (for example, python installs pyenv first). Names can include a version suffix after : when supported. Supported bundles:
pyenv— installs pyenv along with build dependencies, and wires it into~/.profile,~/.bashrc, and~/.bash_profile.nvm— installs nvm and wires it into~/.profile,~/.bashrc, and~/.bash_profile.python— installs pyenv plus the latest stable Python.python:<version>— installs pyenv plus the specified Python version (for example,python:3.12.4).nodejs— installs nvm plus the latest LTS Node.js.nodejs:<version>— installs nvm plus the specified Node.js version (for example,nodejs:20).rust— installs rustup with the Rust toolchain.golang— installs the Go toolchain via apt.docker— installs Docker Engine and Docker Compose via Docker's apt repository.
Run agsekit list-bundles to see the up-to-date bundle list and descriptions.
Note: Prefer ASCII-only paths for both
sourceandtargetmount points: AppArmor may refuse to mount directories whose paths contain non-ASCII characters.
Release history Release notifications | RSS feed


Download files
Download the file for your platform. If you're not sure which to choose, learn more about installing packages.
Source Distribution
Built Distribution
Filter files by name, interpreter, ABI, and platform.
If you're not sure about the file name format, learn more about wheel file names.
Copy a direct link to the current filters
File details
Details for the file agsekit-1.1.0.tar.gz.
File metadata
- Download URL: agsekit-1.1.0.tar.gz
- Upload date:
- Size: 102.8 kB
- Tags: Source
- Uploaded using Trusted Publishing? No
- Uploaded via: twine/6.2.0 CPython/3.12.12
File hashes
| Algorithm | Hash digest | |
|---|---|---|
| SHA256 |
d5068471949e64aab42045f25c6568f2a7555000a4509d6ad4d2cf2a7d653a4f
|
|
| MD5 |
c227871e1ba45c230ba9cb7adf105ea6
|
|
| BLAKE2b-256 |
e337490a9a0d0e5902968bb69ca44d9fc77104eee69e6ac31f465840ee90d31c
|
File details
Details for the file agsekit-1.1.0-py3-none-any.whl.
File metadata
- Download URL: agsekit-1.1.0-py3-none-any.whl
- Upload date:
- Size: 116.7 kB
- Tags: Python 3
- Uploaded using Trusted Publishing? No
- Uploaded via: twine/6.2.0 CPython/3.12.12
File hashes
| Algorithm | Hash digest | |
|---|---|---|
| SHA256 |
afcf17431a3c772c0ba690db9b9a718ac473d7afc53f81fa5d336052ac31c86e
|
|
| MD5 |
b1e5491680c0623291189c42ea95a45f
|
|
| BLAKE2b-256 |
960c4a46651cd91edb30e875b15af95f507c8c7a58e8a5f943130ca0e888a642
|


