
Annealage Mesh
An agentic CAD workbench for 3D-printable parts. A 3D viewer and a chat pane sit side by side in the browser, the agent writes CadQuery geometry, and you iterate on the design by pointing at it instead of describing it in words.
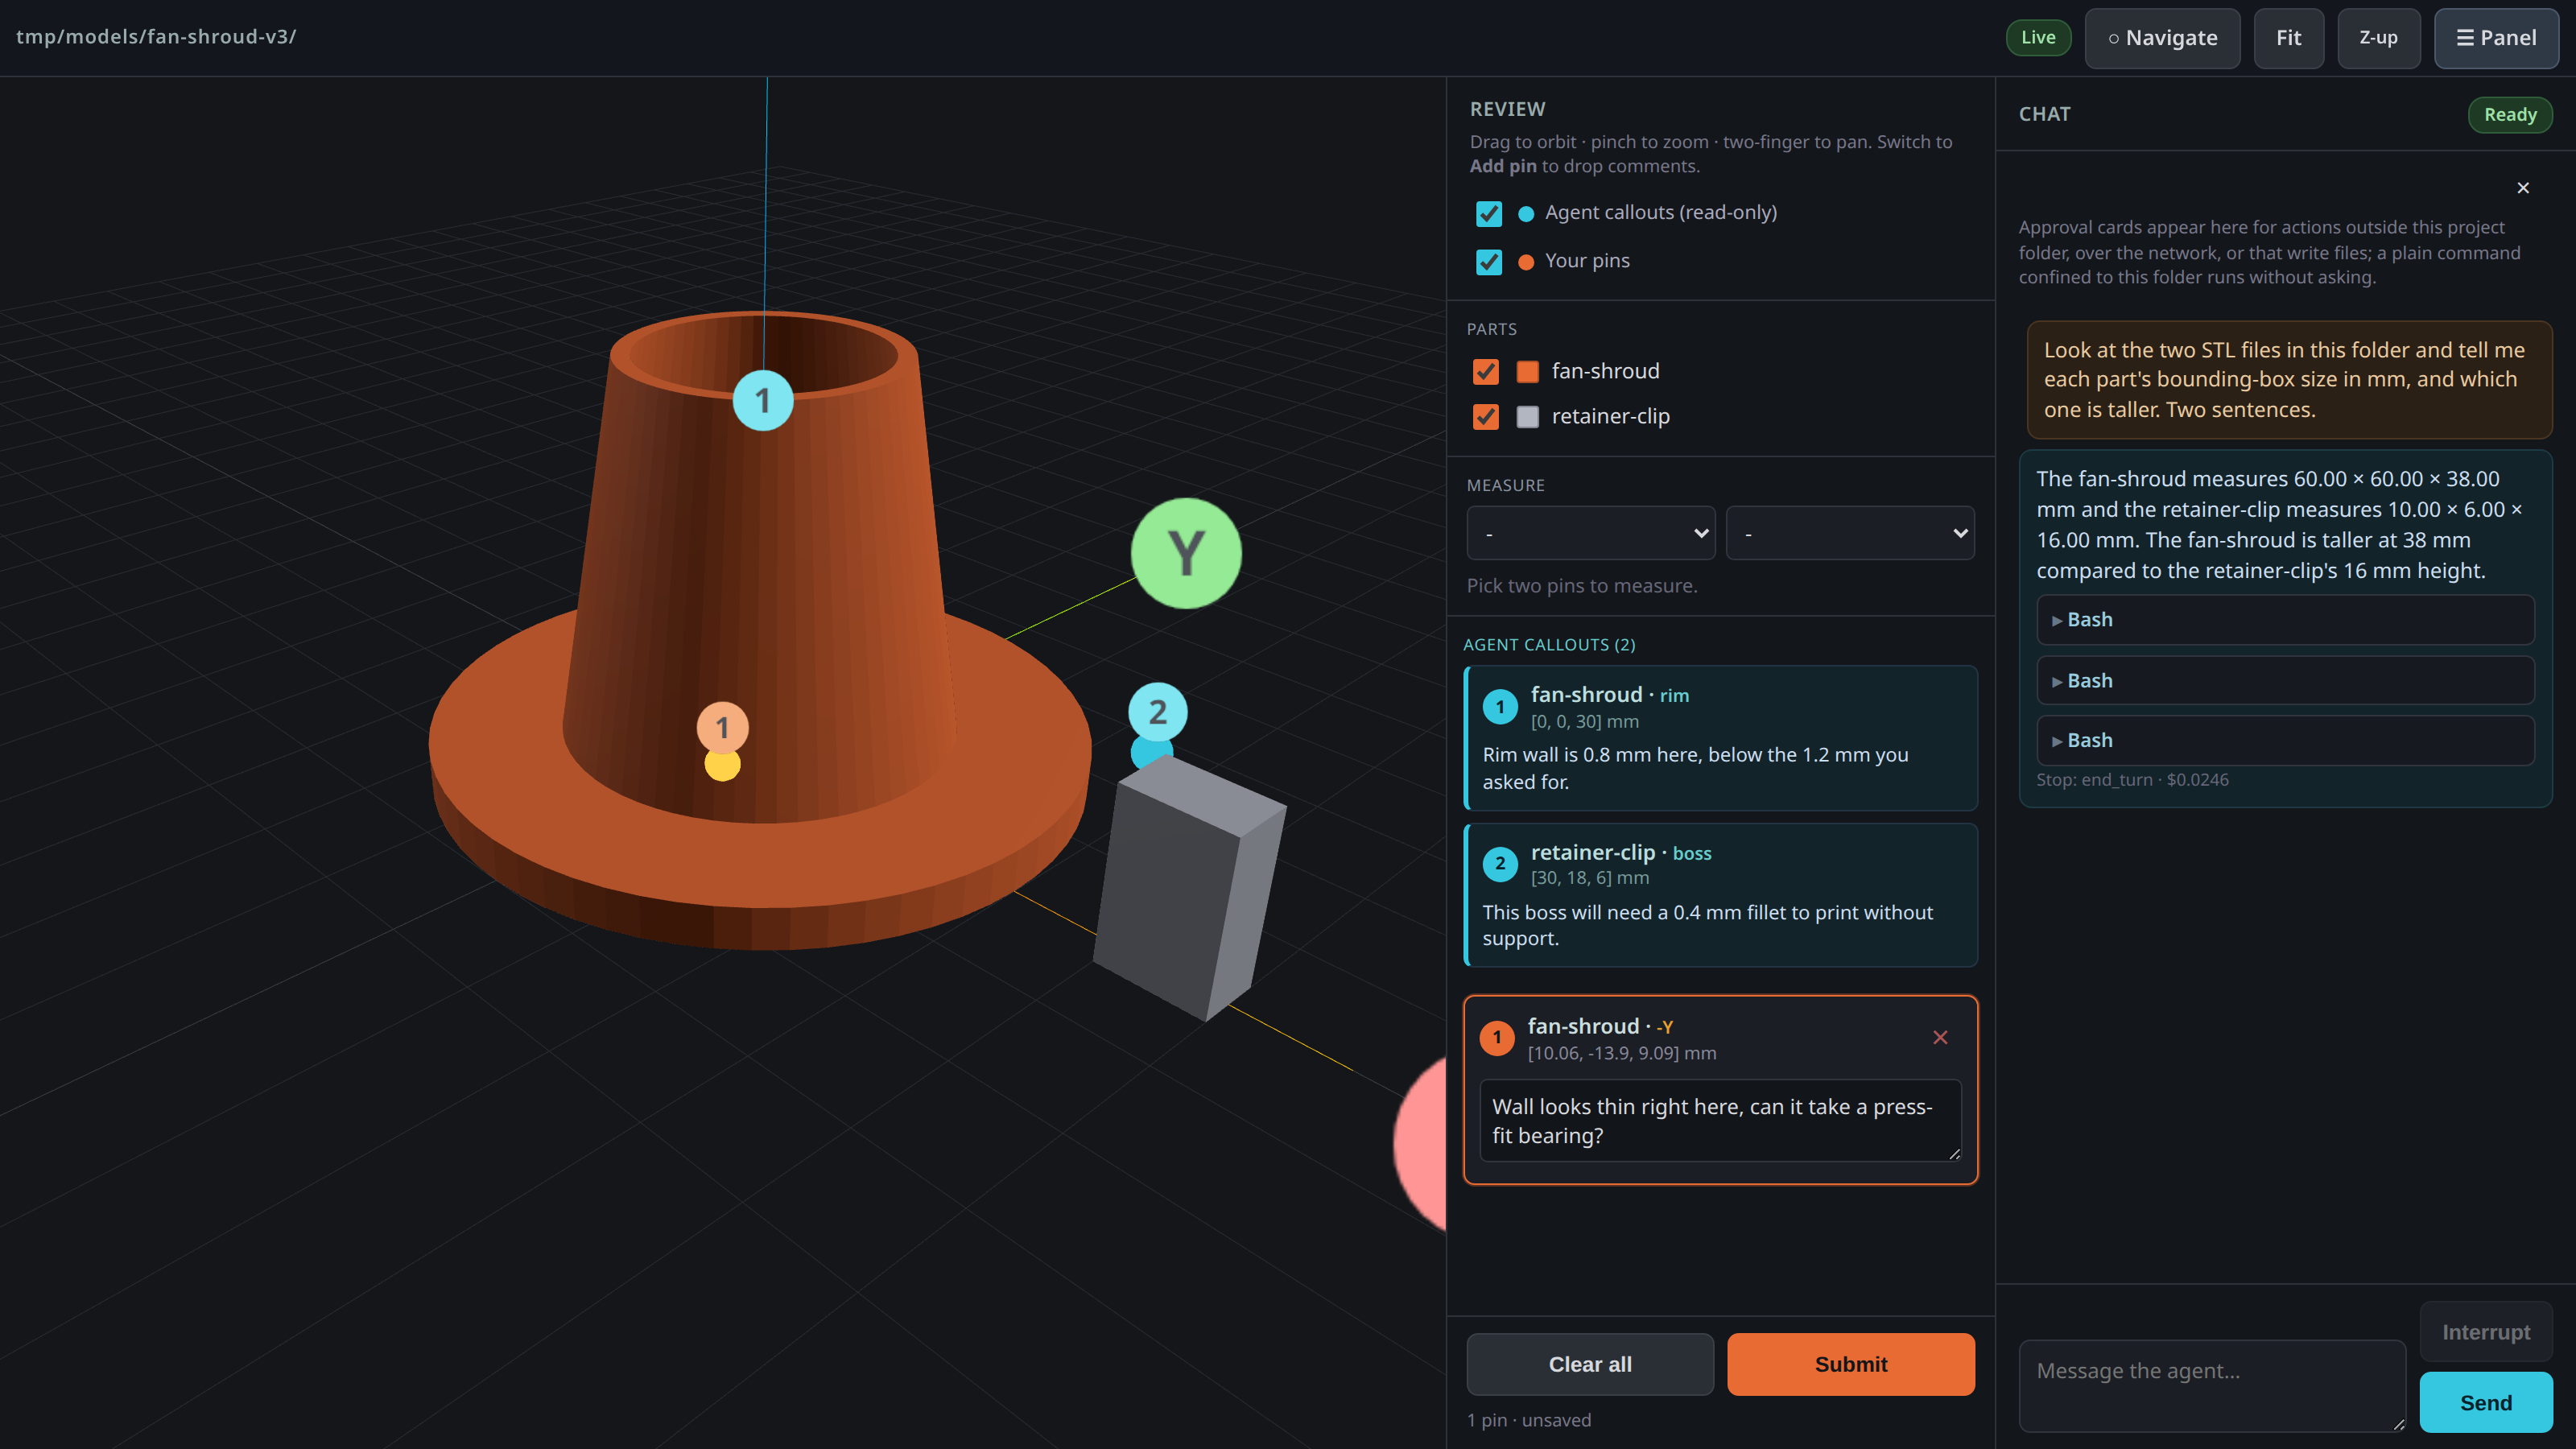
You give it a folder, it scaffolds a parametric CadQuery project and starts a local server. Ask for a part, the agent writes the geometry, and the STL turns up in the viewer within a fraction of a second. Click the face that's wrong, type what's wrong with it, and the agent revises the script. You can pin your problems on the model, the agent can pin its questions right back, and the two of you iterate on a shared surface instead of trading paragraphs about which corner you mean.
Why
I built this while iterating on a 3D-printed part with an agent. The CAD was generated from a script, I'd look at a render, then spend ages typing things like "no, the inside corner on the far wall near the fan, not that one" trying to describe which face I meant. It was a bit of a pain, and half the time the agent picked the wrong spot anyway.
Pointing at the thing is just so much easier. Click the face, type the comment right there, the agent gets it back with the actual coordinates, no guessing.
It's bidirectional too, which turned out to be the good bit. The agent writes its own callouts (a location plus a note) and they show up as cyan pins in the viewer. I mark up what I want changed, it pins its questions on the geometry, and we go back and forth pointing at the same model instead of describing it in words.
Install
It's on PyPI as annealage-mesh, so with uv there's nothing to install at all:
uvx annealage-mesh ./path/to/part
Or keep it around as a tool:
uv tool install annealage-mesh
# or
pipx install annealage-mesh
To run the unreleased main instead, point uv at the repo:
uvx --from git+https://github.com/Annealage/mesh annealage-mesh ./path/to/part
On Linux you'll also want bubblewrap and socat:
apt install bubblewrap socat
That's what keeps the agent's shell contained, and agent mode won't start without them rather than quietly running an uncontained one. macOS has its own sandbox built in so there's nothing to install there. If you'd rather not bother, annealage-mesh view gives you the viewer without an agent session and needs neither.
Python 3.10+. Three small runtime dependencies: microdot for the server, platformdirs to find your settings file, and tomli to read it on 3.10 (3.11+ has tomllib built in). three.js 0.160.0 is vendored and served locally, so the viewer needs no network access at all. Agent backends have their own dependencies (below).
Agent backends
Three backends, each getting the same viewer tools, the same MCP surface, and the same permission model. The --backend flag or the backend key in your settings file picks which one a session uses.
- Claude (
--backend claude): uses the Claude Agent SDK. The SDK bundles the Claude Code CLI, so installing it pulls about 90 MB. - Codex (
--backend codex): uses OpenAI's Codex CLI. Installopenai-codexseparately. - OMP (
--backend local): uses Oh My Pi and all the providers it supports, including local models. Installomp-rpcfrom the oh-my-pi repo.
Usage
Point it at a folder:
annealage-mesh ./build
It sets the folder up if it isn't already (a dimensions.json for your caliper measurements, a model.py scaffold with PEP-723 inline deps for CadQuery, a cad/ directory of helper scripts, models/ and images/ directories, a CLAUDE.md stub, a .gitignore, and a git init with one commit if git is installed), starts the server, prints the URL with a per-run token in it, and opens your browser. Every .stl in the folder shows up in the viewer, toggle them on and off in the side panel.
Four subcommands for when you want less than all of that:
annealage-mesh view ./build     # viewer and chat, no scaffold, no git
annealage-mesh init ./build     # set the folder up and stop
annealage-mesh doctor ./build   # what's installed, what's configured, then stop
annealage-mesh migrate ./build  # got an older project? add the CAD scaffold to it
If a folder of yours is actually called view, init or doctor, spell it ./view and it's read as the directory. Running inside an existing agent session? The bare form detects it and flips to viewer-only so you don't end up with an agent inside an agent.
- Drag to orbit, scroll or pinch to zoom, right-drag or two-finger to pan.
- Flip to "Add pin" mode, click the model to drop a pin, type a comment against it in the panel.
- Hit Submit. Your pins get written to
mesh-comments.jsonin the served folder, which is what the agent reads. - Type in the chat pane to put the agent to work in that folder. Interrupt stops a turn mid-flight, each turn shows what it cost.
- The agent works the viewer too, not just the folder. It can move the camera, hide and show parts, screenshot what's on screen and pin its own callouts, so "show me the underside of that boss" is something it does rather than tells you to do.
- Hit Pause in the topbar and everything that changes the view gets refused until you hit it again. Line up a shot or type a comment without it moving underneath you. It can still read while paused.
- Need a distance between two features? Pick any two placed pins (yours or the agent's) in the Measure panel for ΔX/ΔY/ΔZ and the direct distance, drawn as a line in the view.
- Attach a picture to a message with the paperclip, a paste, or a drag and drop: a photo of the printed part, a slicer screenshot, a reference drawing.
- Hit Sketch to draw straight on the 3D view, circle the wall that's wrong, send that as the picture. Quicker than a pin when the shape of the problem is the point.
- Export in the chat header writes the conversation into
review/as markdown you can commit. The agent can do it too, with your approval, when you ask for a record of what you decided. - The gear opens Settings: port, host, model, backend, effort, a couple of viewer preferences, each shown with where its value came from (a flag, this project's config, your own settings, or the built-in default) so you know which file to edit. Anything that needs a restart says so rather than pretending to apply. There's a Diagnostics block in there too, same facts
doctorprints.
It works on a phone too, the three panes become tabs and navigation is all touch (one finger orbits, two fingers pan and zoom). --host tailscale binds your tailnet address instead of loopback, which is what I use to look at a part on my phone while the agent iterates on the desktop.
Sessions are kept, so -c picks up the most recent conversation for that folder and -r lists what's there. Reloading the browser mid-turn doesn't lose anything, the conversation belongs to the session rather than the socket.
There's a fuller walkthrough in docs/user-guide.md covering the loop, the flags, remote access and what to do when something's off.
The CAD pipeline
Mesh ships a CadQuery-based pipeline for parametric modelling. Five stages, each building on the last:
- Evidence then dimensions. Caliper measurements go into
dimensions.json, one source of truth. Measured values are sacred; derived numbers get computed in the model script, not baked into the JSON. - Scaffold.
model.pyreads that file, uses PEP-723 inline deps (uv run model.pyjust works), and models the reference hardware first so the printable part is placed against real geometry. - Robust solids. CadQuery geometry with OCCT kernel safety. The bundled
cad/robust_solids.pyhandles the sharp edges:safe_fillettries radii largest-first and falls back,assert_validcatches the silent boolean failures that OCCT won't tell you about. - Verify.
cad/section_probe.pyslices the mesh, probes points, and checks watertightness before the human ever sees it. Cross-section PNGs go intoimages/so you can eyeball interior walls. - Print prep. Orientation, splitting hollow parts into open-face trays, plate layout, and watertight export via
cad/export_watertight.py. Repairs are volume-guarded so they never silently reshape the part.
The helpers are CadQuery-specific, but the viewer itself just watches for STL output. If you'd rather use OpenSCAD, build123d, or anything else that produces STLs, it all works the same way, you just won't have the helper scripts.
Files in the served folder
dimensions.json- measured values thatmodel.pyreads. One source of truth for every number that came off a caliper.model.py- the parametric CadQuery script.uv run model.pywrites STEP and STL intomodels/.cad/- helper scripts:robust_solids.py,section_probe.py,export_watertight.py,pin_to_model.py.mesh-comments.json- your pins and comments, written on submit (also appended tomesh-comments.log).mesh-callouts.json- callouts to show in the viewer. Write pins here and they appear live (cyan, read-only). This is how an agent points back at the model.images/- pictures you attached, sketches you drew, screenshots the agent saved. Meant to be committed..mesh/- session event logs, this project's config, allow-always decisions, and a lock file so two servers can't fight over one folder. Gitignored exceptconfig.toml, which is shareable and holds no secret.review/- exported transcripts. Created the first time you export one, not before.CLAUDE.md- a stub describing the folder's contract, generated once if you don't already have one. Never overwritten.
What it'll ask you about
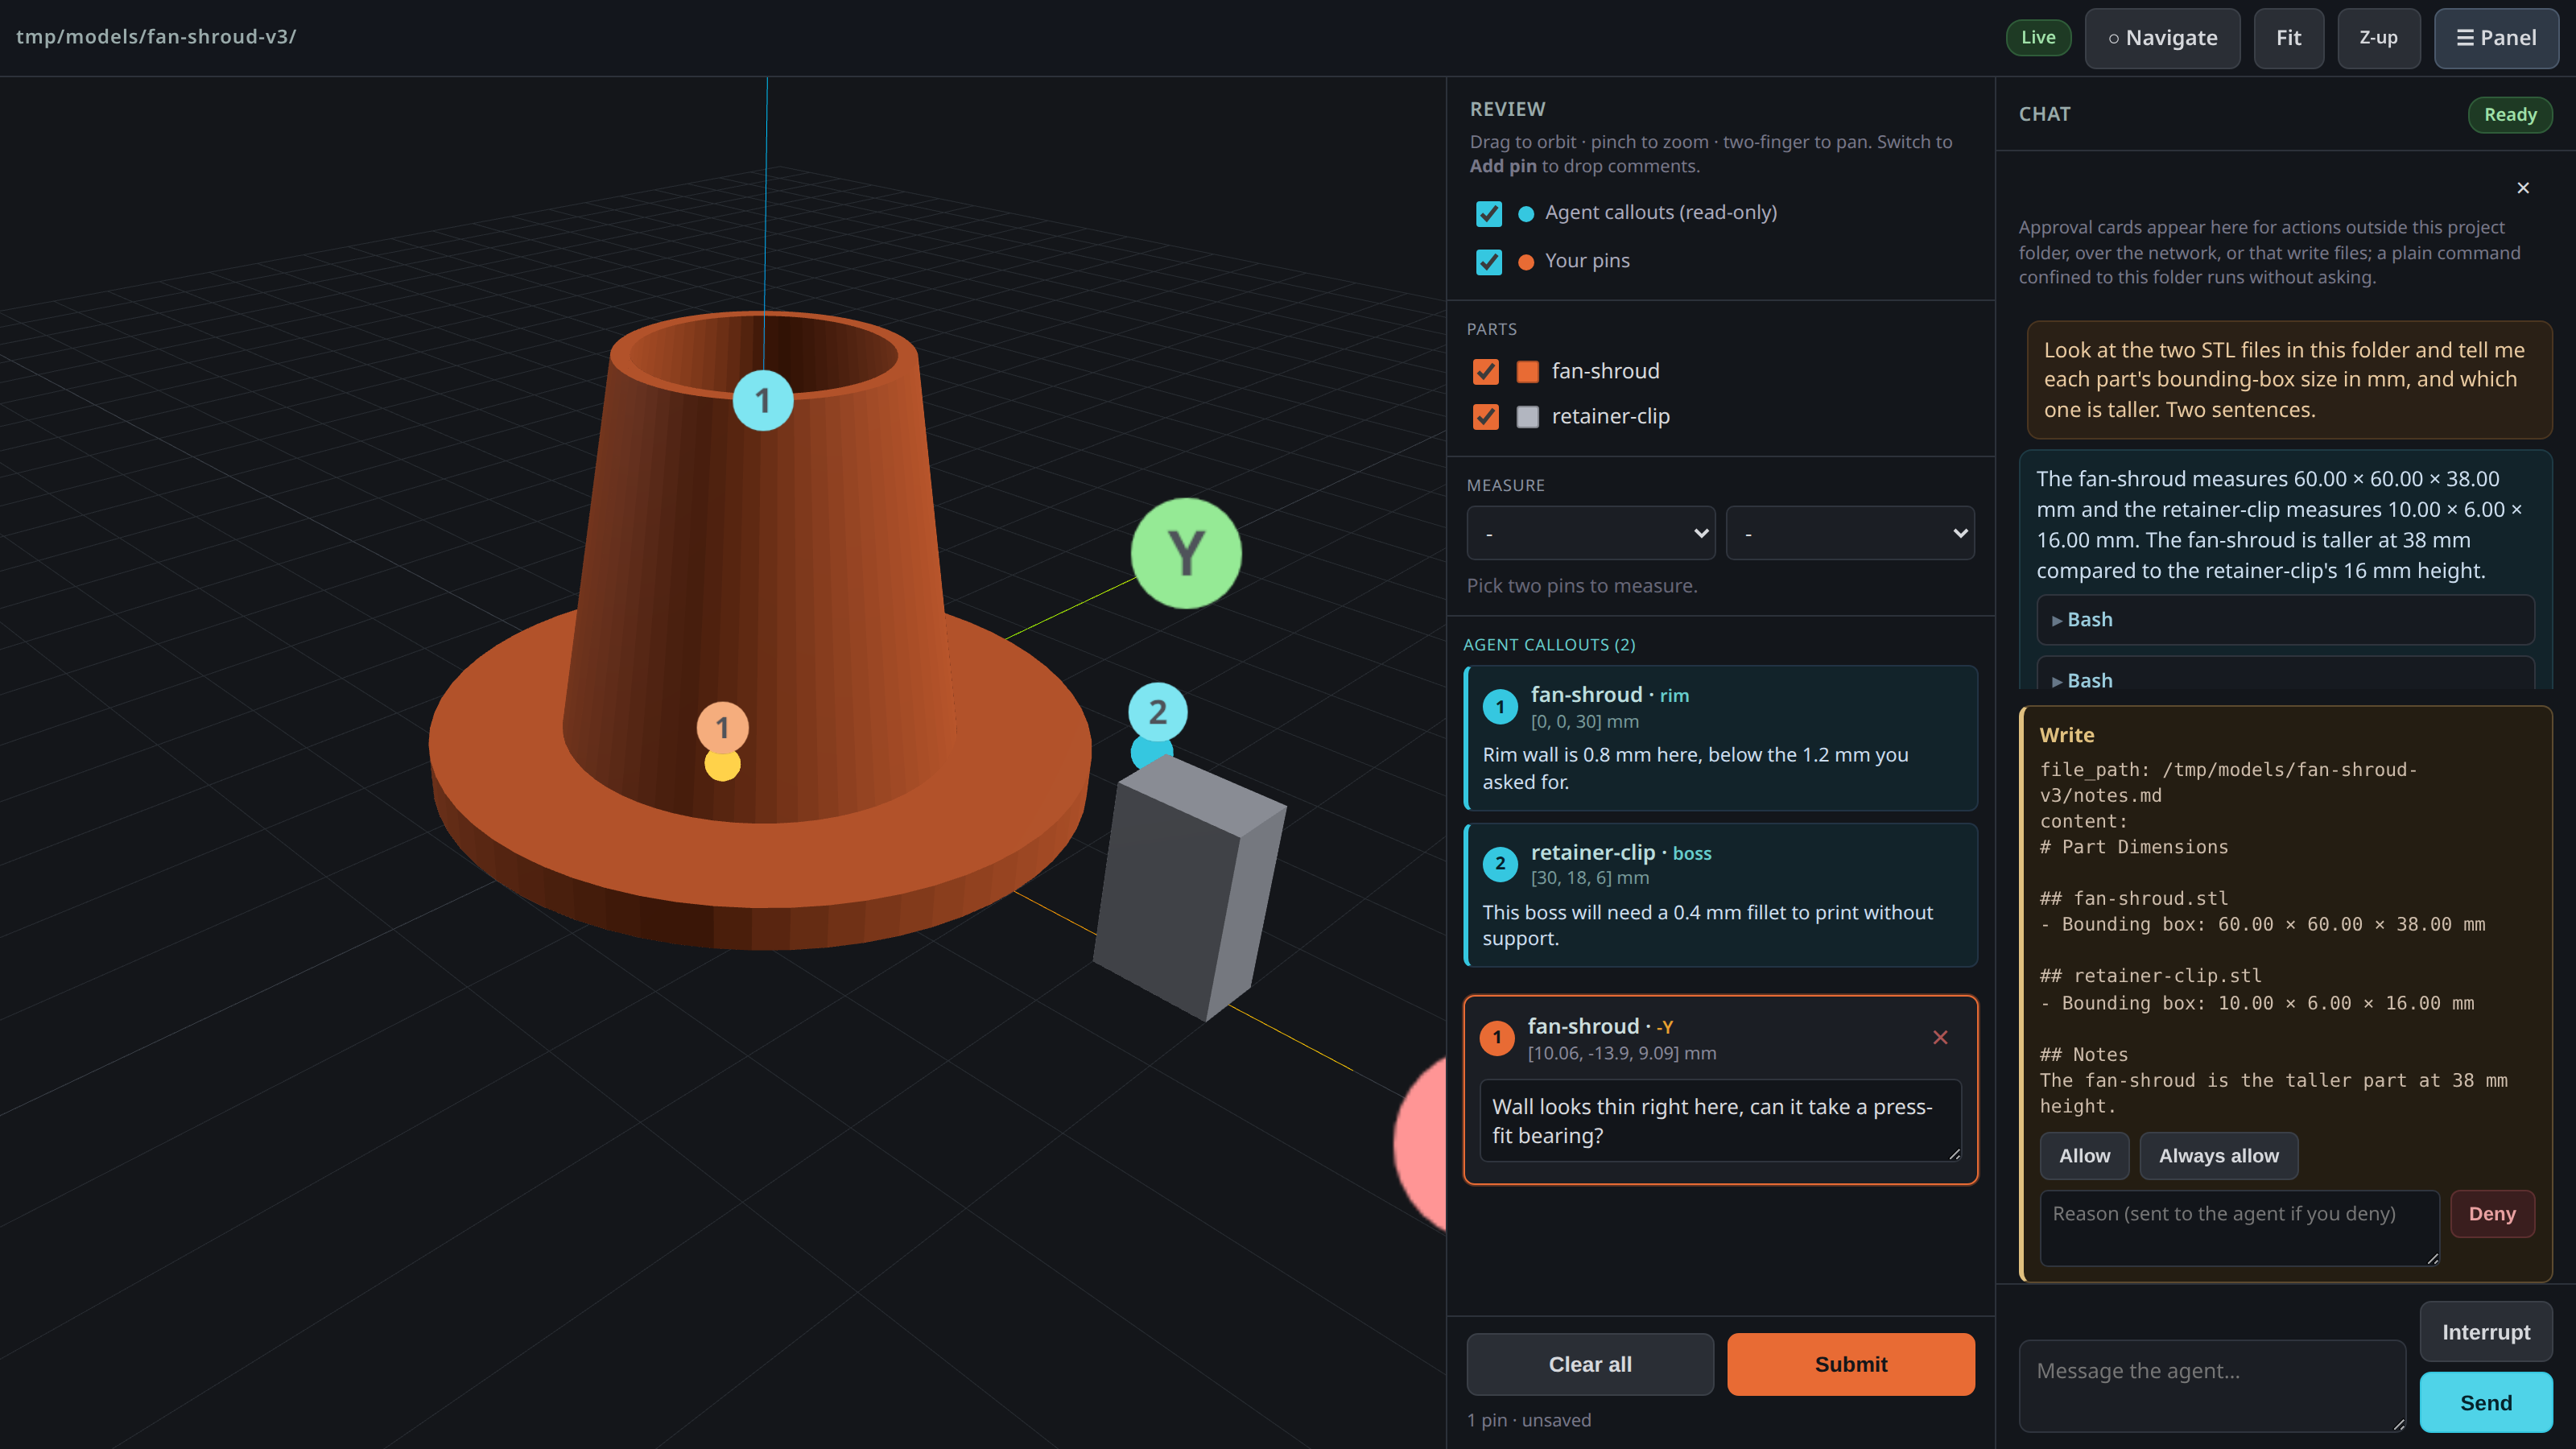
The agent's shell runs sandboxed, so a command that stays inside the project folder just runs without asking. That's deliberate, regenerating a part twenty times would be miserable otherwise. Anything that writes through its edit tools, wants out of the folder, or reaches the network gets you a card in the chat pane with the full command or file contents on it, and you allow it, allow it for the rest of the session, or deny it with a reason. The reason goes to the agent verbatim, so "not that file, do the enclosure instead" is more use to it than a bare no.
Its viewer tools split by what a mistake would cost. Reading anything, and driving the view itself, never asks: it can move the camera and hide parts freely, because you're looking at the screen while it happens and a card per camera move would just get clicked without reading. Pause is the control for that, not a prompt. What does ask is the things that leave something behind after you close the page: writing a callout, deleting one, saving a screenshot, and setting a measured value in dimensions.json.
Four things worth knowing about the containment. The sandbox stops writes and network, not reads, so on its own a contained shell could read anything your user can. Mesh refuses a short list of credential paths on top of that (~/.ssh, ~/.aws, ~/.config/gcloud, ~/.kube, ~/.gnupg, ~/.netrc, ~/.docker/config.json, ~/.config/gh and its own ~/.claude/.credentials.json), for the file tools and for shell commands that name them. Be clear on how far that goes: for the file tools it's exact, symlinks included, but for a shell command it's text matching, so a path built from a variable or a glob gets through. It raises the floor against accidents and direct attempts; it isn't a wall against a determined agent. git is deliberately outside the sandbox, because it has to see the real filesystem to work on your repository; that is a large carve-out, since git can be told to run commands through its own config, so a folder whose .git/config names one is refused until you accept it (below). And the model can't drop the sandbox for a command by asking, which it does try if you let it.
If the folder you point it at has its own .claude/settings.json or .mcp.json in it, mesh won't start the agent until you've said you trust that folder. Those files can declare hooks, hooks are shell commands, and one kind runs before you've typed anything at all, so an unpacked model archive off the internet isn't something to hand a shell to sight unseen. Read them, then --trust-project-config accepts them, recorded against the exact contents you read so any later edit asks again.
It binds to 127.0.0.1 by default, and the startup banner tells you what it's reachable on every run. On anything that isn't loopback the token in the URL stops being defence in depth and becomes the only thing between the network and an agent with a shell, so keep that URL to yourself.
For AI agents
If you're an agent (or setting one up) working outside the built-in chat pane, the contract is two JSON files in the served folder plus a few MCP tools.
Read the human's feedback from mesh-comments.json:
{
  "submitted_at": "...",
  "count": 1,
  "annotations": [
    { "id": 1, "part": "bracket", "label": "+Z", "point": [12.5, -3.2, 44.0],
      "normal": [0, 0, 1], "faceIndex": 1234, "comment": "this fillet's too sharp" }
  ]
}
point is the click location in model space (same units as the STL), so you can map a comment straight to a spot in the CAD script that generated it.
Write your own callouts to mesh-callouts.json and they show up as cyan pins in the viewer, live:
{
  "annotations": [
    { "id": 1, "author": "agent", "part": "bracket", "label": "+Y", "point": [0, 20, 10],
      "comment": "moved this wall out 2mm, that clear enough?" }
  ]
}
point and comment are the only fields that really matter, the rest are display niceties.
Three MCP tools complement the file contract:
mesh_verifyruns an STL quality check (open edges, volume, body count) and returns the result structured. Same checks ascad/section_probe.py verify, but callable from any MCP client.mesh_dimensionsreads and lists entries indimensions.jsonwithout hand-editing the file.mesh_dimensions_setwrites a measured value intodimensions.json(requires human approval, since it's changing the numbers the model is built from).
There's a skill in skill/ that wires this up as a workflow for agents that support skill files.
Licence
PolyForm Noncommercial 1.0.0, free to use for any noncommercial purpose. Commercial use needs a separate licence; see COMMERCIAL.md.
The skill in skill/annealage-mesh/ is MIT, so it can be copied into any agent configuration without restriction. The three.js files vendored in src/annealage_mesh/static/js/vendor/ are the three.js authors' work under the MIT License (see the LICENSE there).
1 maintainer

Release files for annealage-mesh 2.1.1
For a detailed explanation of source distributions (sdists) and built distributions (wheels), please see the package formats documentation.
Source distribution (sdist)
| File | Size | Uploaded | |
|---|---|---|---|
| annealage_mesh-2.1.1.tar.gz | 814.4 kB | Details |
Built distribution (wheel)
| File | Interpreter | ABI | Platform | Reset |
|---|---|---|---|---|
| annealage_mesh-2.1.1-py3-none-any.whl | Python 3 | none | any | Details |
Total release size: 1.4 MB
Release files / annealage_mesh-2.1.1.tar.gz
| Download URL | annealage_mesh-2.1.1.tar.gz |
|---|---|
| Size | 814.4 kB |
| Tags | Source |
|
SHA-256 checksum How to use checksums |
78fa9661db2e8a2965087e8c4f3b8dfd4bba53286c05cfef2afd2b73974e3e3f
|
|
BLAKE2b-256 checksum How to use checksums |
2b268de60dd1454b819d09a68188fa9332263345f979ede106b23257f386ed87
|
| Upload date | |
|
Uploaded using Trusted Publishing? What is trusted publishing? |
Yes |
| Uploaded via |
twine/7.0.0 CPython/3.13.14
|
Provenance
Provenance describes where a file came from. On PyPI, provenance is shared via attestations, which provide a verifiable record of the build or publishing details. View details, limitations and caveats.


PyPI Publish Attestation
PyPI verified that this artifact, at this checksum, originated from the publisher listed below.
Signed by GitHub Actions, verified by PyPI on Sep 26, 2026.
Transparency logRelease files / annealage_mesh-2.1.1-py3-none-any.whl
| Download URL | annealage_mesh-2.1.1-py3-none-any.whl |
|---|---|
| Size | 630.6 kB |
| Tags | Python 3 |
|
SHA-256 checksum How to use checksums |
672df63e3cfdb9a691afea311eda9f6772256dd61d43bbc7693085f2881f0a38
|
|
BLAKE2b-256 checksum How to use checksums |
14c7f4b0bdd859f9721f5e8a922fe6350cb97786ca7f7fea5c4eb76d1e990660
|
| Upload date | |
|
Uploaded using Trusted Publishing? What is trusted publishing? |
Yes |
| Uploaded via |
twine/7.0.0 CPython/3.13.14
|
Provenance
Provenance describes where a file came from. On PyPI, provenance is shared via attestations, which provide a verifiable record of the build or publishing details. View details, limitations and caveats.
PyPI Publish Attestation
PyPI verified that this artifact, at this checksum, originated from the publisher listed below.
Signed by GitHub Actions, verified by PyPI on Sep 26, 2026.
Transparency log













