
Build native Android apps in pure Python with a fast desktop preview and native Java/XML output.

Project description
🚀 ApkPy — Build Native Android Apps in Pure Python
Welcome to ApkPy, the revolutionary transpiler framework that empowers you to build lightning-fast, native Android applications using only Python and CSS-style definitions. We don't use heavy WebViews or slow runtime rendering engines. ApkPy parses your Python logic and directly generates pure Android Java and XML components, ready to be compiled into a .apk.
ApkPy 1.1.0 — the complete native design-system update
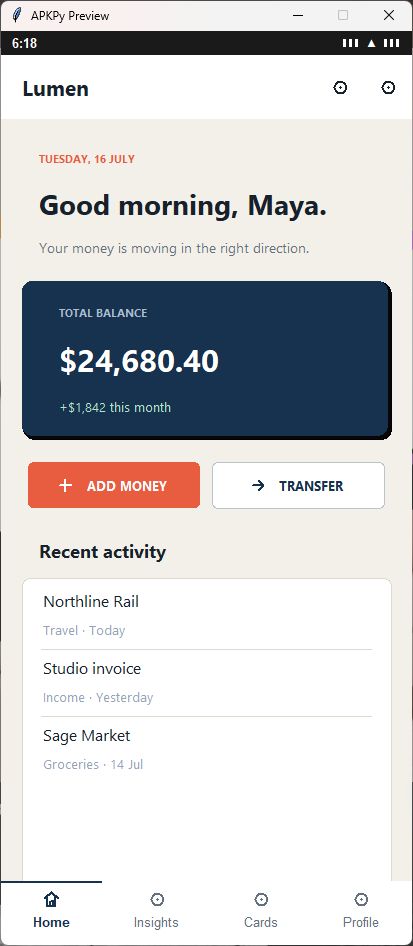
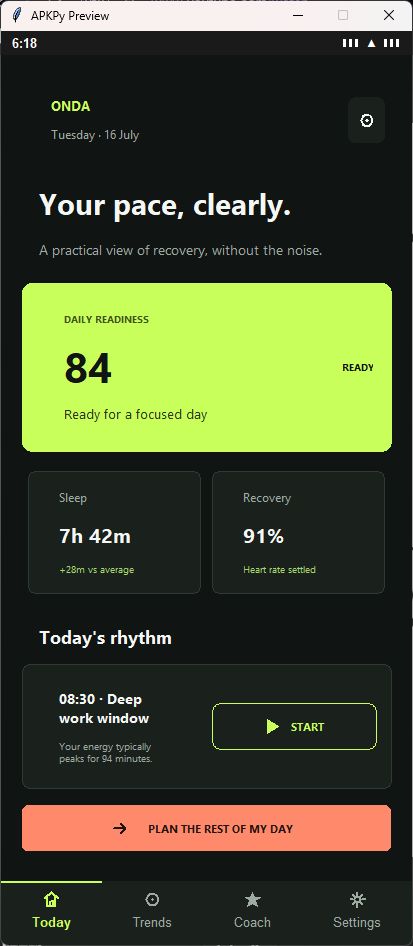
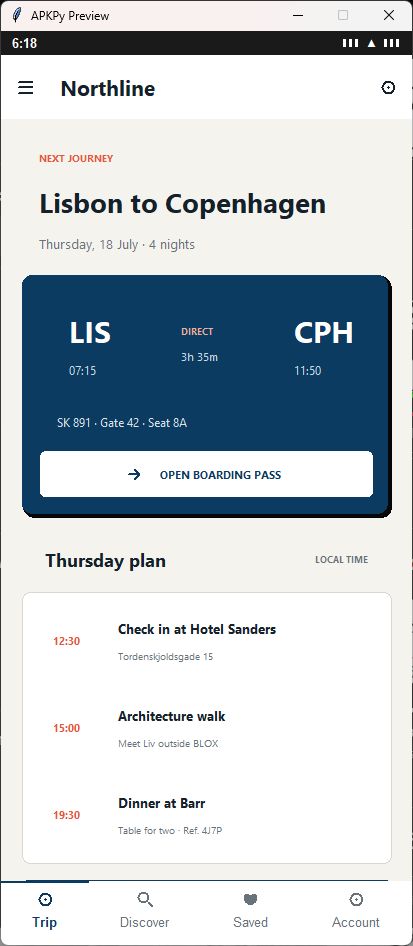
Version 1.1.0 brings the nine parts of ApkPy's new visual plan together: global themes, Material buttons and icons, responsive layouts, advanced flex/grid, cards, app bars, overlays, content states and smart images. They are not nine separate demos; they share one Theme/CSS cascade and generate optimized native Android output only for the features an app actually uses.
| Lumen · finance | Onda · wellbeing |
|---|---|
 |
 |
| Northline · travel | Afterglow · music |
 |
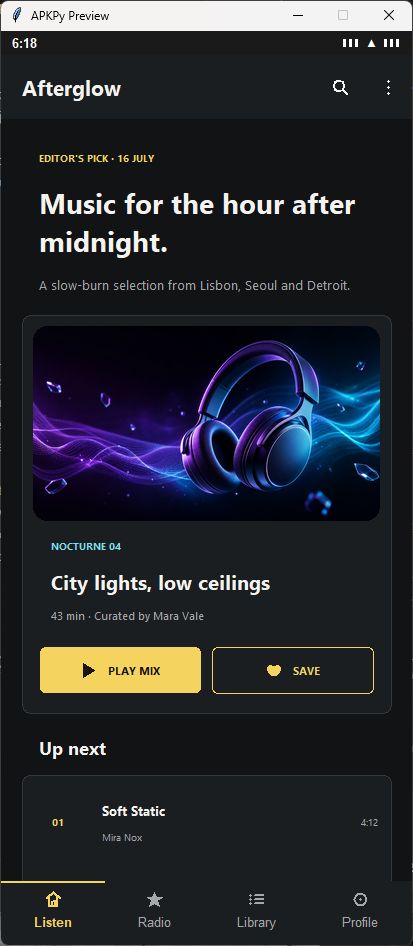 |
The complete syntax guide below explains each part with Python and CSS. The release also preserves ApkPy's SQLite, REST, encrypted storage, AES-256-GCM, PBKDF2 password hashing, background audio and editable playlist APIs.
1. The Vision & Philosophy 🌟
Forget the steep learning curves of Java or Kotlin, and avoid the massive footprint of cross-platform engines. Why choose ApkPy over interpreted frameworks like Kivy or Flet?
- Zero Bloat, Smaller APKs: Because we transpile to pure Android projects, you avoid bundling heavy Python interpreters into your deployment.
- Flawless Performance: By generating true native
Activity,Button,ImageView, andEditTextelements under the hood, your app runs at the maximum possible speed the OS allows. - 100% Native Look & Feel: Because your components interact directly with the Android SDK, OS-level features like haptics, text-selection, and system animations are preserved automatically.
2. How it Works (The Technical Secret) 🛠️
How it works: ApkPy parses your Python code into an Abstract Syntax Tree (AST) and maps UI calls to their corresponding Android XML Layouts and Java Activity classes. It's not a simulation; it's code generation.
Here's what happens under the hood every time you run apkpy build:
- Parsing — ApkPy reads your
writehere.pyfile and builds a full AST. - Component Mapping — Each
label(),button(),inputs(),image()call is translated to its native Android equivalent (TextView,Button,EditText,ImageView). - CSS Translation — Your
style = """ ... """string is parsed and converted to Android XML drawables,dpvalues, and color attributes. - Java/XML Generation — Full Java Activity classes and XML layout files are generated from scratch.
- ZIP Packaging — Everything is bundled into a
.zipfile you can open directly in Android Studio.
3. Full Installation & Setup 📥
Getting started is instantly accessible. You do not need any prior knowledge of Android Studio to start designing.
pip install apkpy
(Need the new features? Run pip install --upgrade apkpy)
Your First App — Full CLI Workflow
# 1. Create a new project
apkpy start my_project

# 2. Enter your project folder
cd my_project

# 3. Open writehere.py and design your app
# (edit it with any editor — VS Code, PyCharm, Notepad, etc.)

# 4. Preview it instantly on your computer (no Android needed!)
python writehere.py

# 5. When you're happy, compile straight to an installable APK
apkpy run
# → No Android Studio needed — produces my_project-debug.apk right here
# → add --qr to install over Wi-Fi, or --usb to push it over a cable

# (Prefer Android Studio? `apkpy build` makes a .zip project to open there instead.)
First run? Use
apkpy doctorto check your toolchain (a JDK 17–21 + the Android SDK). If you have Android Studio, ApkPy reuses its bundled JDK/SDK automatically; otherwise runapkpy setuponce to download them.
🎯 Jump-Start with a Ready-Made Example
Not sure where to begin? Use apkpy examples to instantly drop a complete, working app into any folder:
apkpy examples
What example do you want to use?

  [1] Hello World
  [2] Calculator
  [3] Notes
  [4] Settings
  [5] Login Screen
  [6] Location / GPS
  [7] Network Images
  [8] Loading Spinner
  [9] Secure Login
  [10] REST Client
  [11] DB Notes List

Enter a number: 3

Where do you want to create it? [.]: C:\Users\me\my_project

Done! "Notes" example created at:
  C:\Users\me\my_project\writehere.py

Preview it with:  python writehere.py
Build it with:    apkpy build
All 11 examples are fully working apps you can preview immediately and build for Android without changing a single line.
4. Complete Syntax Guide (v1.1.0) 🎨
ApkPy 1.1.0 extends the stable 1.0.0 foundation with a complete visual system, responsive composition and richer native components. The same Python component tree is rendered by the Hot Previewer and compiled into Android Java/XML.
The Screen
Everything belongs to a Screen. Screens translate directly to native Android Activities.
login_screen = Screen(id="login_container")
Pass scroll=True to make the whole screen vertically scrollable — all components, including long lists, will scroll together as one page:
home = Screen(id="home", scroll=True)
The Container (Nesting)
Containers allow you to group components together, creating complex layouts like cards, headers, or custom grids.
# Create a container on the screen
header_box = container(id="header_style", screen=login_screen)

# Add a label inside that container
label("Welcome Back", parent=header_box)
The CSS Engine
Say goodbye to complex dictionary configurations. ApkPy uses a multi-line string approach with standard CSS syntax. No quotes are needed around values!
style = """
login_container {
    gap: 15px;
    flex-direction: column;
}
"""
Global Themes & Design Tokens (1.1.0)
Theme gives the whole app a coherent light or dark palette, typography,
spacing and corner radius. The same normalized tokens are used by the Hot
Previewer and by the generated Android Java/XML project.
from apkpy_lib import Screen, label, button, inputs, Theme, run

home = Screen(id="home")
label("Welcome", screen=home)
inputs("Email", screen=home)
button("Continue", screen=home)

app_theme = Theme(
    mode="dark",                 # "light" or "dark"
    primary="#8B5CF6",
    secondary="#22D3EE",
    background="#09090B",
    surface="#18181B",
    text="#FAFAFA",
    text_secondary="#A1A1AA",
    border="#3F3F46",
    radius=18,
    spacing=14,
    font_family="sans-serif",
)

run(start_screen=home, theme=app_theme)
The built-in theme styles labels, buttons, inputs, containers, lists, grids, carousels, spinners, bottom navigation, the mini-player, and Android's status and navigation bars. Every value remains overridable through CSS.
Use design tokens in CSS with var(--token):
label {
    color: var(--text);
}

button {
    background-color: var(--secondary);
}

danger_button {
    background-color: var(--error);
}
Available tokens are primary, secondary, background, surface, text,
text_secondary, on_primary, error, success, border, radius,
spacing, and font-family.
The cascade is deterministic:
Theme defaults → component selector (button, label, inputs, …) → component ID
This means an ID rule always wins, while components without IDs still receive the complete visual theme.
Material 3 Button Variants (1.1.0)
Use variant= to get a complete, coherent button treatment without repeating
CSS. The Previewer and generated Android project use the same variant cascade.
button("Continue", variant="filled", icon="arrow_forward", screen=home)
button("Cancel", variant="text", screen=home)
button("Save", variant="tonal", icon="save", screen=home)
button("Delete", variant="danger", icon="delete", screen=home)
| Variant | Intended use |
|---|---|
filled |
Primary/high-emphasis action |
outlined |
Secondary action with a visible border |
tonal |
Medium-emphasis action using a soft theme colour |
text |
Low-emphasis action without a visible container |
danger |
Destructive action using the theme error colour |
icon |
Compact 48dp icon-only action with accessible text |
actions = container(id="actions", screen=home)
button("Favourite", variant="icon", icon="favorite", parent=actions)
button("Edit", variant="icon", icon="edit", parent=actions)
button("More options", variant="icon", icon="more_vert", parent=actions)
Common icon names include add, arrow_back, arrow_forward, check,
close, delete, download, edit, favorite, info, more_vert,
notifications, pause, play_arrow, save, search, settings, star,
and upload. Android receives native vector drawables; the Previewer uses
matching lightweight symbols.
The cascade for a variant button is:
Theme → button selector → Material variant → component ID
An ID therefore remains the final override. A whole variant can also be customized with a semantic selector:
button:outlined {
    border-color: var(--secondary);
    color: var(--secondary);
}
Omitting variant= preserves the legacy button behaviour.
Responsive Layouts (1.1.0)
Define the component tree once and only change its arrangement at each
breakpoint. column() and row() are layout descriptions consumed by
responsive(); the components themselves are not duplicated.
home = Screen(id="home", scroll=True)

profile = container(id="profile")
label("Profile", parent=profile)

details = container(id="details")
label("Details", parent=details)

layout = responsive(
    mobile=column(profile, details),
    tablet=row(profile, details),
    landscape=row(profile, details),
    breakpoint=600,
    id="dashboard",
    screen=home,
)
The default tablet breakpoint is 600dp. The optional landscape= layout is
selected whenever the viewport is wider than it is tall. CSS media queries use
the same viewport in the Previewer and Android generator:
dashboard {
    display: grid;
    grid-template-columns: 1fr;
    width: 100%;
    max-width: 720px;
    min-height: 100vh;
}

@media (min-width: 600px) {
    dashboard {
        grid-template-columns: 280px 1fr;
    }

    profile {
        width: 280px;
    }
}

@media (orientation: landscape) {
    dashboard { gap: 20px; }
}
Responsive dimensions support px/dp, %, vw, and vh, including
width, max-width, and min-height. For visual testing, use presets such as
device("Small Phone"), device("Pixel 9"), device("Tablet"),
device("Pixel 9 Landscape"), or use device("responsive") and resize the
Previewer freely.
During apkpy build, responsive screens receive native Android resource
variants in res/layout, res/layout-land, res/layout-sw600dp, and
res/layout-sw600dp-land. Android therefore selects the correct layout before
the Activity is drawn; no Java screen-size branching is required.
Advanced Flexbox, Grid & Layering (1.1.0)
Containers now support wrapping flex rows, flexible child sizing, real grid tracks/spans, fixed aspect ratios and layered elements. The same declarations are interpreted by the Hot Previewer and by the generated Android project:
actions = container(id="actions", screen=home)
button("Publish", id="publish", parent=actions)
button("Preview", id="preview", parent=actions)

gallery = container(id="gallery", screen=home)
featured = container(id="featured", parent=gallery)
label("NEW", id="badge", parent=featured)
actions {
    display: flex;
    flex-direction: row;
    flex-wrap: wrap;
    justify-content: space-between;
    align-items: center;
    gap: 12px;
}

publish { flex-grow: 1; flex-shrink: 1; flex-basis: 140px; }
preview { flex-shrink: 0; flex-basis: 120px; align-self: center; }

gallery {
    display: grid;
    grid-template-columns: repeat(2, 1fr);
    gap: 16px;
}

featured { grid-column: 1 / span 2; aspect-ratio: 16 / 7; }
badge { position: absolute; top: 12px; right: 12px; z-index: 3; }
Supported child properties are flex-grow, flex-shrink, flex-basis,
align-self, grid-column, grid-row, aspect-ratio, position: absolute,
the top/right/bottom/left offsets, and z-index. Grid tracks accept
fixed px/dp sizes, percentages and fr units, including repeat().
For performance, ApkPy keeps ordinary containers as native LinearLayouts.
The generated ApkpyLayout ViewGroup is added only when a project actually
uses advanced layout rules; it has no external runtime dependency.
Cards & Surfaces (1.1.0)
card() groups related content in a semantic Material surface. Use the
ready-made form when a card follows the usual media/title/body/actions pattern:
from apkpy_lib import Screen, card, card_action, toast

home = Screen(id="home", scroll=True)

card(
    title="Premium",
    subtitle="No ads and offline downloads",
    image="premium.jpg",
    content="High-quality audio on every device.",
    actions=[
        card_action("Learn more", variant="text"),
        card_action(
            "Try it", variant="filled",
            command=lambda: toast("Trial started"),
        ),
    ],
    variant="elevated",
    id="premium_card",
    screen=home,
)
card_action() creates a detached button specifically for the actions list;
it accepts the same variant, icon, command, and id options as a normal
button. Actions are aligned in one compact row automatically.
For a custom hierarchy, create an empty card and attach any components to it:
plan = card(id="premium_card", variant="outlined", screen=home)
label("PREMIUM", variant="overline", parent=plan)
label("Music without limits", variant="title", parent=plan)
label("Listen anywhere, even offline.", variant="body", parent=plan)
button("Try it", variant="text", parent=plan)
The card variants are elevated, filled, and outlined. Semantic labels can
use title, subtitle, body, and overline; all variants still participate
in the Theme/CSS cascade. On Android, each card becomes a native
MaterialCardView with one lightweight LinearLayout for its children. A
cards-only project does not ship the advanced ApkpyLayout helper.
App Bars & Collapsible Headers (1.1.0)
Attach navigation and page actions to a screen without placing toolbar widgets
inside its content. app_bar() stays fixed while a scrollable screen moves:
from apkpy_lib import Screen, action, app_bar, toast

library = Screen(id="library", scroll=True)

app_bar(
    title="Library",
    leading="menu",
    actions=[
        action("search", command=lambda: toast("Search"), label="Search library"),
        action("more_vert", command=lambda: toast("More"), label="More options"),
    ],
    screen=library,
)
Use sliver_app_bar() when the page needs a large media header. The image
collapses as the content scrolls; pinned=True keeps the 64dp toolbar visible:
from apkpy_lib import sliver_app_bar

profile = Screen(id="profile", scroll=True)
sliver_app_bar(
    title="Profile",
    image="cover.jpg",
    expanded_height=240,
    pinned=True,
    actions=[action("edit", command=lambda: toast("Edit"), label="Edit profile")],
    screen=profile,
)
Both bars use the Theme/CSS cascade through app_bar, sliver_app_bar, and
their optional IDs. Android output uses native MaterialToolbar,
AppBarLayout, and CollapsingToolbarLayout; menu icons are generated as
vector drawables. Generated apps use Theme.App, defined in themes.xml as a
descendant of Theme.MaterialComponents.DayNight.NoActionBar. The theme maps
ApkPy tokens such as apkpy_primary, apkpy_background, apkpy_surface, and
apkpy_text to the attributes required by Material widgets. A normal app bar
adds no ApkPy runtime or custom ViewGroup.
Overlays, Menus & Pickers (1.1.0)
Create temporary UI without adding invisible placeholder Views to the screen.
An overlay definition is lightweight and only creates its native component
when .open() is called:
from apkpy_lib import (
    Screen, bottom_sheet, button, context_menu, date_picker, menu, modal,
    label, snackbar, time_picker, tooltip,
)

library = Screen(id="library", scroll=True)
status = label("Ready", screen=library)

def selected(value):
    status.set_value("Selected: " + value)

playlist_sheet = bottom_sheet(
    "Add to playlist",
    content="Choose a destination",
    items=["Focus", "Workout", "Saved"],
    on_select=selected,
)
delete_dialog = modal(
    "Delete download?",
    content="The online copy stays available.",
    confirm_text="Delete",
    on_confirm=lambda: snackbar("Download deleted", action="Undo"),
)

button("Open sheet", command=lambda: playlist_sheet.open(), screen=library)
button("Open dialog", command=lambda: delete_dialog.open(), screen=library)

more = button("More", screen=library)
more_menu = menu(
    anchor=more,
    items=["Share", "Edit", "View artist"],
    on_select=selected,
)

track = button("Track options", screen=library)
track_menu = context_menu(
    track,
    items=["Play next", "Add to queue", "Remove"],
    on_select=selected,
)

release_date = date_picker(
    "Release date", initial="2026-07-14", on_select=selected,
)
reminder = time_picker(
    "Reminder", initial="18:30", on_select=selected,
)
date_button = button(
    "Pick date", command=lambda: release_date.open(), screen=library,
)
button("Pick time", command=lambda: reminder.open(), screen=library)
tooltip(date_button, "Opens the native date picker")
popup_menu() is an alias for menu(). A normal menu opens when its anchor is
clicked. A context menu opens with right-click in the Previewer and long press
on Android. snackbar(message, action=..., on_action=..., duration=...) appears
above the current screen chrome; duration is expressed in milliseconds.
Picker callbacks receive ISO-like strings: YYYY-MM-DD for dates and HH:MM
for times. Overlay definitions also expose .close() for programmatic dismiss.
Android output maps these APIs to BottomSheetDialog,
MaterialAlertDialogBuilder, PopupMenu, Snackbar, TooltipCompat,
DatePickerDialog, and TimePickerDialog. Imports, fields, and one helper per
used overlay are emitted only when the project uses these APIs; simple projects
do not carry this runtime.
Skeleton Loading & Content States (1.1.0)
Represent loading, empty content, and recoverable errors without maintaining three copies of the same layout:
from apkpy_lib import Screen, empty_state, error_state, skeleton, toast

library = Screen(id="library", scroll=True)

loading = skeleton(
    variant="music_card",
    count=4,
    id="library_loading",
    screen=library,
)

empty = empty_state(
    icon="music_off",
    title="You have no music yet",
    message="Explore the catalogue and save your first track.",
    action="Explore music",
    on_action=lambda: toast("Opening catalogue"),
    id="library_empty",
    visible=False,
    screen=library,
)

error = error_state(
    title="Could not load",
    message="Check your connection and try again.",
    retry=lambda: toast("Trying again"),
    retry_text="Try again",
    id="library_error",
    visible=False,
    screen=library,
)

def show_empty():
    loading.hide()
    error.hide()
    empty.show()
skeleton() supports music_card, list, card, and text variants plus a
configurable count. All three components support visible=..., .show(),
and .hide(), so a request can replace loading with its final state without
rebuilding the screen. Style them with the skeleton, empty_state, and
error_state selectors, or by ID as usual.
The Previewer animates each skeleton component with one Canvas and one timer,
not one widget per placeholder. Android emits ordinary View, ImageView,
TextView, and Button XML plus one shared AlphaAnimation helper per
Activity. The helper and animation imports are omitted completely when a
screen does not use skeleton().
Advanced Images & Avatars (1.1.0)
Remote artwork can show a local placeholder immediately, fall back cleanly when the network fails, reuse an in-memory cache, and fade into place:
from apkpy_lib import Screen, avatar, image

player = Screen(id="player", scroll=True)

cover = image(
    "https://example.com/cover.jpg",
    placeholder="cover_placeholder.png",
    fallback="broken_image.png",
    cache=True,
    fade_in=True,
    aspect_ratio="16:9",
    id="cover",
    screen=player,
)

avatar(
    "profile.jpg",
    size=48,
    status="online",
    id="profile",
    screen=player,
)
image() also accepts blur=12, tint="#7C3AED", and ratios such as
aspect_ratio="1:1". avatar() uses the same placeholder, fallback, cache,
fade, blur, and tint pipeline while adding a circular crop and an optional
online, away, busy, or offline status badge. Normal CSS image options
(object-fit, border-radius, opacity, borders, and shadows) still apply.
The Previewer downloads outside the UI thread, keeps a bounded 32-image cache,
ignores stale responses after set_src(), and draws its placeholder/status
icons as vectors. Android uses a three-worker executor and a bounded LRU cache,
emits local placeholder/fallback drawables, performs a native 220 ms fade, and
uses RenderEffect for blur on Android 12+. The executor, cache, blur code, and
remote loader are omitted from Activities that do not need them.
New Layout & Styling Features (v0.9.3+)
Our Android-generation engine has been completely rewritten to use XML-driven layouts, ensuring 1:1 parity between your code and the native Android rendering.
gap: 20px;– Automatically places calculateddpmargins between elements in your layout container.flex-direction: row; / column;– Orients your components mapped directly toandroid:orientation="horizontal"or"vertical".padding: 10px 20px;– Pushes text content away from your component edges.border-radius: 15px;– Generates native XML shape drawables for smooth rounded corners.border-color: #000;andborder-width: 2px;– Easily define component outlines.pressed-color: #cccccc;– Defines the feedback color when a button is clicked (native<selector>).focus-border-color: #2196F3;– When a user taps your inputs, ApkPy dynamically swaps the border colors via native XML states!font-size: 18px;– Set text size in pixels (automatically converted tospfor Android).font-weight: bold;– Makes your text thicker. Supportsboldor numeric values (700,800,900).font-family: 'sans-serif';– Choose between native font styles.
Typography Support 🔠
ApkPy ensures your text looks great and consistent across platforms by mapping CSS generic families to native system fonts:
sans-serif: The modern look. Maps to Roboto (Android) and Segoe UI (Windows) or Helvetica (macOS).serif: The classic look. Maps to Times New Roman.monospace: Perfect for code or alignment. Maps to Consolas (Windows) or Courier.
Note: You can also use font-style: italic; to add emphasis to your labels.
5. Component & Logic Workflow ⚙️
Adding elements and routing interactions is declarative and incredibly clean.
Adding Components:
Simply call the component and attach it to your screen. Give it an id to map it to your CSS string.
btn = button("Login", id="primary_btn", screen=login_screen)
inputs("Your email", type="text", id="email_input", screen=login_screen)
Nesting with parent:
Every component (label, button, inputs, container) now supports a parent parameter. If set, the component will be rendered inside that container instead of directly on the screen.
card = container(id="card_bg", screen=my_screen)
label("Title", parent=card)
button("Click Me", parent=card)
Supported Input Types:
| Type | What it does | How to use |
|---|---|---|
"text" |
Single-line text field | inputs("Placeholder", type="text", id="…", screen=…) |
"password" |
Text field that hides what you type | same as text |
"search" |
Text field with a ✕ clear button | same as text |
"textarea" |
Multi-line text area | same; add rows: 6; in CSS to control height |
"checkbox" |
A tick-box (checked = "true", unchecked = "false") |
inputs("Accept terms", type="checkbox", …) |
"switch" |
A toggle switch — ideal for on/off settings | inputs("Dark mode", type="switch", …) |
"range" |
A slider from 0 to 100 | inputs("Volume", type="range", …) |
"radio" |
Pick one option from a group | inputs("A|B|C", type="radio", …) |
"select" |
Dropdown / spinner — pick one from a menu | inputs("A|B|C", type="select", …) |
How get_value() and set_value() work for each type:
| Type | get_value() returns |
set_value() accepts |
|---|---|---|
text / password / search / textarea |
The text the user typed | Any string |
checkbox / switch |
"true" or "false" |
"true" or "false" |
range |
A number between "0" and "100" |
A number string, e.g. "75" |
radio |
The text of the selected option | The exact text of the option to select |
select |
The text of the selected option | The exact text of the option to select |
CSS properties specific to type="switch":
color:— the color of the label text next to the toggleaccent-color:— the color of the track when the switch is ONbackground-color:— legacy alias when set on the switch's own ID
With Theme, accent-color defaults to the theme's primary token. It is
kept separate from the input surface so a checked switch remains visible.
# Example: settings screen with two toggle switches
sw_dark  = inputs("Dark mode",     type="switch", id="sw_dark",  screen=settings)
sw_notif = inputs("Notifications", type="switch", id="sw_notif", screen=settings)

# Reading state
is_dark = sw_dark.get_value()   # → "true" or "false"

# Restoring saved state on startup
saved = storage.get("dark_mode", "false")
sw_dark.set_value(saved)  # pass "true" to turn it on, "false" to turn it off
sw_dark {
    color: #F8FAFC;              /* label text color */
    accent-color: #4F46E5;       /* track color when ON */
}
Linking Logic & Navigation:
Instead of fighting with Android Intent classes, handle navigation with a single method.
login_screen.on_click_navigate(button=btn, to=dashboard_screen)
The Application Lifecycle:
Your file must end by invoking the execution layer with run().
run(start_screen=login_screen)
5a. Dropdown (Select) 🔽
The type="select" input creates a native dropdown menu — the user taps it, a list of options slides out, and they pick one. Perfect for language selectors, country pickers, category filters, and any setting where there are more than 2-3 options.
How to use it
Pass the options as a single string separated by | (pipe character):
from apkpy_lib import Screen, inputs, button, label, toast, storage, run

settings = Screen(id="settings")

# Options separated by |
language = inputs("Português|English|Español|Français", type="select", id="lang", screen=settings)
country  = inputs("Portugal|Brasil|Spain|France|Mexico", type="select", id="country", screen=settings)

# Auto-load the last saved choice
saved_lang    = storage.get("lang", "")
saved_country = storage.get("country", "")
if saved_lang    != "": language.set_value(saved_lang)
if saved_country != "": country.set_value(saved_country)

def save():
    storage.set("lang",    language.get_value())   # e.g. "Português"
    storage.set("country", country.get_value())    # e.g. "Portugal"
    toast("Saved!")

button("SAVE", id="btn", command=save, screen=settings)

if __name__ == "__main__":
    run(start_screen=settings)
CSS styling
lang {
    color: #F8FAFC;              /* text color of the selected item */
    background-color: #1E293B;  /* background of the dropdown box */
    border-color: #334155;      /* border around the box */
    border-width: 1px;
    border-radius: 10px;        /* rounded corners */
}
Behaviour
| Method | What it does |
|---|---|
language.get_value() |
Returns the currently selected option, e.g. "English" |
language.set_value("English") |
Selects the option with that exact text |
[!TIP] The first option in the list is selected by default when the app starts. Use
set_value()at startup to restore the user's last saved choice.
5b. Multi-line Textarea 📝
The type="textarea" input creates a multi-line text field — just like a text input, but it grows vertically and lets the user write paragraphs, notes, or long descriptions.
How to use it
from apkpy_lib import Screen, inputs, button, label, toast, storage, run

my_screen = Screen(id="notes")

note = inputs("Write your note here...", type="textarea", id="note_field", screen=my_screen)

# Auto-load saved note
saved = storage.get("note", "")
if saved != "":
    note.set_value(saved)

def save():
    text = note.get_value()
    storage.set("note", text)
    toast("Note saved!")

button("SAVE NOTE", id="btn", command=save, screen=my_screen)

if __name__ == "__main__":
    run(start_screen=my_screen)
CSS styling — control the height with rows
note_field {
    rows: 6;                    /* height in lines (default is 4) */
    background-color: #1E293B;
    color: #F8FAFC;
    border-color: #334155;
    border-radius: 10px;
    border-width: 1px;
    padding: 14px;
}
Behaviour
| Method | What it does |
|---|---|
note.get_value() |
Returns everything the user typed as a string |
note.set_value("Hello!") |
Replaces the full content of the textarea |
[!TIP] Use
rowsin the CSS to make the field taller.rows: 4(default) is good for short messages,rows: 8or more for longer content like diary entries or descriptions.
5c. Toggle Switch 🔘
The type="switch" input creates a native on/off toggle switch — the kind you see in every Android settings screen. Much more natural than a checkbox for settings like "Dark mode", "Notifications", or "Auto-save".
How to use it
from apkpy_lib import Screen, inputs, button, label, toast, storage, run

settings = Screen(id="settings")

label("App Settings", id="title", screen=settings)

sw_dark  = inputs("Dark mode",      type="switch", id="sw_dark",  screen=settings)
sw_notif = inputs("Notifications",  type="switch", id="sw_notif", screen=settings)
sw_sound = inputs("Sound effects",  type="switch", id="sw_sound", screen=settings)

# Auto-load saved state when the app opens
if storage.get("dark",  "") != "": sw_dark.set_value(storage.get("dark",  ""))
if storage.get("notif", "") != "": sw_notif.set_value(storage.get("notif", ""))
if storage.get("sound", "") != "": sw_sound.set_value(storage.get("sound", ""))

def save():
    storage.set("dark",  sw_dark.get_value())   # "true" or "false"
    storage.set("notif", sw_notif.get_value())
    storage.set("sound", sw_sound.get_value())
    toast("Settings saved!")

button("SAVE", id="btn", command=save, screen=settings)

style = """
settings { background-color: #0F172A; padding: 24px; gap: 12px; }
title    { color: #F8FAFC; font-size: 20px; font-weight: bold; margin-bottom: 8px; }
sw_dark  { color: #F8FAFC; background-color: #4F46E5; }
sw_notif { color: #F8FAFC; background-color: #4F46E5; }
sw_sound { color: #F8FAFC; background-color: #4F46E5; }
btn      { background-color: #4F46E5; color: #F8FAFC; border-radius: 12px; font-weight: bold; padding: 14px; pressed-color: #3730A3; }
"""

if __name__ == "__main__":
    run(start_screen=settings)
CSS styling
sw_dark {
    color: #F8FAFC;              /* color of the label text */
    background-color: #4F46E5;  /* color of the track when the switch is ON */
}
Two CSS properties control the switch appearance:
color— the label text next to the toggle (e.g. "Dark mode")background-color— the track color when the switch is ON. When OFF, the track is always grey. Defaults to#4CAF50(Material green) if not set.
Behaviour
| Method | What it does |
|---|---|
sw_dark.get_value() |
Returns "true" if the switch is ON, "false" if OFF |
sw_dark.set_value("true") |
Turns the switch ON |
sw_dark.set_value("false") |
Turns the switch OFF |
[!TIP] Always save and reload the switch state with
storageso the user's settings are remembered between sessions. See the Storage section for the full pattern.
5d. Number Input 🔢
The type="number" input creates a text field that only accepts numeric values — on Android it opens the numeric keyboard automatically, so the user never has to switch. Works for integers, decimals, and negative numbers.
How to use it
from apkpy_lib import Screen, inputs, button, label, toast, run

my_screen = Screen(id="calculator")

inp_a = inputs("First number...",  type="number", id="inp_a", screen=my_screen)
inp_b = inputs("Second number...", type="number", id="inp_b", screen=my_screen)
result_lbl = label("Result: —", id="result", screen=my_screen)

def calculate():
    a = inp_a.get_value()   # always a string, e.g. "3.5"
    b = inp_b.get_value()   # e.g. "2"
    if a != "" and b != "":
        total = float(a) + float(b)
        result_lbl.set_value(f"Result: {total}")
    else:
        toast("Fill in both numbers!")

button("ADD", id="btn", command=calculate, screen=my_screen)

if __name__ == "__main__":
    run(start_screen=my_screen)
CSS styling
inp_a {
    color: #F8FAFC;
    background-color: #1E293B;
    border-color: #334155;
    border-width: 1px;
    border-radius: 10px;
}
Same CSS properties as a regular text input — color, background-color, border-color, border-width, border-radius, padding, font-size.
Behaviour
| Method | What it does |
|---|---|
inp_a.get_value() |
Returns the typed value as a string, e.g. "3.5" or "-10" |
inp_a.set_value("42") |
Pre-fills the field with that value |
[!IMPORTANT]
get_value()always returns a string (like all other input types). Convert toint()orfloat()in your Python code before doing arithmetic.
[!TIP] In the Hot Previewer, the field rejects any non-numeric character as you type — matching the numeric keyboard behaviour on Android. Decimals (
.) and negatives (-) are allowed.
5e. Date & Time Pickers 📅🕐
The type="date" and type="time" inputs open the native Android date/time dialogs — the same polished pickers the user already knows from their phone's Calendar or Clock app. No custom UI to build.
How to use them
from apkpy_lib import Screen, inputs, button, label, toast, storage, run

my_screen = Screen(id="booking")

label("Book your appointment", id="title", screen=my_screen)

inp_date = inputs("Select date...", type="date", id="inp_date", screen=my_screen)
inp_time = inputs("Select time...", type="time", id="inp_time", screen=my_screen)

# Auto-load saved values
saved_date = storage.get("date", "")
saved_time = storage.get("time", "")
if saved_date != "": inp_date.set_value(saved_date)
if saved_time != "": inp_time.set_value(saved_time)

def confirm():
    date = inp_date.get_value()   # e.g. "25/12/2024"
    time = inp_time.get_value()   # e.g. "14:30"
    if date == "" or time == "":
        toast("Please select a date and time!")
        return
    storage.set("date", date)
    storage.set("time", time)
    toast(f"Booked for {date} at {time}!")

button("CONFIRM", id="btn", command=confirm, screen=my_screen)

if __name__ == "__main__":
    run(start_screen=my_screen)
CSS styling
inp_date {
    color: #F8FAFC;
    background-color: #1E293B;
    border-color: #334155;
    border-width: 1px;
    border-radius: 10px;
}

inp_time {
    color: #F8FAFC;
    background-color: #1E293B;
    border-color: #334155;
    border-width: 1px;
    border-radius: 10px;
}
Same CSS properties as any other input — color, background-color, border-color, border-width, border-radius, padding.
Behaviour
| Method | What it does |
|---|---|
inp_date.get_value() |
Returns "" if nothing selected yet, or "DD/MM/YYYY" after the user picks a date |
inp_date.set_value("25/12/2024") |
Pre-fills the field with that date |
inp_time.get_value() |
Returns "" if nothing selected yet, or "HH:MM" after the user picks a time |
inp_time.set_value("14:30") |
Pre-fills the field with that time |
[!TIP] Always check
get_value() != ""before using the result — if the user hasn't tapped the picker yet, it returns an empty string.
[!NOTE] In the Hot Previewer, clicking the field opens a small dialog with spinboxes for day/month/year (or hour/minute). On Android it opens the native
DatePickerDialog/TimePickerDialog. Your code is 100% identical for both.
5f. Scrollable Screens 📜
Add scroll=True to any Screen to make it vertically scrollable. Every component on that screen — labels, inputs, lists, buttons — scrolls together as a single page. This is the right approach for forms, logs, or any screen where content might overflow the device height.
How to use it
from apkpy_lib import Screen, label, inputs, button, list_view, run

home = Screen(id="home", scroll=True)

label("Daily Check-in", id="title", screen=home)
inputs("How are you feeling?", type="textarea", id="notes", screen=home)
button("SAVE", id="btn", command=save, screen=home)
# ... add as many components as you need — they all scroll together
In the Hot Previewer
The screen becomes a scrollable canvas. Scroll with the mouse wheel from anywhere on the screen — no need to hover over a specific element.
On Android
The screen compiles to a NestedScrollView wrapping a LinearLayout. All components (including list_view) use native TextView containers instead of ListView, so there's no conflict between nested scrollable views and the outer scroll.
[!TIP]
scroll=Trueandlist_viewwork seamlessly together. The list items become part of the scrollable page — you get infinite scroll for free, without any fixed-height list box.
5g. List View 📋
list_view renders a vertical list of items with an optional click handler. Items can be plain strings or dicts with "title" and "subtitle" keys.
How to use it
from apkpy_lib import Screen, list_view, toast, run

home = Screen(id="home", scroll=True)

items = [
    {"title": "08/06/2026", "subtitle": "Mood: Great — Energy: 85"},
    {"title": "07/06/2026", "subtitle": "Mood: Good — Energy: 70"},
    {"title": "06/06/2026", "subtitle": "Mood: Okay — Energy: 55"},
]

history = list_view(
    items,
    id="history_list",
    screen=home,
    on_click=lambda item: toast(item["title"] + ": " + item["subtitle"]),
)

if __name__ == "__main__":
    run(start_screen=home)
Updating the list at runtime
Call .set_items(new_list) on the list view variable to replace its contents — for example after saving a new entry:
def save():
    items.insert(0, {"title": "today", "subtitle": "Mood: Great"})
    history.set_items(items)
    toast("Saved!")
Feeding the list from a database or API (set_items + JSON) 📊
set_items also accepts a JSON string directly — exactly what db.query() returns and what most REST APIs respond with. Use title= and subtitle= to pick which field of each JSON object to display:
def refresh():
    rows = db.query("SELECT content, created FROM notes ORDER BY id DESC")
    notes_list.set_items(rows, title="content", subtitle="created")
The same works with an API response:
def on_response(success, response):
    if success:
        # e.g. Supabase: [{"name": "Alice", "email": "a@x.com"}, ...]
        users_list.set_items(response, title="name", subtitle="email")
- Each row renders as
title — subtitle(subtitle omitted when empty). - Arrays of plain values (
["a", "b"]as JSON) also work — each value becomes one row. - Invalid JSON results in an empty list instead of a crash.
- Calling a refresh function at module level (e.g.
refresh()at the bottom of the file) runs it on app start — in the Previewer and in the AndroidonCreate— so the list is filled when the app opens.
This closes the data → UI loop: db.query/https fetch the rows, set_items shows them, on_click + on_click_navigate(data=...) handle the taps.
CSS styling
history_list {
    background-color: #1E293B;   /* background of each item */
    color: #F8FAFC;              /* text color */
    border-color: #334155;       /* color of the divider lines between items */
    height: 200px;               /* fixed height when scroll=False; ignored in scroll screens */
}
| CSS property | What it controls |
|---|---|
color |
Text color of each list item |
background-color |
Background color of each item row |
border-color |
Color of the 1dp divider between rows |
height |
Fixed height of the list box (only applies when scroll=False). Avoid using a tall fixed height with few items — on Android, the empty space below the last item is filled with background-color, creating a visible coloured box. Either omit height (list sizes to its content) or use scroll=True on the screen instead. See example below. |
Height warning
/* ❌ Avoid — creates a 400dp coloured box even with only 3 items */
my_list {
    background-color: #1E293B;
    height: 400px;
}

/* ✅ Correct — list wraps to fit its items */
my_list {
    background-color: #1E293B;
}
on_click lambda
The on_click parameter accepts an inline lambda. The argument item is the full string stored internally — for dict items it's "title — subtitle":
on_click=lambda item: toast(item["title"] + ": " + item["subtitle"])
item["title"] extracts everything before the — separator; item["subtitle"] extracts everything after it.
[!NOTE] In scroll screens,
list_viewcompiles toTextViewsinside aLinearLayoutrather than a nativeListView. This avoids the classic Android conflict between two nested scrollable containers, and is the same approach used by apps like Gmail and WhatsApp for chat lists inside scroll views.
5h. Rich Lists, Carousels & Grids 🖼️
For media-heavy apps, ApkPy supports cards with a title, subtitle, remote image and optional src payload:
tracks = [{
    "title": "Midnight Drive",
    "subtitle": "Neon Avenue",
    "image": "https://example.com/cover.jpg",
    "src": "https://example.com/song.mp3",
}]

def play_track(item):
    audio.play_background(item["src"], title=item["title"],
                          artist=item["subtitle"], art=item["image"])

results = list_view(tracks, screen=home, rich=True, on_click=play_track)
recent = carousel(tracks, screen=home, on_click=play_track)
genres = grid(tracks, screen=home, cols=2, on_click=play_track)
list_view(..., rich=True)renders thumbnail + title + subtitle rows.carousel(...)renders a horizontally scrolling shelf of cards.grid(..., cols=N)renders a native N-column grid.set_items(json, title=..., subtitle=..., image=...)maps API or SQLite fields into rich rows.- The complete dict is passed to
on_click, including fields such assrcthat are not directly visible.
Remote images load asynchronously and declare Android's INTERNET permission automatically.
5i. Audio, Queues & Background Playback 🎵
ApkPy's audio API is designed for music, radio and podcast apps. Basic playback is available through audio.play(src), pause(), resume(), stop() and seek(seconds).
Use play_background for a track that must continue when the app leaves the foreground:
audio.play_background(
    "https://example.com/song.mp3",
    title="Midnight Drive",
    artist="Neon Avenue",
    art="https://example.com/cover.jpg",
)
On Android this generates a foreground media service with a native media notification, lock-screen metadata and transport controls. It also handles audio focus, including pause, duck and resume behaviour.
Playlists, next/previous, shuffle and repeat
audio.play_playlist(
    ["https://example.com/one.mp3", "https://example.com/two.mp3"],
    titles=["First Track", "Second Track"],
    artists=["Example Band", "Example Band"],
    arts=["https://example.com/one.jpg", "https://example.com/two.jpg"],
    start=0,
)

audio.next()
audio.previous()
audio.shuffle()
audio.repeat()
start may also be the selected source URL, which makes a rich-list or carousel tap start the full queue at that item.
Bind a full player UI
progress = inputs("", type="range", screen=player)
time = label("0:00 / 0:00", screen=player)
cover = image("", screen=player)
title = label("", screen=player)
artist = label("", screen=player)
play_pause = button("▶", screen=player)
shuffle = button("Shuffle", screen=player)
repeat = button("Repeat", screen=player)

audio.now_playing(progress=progress, time=time, cover=cover,
                  title=title, artist=artist)
audio.controls(play_pause=play_pause, shuffle=shuffle, repeat=repeat)
now_playing keeps the components synchronized with the media service; moving the bound range input seeks through the track. controls updates ordinary buttons to reflect the current play/pause, shuffle and repeat state.
Persistent mini-player
mini_player(open=player)
The mini-player appears above bottom_nav across the app, follows the current track and opens the chosen full-player screen when tapped.
Favourites and user playlists
audio.like_button(like_btn, liked="❤️", unliked="🤍")
audio.liked_list(liked_tracks)
audio.add_to_playlist("Road trip")
audio.play_saved_playlist("Road trip")
audio.playlists_list(playlists)
audio.edit_playlist("Road trip")
audio.playlist_editor(editor)
audio.remove_from_playlist("Road trip")
audio.delete_playlist("Road trip")
These APIs persist the track source, title, artist and cover automatically. Bound lists refresh when their screens resume.
5j. Offline Downloads 📥
The files API downloads files asynchronously into app-private storage:
def downloaded(success, path):
    if success:
        audio.play(path)
    else:
        toast("Download failed")

files.download("https://example.com/song.mp3", "song.mp3", on_result=downloaded)

if files.exists("song.mp3"):
    audio.play(files.path("song.mp3"))

files.delete("song.mp3")
No broad Android storage permission is required.
5k. OAuth Login — Google, Spotify & GitHub 🔐
auth implements OAuth 2.0 Authorization Code flow with PKCE and includes provider defaults for Google, Spotify and GitHub:
def signed_in(user):
    name.set_value(user["name"])

auth.login(
    provider="spotify",
    client_id="YOUR_SPOTIFY_CLIENT_ID",
    scopes=["user-read-email", "user-read-private"],
    then=home,
)

auth.user(on_result=signed_in)   # {"name", "email", "picture"}
token = auth.token()
logged_in = auth.is_logged_in()
auth.logout()
Android returns from the browser through apkpy://auth; the Previewer uses a loopback URL such as http://127.0.0.1:8888/callback. Register both redirects with the provider. PKCE avoids embedding a client secret in the APK.
ApkPy provides the UI, playback and authentication primitives for a Spotify-style app, but does not bundle Spotify's catalogue. Only use tracks, artwork and APIs that you are authorized to access.
5l. Bottom Navigation Bar 🗂️
bottom_nav adds a native bottom tab bar that links multiple screens together — the standard Android pattern for apps with 2–5 top-level sections (think Instagram, WhatsApp, YouTube).
Basic usage
from apkpy_lib import Screen, label, bottom_nav, run

home     = Screen(id="home")
explore  = Screen(id="explore")
profile  = Screen(id="profile")

label("Home screen",    id="lbl1", screen=home)
label("Explore screen", id="lbl2", screen=explore)
label("Profile screen", id="lbl3", screen=profile)

bottom_nav(
    [home, explore, profile],
    labels=["Home", "Explore", "Profile"],
    icons=["home", "search", "person"]
)

if __name__ == "__main__":
    run(start_screen=home)
Parameters
| Parameter | Type | Description |
|---|---|---|
screens |
list[Screen] |
Screens to link — 2 to 5 |
labels |
list[str] |
Tab label text. Defaults to the screen id if omitted |
icons |
list[str] |
Icon name per tab. Defaults to "circle" if omitted |
Available icons
home · person · settings · search · list · add · star · bell · chart · message · heart · camera · info · circle
Complete example — 3-screen app
from apkpy_lib import Screen, label, button, inputs, list_view, toast, bottom_nav, run

# ── Screens ───────────────────────────────────────────
home     = Screen(id="home")
explore  = Screen(id="explore", scroll=True)
profile  = Screen(id="profile")

# ── Home ──────────────────────────────────────────────
label("Dashboard", id="dash_title", screen=home)
button("Get started", id="btn_start", command=lambda: toast("Let's go!"), screen=home)

# ── Explore (scrollable with a list) ──────────────────
label("Trending", id="exp_title", screen=explore)
explore_list = list_view(
    [
        {"title": "Morning Routine",   "subtitle": "10 min · Productivity"},
        {"title": "Deep Focus",        "subtitle": "25 min · Work"},
        {"title": "Evening Wind-Down", "subtitle": "15 min · Wellness"},
    ],
    id="exp_list",
    screen=explore,
    on_click=lambda item: toast(item["title"])
)

# ── Profile ───────────────────────────────────────────
label("Alex Johnson",        id="p_name",  screen=profile)
label("alex@example.com",    id="p_email", screen=profile)
button("Log out", id="btn_logout", command=lambda: toast("Bye!"), screen=profile)

# ── Bottom nav ────────────────────────────────────────
bottom_nav(
    [home, explore, profile],
    labels=["Home", "Explore", "Profile"],
    icons=["home", "search", "person"]
)

style = """
home    { background-color: #0F172A; padding: 24px; gap: 16px; }
explore { background-color: #0F172A; padding: 24px; gap: 14px; }
profile { background-color: #0F172A; padding: 32px; gap: 12px; }

dash_title { color: #F8FAFC; font-size: 26px; font-weight: bold; }
btn_start  { background-color: #6366F1; color: #FFFFFF; border-radius: 12px; padding: 14px; }

exp_title { color: #F8FAFC; font-size: 22px; font-weight: bold; }
exp_list  { background-color: #1E293B; color: #F8FAFC; border-color: #334155; height: 400px; }

p_name    { color: #F8FAFC; font-size: 22px; font-weight: bold; }
p_email   { color: #94A3B8; font-size: 14px; }
btn_logout { background-color: #1E293B; color: #F87171; border-radius: 12px; padding: 14px; }
"""

if __name__ == "__main__":
    run(start_screen=home)
How it works on Android
- Each screen gets a
RelativeLayoutwrapper so content always sits above the bar — no content is hidden behind it. - A single
res/menu/bottom_nav_menu.xmlis generated and shared by all screens. - Each icon is an auto-generated
res/drawable/ic_nav_*.xmlvector — no image assets or icon fonts needed. - Tab switches use
FLAG_ACTIVITY_REORDER_TO_FRONT— existing Activities are reused, not recreated. Switching tabs is instant. overridePendingTransition(0, 0)removes the default slide animation so tabs feel like tabs, not page navigation.- Each Activity overrides
onResume()to restore the correct selected tab — so pressing the system back button and returning to a screen always shows the right tab highlighted. - Active tab icon/label: white (
#FFFFFF). Inactive: grey (#64748B). Bar background:#1E293B.
Hot Previewer
Renders a 56 px dark bar at the bottom with one column per tab. The active tab shows a coloured indicator line and bold white label; inactive tabs are grey. Clicking any tab navigates instantly.
[!NOTE] Call
bottom_navonce, at the top level — outside any screen or function. It automatically applies to every screen in the list.
5m. Passing Data Between Screens 📦
Pass values from one screen to another using on_click_navigate(screen, data={...}) and screen.get_param("key"). This works with both button clicks and list taps — on Android it compiles to Intent.putExtra / getIntent().getStringExtra; in the Hot Previewer it uses an in-memory dictionary.
Quick example
from apkpy_lib import Screen, label, button, list_view, on_click_navigate, run

list_screen  = Screen(id="list_screen")
detail_screen = Screen(id="detail_screen")

items = [
    {"title": "Apple",  "subtitle": "A red fruit"},
    {"title": "Banana", "subtitle": "A yellow fruit"},
]

# Tap a list item → navigate and pass data
item_list = list_view(
    items,
    id="item_list",
    screen=list_screen,
    on_click=lambda item: on_click_navigate(detail_screen, data={"title": item["title"], "desc": item["subtitle"]})
)

# Detail screen: read the incoming data
lbl_name = label("", id="lbl_name", screen=detail_screen)
lbl_desc = label("", id="lbl_desc", screen=detail_screen)

# Populate labels on load using get_param
lbl_name.set_value(detail_screen.get_param("title"))
lbl_desc.set_value(detail_screen.get_param("desc"))

# Optional default value if the param is missing
lbl_name.set_value(detail_screen.get_param("title", "Unknown"))
You can also pass data via a regular button click:
btn_go = button("Open Detail", screen=list_screen,
                command=lambda: on_click_navigate(detail_screen, data={"title": "Manual"}))
on_click_navigate(screen, data={})
| Parameter | Type | Description |
|---|---|---|
screen |
Screen |
The destination screen to navigate to |
data |
dict |
Key/value pairs to pass. Values are converted to strings. |
screen.get_param(key, default="")
| Parameter | Type | Description |
|---|---|---|
key |
str |
The key to look up (must match a key passed in data=) |
default |
str |
Value to return if the key was not passed (default: "") |
Technical notes
Android: on_click_navigate(screen, data={"k": v}) compiles to:
Intent intent = new Intent(this, TargetActivity.class);
intent.putExtra("k", String.valueOf(v));
startActivity(intent);
screen.get_param("k") compiles to getIntent().getStringExtra("k").
Hot Previewer: params are stored on screen._params before navigation; get_param reads from that dict.
Setting component values on load: Assign the component to a variable and call set_value with get_param at module level — the compiler places these setText() calls in the correct Activity's onCreate:
lbl_title = label("", screen=detail_screen)
lbl_title.set_value(detail_screen.get_param("title"))  # → onCreate: lbl1.setText(getIntent().getStringExtra("title"))
5n. Loading Spinner ⏳
spinner() adds a native circular loading indicator — the spinning ring you see in every app while it's fetching data. It's the natural companion to https.get(), db.query(), camera.capture(), or any work that takes a moment: show it when the work starts, hide it when the result arrives.
How to use it
from apkpy_lib import Screen, button, label, spinner, https, json_get, run

main = Screen(id="main")
result = label("Press the button", id="result", screen=main)

# Start hidden — we only show it while loading.
loading = spinner(id="loading", screen=main, visible=False)

def on_response(success, response):
    loading.hide()                       # work finished → hide the spinner
    if success:
        result.set_value(json_get(response, "title"))
    else:
        result.set_value("Request failed")

def fetch():
    loading.show()                       # work starting → show the spinner
    https.get("https://jsonplaceholder.typicode.com/todos/1", on_response=on_response)

button("FETCH", id="btn", command=fetch, screen=main)

if __name__ == "__main__":
    run(start_screen=main)
Parameters & methods
| Description | |
|---|---|
spinner(id=..., screen=..., visible=True) |
Creates the spinner. Pass visible=False to start hidden. |
.show() |
Shows the spinner and starts it spinning. |
.hide() |
Hides the spinner and stops it. |
CSS styling
loading {
    color: #6366F1;   /* color of the spinning ring */
    width: 48px;      /* size (optional — defaults to the platform's standard size) */
    height: 48px;
}
How it works
| Environment | What spinner uses |
|---|---|
| Hot Previewer (your computer) | An animated rotating arc drawn on a Tkinter Canvas; .show() / .hide() start and stop the animation. |
| Android Build (real device) | An indeterminate ProgressBar (color → android:indeterminateTint). .show() / .hide() compile to setVisibility(View.VISIBLE) / setVisibility(View.GONE); visible=False starts it as android:visibility="gone". |
[!TIP] The pattern is always the same:
loading.show()right before the async call, andloading.hide()as the first line of youron_response/on_resultcallback — so it disappears the moment the result is back, whether it succeeded or failed.
6. The Two-Step Execution Flow 🔄
ApkPy makes the development lifecycle effortless via two distinct phases:
Phase 1: Development (Hot Previewer)
Simply run your Python file normally:
python writehere.py
This instantly boots up our Tkinter-based Hot Previewer on your computer. You get immediate visual feedback for your screens, interactive inputs, focus colors, buttons, and navigation without needing an emulator!
Phase 2: Production (Native Compilation)
When you're ready to deploy, run the CLI tool in your project folder:
apkpy build
This triggers the transpiler! ApkPy generates all Java classes, Manifests, XML Layouts, and Drawables completely from scratch. This new XML-driven approach ensures that complex layouts, margins, and alignments are handled natively by the Android OS for maximum stability. Open the resulting bundled .zip project and generate your production .apk!
7. What's New in v1.1.0 — the plan, completed
- Global themes and design tokens —
Theme(...)now supplies the palette, typography, spacing, radius, component defaults and Android system-bar colours. CSS reuses the same values withvar(--primary),var(--surface),var(--text)and the other normalized tokens. See Global Themes & Design Tokens above. - Material buttons and native vector icons —
filled,outlined,tonal,text,dangerandiconvariants share a predictable cascade. Icons no longer depend on whichever emoji font happens to be installed. See Material 3 Button Variants. - Responsive mobile, tablet and landscape layouts — compose the component
tree once with
responsive(),row()andcolumn(). Android receives real resource-qualified layouts instead of runtime screen-size branches. See Responsive Layouts. - Advanced flex, grid and layering — wrapping, grow/shrink/basis, grid tracks and spans, aspect ratios, absolute offsets and z-index now work in both targets. The custom native ViewGroup is emitted only when required. See Advanced Flexbox, Grid & Layering.
- Material cards and semantic surfaces — use the ready-made
title/subtitle/image/content/actions form or attach any components to an
empty
card(). Android generatesMaterialCardView, not a simulated panel. See Cards & Surfaces. - Fixed and collapsible app bars —
app_bar(),sliver_app_bar()andaction()generate Material toolbars outside scrollable content, with native menus and vector icons. See App Bars & Collapsible Headers. - Overlays, menus and pickers — bottom sheets, dialogs, popup/context menus, snackbars, tooltips, date pickers and time pickers share callbacks and dismiss behaviour across Previewer and Android. See Overlays, Menus & Pickers.
- Skeleton, loading, empty and error states — switch a shared content area
with
.show()/.hide()instead of rebuilding three copies of the screen. Animation code remains conditional. See Skeleton Loading & Content States. - Smart images and avatars — local placeholders, network fallbacks, bounded cache, fade, aspect ratio, blur, tint, circular crops and presence badges are now one coherent pipeline. See Advanced Images & Avatars.
The release includes four English showcase apps — Lumen, Onda, Northline and Afterglow — covering finance, wellbeing, travel and music. Their 16 Android Activities compiled with Gradle and opened on a Pixel 9 emulator without an AndroidRuntime crash. The generated output passed 108 XML parses, 24 Java structure checks and the complete 146-case transpiler suite.
A small 1.1.0 composition
from apkpy_lib import (
    Screen, Theme, action, app_bar, card, card_action, image, run, snackbar,
)

home = Screen(id="home", scroll=True)
app_bar("Library", actions=[action("search", label="Search")], screen=home)

image(
    "https://example.com/cover.jpg",
    placeholder="cover-placeholder.png",
    fallback="cover-fallback.png",
    cache=True,
    fade_in=True,
    aspect_ratio="16:9",
    screen=home,
)

card(
    title="Nocturne 04",
    subtitle="43 min · Curated by Mara Vale",
    actions=[card_action(
        "Play mix", variant="filled", icon="play_arrow",
        command=lambda: snackbar("Playing Nocturne 04"),
    )],
    screen=home,
)

run(
    start_screen=home,
    theme=Theme(
        mode="dark", primary="#8B5CF6", secondary="#22D3EE",
        background="#09090B", surface="#18181B", text="#FAFAFA",
    ),
)
The new visual layer works directly with the existing native features. For example, sensitive SQLite fields can still be encrypted before insertion:
from apkpy_lib import crypto, db

db.execute("CREATE TABLE IF NOT EXISTS notes (id INTEGER PRIMARY KEY, body TEXT)")
db.execute(
    "INSERT INTO notes (body) VALUES (?)",
    [crypto.encrypt("Private tour notes")],
)
rows = db.query("SELECT body FROM notes WHERE id = ?", [1])
On Android, crypto.encrypt() uses authenticated AES-256-GCM with a per-device
key protected by Android Keystore. Passwords should use
crypto.hash_password() and crypto.verify_password() instead. Values written
with storage.set() remain encrypted automatically before reaching disk.
What's New & Bug Fixes in v1.0.0
- 🔒 Automatic encrypted storage: Every
storage.set(key, value)is encrypted automatically before it reaches SharedPreferences, andstorage.get()decrypts it transparently. Existing code needs no changes, older plaintext values remain readable for migration, and stolen preference files contain onlyenc1$…ciphertext. On Android the encryption key is generated and protected by the Android Keystore. - 🛡️
crypto.encrypt()/crypto.decrypt()— AES-256-GCM for sensitive data: Encrypt values that must be read back, such as private notes, tokens or selected SQLite fields. Android uses authenticated AES‑256‑GCM with a random per-device Keystore key; tampered, malformed or foreign-device ciphertext safely returns""instead of exposing corrupted data. See §25. - 🔑 Secure password hashing with PBKDF2:
crypto.hash_password()creates a random salt and applies PBKDF2-HMAC with 200,000 iterations;crypto.verify_password()checks it with a constant-time comparison. Passwords and PINs should be hashed, not encrypted. See §25. - 🎵 Native audio and background playback:
audio.play,pause,resume,stop,seekandplay_backgroundnow cover music, radio and podcast playback. Background audio uses a foreground Android media service with notification/lock-screen metadata, transport controls and audio-focus handling. See §5i. - ⏭️ Queues and full player UI:
audio.play_playlist,next,previous,shuffleandrepeatmanage a real queue.audio.now_playing(...)binds progress/time/cover/title/artist components andaudio.controls(...)synchronizes play/pause, shuffle and repeat buttons. See §5i. - 🎛️ Persistent mini-player, favourites and playlists:
mini_player(open=...)adds a global now-playing bar.audio.like_button,liked_list,add_to_playlist,play_saved_playlist,playlists_list,edit_playlist,playlist_editor,remove_from_playlistanddelete_playlistprovide persistent library features. See §5i. - 🖼️ Rich lists, carousels and grids:
list_view(..., rich=True),carousel(...)andgrid(..., cols=N)render native media cards with remote covers, titles, subtitles and custom payloads such as an audiosrc. Dynamic rich lists acceptset_items(..., image="field"). See §5h. - 📥 Offline downloads with
files: Download asynchronously withfiles.download, then inspect, play or remove app-private files withexists,pathanddelete—no broad storage permission required. See §5j. - 🔐 OAuth 2.0 + PKCE with
auth: Browser sign-in for Google, Spotify and GitHub (or custom providers), token persistence, normalized user profiles and logout throughauth.login,token,is_logged_in,userandlogout. Android uses a generated deep-link Activity; the Previewer uses a localhost callback. See §5k. - 🗂️
bottom_nav(screens, labels=[], icons=[]): Native bottom navigation bar linking 2–5 screens. On Android, compiles toBottomNavigationViewwith auto-generated menu XML and vector drawables — zero assets to manage. Tab switches reuse Activities (FLAG_ACTIVITY_REORDER_TO_FRONT) for instant navigation with no re-creation. Each Activity has anonResume()guard so the correct tab is always highlighted when you return to a screen (e.g. after pressing the system back button). In the Hot Previewer, renders a dark bar at the bottom with active-tab indicator line and bold label. - 📜 Scrollable screens (
scroll=True): Passscroll=Trueto anyScreento make the entire page vertically scrollable — all components scroll together. In the Previewer, scroll with the mouse wheel from anywhere on the screen. On Android, compiles toNestedScrollViewwith aLinearLayoutinside. - 📋
list_view(items, id=..., screen=..., on_click=...): New native list component. Accepts plain strings or dicts with"title"and"subtitle"keys. Supports CSScolor,background-color,border-color, andheight. Update the list at runtime with.set_items(new_list)— which also accepts a JSON string fromdb.query()or anhttpsresponse, withtitle=/subtitle=field mapping. Lambdaon_clickcallbacks are fully supported. In scroll screens, compiles toTextViewsinside aLinearLayout(no nested scroll conflict). - 🐛 Fixed
type="range"(SeekBar) Gradle errors:set_value()now usessetProgress(Integer.parseInt(...))andget_value()usesString.valueOf(getProgress())— the previous code incorrectly calledsetText()/getText()on a SeekBar. - 🐛 Fixed
list_viewtoast duplication:item["title"]anditem["subtitle"]inon_clicklambdas now correctly extract the two parts of the stored string — the previous code duplicated the full item text. - 🐛 Fixed
list_viewtext always black on Android: A customArrayAdaptersubclass with agetView()override is now generated to apply the CSScolorandbackground-colorto every item row. - 🧩 User-defined functions with arguments: Define your own helper functions that take parameters —
def adjust(delta): ...— and call them from anycommand=oron_click=lambda with arguments (command=lambda: adjust("10")). Compiles to a real Java methodpythonCallback_adjust(String delta)with a typed call site, instead of being silently dropped. Identical behaviour in the Previewer and on Android. - 🔢 Comparison operators in
if(<,>,<=,>=): Conditions now support the full set of comparisons alongside==/!=. Numbers compare numerically — floats included (if price >= 1.5) — and strings compare lexicographically, just like Python. Compiles to nativeDouble.parseDouble(...)/compareTo(...)checks. - 🔁 Iterate
db.query()directly:for row in db.query("SELECT level FROM tank"):now works inline — no temporary variable needed. Previously only an assignedrows = db.query(...)would iterate on Android, while the inline form silently produced zero rows (it worked only in the Previewer). Both forms now compile to the same native SQLite read. - 🚀
apkpy run— compile straight to an installable APK: One command transpileswritehere.py, compiles it with Gradle, and drops a ready-to-install<app>-debug.apkright next to your script — no Android Studio needed. The.apkis always written to disk;--qradditionally serves it over your Wi-Fi with a scannable QR code, and--usbinstalls it to a connected device viaadb. (apkpy buildstill produces a.zipAndroid Studio project if you'd rather compile there.) - 🩺
apkpy doctor: Reports whether your machine has a compatible toolchain — a JDK 17–21, the Android SDK, and Gradle — and points at what's missing. If you have Android Studio, ApkPy auto-detects and reuses its bundled JDK and SDK, so there's noANDROID_HOMEto configure. - 📥
apkpy setup: For machines without Android Studio — downloads a compatible JDK, Gradle, and the Android SDK packages into~/.apkpysoapkpy runworks out of the box. - 🎲
random— bundled in apkpy_lib:from apkpy_lib import random(no stdlib import needed), thenrandom.randint(a, b),random.choice(list)andrandom.random(). Transpiles to native Android (java.util.Random/Math.random()) — perfect for dice, pickers, quizzes and games. Works the same in the Previewer (it wraps Python's realrandom) and on Android. The random values won't match between the two — that's expected: each side is independently random. - 📱 Preview on any device size —
device(...): A Previewer-only helper to resize the preview window to a specific phone (device("Pixel 8")) or go full-window (device("fullscreen")borderless with Esc to exit, ordevice("maximized")which keeps the title bar). Accepts every Pixel from the Pixel 4 to the Pixel 10 Pro; the default stays Pixel 9. It's ignored on Android — there the real screen is the device — so leaving it in your code never changes the APK. - 🧬 f-strings (
f"...{value}..."): Writef"Olá {nome}! Total: {preco:.2f} €"instead of gluing strings with+andstr(). Inserts variables and inline expressions ({a + b}); a format spec like{preco:.2f}fixes the decimals and compiles toString.format(Locale.US, "%.2f", ...), matching Python exactly. See §29. - 🔁
whileloops:while i < 5:now compiles to native Java, with the same condition set asif(<,and/or/not, …) and fullbreak/continuesupport. An automatic safety limit stops an accidental infinite loop from freezing the Android UI thread. See §29. - ➕ Augmented assignment (
+=,-=,*=,/=,%=):total += 5,i -= 1,texto += "!"— numeric maths or string concatenation, depending on the value. See §29. - ✅
.isdigit()— input validation:if valor.isdigit():beforeint(valor)so empty/non-numeric input shows a message instead of crashing. Compiles tomatches("\\d+")with the same truth value as Python. See §29. - 🔤
.startswith(x)/.endswith(x): Check prefixes and suffixes inside anif—if url.startswith("https://"),if email.endswith("@gmail.com"). Maps directly to Java's.startsWith(...)/.endsWith(...)for an exact match with Python. See §29. - 🕐
datetime— bundled in apkpy_lib:from apkpy_lib import datetime, thendatetime.now(),datetime.date(),datetime.time(),datetime.hour()(andyear/month/day/minute/second). Everything returns a string; compiles to nativeSimpleDateFormat. See §30. - 📦
from apkpy_lib import *: Import the whole library in one line — andcontaineris now exported too (it was missing). See §31. - 🐛 Fixed string-literal escaping: Strings containing a newline (
"a\nb"), tab or backslash now compile correctly. Previously only quotes were escaped, so a\ncould break the Android build witherror: unclosed string literal. The fix covers labels,set_value, f-strings, comparisons, module constants and list items. - 📦
apkpy.toml— app name, icon, package id & version:apkpy initscaffolds it;apkpy run/apkpy buildapply it automatically. Thenamebecomes the launcher label (it used to be hardcoded "ApkPy App"), theiconis generated in every density, andapplication_id/version_*flow into the build. No config and no--name?apkpy runasks for the name the first time and saves it. See §32. - 🔑
apkpy release— signed builds for the Play Store:apkpy releaseproduces a signed.apk(the unsigned ones don't install);apkpy release --aabproduces an App Bundle for Google Play. The signing key is created once per app and reused for every update — exactly what the store requires. See §32.
Previous Highlights (v0.9.9)
- 📅
type="date": Opens the native AndroidDatePickerDialog. Returns"DD/MM/YYYY"fromget_value(), or""if the user hasn't picked yet. In the Previewer opens a spinbox dialog (Day / Month / Year). - 🕐
type="time": Opens the native AndroidTimePickerDialog. Returns"HH:MM"fromget_value(). In the Previewer opens a spinbox dialog (Hour / Minute). - 🔢
type="number": Shows the numeric keyboard on Android automatically. In the Previewer, rejects non-numeric characters as you type. Supports decimals and negatives.get_value()always returns a string — useint()orfloat()in your code. - 🔘
type="switch": NativeSwitchCompattoggle. CSSbackground-colorsets the "on" track colour.get_value()returns"true"or"false". - 🔽
type="select": Native AndroidSpinnerdropdown. Pass options as"A|B|C".get_value()returns the selected option text. - 📝
type="textarea": Multi-lineEditText. Control height with CSSrows.
Previous Highlights (v0.9.8) 🚀
- 🗨️
alert(title, message): Show a native informational dialog with an OK button. Fire-and-forget — no callback needed. Compiles toAlertDialog.Builderon Android. In the Previewer, opens a custom dialog with an English "OK" button (unaffected by OS language). - ✅
confirm(title, message, on_result=callback): Show a native confirmation dialog with OK and Cancel buttons. Callson_result(True)if the user confirms,on_result(False)if they cancel — the same asyncon_resultpattern ascamera.capture/gallery.pick. Compiles toAlertDialog.Builderwith positive/negative buttons on Android.
We've been hard at work making ApkPy the most reliable Python-to-Android framework. Here's what's new in v0.9.8 (now superseded by v0.9.9):
- ⏱️ Background Services API (
service): Run code even when your app is closed.service.every(run=fn, minutes=N, id=...)schedules recurring work,service.once(run=fn, after_minutes=N, id=...)schedules a one-time delayed task, andservice.cancel(id=...)stops a scheduled task. Compiles to nativeWorkManager(PeriodicWorkRequest/OneTimeWorkRequest) with realonly_on_wifi/only_when_chargingconstraints — your background functions can usestorage,db,https,toastandnotifywith 100% identical code between the Previewer and Android. - 🔔
notify(title, message, id=...): Show native system notifications in the phone's notification bar — visible even when the app isn't open. The perfect companion to background services: tell the user something happened without requiring the app to be in the foreground. Compiles toNotificationCompat.Builder+NotificationManager, including the Android 13+ runtime permission request. - 📤
share(text, title=None): Open the native Android share sheet to send text to WhatsApp, Email, SMS, Bluetooth and more, with a single call. Compiles toIntent.ACTION_SEND+Intent.createChooser(...)and works from both screens and background services. - 📋
clipboard.copy(text): Copy text to the system clipboard withclipboard.copy(...). Compiles to nativeClipboardManager/ClipDataon Android, and writes to the real OS clipboard in the Previewer — soCtrl+Voutside the app pastes the actual text. - 📸
camera.capture(on_result=...)&gallery.pick(on_result=...): Open the native camera or image picker and get the resulting photo's path back through an asyncon_result(success, path)callback — same async pattern ashttps. Compiles toActivityResultContracts.TakePicture()/GetContent()with automaticCAMERApermission +FileProvidersetup (zero manifest editing). Since your computer has no camera or gallery, the Previewer simulates both by opening your OS's file picker — your code stays 100% identical either way. - 🐛 Bug fixes: Fixed
apkpy buildopening a blank Previewer window on every run; fixedtoast(f"...")(f-strings) generating empty messages; fixednotify()not requesting thePOST_NOTIFICATIONSruntime permission on Android 13+; fixedservice.cancel()/service.once()being dropped inside nested button-handler code paths. - Cross-platform parity: All new features are fully functional in Phase 1 (Tkinter Previewer) and compile to native Android code in Phase 2.
Previous Highlights (v0.9.7.1)
- 🗄️ SQLite Database API: Build fully offline, data-persistent Android apps with the new
dbobject. Usedb.execute()for writes anddb.query()for reads — with zero Java knowledge required. - 🌐 HTTPS Network API: Connect your app to any REST API on the internet with
https.get(),https.post(),https.put(),https.patch()andhttps.delete()— full CRUD. Supports customheadersfor Bearer tokens and API keys. Runs in a background thread — no UI freezes. Compiles to native AndroidHttpURLConnection. - 🔎
json_get()Helper: Safely navigate JSON results fromdb.query()orhttpsresponses using dot-notation paths (e.g.,json_get(result, "main.temp")). Works identically in the Previewer and on real Android.
Previous Highlights (v0.9.3)
- XML Layout Engine: Moved from programmatic Java UI to native Android XML layouts. This fixes 99% of layout inconsistencies.
- Named Builds: Running
apkpy buildnow interactively asks you for the project name. - Pixel 9 Pro Previewer: The Hot Previewer is now perfectly calibrated to match the Pixel 9 Pro screen.
- Automatic Gravity & Centering: Fixed bugs where elements wouldn't center correctly.
- Animation Stability: Fixed glitches in
@keyframesanimations.
8. FAQ (Quick Answers) ❓
"Does it support Android APIs?" Yes! Native permissions, camera, gallery, background services, notifications, sharing, clipboard and GPS/location are already supported — see Sections 12, 18-22 and 24 below. We're expanding support for vibration and more in upcoming versions.
"I clicked 'Take Photo' in the Previewer and it just opened a file picker — is that a bug?"
No, that's by design! Your computer doesn't have a camera app or photo gallery, so camera.capture() and gallery.pick() simulate the flow in the Previewer by opening your OS's file explorer — pick any image and it's treated as "the photo you took" / "the image you chose". Your on_result(success, path) callback receives the real file path either way. On a real Android device (after apkpy build), the exact same code opens the actual native camera/gallery apps. See Section 22 for details.
"Do I need the Android SDK installed?"
To write and preview your app using python writehere.py, no SDK is required. However, apkpy build generates a native Android Studio project. To compile that project into a final .apk, you will need the Android SDK/Java installed on your machine (or just upload the generated folder to a CI/CD service like GitHub Actions).
"Can I use images in my app?"
Yes! See Section 10 below. Just put your image file next to writehere.py and use the image() component — ApkPy handles copying assets into Android's drawable folder automatically.
9. Spacing & Margins (Precision Layout) 📐
Margins allow you to create "invisible space" around your components. This is essential for moving buttons down, separating inputs, or creating breathing room between elements.
Example Code:
my_button {
    /* Move the button 50 pixels down from whatever is above it */
    margin-top: 50px;

    /* Push the button 20 pixels away from the left edge */
    margin-left: 20px;
}

header {
    /* Put a 30 pixel gap at the bottom of the title */
    margin-bottom: 30px;
}
Margin Guide (For Absolute Beginners):
| Property | What it does (in simple terms) |
|---|---|
margin |
Adds space to all four sides (top, bottom, left, and right) at once. It's like putting a bubble around the whole component. |
margin-top |
Pushes the component down. It adds space to the top edge. Use this if you want something to move lower on the screen. |
margin-bottom |
Pushes the next component away. It adds space to the bottom edge. |
margin-left |
Pushes the component to the right. It adds space to the left side. |
margin-right |
Pushes the component to the left. It adds space to the right side. |
[!TIP] In ApkPy, you can use
px(like20px). The compiler automatically converts this todpfor Android, so your app looks perfect on every phone screen size!
10. Images & Toast Notifications 🖼️
Images
The image() component renders a native Android ImageView. Just place your image file (.png, .jpg) in the same folder as writehere.py and reference it by filename. ApkPy will automatically copy it into the Android res/drawable folder during the build step.
from apkpy_lib import image, Screen

home = Screen(id="home_screen")

# Just place 'logo.png' next to your writehere.py file!
image("logo.png", id="app_logo", screen=home)
You can fully style the image through CSS just like any other component:
app_logo {
    width: 150px;
    height: 150px;
    border-radius: 75px;      /* Makes it circular! */
    margin-top: 60px;
    box-shadow: 0 8px 20px #000;
    animation-name: fadeIn;
    animation-duration: 1000ms;
}
[!IMPORTANT] ApkPy automatically handles the conversion of your image file into an Android-compatible resource. You do not need to manually add it to any resource folder — just place it next to your script and it works.
Images from the internet (URLs) 🌐
image() also accepts a full URL — perfect for avatars, product photos, or any image coming from a REST API. ApkPy detects the http:// / https:// prefix automatically and loads the image at runtime, in a background thread, so the UI never freezes.
from apkpy_lib import Screen, image, run

home = Screen(id="home")

# Local file → copied into res/drawable at build time
image("logo.png", id="logo", screen=home)

# Remote URL → downloaded on the device at runtime
image("https://picsum.photos/400/200", id="banner", screen=home)
| Environment | What happens with a URL |
|---|---|
| Hot Previewer (your computer) | The image is downloaded with urllib in a background thread; a "loading…" placeholder shows until it arrives, then it's drawn (with the same object-fit, border-radius, opacity, and filters as local images). |
| Android Build (real device) | Compiles to a background Thread + HttpURLConnection + BitmapFactory.decodeStream(...), then setImageBitmap(...) on the UI thread. The INTERNET permission is declared automatically. No third-party library (Glide/Picasso) needed. |
All the same CSS works on remote images — width, height, border-radius, object-fit, opacity, box-shadow, animations:
banner {
    width: 400px;
    height: 200px;
    border-radius: 12px;
}
[!TIP] Pair this with
https.get()+list_viewto show images from an API — e.g. a product list where each row's image comes from a URL in the JSON response.
[!NOTE] A remote
image()has noandroid:srcin the layout — it's blank until the download finishes (just like the "loading…" placeholder in the Previewer). If the URL fails (offline, 404), the image simply stays blank; it never crashes the app.
Toast Notifications 🍞
Toasts are small, temporary pop-up messages that appear at the bottom of the screen — a staple of Android UX. In ApkPy, triggering one is a single line of Python:
from apkpy_lib import toast

def on_save():
    toast("Your data was saved! ✅")
In the Hot Previewer (Phase 1), toasts appear as an overlay message at the bottom. On a real Android device (Phase 2), they compile to the native Toast.makeText(...) Java call — identical to what professional apps use.
You can call toast() from any function — button clicks, storage operations, permission results, or even on app startup:
from apkpy_lib import toast, run, Screen

home = Screen(id="home")
run(start_screen=home)
toast("Welcome back! 👋")  # Shows when the app launches
11. Storage & Persistence 💾
ApkPy provides a powerful, built-in storage API that allows you to persistently save data across app sessions — things like user preferences, saved form values, login tokens, and more.
How It Works Under the Hood
| Environment | What storage uses |
|---|---|
| Hot Previewer (your computer) | A local .json file saved next to your script |
| Android Build (real device) | Native Android SharedPreferences — the fastest and most battery-efficient persistent storage on Android |
This means your code is 100% identical in both environments. No special cases, no if platform: checks.
[!NOTE] Everything you store is encrypted automatically.
storage.set()encrypts every value before it touches the disk (AES-256 with an Android Keystore key on Android), andstorage.get()decrypts transparently — your code doesn't change at all. If someone steals the preferences file, all they see isenc1$…gibberish. Values saved by older versions in plain text are still read normally. See section 25. Crypto for details.
Importing Storage
from apkpy_lib import storage
The Full API
| Method | Description | Example |
|---|---|---|
storage.set(key, value) |
Saves a value permanently | storage.set("username", "Alice") |
storage.get(key, default) |
Reads a value (returns default if not found) |
storage.get("username", "Guest") |
storage.delete(key) |
Removes a single key | storage.delete("token") |
storage.clear() |
Wipes all stored data | storage.clear() |
Basic Example — Saving a User's Name
from apkpy_lib import Screen, inputs, button, toast, storage, run

my_screen = Screen(id="main")

name_field = inputs("Enter your name", type="text", id="name_field", screen=my_screen)

def save_name():
    name = name_field.get_value()
    if name != "":
        storage.set("username", name)
        toast(f"Saved: {name} ✅")

def load_name():
    saved = storage.get("username", "")
    if saved != "":
        name_field.set_value(saved)
        toast(f"Welcome back, {saved}! 👋")
    else:
        toast("No name saved yet.")

button("Save", id="btn_save", command=save_name, screen=my_screen)
button("Load", id="btn_load", command=load_name, screen=my_screen)

run(start_screen=my_screen)
Advanced Example — Settings Screen with Auto-load
One of the most useful patterns is auto-loading saved preferences when the app starts — so the user never has to set things up twice:
from apkpy_lib import Screen, inputs, button, label, toast, storage, run

settings_screen = Screen(id="settings")

# Dropdown for language
language_select = inputs("English|Portuguese|Spanish", type="select", id="lang_select", screen=settings_screen)

# Toggle switches for on/off settings
sw_notif = inputs("Notifications",  type="switch", id="sw_notif", screen=settings_screen)
sw_dark  = inputs("Dark mode",      type="switch", id="sw_dark",  screen=settings_screen)

status = label("", id="status", screen=settings_screen)

# ── Auto-load saved values when the app opens ────────────────────────────────
saved_lang  = storage.get("language", "")
saved_notif = storage.get("notifications", "")
saved_dark  = storage.get("dark_mode", "")

if saved_lang  != "": language_select.set_value(saved_lang)
if saved_notif != "": sw_notif.set_value(saved_notif)   # "true" turns it on
if saved_dark  != "": sw_dark.set_value(saved_dark)

# ── Save button ──────────────────────────────────────────────────────────────
def save_settings():
    storage.set("language",      language_select.get_value())  # e.g. "English"
    storage.set("notifications", sw_notif.get_value())         # "true" or "false"
    storage.set("dark_mode",     sw_dark.get_value())          # "true" or "false"
    toast("Settings saved! ⚙️")
    status.set_value("Saved: " + language_select.get_value())

button("SAVE SETTINGS", id="btn_settings", command=save_settings, screen=settings_screen)

style = """
settings {
    background-color: #0F172A;
    padding: 24px;
    gap: 16px;
}
lang_select { color: #F8FAFC; background-color: #1E293B; border-color: #334155; border-radius: 10px; }
sw_notif    { color: #F8FAFC; background-color: #4F46E5; }
sw_dark     { color: #F8FAFC; background-color: #4F46E5; }
status      { color: #38BDF8; font-size: 13px; }
btn_settings { background-color: #4F46E5; color: #F8FAFC; border-radius: 12px; font-weight: bold; pressed-color: #3730A3; }
"""

run(start_screen=settings_screen)
[!IMPORTANT] The
.get_value()and.set_value()methods work on virtually all interactive inputs — text fields, checkboxes, radio button groups, dropdowns, sliders, and even labels. String comparisons with==or!=work natively in both the Previewer (Python) and on the final Android device (Java).
[!TIP] Use
storage.get("key", "default_value")to safely provide a fallback for first-time users who have no saved data yet. This prevents crashes and unexpected empty states.
12. Native Permissions & Features 📱
ApkPy allows you to interact directly with Android system features using a simple Python API.
Declaring Manifest Permissions
Declare what your app needs so the compiler can update AndroidManifest.xml automatically.
from apkpy_lib import declare_permissions
declare_permissions(["CAMERA", "LOCATION_FINE", "INTERNET"])
Runtime Permission Requests & Toasts
Prompt users for permissions and provide instant feedback with native Toasts.
from apkpy_lib import permissions, toast

def ask_camera():
    def on_result(granted):
        if granted:
            toast("Camera access granted! 📸")
        else:
            toast("We need camera permission to continue.")

    permissions.request("CAMERA", on_response=on_result)
13. Master Example: "Coffee Haven" ☕
This is a complete, real-world multi-screen app built entirely with ApkPy. It demonstrates images, navigation, radio buttons, text inputs, storage persistence, toast notifications, and a fully custom CSS design all working together.
from apkpy_lib import Screen, button, label, inputs, image, run, toast, storage

# 1. Setup Screens
welcome_screen = Screen(id="welcome_container")
order_screen = Screen(id="order_container")

# 2. Logic: Handle Order
def place_order():
    # Save preferences to storage so the user's choices are remembered
    storage.set("coffee_select", coffee_select.get_value())
    storage.set("special_notes", special_notes.get_value())
    toast("Order placed! Your coffee will be ready soon. ☕")

# 3. Welcome Screen UI
image("logo.png", id="welcome_logo", screen=welcome_screen)
label("COFFEE HAVEN", id="welcome_title", screen=welcome_screen)
label("The best brew in town.", id="welcome_subtitle", screen=welcome_screen)
btn_start = button("EXPLORE MENU", id="btn_primary", screen=welcome_screen)

# Navigate to Order Screen on button click
welcome_screen.on_click_navigate(button=btn_start, to=order_screen)

# 4. Order Screen UI
label("SELECT YOUR COFFEE", id="menu_title", screen=order_screen)

# Radio buttons for coffee selection
coffee_select = inputs("Espresso|Latte|Cappuccino|Mocha", type="radio", id="coffee_select", screen=order_screen)

# Free-text for special instructions
special_notes = inputs("Special instructions (e.g., extra sugar)", type="text", id="special_notes", screen=order_screen)

# Auto-load saved preferences from last session!
saved_coffee = storage.get("coffee_select", "")
if saved_coffee != "":
    coffee_select.set_value(saved_coffee)

saved_notes = storage.get("special_notes", "")
if saved_notes != "":
    special_notes.set_value(saved_notes)

# Place Order button
button("PLACE ORDER", id="btn_order", command=place_order, screen=order_screen)

# 5. Full Custom CSS
style = """
welcome_container {
    background-color: #2D1E17;
    flex-direction: column;
    gap: 0px;
}

order_container {
    background-color: #FDF8F5;
    flex-direction: column;
    padding: 30px;
    gap: 20px;
}

welcome_logo {
    width: 180px;
    height: 180px;
    border-radius: 90px;
    margin-top: 100px;
    box-shadow: 0 10px 20px #000;
    animation-name: fadeInDown;
    animation-duration: 1000ms;
}

welcome_title {
    color: #FDF8F5;
    font-size: 32px;
    font-weight: bold;
    margin-top: 40px;
    animation-name: fadeInDown;
    animation-duration: 1200ms;
}

welcome_subtitle {
    color: #D4A373;
    font-size: 18px;
    margin-bottom: 60px;
    animation-name: fadeIn;
    animation-duration: 2000ms;
}

btn_primary {
    background-color: #D4A373;
    color: #2D1E17;
    border-radius: 30px;
    font-weight: bold;
    font-size: 18px;
    padding: 18px 45px;
    pressed-color: #B88B5B;
    animation-name: fadeInUp;
    animation-duration: 1000ms;
}

menu_title {
    color: #2D1E17;
    font-size: 24px;
    font-weight: bold;
    animation-name: fadeIn;
    animation-duration: 1000ms;
}

coffee_select {
    color: #3E2723;
    font-size: 18px;
}

special_notes {
    border-color: #D4A373;
    border-radius: 12px;
    padding: 20px;
    focus-border-color: #2D1E17;
}

btn_order {
    background-color: #2D1E17;
    color: #FDF8F5;
    border-radius: 15px;
    font-weight: bold;
    font-size: 18px;
    padding: 20px;
    pressed-color: #1A110D;
    margin-top: 30px;
    animation-name: zoomIn;
    animation-duration: 800ms;
}

@keyframes fadeInDown {
    from { opacity: 0; margin-top: -40px; }
    to   { opacity: 1; margin-top: 0px; }
}

@keyframes fadeInUp {
    from { opacity: 0; margin-top: 40px; }
    to   { opacity: 1; margin-top: 0px; }
}

@keyframes zoomIn {
    from { opacity: 0; scale: 0.8; }
    to   { opacity: 1; scale: 1.0; }
}

@keyframes fadeIn {
    from { opacity: 0; }
    to   { opacity: 1; }
}
"""

if __name__ == "__main__":
    run(start_screen=welcome_screen)
14. Master Example: Mini Profile App 👤
This example demonstrates inputs, permissions, toasts, and advanced CSS styling in a focused single-screen app.
from apkpy_lib import Screen, button, label, inputs, run, toast, declare_permissions, permissions

# 1. Declare permission for the compiler
declare_permissions(["CAMERA"])

# 2. Setup the Screen
profile_screen = Screen(id="profile_container")

# 3. Logic: Handle Camera Request
def update_photo():
    def on_perm(granted):
        if granted:
            toast("Thanks! Accessing camera for your photo...")
        else:
            toast("We need camera access to take a photo!")

    permissions.request("CAMERA", on_response=on_perm)

# 4. Build the UI
label("Mini Profile App", id="header", screen=profile_screen)
inputs("Enter your Full Name", type="text", id="name_field", screen=profile_screen)
inputs("Short Bio", type="text", id="bio_field", screen=profile_screen)

btn_photo = button("Set Profile Picture", id="btn_outline", command=update_photo, screen=profile_screen)
btn_save  = button("Save Profile", id="btn_primary", screen=profile_screen)

# 5. Advanced CSS System
style = """
profile_container {
    flex-direction: column;
    gap: 20px;
    background-color: #ffffff;
    padding: 30px;
}

header {
    color: #1a1a1a;
    font-size: 24px;
    font-weight: bold;
}

name_field, bio_field {
    border-color: #e0e0e0;
    border-radius: 12px;
    padding: 14px;
    focus-border-color: #6200EE;
}

btn_outline {
    background-color: #ffffff;
    color: #6200EE;
    border-color: #6200EE;
    border-width: 2px;
    border-radius: 20px;
    pressed-color: #f3e5f5;
}

btn_primary {
    background-color: #6200EE;
    color: white;
    border-radius: 20px;
    pressed-color: #3700B3;
}
"""

run(start_screen=profile_screen)
15. Declarative CSS Animations 🎬
ApkPy supports native declarative animations using a syntax inspired by CSS Keyframes. You can define how a component should transition from one state to another, and the framework will generate the corresponding native Android Animation XML and Java logic.
How it Works: The @keyframes Block
An animation is defined using the @keyframes keyword followed by a name. Inside, you define two states:
from(or0%): The starting state of the component when it appears.to(or100%): The final state where the component should end.
@keyframes slideUp {
  from {
      opacity: 0;
      margin-top: 50px;
  }
  to {
      opacity: 1;
      margin-top: 0px;
  }
}
Applying the Animation
my_button {
    animation-name: slideUp;
    animation-duration: 1500ms;
}
Supported Properties:
| Property | Description | Example |
|---|---|---|
opacity |
Fades the component in or out (0.0 is invisible, 1.0 is solid). | opacity: 0; to opacity: 1; |
margin-top |
Moves the component vertically (Y-axis). | margin-top: 100px; to 0px; |
margin-left |
Moves the component horizontally (X-axis). | margin-left: -50px; to 0px; |
scale |
Resizes the component (1.0 is normal size). | scale: 0.5; to scale: 1.0; |
Ready-to-Use Animation Presets:
1. Smooth Fade-In
@keyframes fadeIn {
    from { opacity: 0; }
    to { opacity: 1; }
}
2. Slide Down From Top
@keyframes fadeInDown {
    from { opacity: 0; margin-top: -40px; }
    to { opacity: 1; margin-top: 0px; }
}
3. Slide Up From Bottom
@keyframes fadeInUp {
    from { opacity: 0; margin-top: 40px; }
    to { opacity: 1; margin-top: 0px; }
}
4. The "Pop" / Zoom Effect
@keyframes zoomIn {
    from { scale: 0.5; opacity: 0; }
    to { scale: 1.0; opacity: 1; }
}
5. Side Slide From Left
@keyframes slideFromLeft {
    from { margin-left: -200px; opacity: 0; }
    to { margin-left: 0px; opacity: 1; }
}
[!IMPORTANT] Cross-Platform Support: These animations are fully functional in the Tkinter Previewer (Phase 1) so you can test the "vibe" of your app, and they compile to Native Android XML (Phase 2) for maximum performance on real devices.
16. SQLite Database 🗄️
ApkPy now supports native local databases powered by SQLite. Build offline-first apps that store structured data permanently on the device — no internet required.
How It Works Under the Hood
| Environment | What db uses |
|---|---|
| Hot Previewer (your computer) | Python's built-in sqlite3 module, saved as apkpy_app.db next to your script |
| Android Build (real device) | Native android.database.sqlite.SQLiteDatabase — the same engine used by Google apps |
Your code is 100% identical in both environments.
Importing the Database
from apkpy_lib import db, json_get
The Full API
| Method | Description | Example |
|---|---|---|
db.execute(sql) |
Runs an SQL statement that modifies data | db.execute("CREATE TABLE IF NOT EXISTS users (name TEXT)") |
db.execute(sql, params) |
Same, but fills the ? placeholders safely — use this whenever the SQL contains user data |
db.execute("INSERT INTO users (name) VALUES (?)", [name]) |
db.query(sql) |
Runs a SELECT and returns a JSON string |
result = db.query("SELECT * FROM users") |
db.query(sql, params) |
Same, with safe ? placeholders |
result = db.query("SELECT * FROM users WHERE name = ?", [name]) |
db.last_insert_id() |
The rowid (auto-increment id) of the last inserted row |
new_id = db.last_insert_id() |
db.begin() |
Starts a transaction (everything after is pending) | db.begin() |
db.commit() |
Saves everything done since db.begin() |
db.commit() |
db.rollback() |
Undoes everything done since db.begin() |
db.rollback() |
Getting the new row's id — last_insert_id() 🔑
Right after an INSERT into a table with an INTEGER PRIMARY KEY AUTOINCREMENT column, call db.last_insert_id() to get the id the database just generated — no extra SELECT needed:
db.execute("INSERT INTO users (name) VALUES (?)", [name])
new_id = db.last_insert_id()     # e.g. 42
toast(f"User created with id {new_id}")
It works in any expression (f-strings, set_value, even as a ? parameter for the next query). In the Hot Previewer it returns Python's cursor.lastrowid; on Android it transpiles to SELECT last_insert_rowid() on the same connection — the same value in both.
Transactions — all or nothing 🏦
Some operations only make sense if they all succeed together. A bank transfer is the classic case: debit one account and credit the other — never just one. Wrap them between db.begin() and db.commit() and they're written to disk atomically. If anything goes wrong, db.rollback() undoes everything since db.begin(), leaving the database exactly as it was.
def transfer(amount):
    db.begin()                                                              # start transaction
    db.execute("UPDATE accounts SET balance = balance - ? WHERE name = ?", [amount, "Ana"])
    db.execute("UPDATE accounts SET balance = balance + ? WHERE name = ?", [amount, "Bo"])
    db.execute("INSERT INTO movements (description) VALUES (?)", [f"Ana -> Bo: {amount}"])
    move_id = db.last_insert_id()
    db.commit()                                                             # save all 3 at once
    toast(f"Transfer done (movement #{move_id})")
Undoing instead of saving:
db.begin()
db.execute("UPDATE accounts SET balance = balance - 50 WHERE name = ?", ["Ana"])
db.rollback()      # nothing changed — Ana's balance is untouched
[!IMPORTANT] A transaction is one connection: every
db.execute()/db.query()betweenbegin()andcommit()shares it, so it's all-or-nothing. Always close a transaction with eithercommit()orrollback(). On Android this transpiles toSQLiteDatabase.beginTransaction()→setTransactionSuccessful()→endTransaction()(the native, durable way); arollback()simply ends the transaction without marking it successful.
[!TIP] Besides atomicity, wrapping a batch of inserts in a single transaction is also much faster than committing each one separately — SQLite only flushes to disk once.
Parameterized Queries — SQL Injection Protection 🛡️
Never build SQL by pasting user input into the string. This classic pattern is dangerous:
db.execute(f"INSERT INTO users (name) VALUES ('{name}')") # ❌ DON'T
Two things go wrong:
- Broken queries — if the user types
O'Brien, the apostrophe closes the SQL string and the statement crashes. - SQL injection — a malicious user types
x'); DROP TABLE users; --and your table is gone.
The fix is one small change — put a ? where the value goes and pass the values as a list:
db.execute("INSERT INTO users (name) VALUES (?)", [name])                    # ✅ DO
rows = db.query("SELECT * FROM users WHERE name = ? AND age > ?", [name, idade])
The values are bound by the SQLite engine itself (never concatenated into the SQL), so apostrophes are just text and injection is impossible. It works identically in the Previewer (Python sqlite3 placeholders) and on Android (SQLiteDatabase.execSQL(sql, args) / rawQuery(sql, args)).
[!IMPORTANT] Rule of thumb: if any part of the SQL comes from
get_value(), storage, or the network — use?placeholders. Only hardcoded SQL (likeCREATE TABLE) is fine without them.
Reading Data with json_get()
Since db.query() returns a JSON string, use json_get() to read values without complex parsing:
result = db.query("SELECT * FROM users ORDER BY id DESC")
first_name = json_get(result, "0.name")   # First row, "name" column
first_id   = json_get(result, "0.id")     # First row, "id" column
[!TIP] The dot-notation path works like:
"<row_index>.<column_name>". So"0.name"means "thenamecolumn of the first row (index 0)".
Showing query results in a list
To display all rows instead of one value, pass the JSON from db.query() straight to a list_view:
rows = db.query("SELECT content, created FROM notes ORDER BY id DESC")
notes_list.set_items(rows, title="content", subtitle="created")
See Feeding the list from a database or API in the list_view section (and apkpy examples → [11] DB Notes List / examples/14_db_notes_list.py) for the full pattern.
Full Example — Offline User Manager
from apkpy_lib import Screen, button, label, input_field, run, toast, db, json_get

# Create the table once on startup
db.execute("CREATE TABLE IF NOT EXISTS users (id INTEGER PRIMARY KEY AUTOINCREMENT, name TEXT)")

my_screen = Screen(id="main_container")

nome_input  = input_field("Enter a name", id="input_nome", screen=my_screen)
lbl_total   = label("Total users: 0", id="lbl_total", screen=my_screen)
lbl_last    = label("Last added: --", id="lbl_ultimo", screen=my_screen)

def refresh_ui():
    rows   = db.query("SELECT * FROM users ORDER BY id DESC")
    count  = db.query("SELECT COUNT(*) as total FROM users")
    lbl_last.set_value(f"Last: {json_get(rows, '0.name')}")
    lbl_total.set_value(f"Total users: {json_get(count, '0.total')}")

def add_user():
    name = nome_input.get_value()
    if name != "":
        # `?` placeholder = safe against SQL injection and apostrophes
        db.execute("INSERT INTO users (name) VALUES (?)", [name])
        toast("User added! ✅")
        nome_input.set_value("")
        refresh_ui()

button("ADD USER", id="btn_add", command=add_user, screen=my_screen)
refresh_ui()

if __name__ == "__main__":
    run(start_screen=my_screen)
[!IMPORTANT] Always create your table with
CREATE TABLE IF NOT EXISTS— this is safe to run every time the app starts and won't overwrite existing data.
17. HTTPS & Network Requests 🌐
ApkPy gives you a simple, non-blocking HTTP client that works identically in both environments. Connect your app to any REST API on the internet using https.get(), https.post(), https.put(), https.patch() and https.delete() — the five methods that make up full CRUD.
How It Works Under the Hood
| Environment | What https uses |
|---|---|
| Hot Previewer (your computer) | Python's urllib.request running in a background thread — the UI never freezes |
| Android Build (real device) | Native HttpURLConnection running in a Java background thread via AsyncTask pattern |
Importing
from apkpy_lib import https, json_get
The Full API
| Method | Description |
|---|---|
https.get(url, headers={}, on_response=callback) |
Reads a resource (GET) |
https.post(url, data={}, headers={}, on_response=callback) |
Creates a resource (POST) |
https.put(url, data={}, headers={}, on_response=callback) |
Replaces a resource entirely (PUT) |
https.patch(url, data={}, headers={}, on_response=callback) |
Partially updates a resource (PATCH) |
https.delete(url, headers={}, on_response=callback) |
Deletes a resource (DELETE) |
Together that's full CRUD against any REST backend — Supabase, Firebase, Django/FastAPI, anything that speaks HTTP.
The on_response callback always receives two arguments:
success—Trueif the HTTP status was 2xx,Falseotherwise.response— The response body as a plainString. On a 4xx/5xx error, this is the error body the server sent back (most APIs return a useful JSON error message), so you can show the user what went wrong.
Basic GET Request
from apkpy_lib import Screen, button, label, run, toast, https, json_get

my_screen = Screen(id="main")
result_lbl = label("Press the button!", id="result", screen=my_screen)

def on_response(success, response):
    if success:
        title = json_get(response, "title")  # Reads the 'title' key from JSON
        result_lbl.set_value(title)
    else:
        toast("Request failed: " + response)

def fetch_data():
    result_lbl.set_value("Loading...")
    https.get("https://jsonplaceholder.typicode.com/todos/1", on_response=on_response)

button("Fetch Data", id="btn", command=fetch_data, screen=my_screen)

if __name__ == "__main__":
    run(start_screen=my_screen)
Using Headers (API Keys & Bearer Tokens)
The headers parameter lets you pass any HTTP headers as a Python dictionary. This is how you authenticate with APIs that require tokens or keys:
# Example: Calling an API protected by a Bearer token
def fetch_private_data():
    my_headers = {
        "Authorization": "Bearer YOUR_TOKEN_HERE",
        "Content-Type": "application/json"
    }
    https.get("https://api.example.com/profile", headers=my_headers, on_response=on_response)
POST Request with JSON Body
def send_data():
    payload = {"title": "My Post", "body": "Hello World", "userId": 1}
    headers = {"Content-Type": "application/json"}
    https.post(
        "https://jsonplaceholder.typicode.com/posts",
        data=payload,
        headers=headers,
        on_response=on_post_response
    )
PUT, PATCH & DELETE — Updating and Removing Resources
https.put and https.patch work exactly like https.post (URL, body, headers, callback). https.delete works like https.get (no body):
def on_done(success, response):
    if success:
        toast("Done!")
    else:
        toast("Failed: " + response)   # response = the server's error body

# PUT — replace the whole resource
def update_profile():
    https.put(
        "https://api.example.com/users/42",
        '{"name": "Alex", "email": "alex@example.com"}',
        headers={"Content-Type": "application/json"},
        on_response=on_done
    )

# PATCH — change only the fields you send
def rename_user():
    https.patch(
        "https://api.example.com/users/42",
        '{"name": "Alex J."}',
        headers={"Content-Type": "application/json"},
        on_response=on_done
    )

# DELETE — remove the resource
def delete_user():
    https.delete("https://api.example.com/users/42", on_response=on_done)
[!NOTE] PATCH on Android: Android's
HttpURLConnectiondoesn't acceptPATCHnatively, so ApkPy automatically falls back toPOSTwith the standardX-HTTP-Method-Override: PATCHheader. Most APIs (Firebase, many REST frameworks) honor it; if yours doesn't, usePUTinstead. In the Hot Previewer,PATCHis always sent natively.
Real-World Example — Weather App
from apkpy_lib import Screen, button, label, inputs, run, toast, https, json_get

API_KEY = "your_openweathermap_api_key"

weather_screen = Screen(id="weather_screen")
city_input = inputs("Enter city...", type="text", id="city_input", screen=weather_screen)
temp_label  = label("-- °C", id="temp", screen=weather_screen)
desc_label  = label("---", id="desc", screen=weather_screen)

def on_weather(success, response):
    if success:
        temp = json_get(response, "main.temp")
        desc = json_get(response, "weather.0.description")
        temp_label.set_value(f"{temp} °C")
        desc_label.set_value(desc.capitalize())
    else:
        toast("Failed to get weather.")

def get_weather():
    city = city_input.get_value()
    if city != "":
        url = f"https://api.openweathermap.org/data/2.5/weather?q={city}&appid={API_KEY}&units=metric"
        https.get(url, on_response=on_weather)

button("GET WEATHER", id="btn_weather", command=get_weather, screen=weather_screen)

if __name__ == "__main__":
    run(start_screen=weather_screen)
[!IMPORTANT] The
httpsAPI is always non-blocking. Requests always run in a background thread, so your UI will never freeze while waiting for a response. Theon_responsecallback is always called safely back on the main UI thread.
[!TIP] Use
json_get()to read specific fields from API responses without complex JSON parsing. The dot-notation supports nested objects ("main.temp") and list indices ("weather.0.description").
18. Background Services ⏱️
Sometimes your app needs to do work even when nobody's looking at it — syncing data, checking for updates, sending a reminder. The service API lets you schedule Python functions to run in the background, with the exact same code running in the Hot Previewer (on a timer thread) and on a real Android device (compiled to native WorkManager).
How It Works Under the Hood
- In the Hot Previewer: ApkPy runs your function on a background daemon thread on a timer, so you can see the effects (via
storage,db,notify, etc.) while testing locally. - On Android: ApkPy compiles your function into a dedicated
Workerclass and schedules it withWorkManager— Android's official, battery-friendly API for deferrable background work.service.every(...)becomes aPeriodicWorkRequest,service.once(...)becomes aOneTimeWorkRequestwithsetInitialDelay(...), and constraints (only_on_wifi,only_when_charging) map to nativeConstraints.Builder()calls.
[!IMPORTANT] Background functions run without a UI — they can use
storage,db,https,toastandnotify, but cannot callset_value()/get_value()on screen components directly. The recommended pattern is: write the result tostorage, then read it fromstorageinside your normal UI-refresh function.
Importing
from apkpy_lib import service
The Full API
| Function | Description |
|---|---|
service.every(run, minutes, id, only_on_wifi=False, only_when_charging=False) |
Schedules run to repeat every minutes minutes. id uniquely identifies the task (required to cancel it later). |
service.once(run, after_minutes, id) |
Schedules run to execute exactly once, after a delay of after_minutes minutes. |
service.cancel(id) |
Cancels a previously scheduled task by its id — works for both every and once. |
[!NOTE] On Android,
WorkManagerenforces a minimum interval of 15 minutes for periodic work. ApkPy automatically respects this in the compiled app — small values likeminutes=0.05are only meant for quickly testing the flow in the Previewer.
Full Example — Background Sync + Cancel Button
from apkpy_lib import Screen, button, label, run, toast, notify, storage, service

main_screen = Screen(id="main_screen")
status_label = label("Background sync: waiting for first run...", id="status", screen=main_screen)

def atualizar_ui():
    status_label.set_value(storage.get("sync_status", "Background sync: waiting for first run..."))

def sincronizar_em_background():
    count = int(storage.get("sync_count", "0")) + 1
    storage.set("sync_count", str(count))
    storage.set("sync_status", f"Background sync #{count} completed")
    notify("Sync complete", f"Background sync #{count} finished successfully.", id="bg_sync")

def parar_sincronizacao():
    service.cancel(id="bg_sync")
    storage.set("sync_status", "Background sync: stopped by the user")
    toast("Background sync cancelled.")
    atualizar_ui()

button("STOP BACKGROUND SYNC", id="btn_stop", command=parar_sincronizacao, screen=main_screen)

# Repeats every 15 minutes — only when on Wi-Fi and charging.
service.every(run=sincronizar_em_background, minutes=15, id="bg_sync",
              only_on_wifi=True, only_when_charging=True)

atualizar_ui()

if __name__ == "__main__":
    run(start_screen=main_screen)
19. System Notifications 🔔
notify() shows a real notification in the phone's notification bar — unlike toast(), which only appears while the app is open, a notification stays visible (and can re-open the app) even after the user has switched to another app or locked the phone. It's the natural companion to service: tell the user something happened, without needing the app in the foreground.
How It Works Under the Hood
- In the Hot Previewer: shows a native OS-style popup so you can preview the title and message.
- On Android: compiles to
NotificationCompat.Builder+NotificationManager, including a notification channel (required on Android 8+) and the runtimePOST_NOTIFICATIONSpermission request (required on Android 13+).
Importing
from apkpy_lib import notify
Usage
notify("New message", "You have 3 unread notifications", id="inbox")
notify("Sync complete", f"Background sync #{count} finished successfully.", id="bg_sync")
The id parameter uniquely identifies the notification — sending another notify() with the same id updates/replaces the existing notification instead of stacking a new one.
20. Native Sharing 📤
share() opens Android's native share sheet — the same system menu you see when you tap the "share" icon in any app — letting the user send text to WhatsApp, Email, SMS, Bluetooth, or any other app that accepts shared text.
How It Works Under the Hood
- In the Hot Previewer: opens a popup that mimics the Android share sheet, listing common apps. Picking one just closes the popup (it doesn't actually send anything) — it's there so you can test the flow visually.
- On Android: compiles to
Intent.ACTION_SENDwrapped inIntent.createChooser(...), withFLAG_ACTIVITY_NEW_TASKso it works from both regular screens and background services.
Importing
from apkpy_lib import share
Usage
share("Check out this app I built with ApkPy! 🚀")
share(f"My app already has {total} registered users!", title="Share result")
| Parameter | Description |
|---|---|
text |
The text content to share (required). |
title |
Optional title shown at the top of the share sheet. Defaults to "Share via". |
21. Clipboard 📋
clipboard.copy() copies text to the device's system clipboard — perfect for sharing links, generated codes, or query results that the user might want to paste somewhere else.
How It Works Under the Hood
- In the Hot Previewer: writes to the real OS clipboard via Tkinter — pressing
Ctrl+Vin any other app on your computer pastes the actual copied text. - On Android: compiles to native
ClipboardManager/ClipData.newPlainText(...).
Importing
from apkpy_lib import clipboard
Usage
clipboard.copy("https://my-app-link.example.com")
clipboard.copy(f"My app has {total} registered users!")
toast("Copied to clipboard!")
22. Camera & Gallery 📸
camera.capture() opens the device's native camera app to take a photo, and gallery.pick() opens the native image picker to choose an existing photo — both return the result asynchronously through an on_result(success, path) callback, following the exact same async pattern as https.get/post.
How It Works Under the Hood
- On Android:
camera.capture()launches the system camera app viaActivityResultContracts.TakePicture(), requesting theCAMERAruntime permission automatically and writing the photo to acontent://URI through aFileProvider(so the camera app can write into your app's private storage safely).gallery.pick()launches the system image picker viaActivityResultContracts.GetContent()— this is scoped-storage compliant and does not require any storage permission on modern Android. Both deliver the resultingcontent://path to youron_resultcallback once the user finishes. - In the Hot Previewer: your computer obviously doesn't have a "camera app" or a "photo gallery" — so both functions simulate the flow by opening your OS's file explorer (filtered to image files). Whatever image file you pick is treated as "the photo you took" / "the image you chose", and your
on_resultcallback receives its real path on disk. This keeps your Python code 100% identical between testing on your PC and running on a real phone — only what happens "behind the scenes" changes.
Importing
from apkpy_lib import camera, gallery
Usage
def foto_tirada(success, path):
    if success:
        lbl_foto.set_value(f"Photo taken: {path}")
        toast("Photo captured!")
    else:
        toast("No photo was taken.")

def imagem_escolhida(success, path):
    if success:
        lbl_foto.set_value(f"Picked from gallery: {path}")
        toast("Image picked!")
    else:
        toast("No image was picked.")

button("TAKE PHOTO", command=lambda: camera.capture(on_result=foto_tirada), screen=main)
button("PICK FROM GALLERY", command=lambda: gallery.pick(on_result=imagem_escolhida), screen=main)
| Function | Description |
|---|---|
camera.capture(on_result=callback) |
Opens the native camera, takes a photo, and calls callback(success, path). Auto-declares the CAMERA permission and sets up FileProvider for you — no manifest editing required. |
gallery.pick(on_result=callback) |
Opens the native image picker and calls callback(success, path) with the chosen image's path. No extra permissions needed. |
Note:
pathis acontent://URI on Android (use it directly withimage(),https.postfor uploads, etc.) and a regular filesystem path in the Previewer — your callback code doesn't need to know the difference.
23. Alert & Confirm Dialogs 🗨️
ApkPy provides two functions for showing native dialog boxes — identical code between the Hot Previewer and a real Android device.
alert(title, message) — Informational Dialog
Shows a dialog with a title, a message, and an OK button. Use it to inform the user of something that doesn't require a decision.
from apkpy_lib import alert

def save_data():
    # ... save logic ...
    alert("Saved!", "Your data has been saved successfully.")

def show_error():
    alert("Connection Error", "Could not reach the server. Please check your internet connection.")
confirm(title, message, on_result=callback) — Confirmation Dialog
Shows a dialog with OK and Cancel buttons. Calls on_result(True) if the user taps OK, on_result(False) if they tap Cancel. Follows the same async on_result pattern as camera.capture and gallery.pick.
from apkpy_lib import confirm, storage, toast

def on_delete_confirmed(confirmed):
    if confirmed:
        storage.clear()
        toast("All data deleted.")
    else:
        toast("Cancelled.")

def delete_all():
    confirm(
        "Delete all data?",
        "This will permanently erase all saved data. This action cannot be undone.",
        on_result=on_delete_confirmed
    )
How It Works Under the Hood
| Environment | What alert / confirm use |
|---|---|
| Hot Previewer (your computer) | A native Tkinter dialog window with English "OK" / "Cancel" buttons |
| Android Build (real device) | Native androidx.appcompat.app.AlertDialog.Builder — the standard Android dialog |
Full Example
from apkpy_lib import Screen, button, label, inputs, toast, alert, confirm, storage, run

main = Screen(id="main")

label("Settings", id="title", screen=main)
status = label("No action yet.", id="status", screen=main)
name_input = inputs("Your name", id="inp_name", screen=main)

def save():
    name = name_input.get_value()
    if name:
        storage.set("name", name)
        alert("Saved!", f"The name '{name}' was saved successfully.")
        status.set_value(f"Saved: {name}")
    else:
        alert("Missing name", "Please type a name before saving.")

def on_clear_confirmed(confirmed):
    if confirmed:
        storage.clear()
        status.set_value("All data cleared.")
        toast("Done!")
    else:
        status.set_value("Cancelled.")

def clear_data():
    confirm("Clear all data?", "This will erase everything. Are you sure?", on_result=on_clear_confirmed)

button("SAVE NAME",   id="btn_save",  command=save,       screen=main)
button("CLEAR DATA",  id="btn_clear", command=clear_data, screen=main)

style = """
main { background-color: #0F172A; }
title { color: #F8FAFC; font-size: 22px; font-weight: bold; margin-top: 28px; }
status { color: #38BDF8; font-size: 13px; margin-bottom: 8px; }
inp_name { background-color: #1E293B; color: #F8FAFC; border-radius: 10px; border-color: #334155; border-width: 1px; focus-border-color: #818CF8; }
btn_save { background-color: #4F46E5; color: #F8FAFC; border-radius: 12px; font-weight: bold; margin-top: 6px; pressed-color: #3730A3; }
btn_clear { background-color: #1E293B; color: #F87171; border-radius: 12px; font-weight: bold; margin-top: 6px; border-color: #F87171; border-width: 1px; pressed-color: #0F172A; }
"""

if __name__ == "__main__":
    run(start_screen=main)
24. Location / GPS 📍
location.get_current(on_result=callback) reads the device's current location and returns the latitude, longitude and city name asynchronously through an on_result(success, lat, lng, city) callback — the same async pattern as camera.capture and https.
How It Works Under the Hood
| Environment | What location uses |
|---|---|
| Hot Previewer (your computer) | Your PC has no GPS, so it opens a small dialog where you type the coordinates to simulate (defaults to Lisbon 38.7223,-9.1393). The city name is then resolved via OpenStreetMap (Nominatim) in a background thread. |
| Android Build (real device) | Native LocationManager.getLastKnownLocation() (GPS, falling back to network), then android.location.Geocoder to turn the coordinates into a city name — off the UI thread. The ACCESS_FINE_LOCATION and INTERNET permissions are declared automatically, and ACCESS_FINE_LOCATION is requested at runtime — no manifest editing needed. |
Your Python code is 100% identical in both environments.
Importing
from apkpy_lib import location
Usage
from apkpy_lib import Screen, button, label, toast, location, run

main = Screen(id="main")
coords_lbl = label("Tap the button to locate me", id="coords", screen=main)

def on_location(success, lat, lng, city):
    if success:
        coords_lbl.set_value(f"{city} ({lat}, {lng})")
        toast("Location found! 📍")
    else:
        toast("Couldn't get your location.")

button("WHERE AM I?", id="btn_loc",
       command=lambda: location.get_current(on_result=on_location),
       screen=main)

if __name__ == "__main__":
    run(start_screen=main)
| Function | Description |
|---|---|
location.get_current(on_result=callback) |
Reads the current position and calls callback(success, lat, lng, city). Auto-declares ACCESS_FINE_LOCATION + INTERNET and requests location at runtime. |
The on_result callback always receives four arguments:
success—Trueif a location was obtained,Falseotherwise.lat— latitude as a string, e.g."38.7223"(or""on failure).lng— longitude as a string, e.g."-9.1393"(or""on failure).city— the resolved city name, e.g."Lisbon". May be""if the device has no geocoding backend or there is no network —successis stillTruein that case, since the coordinates were obtained.
[!TIP]
latandlngare strings (like everyget_value()). Convert withfloat(lat)before doing distance maths. Raw GPS only ever gives you numbers — the human-readablecitycomes from reverse geocoding the coordinates.
[!NOTE] On Android, the first tap may return
success=Falsewhile the permission dialog is showing — the user grants it, then taps again. This is the same flow ascamera.capture.
25. Crypto / Password Hashing 🔒
Anyone can decompile an APK. If your app stores a password as plain text in storage (SharedPreferences) or in the SQLite db, it is exposed to anyone with a free decompiler. The built-in crypto module solves this with salted password hashing — and you don't need to import hashlib: it's part of ApkPy and compiles to native Java (java.security.MessageDigest + SecureRandom), with zero extra dependencies.
from apkpy_lib import Screen, label, inputs, button, toast, storage, crypto, run

login = Screen(id="login")

pw_in  = inputs("Password", id="pw_in", type="password", screen=login)
status = label("Register first.", id="status", screen=login)

def register():
    senha = pw_in.get_value()
    # Stores "sha256$<random salt>$<hash>" — never the password itself.
    storage.set("pw_hash", crypto.hash_password(senha))
    toast("Registered!")

def do_login():
    senha = pw_in.get_value()
    ok = crypto.verify_password(senha, storage.get("pw_hash", ""))
    if ok:
        status.set_value("Welcome back!")
    else:
        status.set_value("Wrong password.")

button("REGISTER", id="btn_reg", screen=login, command=register)
button("LOGIN",    id="btn_log", screen=login, command=do_login)

if __name__ == "__main__":
    run(start_screen=login)
| Function | Description |
|---|---|
crypto.hash_password(password, algo="sha256", iterations=200000) |
Generates a random 16-byte salt and returns "pbkdf2-algo$iterations$salt$hash". Uses PBKDF2 key stretching: every brute-force guess costs 200,000 hashes instead of 1, making GPU cracking ~200,000× slower. Use algo="sha512" for SHA-512. Store the result directly in storage or db. |
crypto.verify_password(password, stored) |
Returns True if the password matches a value created by hash_password, False otherwise (including malformed/empty stored values). Uses a constant-time comparison. |
crypto.encrypt(text) |
Two-way encryption with a per-device key. Returns "enc1$…" — store it in storage or db and read it back with decrypt. On Android, AES-256-GCM with the key in the Android Keystore (hardware-backed, non-extractable — even with root). |
crypto.decrypt(stored) |
Decrypts a value created by encrypt. Returns "" if the value was tampered with, is malformed, or was created on another device. |
How It Works Under the Hood
| Environment | What crypto uses |
|---|---|
| Hot Previewer (PC) | Python's hashlib.pbkdf2_hmac + os.urandom + hmac.compare_digest; encryption via a hash-based stream cipher + HMAC with a local device key file. |
Android (apkpy build) |
PBKDF2 via native javax.crypto.Mac (HMAC-SHA256/512), AES-256-GCM via javax.crypto.Cipher with an Android Keystore key — no external libraries, no new permissions. |
The hash format "pbkdf2-algo$iterations$salt_hex$hash_hex" is bit-for-bit identical on both platforms — a hash created in the Previewer verifies on Android and vice-versa. Encrypted values (enc1$…) are per-device by design: stealing the file is useless without the device's key.
What this protects you from (honest threat model)
| Attack | Protected? |
|---|---|
| Decompiling the APK looking for passwords/keys | ✅ Nothing sensitive is in the code |
Stealing apkpy_storage.xml / the SQLite file |
✅ Storage is encrypted automatically; db fields you wrapped in crypto.encrypt are unreadable |
| GPU brute-force against stolen password hashes | ✅ PBKDF2 makes each guess ~200,000× more expensive |
| Brute-forcing AES-encrypted values | ✅ Impossible in practice — the key is 256 random bits, not derived from a password |
| SQL injection through an input field | ✅ Use db.execute(sql, [params]) / db.query(sql, [params]) — values are bound by SQLite, never pasted into the SQL (see section 16) |
Trivially weak passwords (e.g. 1234) + stolen hash |
⚠️ PBKDF2 slows the attack massively but can't make a 4-digit PIN safe — encourage strong passwords |
| An attacker using the unlocked phone with the app open | ❌ No cryptography protects against that |
[!IMPORTANT] Because the salt is random, every call to
hash_passwordproduces a different string — even for the same password. Never compare two hashes directly; always usecrypto.verify_password.
[!TIP] Hash what you only need to verify (passwords, PINs). Encrypt what you need to read back (notes, emails, tokens).
storage.set()already encrypts automatically — usecrypto.encryptfor sensitive db fields.
26. For Loops — real Python iteration 🔁
for loops now compile to native Java. Write normal Python; the same loop runs in the Hot Previewer and on Android.
Three forms are supported:
# 1. Over a list (literal or variable)
for cidade in ["Lisboa", "Porto", "Braga"]:
    toast(cidade)

frutas = ["Maçã", "Pera"]
for f in frutas:
    db.execute("INSERT INTO itens (nome) VALUES (?)", [f])

# 2. Counting with range()
for i in range(5):          # 0..4  — range(2, 8) also works
    status.set_value(f"step {i}")

# 3. Over rows from the database or an API  ⭐
rows = db.query("SELECT nome, idade FROM pessoas")
for row in rows:
    toast(f"{row['nome']} tem {row['idade']} anos")
Form 3 is the big one: db.query() results and https responses are iterable row-by-row. Inside the loop, row["column"] reads each field — in the Previewer it's a real dict, on Android it compiles to safe JSON access (_jsonGet). The same works in an HTTP callback:
def on_posts(ok, resp):
    if ok:
        for post in resp:                 # resp = JSON array from the API
            db.execute("INSERT INTO cache (title) VALUES (?)", [post["title"]])

https.get("https://example.com/api/posts", on_response=on_posts)
Loops work inside callbacks, at module level (they run on app start), nested, and combined with if/else in the body. break and continue are supported — they compile to native Java break;/continue;:
for i in range(100):
    if i == 5:
        break            # stops the loop
    if i == 2:
        continue         # skips to the next item
    status.set_value(f"i = {i}")
| Where the data comes from | What each item is |
|---|---|
| List literal / list variable | The value as a string |
range(n) / range(a, b) |
The counter as a string |
db.query(...) |
A row — read fields with row["column"] |
https response (JSON array) |
An object — read fields with item["field"] |
[!NOTE] If the JSON isn't an array (an object, plain text, an error page), the loop simply runs zero times on both platforms — it never crashes the app.
forover dicts is not supported yet.
27. random — randomness bundled in apkpy_lib 🎲
random ships with apkpy_lib — import it straight from the library, no need for Python's stdlib random. It compiles to native Android (java.util.Random / Math.random()), with no runtime bundled.
from apkpy_lib import random

n     = random.randint(1, 6)                      # integer in [a, b] (both ends included)
prize = random.choice(["Gold", "Silver", "Bronze"])  # random element of a list
p     = random.random()                           # float in [0.0, 1.0)
It pairs naturally with functions that return a value:
def roll_dice():
    return random.randint(1, 6)

def play():
    result.set_value("You rolled " + str(roll_dice()))
| Call | Android equivalent |
|---|---|
random.randint(a, b) |
java.util.Random().nextInt(...), result in [a, b] |
random.choice(list) |
a random element of the list |
random.random() |
Math.random() (0.0–1.0) |
[!NOTE] Random values won't match between the Previewer (Python's
random) and Android (java.util.Random) — and that's correct. Unlike arithmetic, the guarantee here isn't "same number", it's "both sides produce a valid random result in range".
28. Preview on any device size — device(...) 📱
A Previewer-only helper to see your app at different screen sizes while you build. It does nothing on Android — there the real screen already is the device, so device(...) is stripped from the build and never changes the generated APK.
from apkpy_lib import device

device("Pixel 8")         # resize the preview window to that model
device("Pixel 9 Pro XL")  # a bigger screen
device("fullscreen")      # borderless full screen (press Esc to exit)
device("maximized")       # maximised window, keeps the title bar (X to close)
Call it once at module level (before run()). Without it, the preview defaults to the Pixel 9. Every Pixel from the Pixel 4 to the Pixel 10 Pro is accepted — models that share a screen size map to the same dimensions. In fullscreen / maximized, the content stays in a centred phone-width column.
29. More Python, natively 🐍
Several core Python constructs now transpile to native Java — write normal Python, get the same behaviour in the Hot Previewer and on Android.
f-strings — f"...{value}..."
Drop variables and expressions straight into text, instead of gluing strings with + and str():
nome = "Ana"
preco = 12.5
recibo.set_value(f"Olá {nome}! Total: {preco:.2f} €")   # → "Olá Ana! Total: 12.50 €"
{var}inserts the value;{a + b}runs the arithmetic inline.- A format spec like
{preco:.2f}fixes the decimals (great for money) — it compiles toString.format(Locale.US, "%.2f", ...), so the result matches Python exactly.
while loops
i = 0
total = ""
while i < 5:
    total += str(i)
    i += 1
status.set_value(total)        # "01234"
Conditions support the same set as if (<, >, ==, and/or/not, …). break and continue work inside. On Android, an automatic safety limit stops an accidental infinite loop from freezing the UI thread.
Augmented assignment — +=, -=, *=, /=, %=
total = 0
total += 5      # same as: total = total + 5
total -= 2
texto = ""
texto += "!"    # with strings it concatenates
It works as a loop counter (i += 1) and reads state straight from a label for a no-fuss counter:
def mais():
    n = int(mostrador.get_value())
    n += 1
    mostrador.set_value(str(n))
.isdigit() — validate input before converting
int("") and int("abc") crash on both platforms — but the Previewer just logs and survives, while Android force-closes. Always check first:
valor = campo.get_value()
if valor.isdigit():
    n = int(valor)
    resultado.set_value(f"O dobro é {n * 2}")
else:
    resultado.set_value("Escreve um número válido!")
Compiles to String.valueOf(valor).matches("\\d+") — same truth value as Python ("123" → yes, "12a" / "" → no).
.startswith(x) / .endswith(x) — check prefixes & suffixes
Two string checks for validating and filtering — perfect for emails, links, codes and file names. Use them inside an if (like .isdigit()):
url = url_in.get_value()
if not url.startswith("https://"):
    aviso.set_value("⚠️ Não é seguro (falta https://)")
elif url.endswith(".pt"):
    aviso.set_value("✅ Site português 🇵🇹")
else:
    aviso.set_value("✅ Seguro")
They map directly to Java's own .startsWith(...) / .endsWith(...) — so the result is identical to Python on both sides.
30. datetime — date & time bundled in apkpy_lib 🕐
Like random, datetime ships with apkpy_lib — no Python stdlib import. Everything returns a string and compiles to native SimpleDateFormat on Android.
from apkpy_lib import datetime

datetime.now()     # "2026-06-16 14:30:45"
datetime.date()    # "2026-06-16"
datetime.time()    # "14:30:45"
datetime.hour()    # "14"   (also year/month/day/minute/second)
A greeting based on the current hour:
def atualizar():
    hora = int(datetime.hour())
    if hora < 12:
        saudacao.set_value("Bom dia ☀️")
    elif hora < 20:
        saudacao.set_value("Boa tarde 🌤️")
    else:
        saudacao.set_value("Boa noite 🌙")
    relogio.set_value(datetime.date() + "\n" + datetime.time())
| Call | Android equivalent (pattern) |
|---|---|
datetime.now() |
SimpleDateFormat("yyyy-MM-dd HH:mm:ss") |
datetime.date() |
SimpleDateFormat("yyyy-MM-dd") |
datetime.time() |
SimpleDateFormat("HH:mm:ss") |
datetime.hour() / minute() / second() |
HH / mm / ss |
datetime.year() / month() / day() |
yyyy / MM / dd |
[!NOTE] The format is identical on both sides, but the exact second won't match between the Previewer and Android — they're two clocks read a moment apart, just like
random.
31. from apkpy_lib import * 📦
Import the whole library in one line:
from apkpy_lib import *

home = Screen(id="home")
label("Hi", id="t", screen=home)
run(start_screen=home)
It brings every public name — Screen, label, button, inputs, container, list_view, run, storage, crypto, db, https, random, datetime, and the rest. (container — the box for grouping/nesting components and laying them out in a row with display: flex; flex-direction: row — is now exported too.)
32. Ship your app — name, icon & signed releases 📦🔑
Two pieces turn your code into a real, publishable app: an apkpy.toml that gives it an identity, and apkpy release that produces a signed build for the Play Store.
apkpy.toml — your app's identity
Run apkpy init once to create it, then edit:
[app]
name = "Link Checker"                         # shown under the icon on the phone
application_id = "com.mycompany.linkchecker"   # unique Play Store id (don't change after publishing)
version_name = "1.0"                           # the version users see
version_code = 1                               # bump by 1 on every release
icon = "icon.png"                              # optional: a square PNG (needs Pillow)
apkpy run / apkpy build pick it up automatically — the name becomes the launcher label, the icon is generated in every density, and application_id / version_* flow into the build. If there's no apkpy.toml (and no --name), apkpy run simply asks you for the name the first time and saves it.
Before this, every app was hardcoded to show "ApkPy App" under the icon — now you control it.
apkpy release — a signed build for the Play Store
apkpy release          # signed .apk (installs on any phone — no "unsigned" error)
apkpy release --aab    # .aab App Bundle — the format Google Play requires
The first time, ApkPy creates a signing key (keystore) for your app and stores it under ~/.apkpy/keystores/. Every future release reuses the same key — which is exactly what the Play Store needs to accept updates.
[!IMPORTANT] Back up that keystore file. If you lose it, you can never publish another update of the same app on the Play Store. It's a binary file — opening it in a text editor shows gibberish (that's normal); inspect it properly with
keytool -list -v -keystore <path>.
A note on the install warnings
When you sideload a signed .apk (install it directly, not from the Play Store), Android still shows an "unknown developer" / Play Protect warning and offers to scan it. That's normal for every app installed outside the Play Store — signing makes the app installable and store-ready, but the warnings only disappear once the app is actually published on the store and installed from there.
🤝 Community & Support
Found a bug? Open an issue on GitHub!
Want to contribute? We are looking for contributors to expand our Native Component library! Join us in making Python a first-class citizen for Android development.
📚 Full Documentation
This README covers the core features, but ApkPy has much more to offer. Our full documentation goes deeper into:
- Advanced multi-screen architectures & navigation stacks
- Deploying to the Google Play Store
- Customizing
build.gradleandAndroidManifest.xml - Using GitHub Actions to build APKs in the cloud (no local SDK needed)
- Full API reference for every component and CSS property
👉 View the ApkPy Repository on GitHub
Made with ❤️ for the Python Community.
Release history Release notifications | RSS feed


Download files
Download the file for your platform. If you're not sure which to choose, learn more about installing packages.
Source Distribution
Built Distribution
Filter files by name, interpreter, ABI, and platform.
If you're not sure about the file name format, learn more about wheel file names.
Copy a direct link to the current filters
File details
Details for the file apkpy-1.1.0.tar.gz.
File metadata
- Download URL: apkpy-1.1.0.tar.gz
- Upload date:
- Size: 513.4 kB
- Tags: Source
- Uploaded using Trusted Publishing? No
- Uploaded via: twine/6.2.0 CPython/3.13.12
File hashes
| Algorithm | Hash digest | |
|---|---|---|
| SHA256 |
e2630e96c13d584a7e8529103bed8201dcdb1504513e241aa6cee31d947adefc
|
|
| MD5 |
3368253535c84412393266f3a6dc1632
|
|
| BLAKE2b-256 |
208ec159327294aed2a1849cd254e14f6aab1a0642c0f8e5e7fb0fb97cefa2ae
|
File details
Details for the file apkpy-1.1.0-py3-none-any.whl.
File metadata
- Download URL: apkpy-1.1.0-py3-none-any.whl
- Upload date:
- Size: 430.7 kB
- Tags: Python 3
- Uploaded using Trusted Publishing? No
- Uploaded via: twine/6.2.0 CPython/3.13.12
File hashes
| Algorithm | Hash digest | |
|---|---|---|
| SHA256 |
d7e0a89d0850ab915c7cd544260cc23c49ced7a670b83de0dd1153b5b4663384
|
|
| MD5 |
8e9d076cd8142e3d10e63e795c8797de
|
|
| BLAKE2b-256 |
39d4d059ca53f7fc444911bb1ac7f374db3a5576f873bc65d5b2fe64c1353470
|






