
Manage AI artifacts across multiple configurations, tools, & repositories

Project description
Artifactr
A cross-platform CLI tool for managing AI project artifacts. Maintain a personal library of skills, agents, and commands in centralized "vaults" and import them into any git repository for use with AI coding assistants.
Installation • Quickstart • The Essentials • Extended Usage • Vault Structure
Why? 🤔
AI coding agents accumulate configs — skills, agents, commands — and they're usually project-local. Starting a new repo often means rebuilding your environment from scratch.
I develop mostly in cloud VMs via ssh and tmux for security purposes. I got tired of rebuilding my setup every time and desperately wanted a terminal-centric solution. Lo-and-behold: Artifactr
It takes inspiration from local-first note-taking applications like Obsidian and Logseq. No external connections are made. Your vaults contain YOUR files.
Vaults are where you store artifacts. "Artifact" is a shorter way of saying "a file or folder used with LLM tools." Currently, the tool supports standard Skills, Commands, and Agents.
Installation
Requires Python 3.10+
It's easiest to globally install artifactr via pipx, which auto-configures a separate python virtual environment (venv) for you:
pipx install artifactr
Otherwise, you can install via pip, though it's recommended to use a non-system venv.
pip install artifactr
To use a non-system venv, find a good folder to put the new environment in, cd into it, and:
- *(NOTE: You will have to
sourcethis venv whenever you want to useartifactr)
python -m venv .venv # <-- creates a venv in a new folder named ".venv"
source .venv/bin/activate # <-- use this python env for all `python` execution
pip install artifactr
Quickstart
art vault init ~/my-new-vault --name favorites # Scaffold a new vault
art store ~/repos/existing-project # Store any existing skills/commands/agents from a repo (AKA artifacts) into your new vault
art tool select claude # Select your choice of agentic tool (opencode/claude/codex || or add your own with `art tool add`)
art project import ~/repos/new-project --link # Import artifacts into your project, using symlinks for automatic syncing
art config import --link # Import artifacts into your selected tool's global configs, using symlinks for automatic syncing
The Essentials
Creating a New Vault
Create a vault with:
art vault init /path/to/your/vault
If the target folder does not exist, the program will make it for you.
If you have no other vault at this point, the program will automatically assign this vault as your default.
Adding an Existing Vault
If you have an existing vault, simply run:
# (Adding a shorthand name is convenient!)
art vault add /path/to/your/vault --name favs
If you have no other vault at this point, the program will automatically assign this vault as your default.
Select Your Preferences
Choose your preferred default vault with:
art vault select {vault_name || path/to/your/vault} # You can use a vault's name or its filepath for vault operations
Choose your preferred coding agent tool with:
art tool select {tool_name} # You can add support for more tools with `art tool add` (see below)
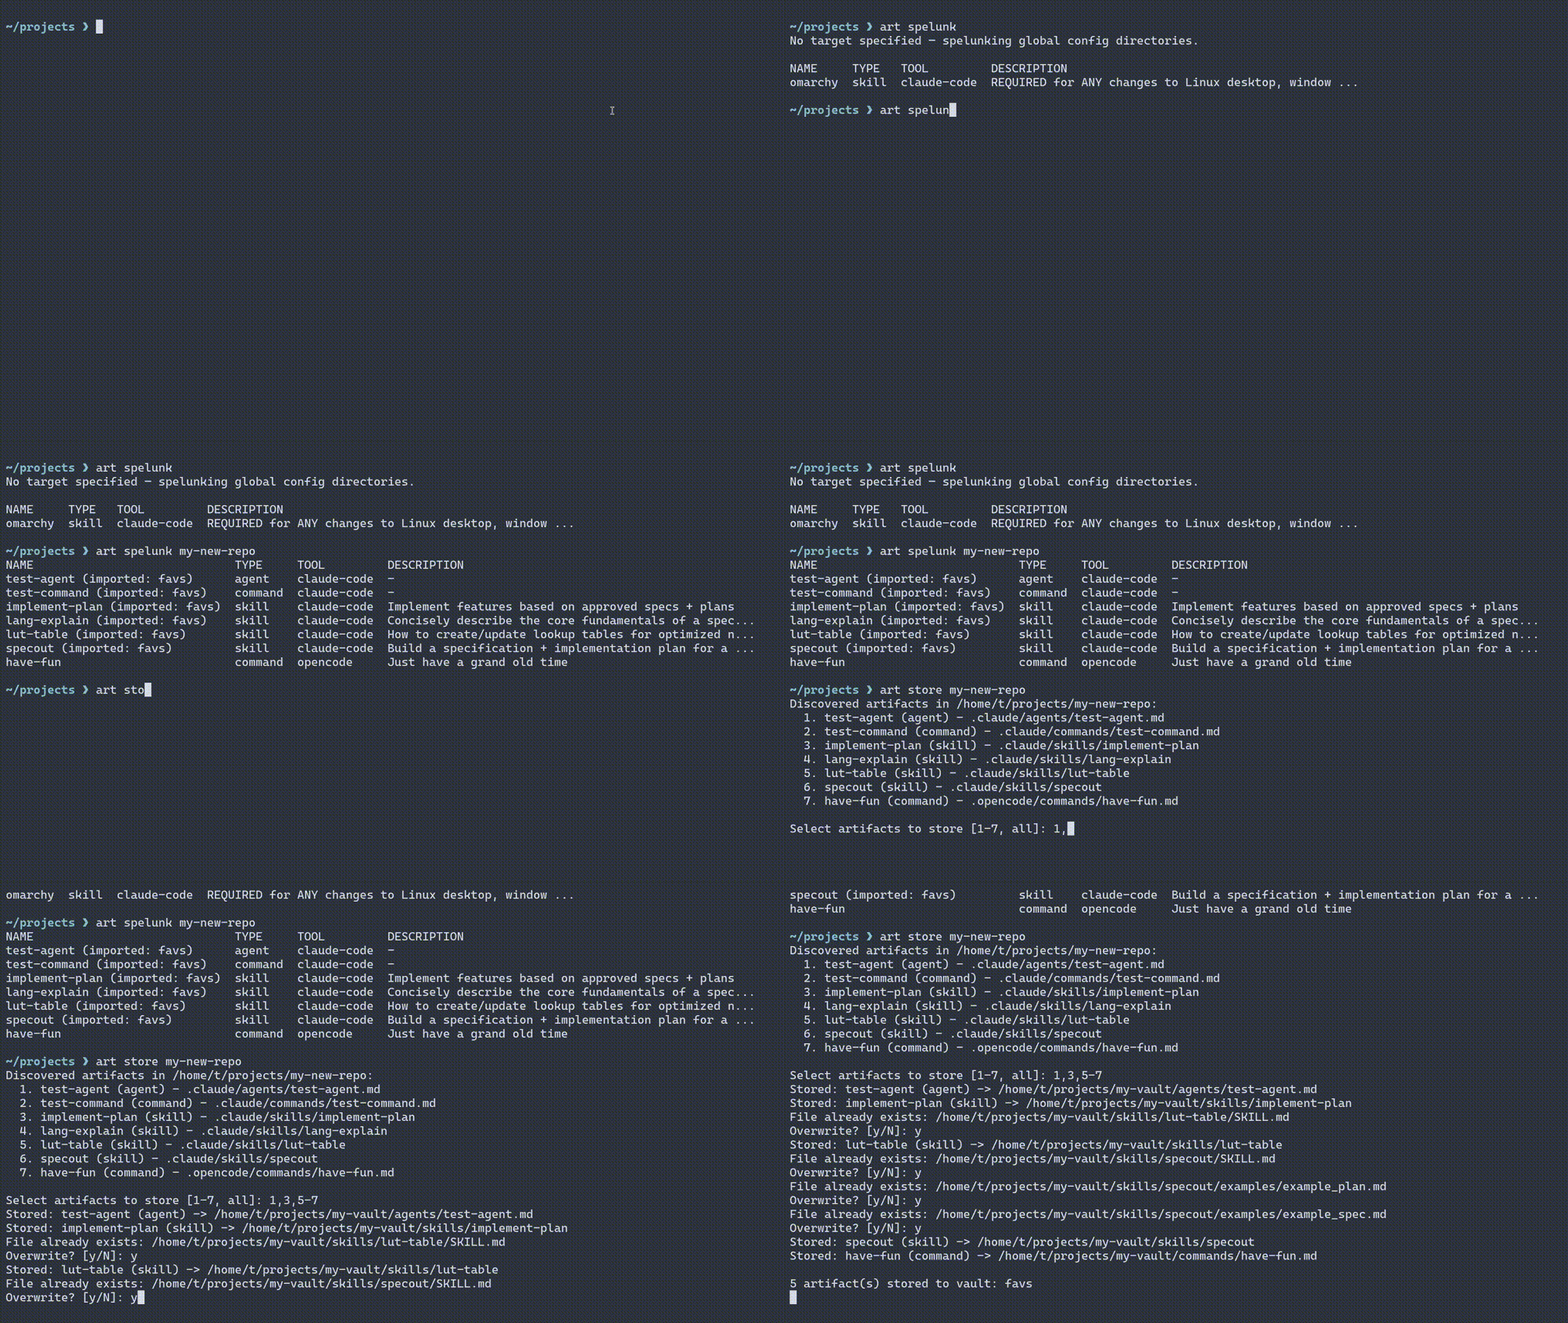
spelunk For and store Artifacts
You can discover new artifacts with art spelunk.
Without any target specified, it will list artifacts found in all tool-specific global config directories.
When given a target directory, it will for search for config folders of all supported tools (.claude, .opencode, .agents, etc.) and the artifacts they contain.
spelunk can also explore the contents of other vaults.
You can art store what you discover into your vault(s). If a target artifact's name conflicts with an existing one in your vault(s), a confirmation prompt will appear:
Removing Artifacts
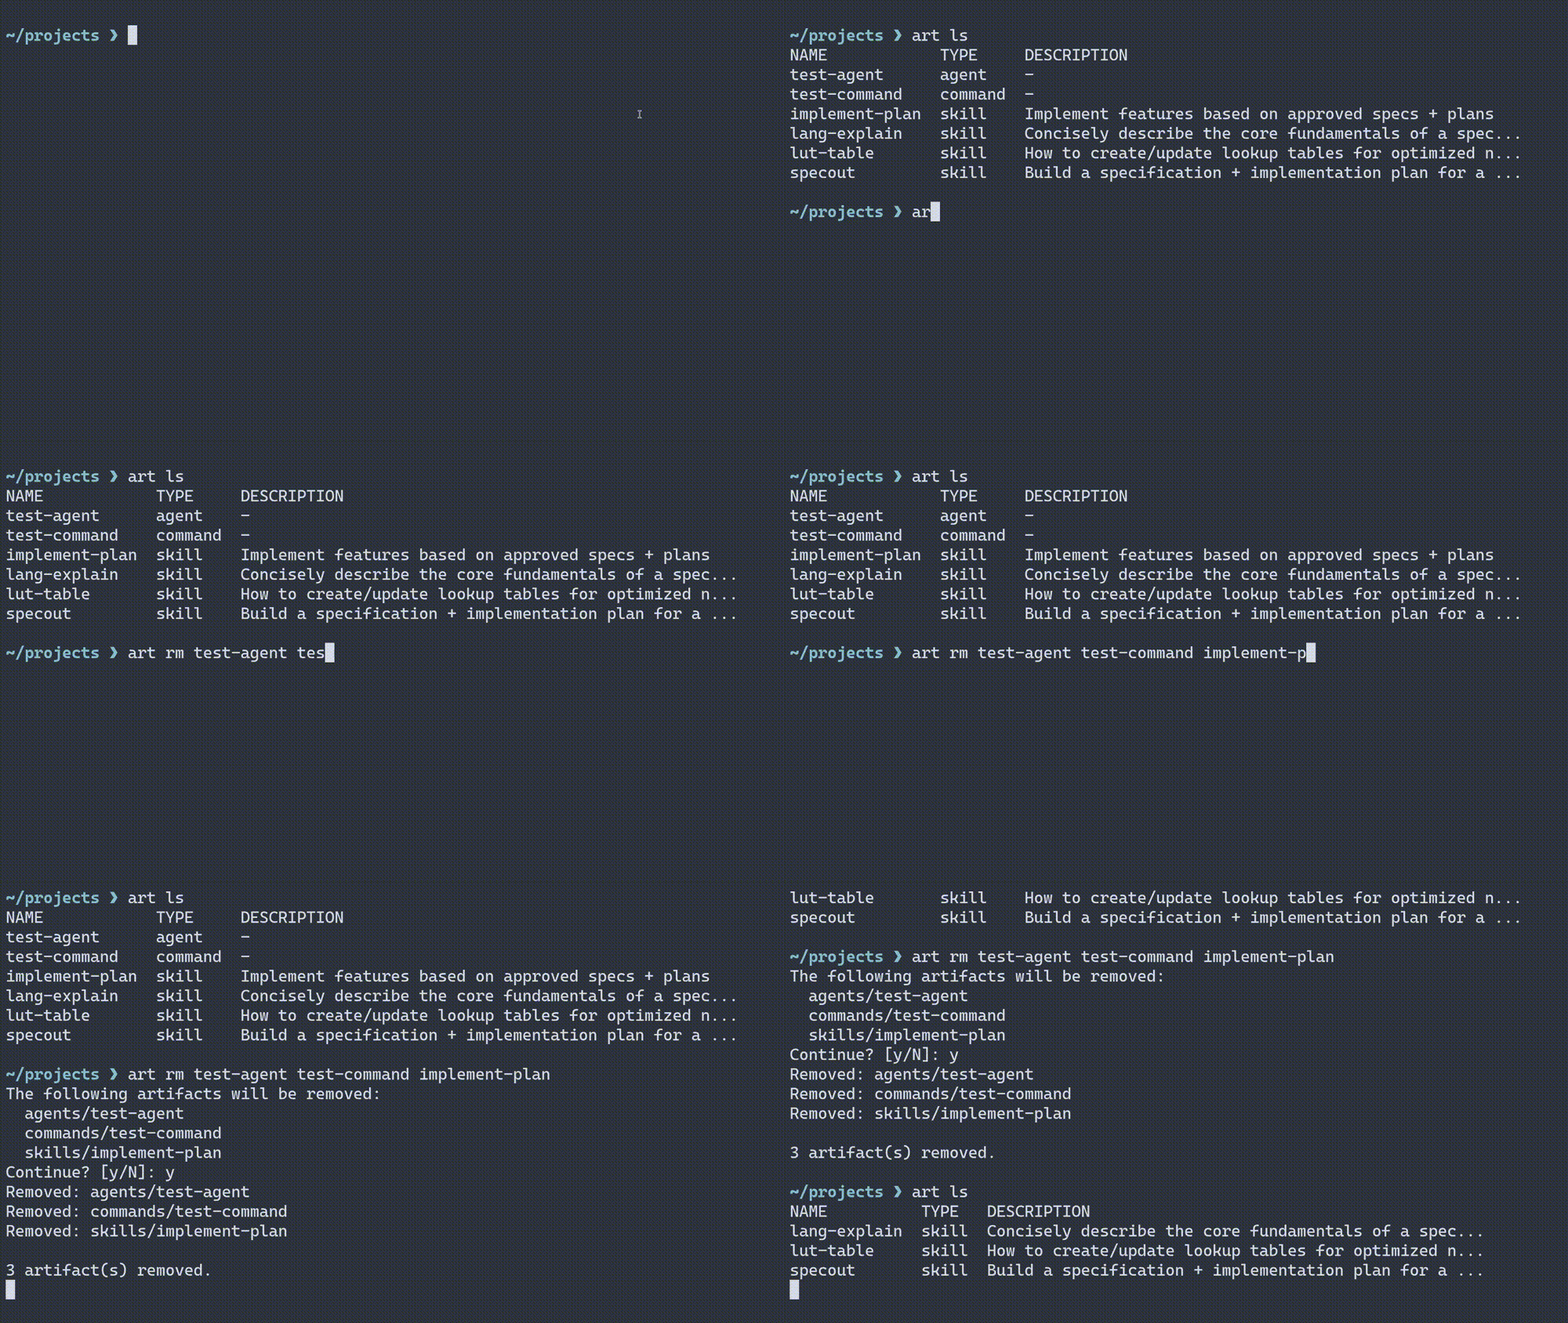
You can remove any number of artifacts from a vault with a single art rm command:
Importing Artifacts
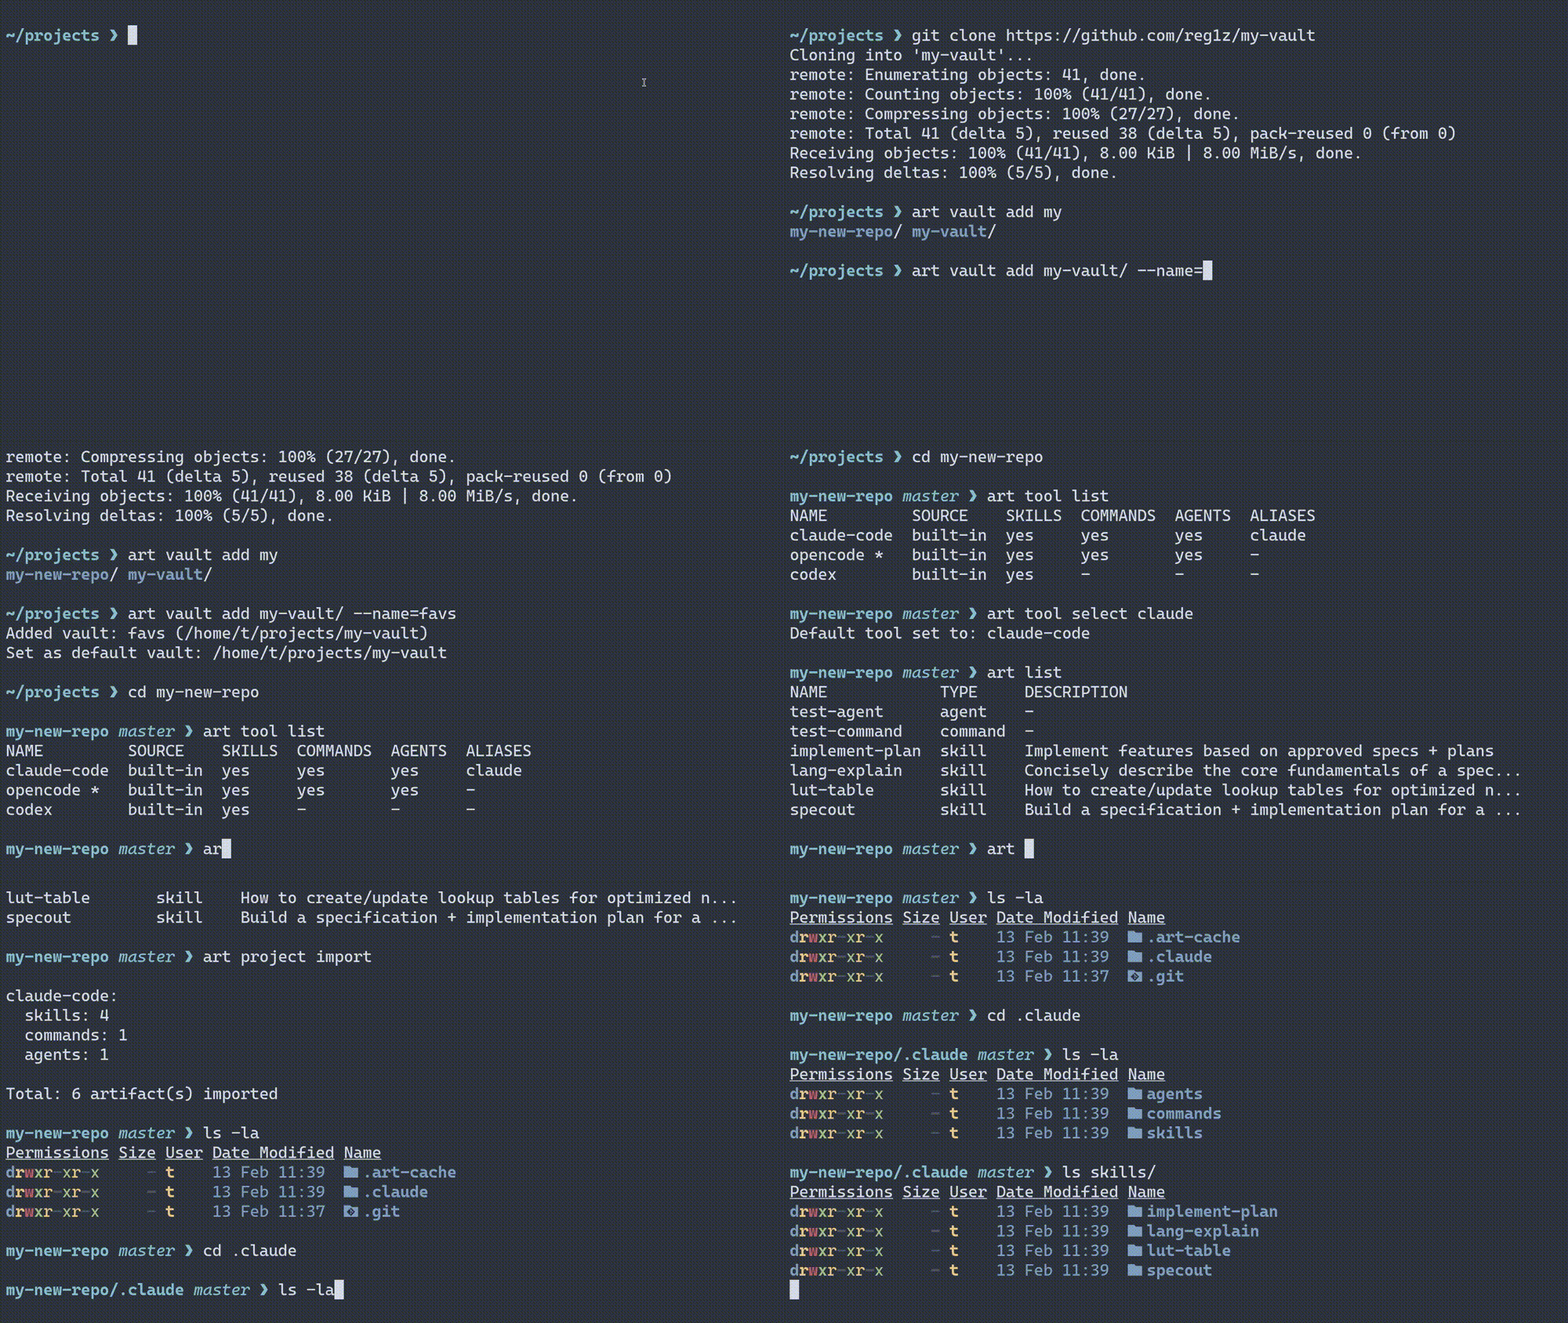
To get your skills, agents, and commands into a project or tool config, you import them:
art project import {optional/target/path} # Without a target path, defaults to the current working directory.
art config import # Same syntax, different location. Defaults to the global user config location of your currently selected coding agent. You can specify specific tools to import to with the `--tools` flag.
Syncing Artifacts Automatically
If you'd like your skill/command/agent definitions to update automatically while editing the contents of a vault, just use the --link / -l flag when importing artifacts into a project or tool config.
Rather than a direct copy-paste, this creates a symbolic link between vault content and the import target. Whenever you update an artifact in your vault, those changes will instantly be reflected wherever you imported them using --link.
art project import --link
art config import --link
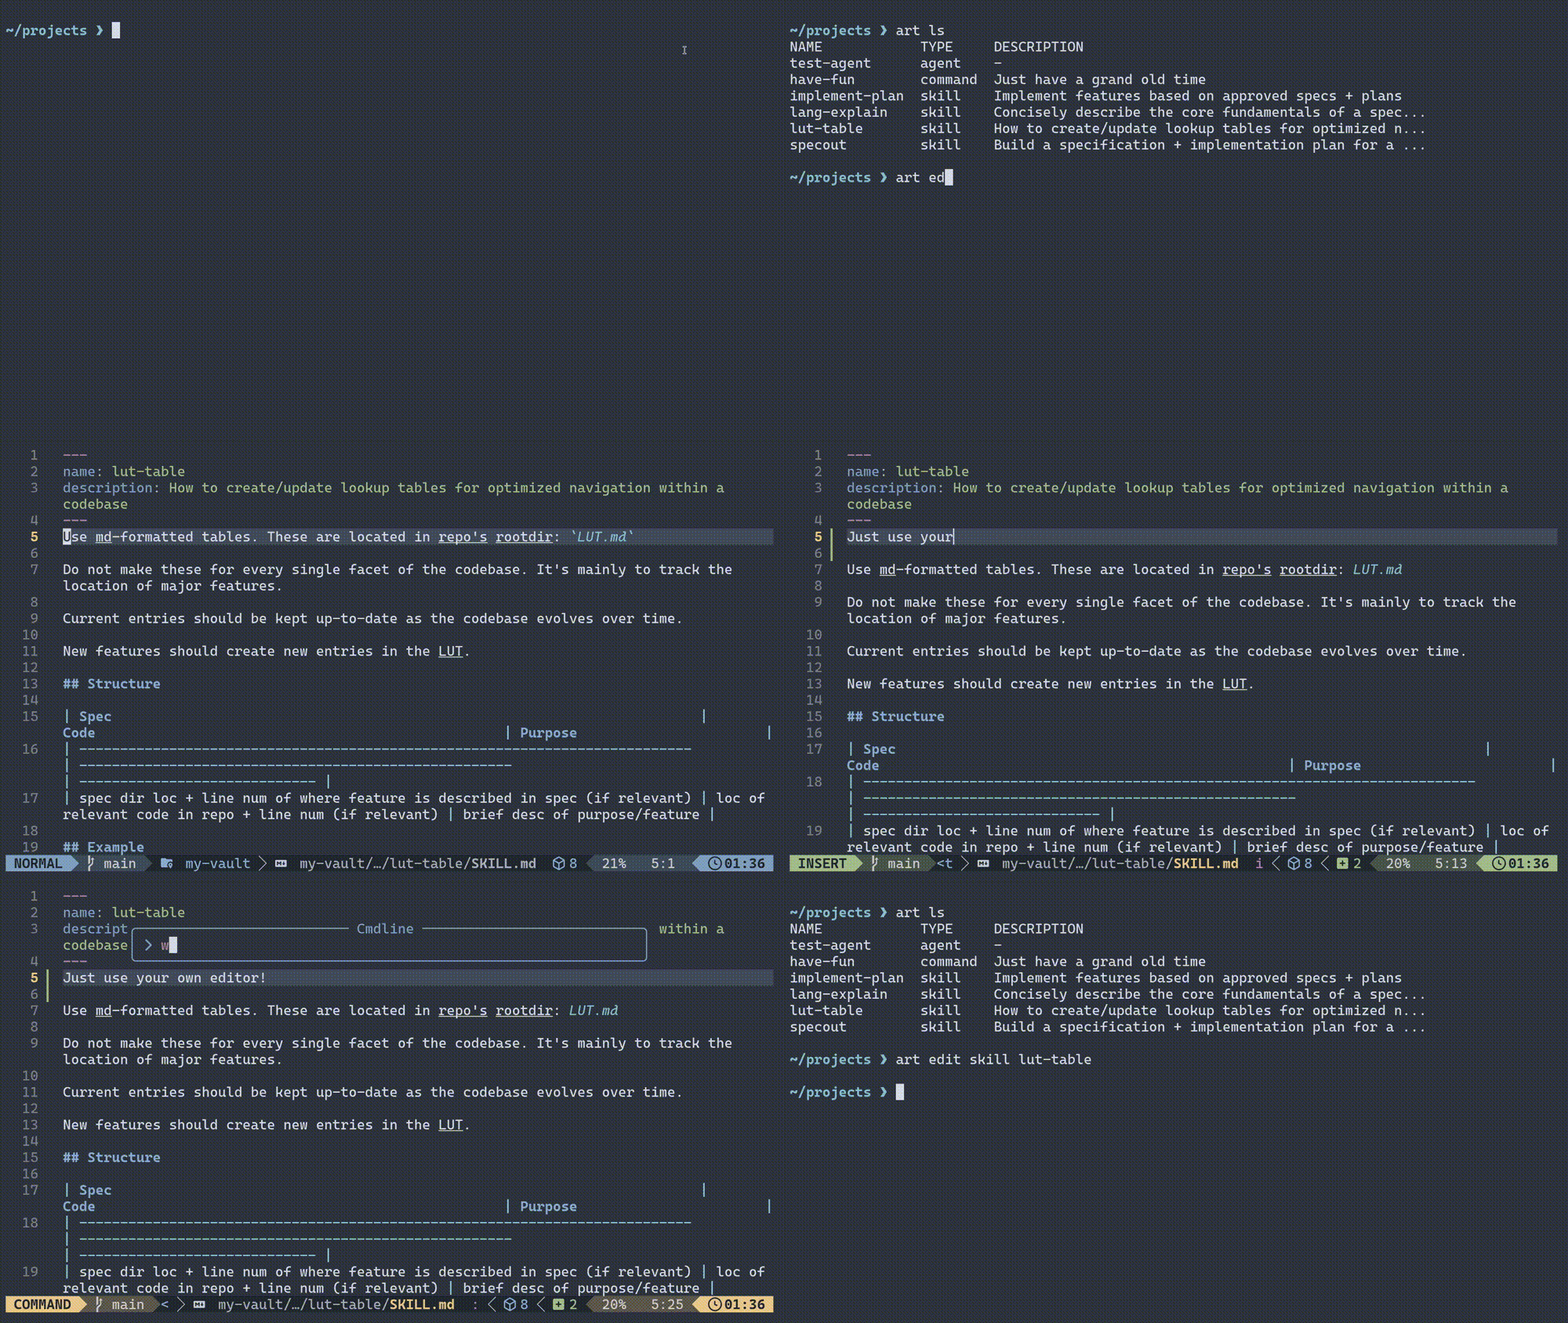
Editing Artifacts - art edit
art edit <artifact-type> <name>
Opens artifacts in your default editor. Uses environment variables to determine your editor. Includes some common editors as fallbacks in case none are defined:
$VISUAL > $EDITOR > nano > neovim > vim > vi
art edit skill <name> opens a skill's SKILL.md file. Support for managing all files/folders within a skill is a high priority on the roadmap.
There are convenient short-hand aliases for many commands:
art ed s my-skill # --> art edit skill my-skill
art ed a my-agent # --> art edit agent my-agent
art ed c my-command # --> art edit command my-command
Creating Artifacts - art create
Create skill, agent, and command definitions with art create. You can add as much custom frontmatter as you'd like with the --field / -D flag.
Skills, agents, and commands all require a description field in frontmatter. Therefore, --description / -d is required.
Unless the --vault flag is used, artifacts are created in the currently selected default vault.
Creating Skills
Skills are directories with a SKILL.md and optional misc. files/folders for added context. Currently, artifactr only supports creating a skill's folder and its SKILL.md. Support for managing all files within a single skill is a high priority item on the roadmap.
Skills require a name and description. artifactr will always name the folder and fill the name field of SKILL.md with the same provided argument, unless overridden with the --name / -n flag.
The --name / -n flag only applies to frontmatter in SKILL.md. This is usually what coding agents parse as the de facto name for slash commands.
Verbose Syntax
# "code-review" will be the name of the skill's folder AND its "name" frontmatter unless overridden with --name / -n
art create skill code-review \
  --description 'For assessing code quality & syntax' \
  --field disable-model-invocation=true \
  --field allowed-tools='Read, Grep' \
  --field argument-hint=[filename] \
  --content 'To the best of your ability, grade my code like the most insufferable pedant you can imagine.' \
  --vault 'claude-vault' \
  --name 'nitpick'
# --name overrides the frontmatter name field. Usually this is what defines a skill's slash command name in tools like claude
Short-hand Syntax
You can also use short-hand aliases the command provides:
art cr s code-review \
  -n 'nitpick' \
  -d 'For assessing code quality & syntax' \
  -D disable-model-invocation=true \
  -D allowed-tools='Read, Grep' \
  -D argument-hint=[filename] \
  -c 'To the best of your ability, grade my code like the most insufferable pedant you can imagine.' \
  --vault 'claude-vault'
Output
Both of the above commands will produce a SKILL.md file at /claude-vault/skills/code-review/SKILL.md that reads:
---
name: nitpick
description: For assessing code quality & syntax
disable-model-invocation: 'true'
allowed-tools: Read, Grep
argument-hint: '[filename]'
---
To the best of your ability, grade my code like the most insufferable pedant you can imagine.
Creating Commands
Uses the same syntax as above. Commands do not require a name field in frontmatter. The name of the file is the name of the slash command. Thus, the --name flag is not supported. If desired, you can still add a name field with the --field / -D flag.
art create command <name> --description 'a command' --content 'crucial context'

# or the shorthand:
art cr c <name> -d 'a command' -c 'crucial context'
Creating Agents
Uses the same syntax as above. The name field in frontmatter is supported by agent definitions, thus the --name / -n flag is supported.
art create agent <name> --description 'an agent' --content 'vital context'

# or the shorthand:
art cr a <name> -d 'an agent' -c 'vital context'
Managing Tools
Currently, artifactr supports claude-code, codex, and opencode. However, you can easily add support for as many tools as you'd like. Codex itself does not support markdown-based agent and command definitions, just skills.
Adding a Custom Tool
You can add any number of custom coding agent tools to artifactr.
By default, these will be added to the global artifactr config at ~/.config/artifactr/config.yaml on Linux.
🌠 You can configure tools per-vault using the --vault flag. These are added to the config at /your-vault/vault.yaml.
art tool add cursor \
  --skills .cursor/skills \
  --commands .cursor/commands \
  --agents .cursor/agents \
  --global-skills ~/.cursor/skills \
  --global-commands ~/.cursor/commands \
  --global-agents ~/.cursor/agents \
  --alias cur,c
# You can add any number of aliases to a custom tool.
# --vault your-vault <-- add vault-scoped tool support to `/your-vault/vault.yaml`
Extended Usage
Managing Vaults
# Initialize a new vault (creates directory with skills/, agents/, commands/ scaffolding)
art vault init ~/my-vault

# Initialize with a name and set as default
art vault init ~/my-vault --name=favorites --set-default

# Add an existing directory as a vault (auto-named as llm-vault-1, llm-vault-2, etc.)
art vault add ~/my-vault

# Add a vault with an explicit name
art vault add ~/my-vault --name=favorites

# Add and set as default in one step
art vault add ~/my-vault --name=favorites --set-default

# Name or rename an existing vault
art vault name ~/my-vault favorites

# List all vaults
art vault list

# List all vaults with full artifact hierarchy
art vault list --all

# Set default vault (by name or path)
art vault select favorites

# Remove a vault (by name or path)
art vault rm favorites
Vaults added without --name are automatically assigned names using the llm-vault-N pattern. Vault names can be used in place of full directory paths in any command that accepts a vault identifier, including --vault on art import.
Managing Tools
# List supported tools — shows artifact support, source, and aliases
art tool list

# Set default tool (defaults to opencode)
art tool select claude-code

# Aliases work anywhere a tool name is accepted
art tool select claude  # resolves to claude-code

# Show details for a specific tool
art tool show codex

# Add a custom tool (e.g., Cursor IDE)
art tool add cursor --skills .cursor/skills --commands .cursor/commands \
  --global-skills '$HOME/.cursor/skills' --alias cur

# Add a tool scoped to a specific vault
art tool add my-tool --skills .my-tool/skills --vault=team-vault

# Remove a custom tool
art tool rm cursor
Listing Vault Contents
# List all artifacts in the default vault
art list

# List from a specific vault
art list --vault=favorites

# Filter by type
art list -S              # skills only
art list -S -C           # skills and commands
art list -S foo,bar      # only skills named foo and bar
Removing Vault Artifacts
# Remove an artifact from the default vault
art rm my-skill

# Use type prefix for disambiguation
art rm skills/my-skill

# Remove without confirmation
art rm my-skill -f
Importing Artifacts (Project)
# Import into current directory (cwd default)
art proj import

# Import into a specific project
art proj import ~/repos/my-project

# Import from a specific vault
art proj import --vault=favorites

# Import for specific tools
art proj import --tools=claude-code,opencode

# Import only skills
art proj import -S

# Symlink instead of copying
art proj import --link

# Import only specific artifacts by name
art proj import --artifacts=helping-hand,code-review

# Don't add artifacts to .git/info/exclude
art proj import --no-exclude
Managing Project Artifacts
# List imported artifacts in current project
art proj list

# Remove specific imported artifacts
art proj rm my-skill

# Wipe all imported artifacts
art proj wipe

# Filter by type or tool
art proj list -S --tools=claude-code
art proj wipe -S -f
Importing Artifacts (Global Config)
# Import into global config directories
art conf import

# Import from a specific vault
art conf import --vault=favorites

# Import only skills for claude-code
art conf import --tools=claude-code -S
Managing Global Config Artifacts
# List globally imported artifacts
art conf list

# Remove globally imported artifacts
art conf rm my-skill

# Wipe all globally imported artifacts
art conf wipe -f
Imported artifacts are tracked in .art-cache/imported (project) and ~/.config/artifactr/.art-cache-global/imported (global), recording which vault and tool each artifact came from.
Creating Artifacts
Create skills, commands, and agents directly from the CLI:
# Create a skill (directory-based, with SKILL.md)
art create skill my-skill -d "A helpful skill" -c "Instructions here"

# Create a command (flat .md file, filename is the name)
art create command deploy-prod -d "Run production deployment"

# Create an agent (flat .md file, name in frontmatter)
art create agent code-reviewer -d "Reviews code changes"

# Add extra frontmatter fields
art create agent my-agent -d "desc" -D model=sonnet -D version=1.0

# Create in a specific vault
art create skill my-skill -d "desc" --vault=favorites

# Create in the current project instead of a vault
art create command my-cmd -d "desc" --here
art create skill my-skill -d "desc" --here --tools=claude-code,opencode
All artifact types require --description / -d. Skills are created as directories with a SKILL.md file; commands and agents are created as flat .md files.
Editing Artifacts
Open an artifact in your terminal editor:
# Edit a skill in the default vault
art edit skill my-skill

# Edit a command or agent
art edit command deploy-prod
art edit agent code-reviewer

# Edit in a specific vault
art edit skill my-skill --vault=favorites

# Edit a project-local artifact
art edit skill my-skill --here
The editor is resolved from $VISUAL, then $EDITOR, then the first available of nano, nvim, vim, vi.
Discovering Artifacts
Scan directories, vaults, or global configs for existing artifacts:
# Discover artifacts in a project
art spelunk ~/repos/my-project

# Spelunk global config (default when no target)
art spelunk

# Explicit global flag
art spelunk -g

# Filter by tool or type
art spelunk ~/repos/my-project --tools=claude-code
art spelunk -S
Example output:
NAME                              TYPE      TOOL      DESCRIPTION
helping-hand (imported: favs)     skill     claude    A helpful assistant
utility-tool                      skill     claude    -
reviewer                          agent     claude    Reviews code changes
deploy                            command   opencode  -
The (imported: ...) marker appears when an artifact was previously imported via art import, showing which vault it came from.
Storing Artifacts
Collect artifacts from a project directory and store them into a vault:
# Store artifacts into default vault
art store ~/repos/my-project

# Store into a specific vault
art store ~/repos/my-project --vault=favorites
You'll be presented with a numbered list of discovered artifacts and can select which ones to store using individual numbers (1), ranges (1-3), comma-separated (1,3,5), combinations (1,3-5), or all.
Vault Structure
vault/
├── vault.yaml          # Optional: portable vault name and tool definitions
├── skills/
│   └── skill-name/
│       ├── SKILL.md
│       └── (supporting files...)
├── agents/
│   └── agent-name.md
└── commands/
    └── command-name.md
The optional vault.yaml file stores a portable vault name and vault-scoped tool definitions. When present, its name takes precedence over the name stored in the global config. Tool definitions in vault.yaml travel with the vault when shared.
Artifacts are copied (or symlinked with --link) to tool-specific directories in the target repo (e.g., .claude/skills/, .opencode/agents/) and automatically excluded from git tracking.
Release history Release notifications | RSS feed


Download files
Download the file for your platform. If you're not sure which to choose, learn more about installing packages.
Source Distribution
Built Distribution
Filter files by name, interpreter, ABI, and platform.
If you're not sure about the file name format, learn more about wheel file names.
Copy a direct link to the current filters
File details
Details for the file artifactr-0.1.0.tar.gz.
File metadata
- Download URL: artifactr-0.1.0.tar.gz
- Upload date:
- Size: 65.2 kB
- Tags: Source
- Uploaded using Trusted Publishing? No
- Uploaded via: twine/6.2.0 CPython/3.14.2
File hashes
| Algorithm | Hash digest | |
|---|---|---|
| SHA256 |
afd0ab4ad5b35e618eda6375f90a4a41b69600bf1c13d838bbf7592e9f360606
|
|
| MD5 |
33b0faeaefd7907ee5c084950e3a1c4c
|
|
| BLAKE2b-256 |
d6d5ca94153bfa9d57459b865f1001f410d1d8d47e05db5ef3b416b4cda16ffa
|
File details
Details for the file artifactr-0.1.0-py3-none-any.whl.
File metadata
- Download URL: artifactr-0.1.0-py3-none-any.whl
- Upload date:
- Size: 42.7 kB
- Tags: Python 3
- Uploaded using Trusted Publishing? No
- Uploaded via: twine/6.2.0 CPython/3.14.2
File hashes
| Algorithm | Hash digest | |
|---|---|---|
| SHA256 |
e7ba96ef62b6be87628e893e4f68a58ea69749f07f51e3a714dfe6aea37bc3a6
|
|
| MD5 |
8f2bbf306cb2a908eabe549683f9153e
|
|
| BLAKE2b-256 |
e6b82e1e7e2d0c4cf80c7eb57c703fb9755f4900466ca2a43310cffba57d728c
|






