
This release is a pre-release and may not be stable for production use.




Automated Behavioral Analysis Interface
Currently built to integrate seamlessly with DeepLabCut
Other tools coming soon!
Table of Contents
- About
- Getting Started
- CLI Usage
- Pretrained Models
- Video Pre-processing
- Workflow & Configuration
- Outputs & Metrics
- Contributing
- License
- Contact
About
Behavython is an automated, high-throughput behavioral analysis interface. It features a modular architecture that converts raw tracking data (CSV/H5) into structured, biologically relevant behavioral metrics.
It natively supports:
- Geometry-based paradigms: Open Field, Elevated Plus Maze (EPM)
- Interaction-based paradigms: Social Recognition, Social Discrimination, Object Discrimination
The software enforces strict scientific reproducibility through automated environment management, robust data validation, and granular metric exports.
Getting Started
Automated Installation (Windows)
For a streamlined setup, we provide a batch script that automates the entire process: creating the Conda environment, installing the required pip dependencies, and configuring the CUDA environment.
How to use the installer:
- Download the script: Download behavython_installer.bat
Right-click the link and select "Save Link As..." to download it as a.batfile
In the windows explorer dowload prompt make sure to select "Save as type: All Files" and not "Text Documents" to avoid saving it as a.txtfile - Run the Installer: Double-click the downloaded file and follow the on-screen instructions.
- Detailed Instructions: For a full walkthrough of the automated process, refer to our Installation Guide.
Step-by-Step Installation (Manual)
We strongly recommend using mamba (or Miniconda/Mamba) to manage your isolated Python environment to prevent dependency conflicts.
1. Create the environment: Create a clean environment explicitly using Python 3.10.
mamba create -n behavython python=3.10
2. Activate the environment: You must be inside the environment for the next steps.
mamba activate behavython
3. Install Behavython:
Use pip inside the activated environment. Crucial: You must include the extra index URL to fetch the correct GPU-compiled PyTorch wheels. Omitting this may result in an incompatible CPU-only installation.
Option A: TensorFlow (Stable / DLC 2.3.x) Recommended for most established pipelines.
pip install "behavython[tf]"
Option B: PyTorch (Experimental / DLC 3.x) Recommended for the latest DeepLabCut features. For GPU support (e.g., CUDA 12.6), install the backend wheels first:
pip install torch torchvision --index-url https://download.pytorch.org/whl/cu126
pip install "behavython[torch]"
To use your NVIDIA GPU for tracking, you must have the appropriate drivers and libraries installed.
For TensorFlow (Option A): TensorFlow 2.10 requires specific versions of the CUDA toolkit and cuDNN. Run this inside your environment to install them:
mamba install -c conda-forge cudatoolkit=11.2 cudnn=8.1.0
Failure to configure the GPU dependencies correctly will result in severe processing slowdowns during DeepLabCut operations.
For PyTorch (Option B):
The pip install command above with the --index-url bundles the necessary CUDA kernels within the wheels. You only need to ensure your system NVIDIA drivers are up to date
CLI Usage
Behavython ships a headless command-line entry point (behavython-cli) for batch processing without opening the GUI. This is useful for server-side automation or scripted pipelines.
Basic usage:
behavython-cli --config run.json
With overrides:
behavython-cli --config run.json --output /data/results --no-plots
A ready-to-edit config template ships with the package at behavython/config/cli_config.json. Fields:
| Field | Description | Default |
|---|---|---|
experiment_type |
One of: open_field, elevated_plus_maze, social_recognition, social_discrimination, object_discrimination |
— |
input_folder |
Folder containing all animal files (CSVs, images, ROI/JSON configs) | — |
output_folder |
Destination directory for results | — |
config_path |
Global fallback arena JSON (maze experiments only) | null |
arena_width / arena_height |
Physical arena dimensions in cm | 30 |
frames_per_second |
Recording frame rate | 30 |
task_duration |
Analysis window in seconds | 300 |
trim_amount |
Seconds to skip at video start | 0 |
crop_video |
Restrict analysis to [trim, trim + duration] |
false |
animal |
mouse or rat (sets body-length threshold) |
mouse |
figure_resolution |
Max plot resolution: 640x480, 1280x720, 1920x1080, 2560x1440 |
1920x1080 |
no_plots |
Skip plot generation | false |
generate_video |
Generate annotated output video | false |
Return codes: 0 = all animals valid, 1 = fatal error, 2 = completed with warnings/invalid animals.
Pretrained Models
Behavython comes with a pretrained model for roi and mouse tracking (c57 black on white arena top view) These can be downloaded from the GitHub Releases page.
The latest release (models-v1.0) includes:
c57_network_2025_minified.zip- Optimized for C57 rodent tracking.roi_network.zip- Dedicated network for Region of Interest detection in social recognition experiments.
Extract these ZIP archives into .behavython/models/ folder in your home directory located in:
- Windows:
C:\Users\<YourUsername>\.behavython\models\ - Linux/Mac:
~/.behavython/models/ - Note: Ensure the extracted model files are directly within the
modelsfolder, not nested inside additional subdirectories.
Video Pre-processing (Experimental)
⚠️ Note: This is currently an experimental feature available only when running Behavython in debug mode. It can be toggled on demand, but please contact the developers for instructions on how to activate it for now.
Behavython includes a dedicated pipeline for standardizing and cropping raw behavioral videos, ensuring they are optimized for computer vision analysis (DeepLabCut, SLEAP, etc.).
High-Performance Batch Cropping
- Interactive Designer: Draw crop regions and define rotation angles directly on video previews.
- Hardware Acceleration: Native support for Nvidia NVENC, enabling processing speeds of up to 800+ FPS.
- Batch Processing: Define settings once and process entire folders in the background.
- Non-Destructive: Original videos are preserved; results are saved in a
/croppedsubfolder.
Video Standardization
Many acquisition systems save videos in legacy formats (like MPEG4 or AVI) that are not "reliably seekable." This can lead to desynced frames during tracking. Behavython's Standardization Tool:
- Automatic Detection: Background probing detects problematic codecs or variable frame rates.
- Lossless Conversion: Converts videos to a pristine H.264 format with Constant Frame Rate (CFR).
- Unlocks GPU Speed: Standardizing moves the decoding workload from the CPU to the GPU, often increasing processing speed by 5x to 10x.
Standard Workflow
- Select Folder: Click
GET FOLDERto choose the directory where your videos are stored (ideally, this folder should only contain the videos you intend to crop). - Standardize (If Prompted): If the interface detects legacy codecs, click the Standardize Videos (Fix Codecs) button to convert them safely.
- Open Cropping Window: Click Open Cropping Window to launch the interactive editor.
- Draw Crops & Set Coordinates:
- Drag with the Left Mouse Button across the frame to draw a crop box.
- Use the Mouse Wheel to rotate the box (hold Ctrl/Shift to adjust rotation speed).
- Once the crop is perfect, click Set Coordinates for that video.
- Note: If all your videos have different positions, you must select each video individually, draw the box, and click "Set Coordinates". If the position is identical across videos, simply use the Apply to checked videos button to propagate your settings.
- Video List Color Code: The sidebar list uses colors to track your progress:
- 🟡 Yellow: Needs attention (Coordinates have not been set).
- 🟢 Green: Ready (Coordinates are set and saved).
- ⚪ White: Finished (The video has already been cropped in the
/croppedfolder).
- Save Project: Click Save Project (JSON) to write your coordinates to disk.
- Execute: Close the cropping window and click CROP VIDEOS in the main GUI to run the batch process.
Workflow & Configuration
The Pipeline
Video → DeepLabCut → Filtered CSV → Behavython Core Pipeline → Metrics & Parquet
Arena Configuration (Geometry Tasks)
For Open Field and Elevated Plus Maze (EPM) experiments, Behavython requires a .json configuration file defining the spatial geometry. You can extract these coordinates using the ImageJ Point Tool.
- Open Field: Requires exactly 4 ordered corners (Top-Left, Top-Right, Bottom-Right, Bottom-Left).
- Elevated Plus Maze: Requires exactly 12 ordered points defining the outer boundaries, arms, and center zone.
Example: Open Field (arena.json)
Use the image as reference to order the points correctly.
Here, you can copy this example and save as a .json file to use
In order, the points should be created in imageJ in this sequence:
- top-left
- top-right
- bottom-right
- bottom-left
{
  "experiment_type": "open_field",
  "arena_corners": [
    [126.0, 72.0],
    [637.0, 74.0],
    [633.0, 581.0],
    [128.0, 581.0]
  ]
}
Example: Elevated Plus Maze (arena.json)
As with the open field, use the image as reference to order the points correctly.
Here, you can copy this example and save as a .json file to use
In order, the points should be created in imageJ in this sequence:
- Center Top Left
- Top Left
- Top Right
- Center Top Right
- Right Top
- Right Bottom
- Center Bottom Right
- Bottom Right
- Bottom Left
- Center Bottom Left
- Left Bottom
- Left Top
{
  "experiment_type": "elevated_plus_maze",
  "maze_points": [
    [128, 336],
    [384, 336],
    [384, 32],
    [514, 32],
    [514, 336],
    [900, 336],
    [900, 446],
    [514, 446],
    [514, 1042],
    [384, 1042],
    [384, 446],
    [128, 446]
  ]
}
Note: Incorrect coordinate ordering will corrupt spatial occupancy metrics.
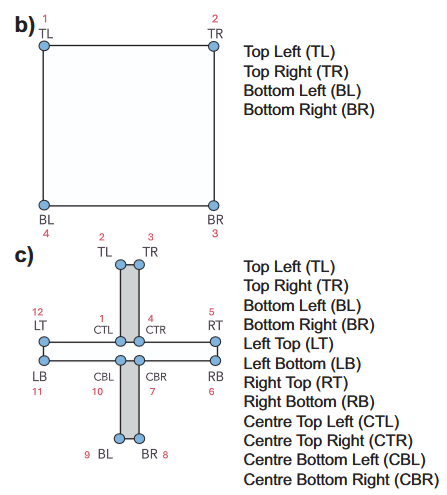
Coordinate ordering reference for Open Field and Elevated Plus Maze.
ROI Configuration (Interaction Tasks)
For interaction paradigms (like Social Recognition or Object Discrimination), Behavython requires Region of Interest (ROI) definitions exported as CSV files. You can generate these using the ImageJ Oval Tool.
ROI Requirements:
- ImageJ Measurements: Go to Analyze → Set Measurements. You must ensure both Centroid and Bounding Rectangle are checked. The resulting CSV needs the bounding box (BX, BY, Width, Height) and centroid (X, Y) coordinates.
- File Naming Convention: The exported CSV must contain the original video name, followed by an ROI identifier:
- Single-Object/Target:
video_name_roi.csv - Two-Choice Tasks:
video_name_roiL.csvandvideo_name_roiR.csv(Left and Right).
- Single-Object/Target:
- File Format: The file must be a standard
.csv(Comma Separated Values) file.
Example: Social Recognition/Discrimination (video_name_roi.csv)
 ,Area,X,Y,BX,BY,Width,Height
1,24065,376.500,387.500,289,300,175,175
Outputs & Metrics
The pipeline outputs data in multiple formats for both statistical aggregation and granular programmatic review.
General Storage
analysis_summary.xlsx/.csv: Scalar metrics aggregated per animal.analysis_timeseries.parquet: Highly compressed, frame-by-frame data utilizing Apache Arrow for efficient downstream data science workflows.analysis_log.json: Comprehensive error and warning logs per session.
Task-Specific Metrics
Geometry Experiments (Open Field, EPM):
- Zone occupancy times and percentages.
- Transition counts between zones.
- Discrete
spatial_statearrays per frame.
Interaction Experiments (Social/Object):
- Investigation and approach proportions.
- Mean inter-bout intervals (seconds).
- Discrete bout analysis (Collision bouts, approach-only bouts, abortive retreats).
analysis_collisions.parquet: Granular export containing distance to objects, interaction angles, and frame-by-frame flags.
Contributing
Contributions to the codebase and scientific pipelines are welcome.
- Open an issue to report bugs or suggest features.
- Submit a pull request for code changes. Ensure modifications align with the project's modular architecture and strict type-hinting standards.
License
This project is distributed under the GNU GPL v3.0 License. See the LICENSE file for more information.
Contact
- Matheus Costa — matheuscosta3004@gmail.com
- João Pedro — mcjpedro@gmail.com
Acknowledgments
- Flávio Mourão — https://github.com/fgmourao
- Núcleo de Neurociências (NNC) — http://www.nnc.ufmg.br
Developed at
Núcleo de Neurociências (NNC)
Universidade Federal de Minas Gerais (UFMG)
Brazil
1 maintainer

Metadata
1 maintainer
Release files for behavython 0.9.9rc8
For a detailed explanation of source distributions (sdists) and built distributions (wheels), please see the package formats documentation.
Source distribution (sdist)
| File | Size | Uploaded | |
|---|---|---|---|
| behavython-0.9.9rc8.tar.gz | 831.9 kB | Details |
Built distribution (wheel)
| File | Interpreter | ABI | Platform | Reset |
|---|---|---|---|---|
| behavython-0.9.9rc8-py3-none-any.whl | Python 3 | none | any | Details |
Total release size: 1.7 MB
Release files / behavython-0.9.9rc8.tar.gz
| Download URL | behavython-0.9.9rc8.tar.gz |
|---|---|
| Size | 831.9 kB |
| Tags | Source |
|
SHA-256 checksum How to use checksums |
0b754e56fd08f8a7409d9ff3d57a4a1badde564d873a0e97d35c04e96c47c571
|
|
BLAKE2b-256 checksum How to use checksums |
e0fa990a78efabf9136bf22de2f783cd7cca53b6e387837f63864dafd8993768
|
| Upload date | |
|
Uploaded using Trusted Publishing? What is trusted publishing? |
No |
| Uploaded via |
twine/6.2.0 CPython/3.10.20
|
Release files / behavython-0.9.9rc8-py3-none-any.whl
| Download URL | behavython-0.9.9rc8-py3-none-any.whl |
|---|---|
| Size | 838.6 kB |
| Tags | Python 3 |
|
SHA-256 checksum How to use checksums |
569014f5d42079c16ed6eb2bfe0801f3688d819dc2f9df0fe992af377f2d2f99
|
|
BLAKE2b-256 checksum How to use checksums |
be8a0d6fd9859cba3fd770793a954222f2f4e02da34bea828a7061fd6bf02cda
|
| Upload date | |
|
Uploaded using Trusted Publishing? What is trusted publishing? |
No |
| Uploaded via |
twine/6.2.0 CPython/3.10.20
|














