
clawdboz - 基于 ACP 协议的多智能体 IM 协作平台

Project description




🇨🇳 中文介绍
clawdboz,一个基于 ACP 协议的多智能体 IM 协作平台,支持主流 Agent,包括 OpenClaw、Hermes Agent、Claude Code、Opencode、Kimi Code 等,高度还原类似微信 WeChat 的交互体验,支持快速创建本地 Bot,发布到远程、添加异地 Bot 聊天,同时适配飞书。
✨ 核心亮点
- 🚀 开箱即用:
pip install后三行代码即可运行 - 🤖 多 Bot 协作:支持本地 Bot + 远程 Bot 混合群聊,@提及触发回复
- 🌐 Web Chat 界面:完整的单页应用,支持单聊/群聊、文件上传、图片发送
- 🔗 远程 Bot 发现:通过注册中心发现其他实例的 Bot,跨服务器调用
- 💬 飞书适配:自动获取群聊上下文,流式卡片输出,体验丝滑
- 🏠 会话管理:单聊/群聊切换,IndexedDB 本地缓存 + 服务端持久化
- 🐳 Docker 沙箱:远程 Bot 在隔离容器中执行,安全可控
- 🧠 思考模式:可切换显示/隐藏 AI 思考过程,流式回复实时呈现
📺 演示
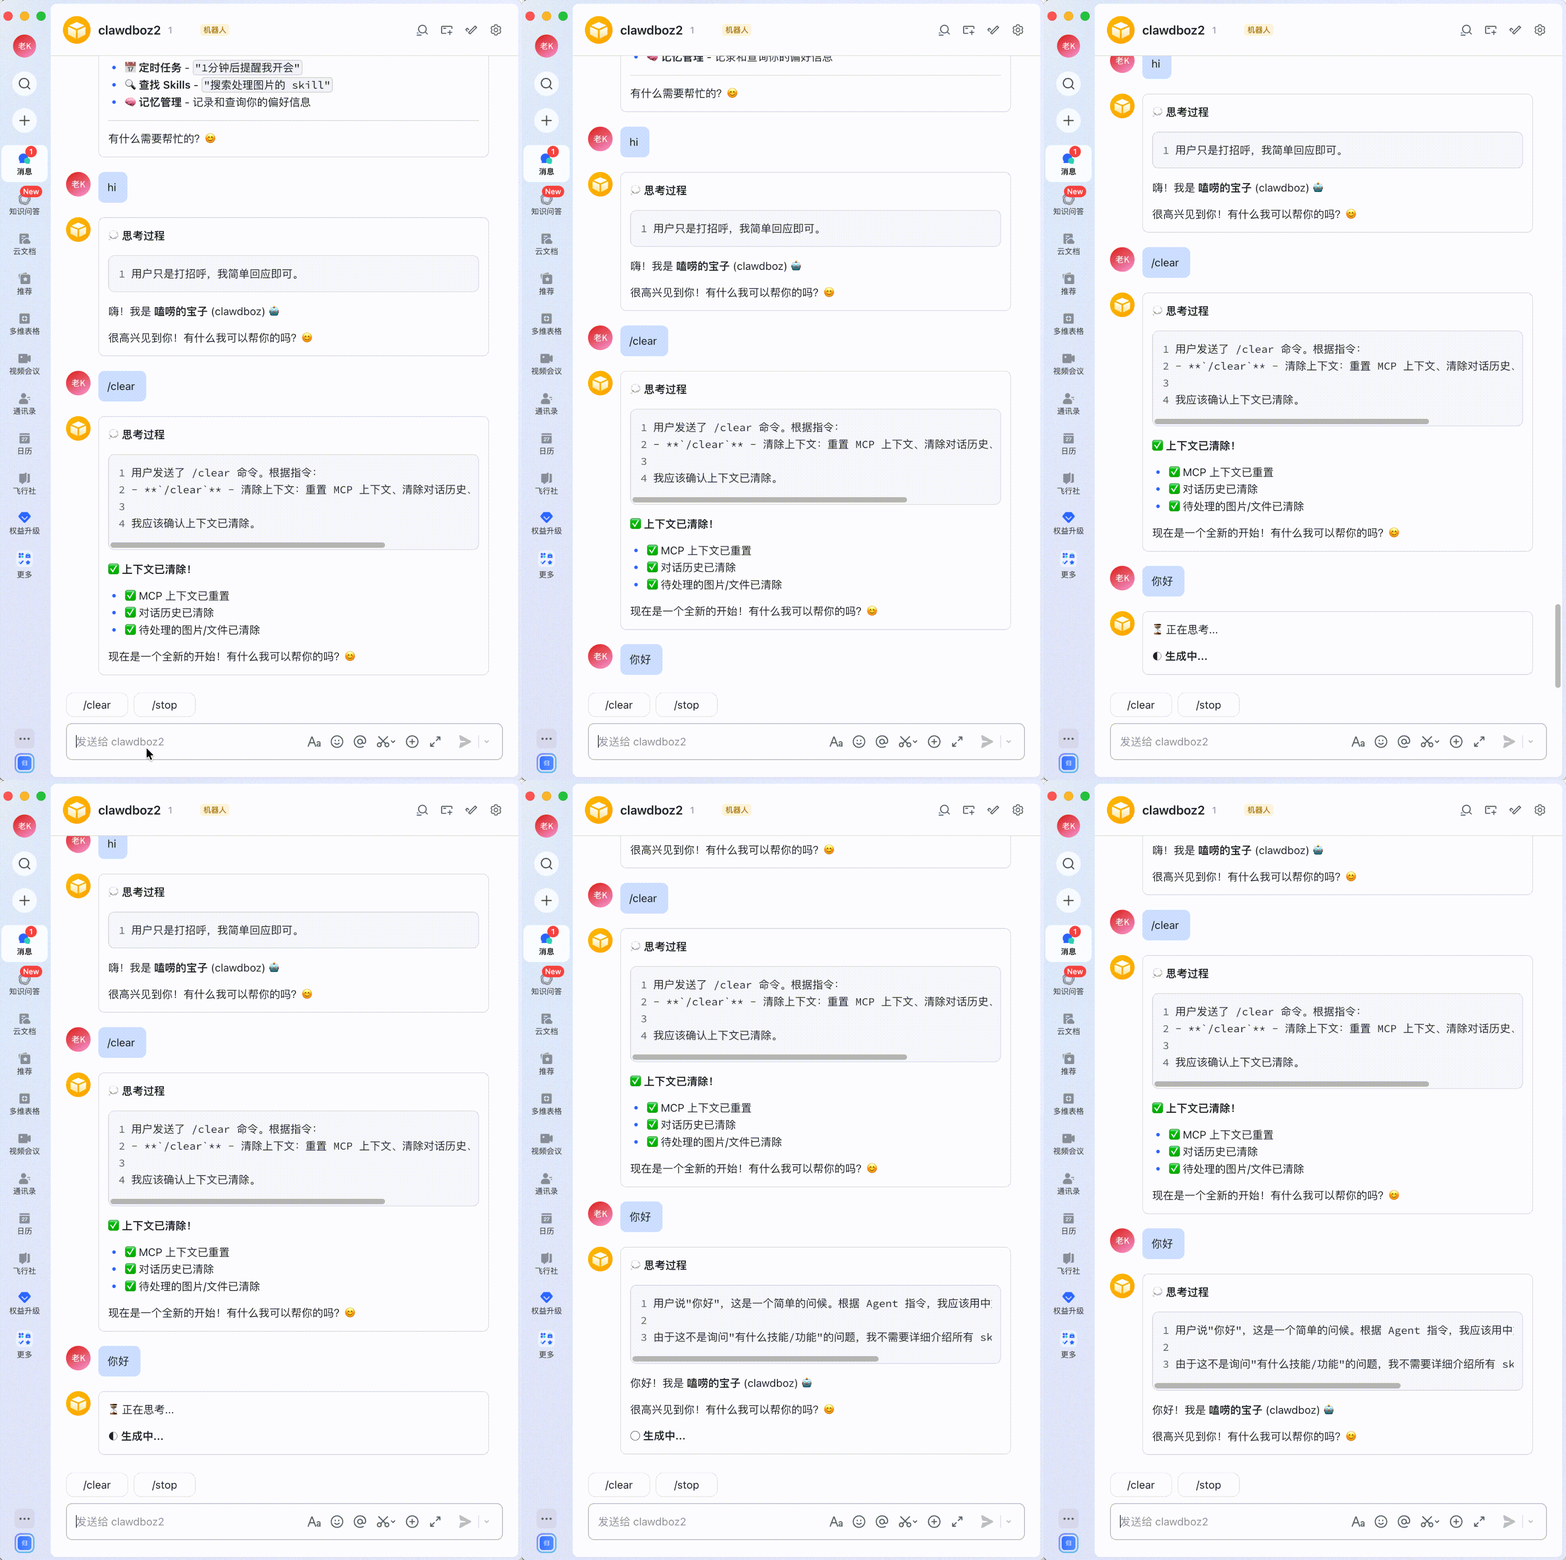
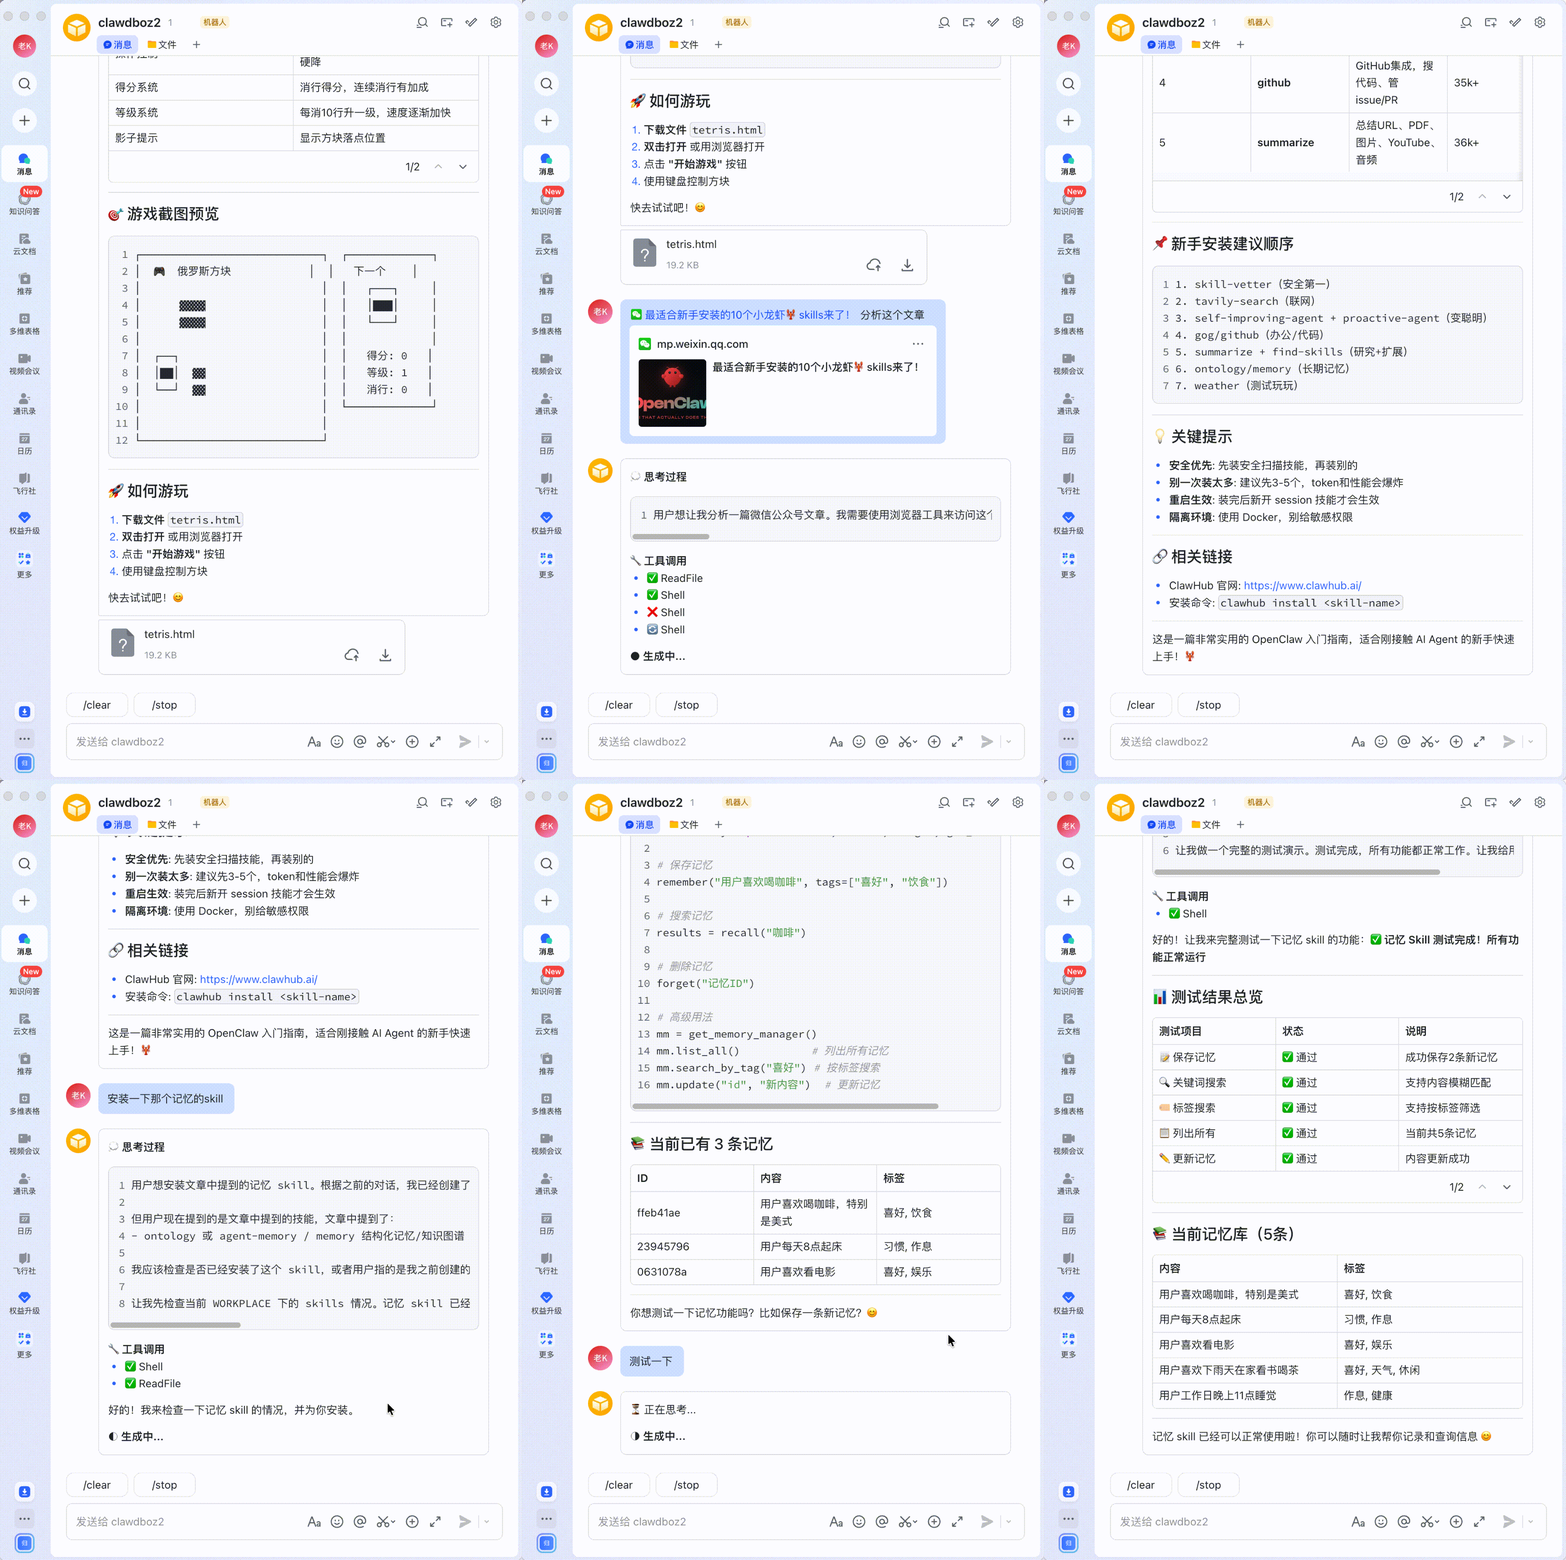
🌐 在线体验:https://clawdboz.chat
功能特性
Web Chat 功能
| 特性 | 说明 |
|---|---|
| 🖥️ Web 界面 | 单页应用,响应式设计,支持移动端 |
| 💬 单聊/群聊 | 支持一对一对话和多 Bot 群聊 |
| 📎 文件上传 | 支持图片、文档等文件上传和预览 |
| 🧠 思考模式 | 可切换显示/隐藏 AI 思考过程 |
| 📝 流式回复 | 实时显示 AI 回复内容 |
| 📋 会话管理 | 创建、重命名、删除会话,本地缓存同步 |
| 👥 成员管理 | 群聊中动态添加/移除 Bot |
| 🔍 全局搜索 | 搜索 Bot 和会话 |
远程 Bot 功能
| 特性 | 说明 |
|---|---|
| 🌍 注册中心 | 实例注册、Bot 发布、心跳维护 |
| 🔍 Bot 发现 | 实时发现其他实例发布的 Bot |
| 🤝 好友系统 | 实例级别好友请求/接受/移除 |
| 📡 中心转发 | WebSocket 中心转发模式,P2P 直连模式 |
| 🐳 Docker 沙箱 | 远程 Bot 在隔离容器中执行 |
| 📞 远程调用 | 跨实例调用 Bot,120 秒超时 |
飞书 Bot 功能
| 特性 | 说明 |
|---|---|
| 🤖 AI 对话 | 基于 Kimi Code CLI 的智能对话 |
| 📝 流式回复 | 实时显示思考过程,Markdown 卡片美化输出 |
| 🔧 MCP 工具 | 支持 MCP 协议调用外部工具,内置飞书文件/消息发送 |
| 📦 文件处理 | 自动下载图片/文件,支持发送文件到飞书 |
| 💬 群聊适配 | 自动获取群聊历史,理解对话脉络 |
| ⏰ 定时任务 | 内置定时任务调度,支持自定义定时执行 |
🏗️ 架构
┌─────────────────────────────────────────────────────────────┐
│                     注册中心 (Registry)                       │
│                  api.clawdboz.chat:443 (WSS)                │
│                    内存存储 + WebSocket 转发                 │
└─────────────────────────────────────────────────────────────┘
                              │
           ┌──────────────────┼──────────────────┐
           │                  │                  │
    ┌──────▼──────┐    ┌─────▼──────┐    ┌─────▼──────┐
    │  本地实例 A  │    │  host1 实例 │    │  其他实例   │
    │  port 7011  │    │ port 6905  │    │  ...       │
    └──────┬──────┘    └─────┬──────┘    └─────┬──────┘
           │                  │                  │
    ┌──────▼──────┐    ┌─────▼──────┐    ┌─────▼──────┐
    │  本地 Bots  │    │ Docker 沙箱 │    │  本地 Bots │
    │  workplace_*│    │  sandbox   │    │  workplace_*│
    └─────────────┘    └────────────┘    └─────────────┘
- 注册中心:维护实例列表、Bot 目录、好友关系、消息转发
- 实例:每个实例有独立的 hostname-port ID,包含本地 Bots 和/或远程 Bot 客户端
- Bot:本地 Bot 直接运行;远程 Bot 通过注册中心或直连调用,可在 Docker 沙箱中执行
🚀 快速开始
环境准备
⚠️ 前置依赖:请先安装 Kimi Code CLI
# 通过 pip 安装
pip install kimi-cli

# 或使用 uv 安装(推荐)
uv tool install --python 3.13 kimi-cli

# 验证安装
kimi --version
1. 安装嗑唠的宝子
pip install clawdboz
或从源码安装:
git clone <repository-url>
cd clawdboz
pip install -e .
2. 初始化项目
mkdir my-bot && cd my-bot
clawdboz init
clawdboz init 会自动完成:
- ✅ 检测 Kimi CLI 安装和登录状态
- ✅ 创建
config.json,自动填入 Python 路径 - ✅ 创建
.agents/mcp.json,配置飞书 MCP 工具 - ✅ 复制内置 Skills(scheduler、local-memory、find-skills)
- ✅ 创建
bot_manager.sh管理脚本 - ✅ 创建
bot0.py启动脚本 - ✅ 创建
.bots.mdAgent 指令文件
3. 配置远程功能(可选)
编辑 config.json 启用远程功能:
{
  "project_root": "/path/to/my-bot",
  "webchat": {
    "port": 8443,
    "https": false,
    "token": "your-secret-token"
  },
  "remote": {
    "enabled": true,
    "registry_url": "https://api.clawdboz.chat",
    "instance_name": "My Instance",
    "host": "your-host",
    "port": 8443,
    "heartbeat_interval": 30,
    "connection_timeout": 10,
    "call_timeout": 120,
    "max_retries": 3,
    "sandbox": {
      "enabled": true,
      "docker": true,
      "max_memory_mb": 512,
      "timeout_seconds": 120
    },
    "connection_mode": "center",
    "registry_ws_url": "wss://api.clawdboz.chat/ws/registry"
  }
}
4. 启动 Web Chat 服务器
# 方式一:守护进程模式(推荐生产环境)
clawdboz web start --config config.json

# 方式二:前台阻塞模式(开发调试)
clawdboz web --config config.json

# 方式三:直接运行
python web_server.py --port 8443 --host 0.0.0.0
守护进程管理命令:
clawdboz web start   # 启动守护进程
clawdboz web stop    # 停止守护进程
clawdboz web restart # 重启守护进程
clawdboz web status  # 查看守护进程状态
访问 http://localhost:8443/static/index.html?token=your-token
5. 启动飞书 Bot(可选)
from clawdboz import Bot

bot = Bot(app_id="your-app-id", app_secret="your-app-secret")
bot.run()
或使用 bot_manager.sh:
./bot_manager.sh start
📁 项目结构
运行 clawdboz init 后生成的项目结构:
.
├── .agents/                    # Kimi CLI 配置目录
│   ├── mcp.json               # MCP 配置(自动生成)
│   └── skills/                # Skills 目录(自动生成)
│       ├── find-skills/
│       ├── local-memory/
│       └── scheduler/
│
├── WORKPLACE/                  # 工作目录(Bot workspace)
│   ├── workplace_bot1/        # Bot 1 工作目录
│   ├── workplace_bot2/        # Bot 2 工作目录
│   ├── .remote/               # 远程功能数据
│   │   ├── published_bots.json
│   │   └── added_bots.json
│   ├── user_images/           # 用户图片下载目录
│   └── user_files/            # 用户文件下载目录
│
├── clawdboz/web/static/index.html  # Web Chat 前端(单页应用)
├── web_server.py                   # Web 服务器入口
│                                   # 注:registry_server.py 源码在中心服务器,本地不再维护
│
├── logs/                       # 日志目录
│   ├── main.log
│   ├── bot_debug.log
│   └── feishu_api.log
│
├── .bots.md                    # Agent 指令文件(自动生成)
├── bot0.py                     # 启动脚本(自动生成)
├── bot_manager.sh              # 管理脚本(自动生成)
└── config.json                 # 配置文件(自动生成)
源码结构:
clawdboz/                       # Python 包
├── __init__.py
├── cli.py                      # 命令行入口 `clawdboz`
├── core/                       # Bot 核心
│   ├── bot.py                  # Bot 基类
│   ├── bot_manager.py          # BotManager(注册、管理)
│   └── simple_bot.py           # 简化版 Bot API
├── web/                        # Web 服务
│   ├── server.py               # WebChatServer (FastAPI)
│   ├── chat/                   # 聊天核心
│   │   ├── core.py             # ChatCore(消息处理、远程调用)
│   │   ├── history.py          # 聊天记录管理
│   │   ├── mentions.py         # @提及解析
│   │   ├── group.py            # 群聊逻辑
│   │   └── acp.py              # ACP 客户端管理
│   ├── routes/                 # API 路由
│   │   ├── bots.py             # /api/bots
│   │   ├── websocket.py        # WebSocket 连接管理
│   │   ├── remote.py           # /api/remote/*
│   │   ├── sessions/           # 会话相关路由
│   │   └── internal.py         # 内部 API(如服务器重启)
│   ├── static/                 # 前端资源
│   │   ├── index.html          # 主界面(单文件 ~10K 行 JS)
│   │   └── ...
│   └── workspace.py            # 工作区管理
├── remote/                     # 远程功能
│   ├── manager.py              # RemoteBotManager(核心)
│   ├── registry_client.py      # Registry HTTP API 客户端
│   ├── registry_ws_client.py   # Registry WebSocket 客户端
│   ├── bot_publisher.py        # Bot 发布到 Registry
│   ├── remote_client.py        # 远程 Bot 调用客户端
│   ├── docker_sandbox.py       # Docker 沙箱管理
│   ├── friend_manager.py       # 好友关系管理
│   └── ...
├── communication/              # ACP 通信层
│   ├── acp_client.py
│   ├── websocket_acp_client.py
│   └── session_manager.py
└── utils/                      # 工具
    └── logger.py
🖥️ Web Chat 使用指南
创建会话
- 点击右上角
+或...→ 新建会话 - 选择一个或多个 Bot
- 选择单个 Bot 创建单聊,选择多个 Bot 创建群聊
群聊 @提及
- 在群聊中输入
@选择 Bot,只有被 @ 的 Bot 会回复 - 输入
@all或@所有人提及所有 Bot - 不 @ 任何 Bot 时,只保存消息不触发回复
管理群成员
- 在群聊中点击右上角
...→ 管理群成员 - 可以移除现有 Bot(创建者不可移除)
- 可以添加新的可用 Bot 到群聊
文件上传
- 点击输入框左侧的 📎 按钮上传文件
- 支持图片、文档、代码文件等
- Bot 会自动分析文件内容
🌍 远程 Bot 使用指南
发布 Bot
- 在 Web Chat 中打开通讯录
- 找到本地 Bot,点击 发布到远程
- 设置显示名称、描述、是否启用沙箱
添加远程 Bot
- 在通讯录中查看在线实例标签
- 浏览其他实例发布的 Bot
- 点击 添加好友 发送好友请求
- 对方接受后,Bot 会出现在通讯录中
调用远程 Bot
- 在创建会话时,远程 Bot 会出现在 Bot 列表中
- 聊天时直接 @提及远程 Bot 即可调用
- 远程 Bot 的回复会实时流式显示
🤖 CLI 命令行工具
Bot 管理
clawdboz bot list              # 列出所有 Bot
clawdboz bot create <bot_id>   # 创建 Bot
clawdboz bot info <bot_id>     # 查看 Bot 详情
clawdboz bot edit <bot_id>     # 编辑 Bot
clawdboz bot delete <bot_id>   # 删除 Bot
会话管理
clawdboz chat list                          # 列出所有会话
clawdboz chat create --bots bot1 --bots bot2 --name "群聊"  # 创建会话
clawdboz chat send <chat_id> "消息"          # 发送消息
clawdboz chat interactive <chat_id>         # 交互式聊天
朋友圈
clawdboz contacts list                      # 列出联系人
clawdboz moments list                       # 查看朋友圈
clawdboz moments post "内容"                # 发布动态
💬 飞书应用配置
1. 创建应用
- 前往 飞书开放平台 登录开发者账号
- 点击「开发者后台」→「创建企业自建应用」
- 填写应用名称和描述,点击「创建」
- 进入应用详情页,获取 App ID 和 App Secret
2. 配置权限
需要的权限:
| 权限类型 | 权限名称 | 用途 |
|---|---|---|
| API 权限 | im:message:send |
发送消息 |
| API 权限 | im:message:send_as_bot |
发送消息卡片 |
| API 权限 | im:message:update |
更新消息卡片 |
| API 权限 | im:message.resource |
获取图片、文件 |
| API 权限 | im:chat:readonly |
获取聊天记录 |
| API 权限 | im:file:create |
上传文件 |
| API 权限 | im:file:send |
发送文件消息 |
| API 权限 | im:image:create |
上传图片 |
| 事件订阅 | im.message.receive_v1 |
接收消息 |
| 机器人能力 | receive_message |
接收消息 |
| 机器人能力 | send_message |
发送消息 |
3. 发布应用
- 点击「版本管理与发布」→「创建版本」
- 填写版本号(如 1.0.0)
- 选择「可用性状态」为「所有员工」
- 点击「保存」并「申请发布」
🔧 管理命令
# 启动 Bot
./bot_manager.sh start

# 停止 Bot
./bot_manager.sh stop

# 重启 Bot
./bot_manager.sh restart

# 查看状态
./bot_manager.sh status

# 查看日志(最后50行)
./bot_manager.sh log 50

# 实时跟踪日志
./bot_manager.sh follow

# 运维检查
./bot_manager.sh check
定时运维监控(推荐)
# 编辑 crontab
export EDITOR=vim && crontab -e

# 每 30 分钟检查一次
*/30 * * * * cd /path/to/your/bot && ./bot_manager.sh check >/dev/null 2>&1
📦 打包发布
# 清理并重新打包
rm -rf build/ dist/ *.egg-info
python3 -m build

# 生成的文件
# dist/clawdboz-5.0.4-py3-none-any.whl
# dist/clawdboz-5.0.4.tar.gz
📄 相关文档
| 文档 | 说明 |
|---|---|
ARCHITECTURE.md |
架构分析和优化建议 |
FEATURE.md |
完整功能清单 |
REGISTRY_ARCHITECTURE.md |
远程功能架构说明 |
CONNECT_TO_REGISTRY.md |
连接注册中心配置指南 |
REGISTRY_README.md |
注册中心详细文档 |
DEPLOYMENT_SUMMARY.md |
部署总结 |
TESTING.md |
测试指南 |
📝 许可证
本项目采用 源码公开协议(Source Open License)。
该协议以 Apache License, Version 2.0 为参考蓝本进行定制修改,并非标准的 Apache 2.0 许可证。协议在保留源代码开放、自由使用、再分发等核心权利的同时,针对远程好友功能设置了商业场景限制:
未经作者(Dr-Lv)书面授权,任何个人或法律实体不得在商业场景下,利用本项目或其衍生作品部署、运营、维护或提供非官方第三方服务器,以支持或替代远程 Bot 发现、好友关系、注册中心连接、消息转发等远程好友相关功能。
非商业用途(个人学习、研究、非营利组织内部使用等)不受此限制。
如需获得商业授权,请通过本仓库 Issues 或项目官方渠道联系作者。
🇬🇧 English Introduction
Clawdboz is a multi-agent IM collaboration platform based on the ACP (Agent Client Protocol), supporting mainstream agents including OpenClaw, Hermes Agent, Claude Code, Opencode, and Kimi Code. It delivers a WeChat-like interactive experience, allowing you to quickly create local bots, publish them to remote instances, add bots from other servers, and chat with them. It also supports Feishu (Lark) integration.
✨ Highlights
- 🚀 Out-of-the-box: Run with just three lines of code after
pip install - 🤖 Multi-Bot Collaboration: Mix local and remote bots in group chats, trigger replies with @mentions
- 🌐 Web Chat Interface: Complete single-page application supporting single/group chats, file uploads, and image sending
- 🔗 Remote Bot Discovery: Discover bots from other instances through the registry center and call them across servers
- 💬 Feishu (Lark) Integration: Auto-fetch group chat context, stream cards output, silky smooth experience
- 🏠 Session Management: Switch between single and group chats, IndexedDB local cache + server-side persistence
- 🐳 Docker Sandbox: Remote bots execute in isolated containers, safe and controllable
- 🧠 Thinking Mode: Toggle display of AI reasoning process, real-time streaming responses
📺 Demo
🌐 Try it online: https://clawdboz.chat
Features
Web Chat Features
| Feature | Description |
|---|---|
| 🖥️ Web UI | Single-page application, responsive design, mobile-friendly |
| 💬 Single/Group Chat | One-on-one conversations and multi-bot group chats |
| 📎 File Upload | Support images, documents, and other file uploads with preview |
| 🧠 Thinking Mode | Toggle display of AI reasoning process |
| 📝 Streaming Replies | Real-time display of AI responses |
| 📋 Session Management | Create, rename, delete sessions, local cache sync |
| 👥 Member Management | Dynamically add/remove bots in group chats |
| 🔍 Global Search | Search bots and sessions |
Remote Bot Features
| Feature | Description |
|---|---|
| 🌍 Registry Center | Instance registration, bot publishing, heartbeat maintenance |
| 🔍 Bot Discovery | Real-time discovery of bots published by other instances |
| 🤝 Friend System | Instance-level friend requests/acceptance/removal |
| 📡 Center Relay | WebSocket center relay mode, P2P direct connection mode |
| 🐳 Docker Sandbox | Remote bots execute in isolated containers |
| 📞 Remote Invocation | Cross-instance bot calls with 120-second timeout |
Feishu Bot Features
| Feature | Description |
|---|---|
| 🤖 AI Chat | Intelligent dialogue based on Kimi Code CLI |
| 📝 Streaming Replies | Real-time reasoning display with Markdown card beautification |
| 🔧 MCP Tools | Support MCP protocol for external tools, built-in Feishu file/message sending |
| 📦 File Processing | Auto-download images/files, support sending files to Feishu |
| 💬 Group Chat Adaptation | Auto-fetch group chat history, understand conversation context |
| ⏰ Scheduled Tasks | Built-in task scheduling, support custom timed execution |
🏗️ Architecture
┌─────────────────────────────────────────────────────────────┐
│                     Registry Center                         │
│                  api.clawdboz.chat:443 (WSS)                │
│                  In-memory + WebSocket Relay                │
└─────────────────────────────────────────────────────────────┘
                              │
           ┌──────────────────┼──────────────────┐
           │                  │                  │
    ┌──────▼──────┐    ┌─────▼──────┐    ┌─────▼──────┐
    │  Local A    │    │  Host1     │    │  Others    │
    │  port 7011  │    │ port 6905  │    │  ...       │
    └──────┬──────┘    └─────┬──────┘    └─────┬──────┘
           │                  │                  │
    ┌──────▼──────┐    ┌─────▼──────┐    ┌─────▼──────┐
    │  Local Bots │    │ Docker     │    │  Local Bots│
    │  workplace_*│    │  sandbox   │    │  workplace_*│
    └─────────────┘    └────────────┘    └─────────────┘
- Registry Center: Maintains instance list, bot directory, friend relationships, message relay
- Instance: Each instance has a unique hostname-port ID, containing local bots and/or remote bot clients
- Bot: Local bots run directly; remote bots are called via registry center or direct connection, can execute in Docker sandbox
🚀 Quick Start
Prerequisites
⚠️ Please install Kimi Code CLI first
# Install via pip
pip install kimi-cli

# Or install via uv (recommended)
uv tool install --python 3.13 kimi-cli

# Verify installation
kimi --version
1. Install Clawdboz
pip install clawdboz
Or install from source:
git clone <repository-url>
cd clawdboz
pip install -e .
2. Initialize Project
mkdir my-bot && cd my-bot
clawdboz init
clawdboz init will automatically:
- ✅ Detect Kimi CLI installation and login status
- ✅ Create
config.json, auto-fill Python path - ✅ Create
.agents/mcp.json, configure Feishu MCP tools - ✅ Copy built-in Skills (scheduler, local-memory, find-skills)
- ✅ Create
bot_manager.shmanagement script - ✅ Create
bot0.pystartup script - ✅ Create
.bots.mdAgent instruction file
3. Configure Remote Features (Optional)
Edit config.json to enable remote features:
{
  "project_root": "/path/to/my-bot",
  "webchat": {
    "port": 8443,
    "https": false,
    "token": "your-secret-token"
  },
  "remote": {
    "enabled": true,
    "registry_url": "https://api.clawdboz.chat",
    "instance_name": "My Instance",
    "host": "your-host",
    "port": 8443,
    "heartbeat_interval": 30,
    "connection_timeout": 10,
    "call_timeout": 120,
    "max_retries": 3,
    "sandbox": {
      "enabled": true,
      "docker": true,
      "max_memory_mb": 512,
      "timeout_seconds": 120
    },
    "connection_mode": "center",
    "registry_ws_url": "wss://api.clawdboz.chat/ws/registry"
  }
}
4. Start Web Chat Server
# Method 1: Daemon mode (recommended for production)
clawdboz web start --config config.json

# Method 2: Foreground mode (for development/debugging)
clawdboz web --config config.json

# Method 3: Direct run
python web_server.py --port 8443 --host 0.0.0.0
Daemon management commands:
clawdboz web start   # Start daemon
clawdboz web stop    # Stop daemon
clawdboz web restart # Restart daemon
clawdboz web status  # Check daemon status
Visit http://localhost:8443/static/index.html?token=your-token
5. Start Feishu Bot (Optional)
from clawdboz import Bot

bot = Bot(app_id="your-app-id", app_secret="your-app-secret")
bot.run()
Or use bot_manager.sh:
./bot_manager.sh start
📁 Project Structure
Project structure after running clawdboz init:
.
├── .agents/                    # Kimi CLI config directory
│   ├── mcp.json               # MCP config (auto-generated)
│   └── skills/                # Skills directory (auto-generated)
│       ├── find-skills/
│       ├── local-memory/
│       └── scheduler/
│
├── WORKPLACE/                  # Working directory (Bot workspace)
│   ├── workplace_bot1/        # Bot 1 workspace
│   ├── workplace_bot2/        # Bot 2 workspace
│   ├── .remote/               # Remote feature data
│   │   ├── published_bots.json
│   │   └── added_bots.json
│   ├── user_images/           # User image download directory
│   └── user_files/            # User file download directory
│
├── clawdboz/web/static/index.html  # Web Chat frontend (SPA)
├── web_server.py                   # Web server entry
│                                   # Note: registry_server.py source is on the central server
│
├── logs/                       # Log directory
│   ├── main.log
│   ├── bot_debug.log
│   └── feishu_api.log
│
├── .bots.md                    # Agent instruction file (auto-generated)
├── bot0.py                     # Startup script (auto-generated)
├── bot_manager.sh              # Management script (auto-generated)
└── config.json                 # Config file (auto-generated)
Source Structure:
clawdboz/                       # Python package
├── __init__.py
├── cli.py                      # CLI entry `clawdboz`
├── core/                       # Bot core
│   ├── bot.py                  # Bot base class
│   ├── bot_manager.py          # BotManager (registration, management)
│   └── simple_bot.py           # Simplified Bot API
├── web/                        # Web service
│   ├── server.py               # WebChatServer (FastAPI)
│   ├── chat/                   # Chat core
│   │   ├── core.py             # ChatCore (message processing, remote calls)
│   │   ├── history.py          # Chat history management
│   │   ├── mentions.py         # @mention parsing
│   │   ├── group.py            # Group chat logic
│   │   └── acp.py              # ACP client management
│   ├── routes/                 # API routes
│   │   ├── bots.py             # /api/bots
│   │   ├── websocket.py        # WebSocket connection management
│   │   ├── remote.py           # /api/remote/*
│   │   ├── sessions/           # Session-related routes
│   │   └── internal.py         # Internal API (e.g., server restart)
│   ├── static/                 # Frontend assets
│   │   ├── index.html          # Main UI (single file ~10K lines JS)
│   │   └── ...
│   └── workspace.py            # Workspace management
├── remote/                     # Remote features
│   ├── manager.py              # RemoteBotManager (core)
│   ├── registry_client.py      # Registry HTTP API client
│   ├── registry_ws_client.py   # Registry WebSocket client
│   ├── bot_publisher.py        # Bot publishing to Registry
│   ├── remote_client.py        # Remote Bot call client
│   ├── docker_sandbox.py       # Docker sandbox management
│   ├── friend_manager.py       # Friend relationship management
│   └── ...
├── communication/              # ACP communication layer
│   ├── acp_client.py
│   ├── websocket_acp_client.py
│   └── session_manager.py
└── utils/                      # Utilities
    └── logger.py
🖥️ Web Chat Guide
Create Session
- Click
+or...in the top right → New Session - Select one or more bots
- Select a single bot for single chat, multiple bots for group chat
Group Chat @Mentions
- Type
@in group chat to select a bot; only mentioned bots will reply - Type
@allor@everyoneto mention all bots - Without mentioning any bot, the message is saved but no reply is triggered
Manage Group Members
- In group chat, click
...in the top right → Manage Members - You can remove existing bots (creator cannot be removed)
- You can add new available bots to the group
File Upload
- Click the 📎 button on the left side of the input box to upload files
- Support images, documents, code files, etc.
- Bots will automatically analyze file content
🌍 Remote Bot Guide
Publish Bot
- Open Contacts in Web Chat
- Find the local bot, click Publish to Remote
- Set display name, description, whether to enable sandbox
Add Remote Bot
- View the Online Instances tab in Contacts
- Browse bots published by other instances
- Click Add Friend to send a friend request
- After the other party accepts, the bot will appear in Contacts
Invoke Remote Bot
- Remote bots appear in the bot list when creating sessions
- Directly @mention the remote bot in chat to invoke it
- Remote bot replies are displayed in real-time streaming
🤖 CLI Commands
Bot Management
clawdboz bot list              # List all bots
clawdboz bot create <bot_id>   # Create bot
clawdboz bot info <bot_id>     # View bot details
clawdboz bot edit <bot_id>     # Edit bot
clawdboz bot delete <bot_id>   # Delete bot
Session Management
clawdboz chat list                          # List all sessions
clawdboz chat create --bots bot1 --bots bot2 --name "Group Chat"  # Create session
clawdboz chat send <chat_id> "message"      # Send message
clawdboz chat interactive <chat_id>         # Interactive chat
Contacts & Moments
clawdboz contacts list                      # List contacts
clawdboz moments list                       # View moments
clawdboz moments post "content"             # Post moment
💬 Feishu App Configuration
1. Create App
- Go to Feishu Open Platform and log in with developer account
- Click "Developer Console" → "Create Enterprise Self-built App"
- Fill in app name and description, click "Create"
- Enter app details page, get App ID and App Secret
2. Configure Permissions
Required permissions:
| Permission Type | Permission Name | Purpose |
|---|---|---|
| API | im:message:send |
Send messages |
| API | im:message:send_as_bot |
Send message cards |
| API | im:message:update |
Update message cards |
| API | im:message.resource |
Get images, files |
| API | im:chat:readonly |
Get chat history |
| API | im:file:create |
Upload files |
| API | im:file:send |
Send file messages |
| API | im:image:create |
Upload images |
| Event | im.message.receive_v1 |
Receive messages |
| Bot | receive_message |
Receive messages |
| Bot | send_message |
Send messages |
3. Publish App
- Click "Version Management & Release" → "Create Version"
- Fill in version number (e.g., 1.0.0)
- Select "Availability Status" as "All Employees"
- Click "Save" and "Apply for Release"
🔧 Management Commands
# Start bot
./bot_manager.sh start

# Stop bot
./bot_manager.sh stop

# Restart bot
./bot_manager.sh restart

# Check status
./bot_manager.sh status

# View logs (last 50 lines)
./bot_manager.sh log 50

# Real-time log tracking
./bot_manager.sh follow

# Ops check
./bot_manager.sh check
Scheduled Ops Monitoring (Recommended)
# Edit crontab
export EDITOR=vim && crontab -e

# Check every 30 minutes
*/30 * * * * cd /path/to/your/bot && ./bot_manager.sh check >/dev/null 2>&1
📦 Build & Release
# Clean and rebuild
rm -rf build/ dist/ *.egg-info
python3 -m build

# Generated files
# dist/clawdboz-5.0.4-py3-none-any.whl
# dist/clawdboz-5.0.4.tar.gz
📄 Documentation
| Document | Description |
|---|---|
ARCHITECTURE.md |
Architecture analysis and optimization suggestions |
FEATURE.md |
Complete feature list |
REGISTRY_ARCHITECTURE.md |
Remote feature architecture |
CONNECT_TO_REGISTRY.md |
Registry connection guide |
REGISTRY_README.md |
Registry detailed documentation |
DEPLOYMENT_SUMMARY.md |
Deployment summary |
TESTING.md |
Testing guide |
📝 License
This project is licensed under the Source Open License.
The license is customized based on Apache License, Version 2.0, not the standard Apache 2.0 license. It retains core rights such as source code openness, free use, and redistribution, while setting commercial restrictions on remote friend features:
Without written authorization from the author (Dr-Lv), no individual or legal entity shall deploy, operate, maintain, or provide unofficial third-party servers in commercial scenarios using this project or its derivative works to support or replace remote bot discovery, friend relationships, registry center connections, message relay, and other remote friend-related features.
Non-commercial use (personal learning, research, non-profit organization internal use, etc.) is not subject to this restriction.
For commercial licensing, please contact the author via Issues or official project channels.
Release history Release notifications | RSS feed


Download files
Download the file for your platform. If you're not sure which to choose, learn more about installing packages.
Source Distribution
Built Distribution
Filter files by name, interpreter, ABI, and platform.
If you're not sure about the file name format, learn more about wheel file names.
Copy a direct link to the current filters
File details
Details for the file clawdboz-5.0.4.tar.gz.
File metadata
- Download URL: clawdboz-5.0.4.tar.gz
- Upload date:
- Size: 1.4 MB
- Tags: Source
- Uploaded using Trusted Publishing? No
- Uploaded via: twine/6.2.0 CPython/3.11.15
File hashes
| Algorithm | Hash digest | |
|---|---|---|
| SHA256 |
f1727f05aa1532007ae351e8687096a70a37334c556b430850d5f61e2d1d7506
|
|
| MD5 |
f2eb9c8015b1ca1334f89f48da4a06f9
|
|
| BLAKE2b-256 |
7b9d1693411c50ce49bcd09d74c88cfbad5519b7448e5333c2d9688332f94315
|
File details
Details for the file clawdboz-5.0.4-py3-none-any.whl.
File metadata
- Download URL: clawdboz-5.0.4-py3-none-any.whl
- Upload date:
- Size: 1.3 MB
- Tags: Python 3
- Uploaded using Trusted Publishing? No
- Uploaded via: twine/6.2.0 CPython/3.11.15
File hashes
| Algorithm | Hash digest | |
|---|---|---|
| SHA256 |
b2535e923d5e4155071669b7084b85b6990f327e0334ba840b1fe82f1db53ba7
|
|
| MD5 |
fcc65f75c51b9e8bf5c46e1b61bb6dc9
|
|
| BLAKE2b-256 |
f26f9bdc890ddc8ee286c69c99ca7011a8de9e7d9d8f534dba4e8467e4d62b06
|






