
CTally
A floating status light for your Claude Code sessions on macOS and Ubuntu: whose turn is it? Glance over instead of tabbing back to the terminal.
pipx install ctally
ctally setup --tmux
The name comes from the tally light, the lamp on a broadcast camera that shows it's live, and from tallying up your sessions.
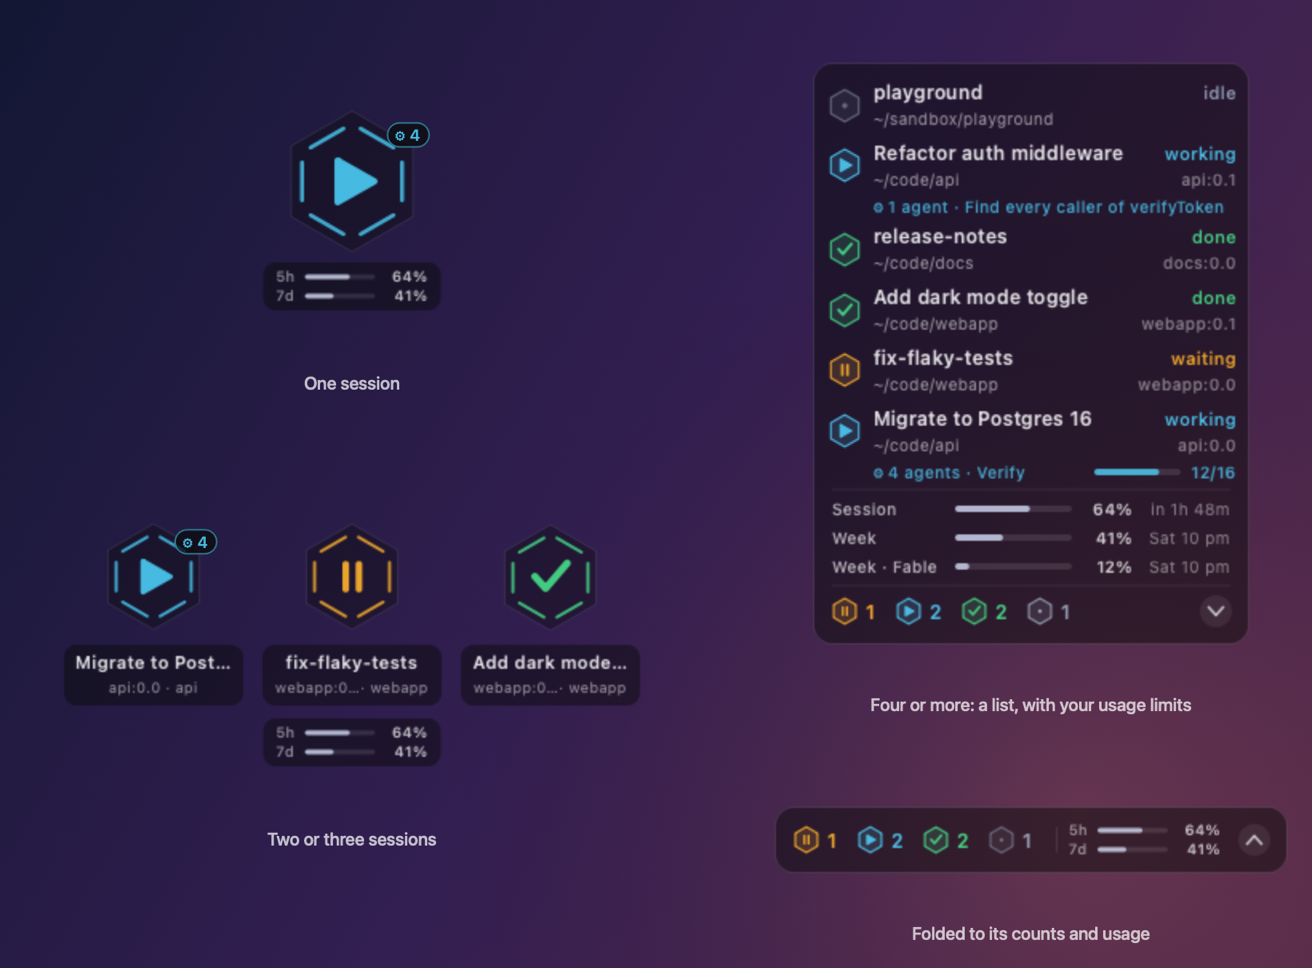
Every session gets a hexagon whose glyph and color say what it's doing:
| State | Meaning | |
|---|---|---|
| ▶ cyan | working | Claude's turn: it's working, or its subagents or a workflow still are |
| ⏸ amber | waiting | your turn: a permission prompt, a question or a plan to approve, or it's waiting for input |
| ⏸ amber | limit | stopped by your plan's usage limit; it turns to done when the limit resets |
| ✓ green | done | your turn: the turn finished, and it stays here until your next prompt |
| • slate | idle | nothing running |
Features
- Floats above everything without ever taking keyboard focus; on macOS on every Space and beside full-screen apps too.
- One to three sessions show as big badges; four or more become a compact list with each session's
name and directory, up to 16 rows. Session names come from
/rename, or else the title Claude gave the session. - Sees subagents and workflows: while a session's agents run, its row says how many and what they're up
to (
4 agents · Verify), with a progress bar for a workflow, and its badge carries the count. More below. - Your plan's usage limits: the session, the week, and each model's week, as bars with when each resets, kept fresh after every reply. More below.
- Built for tmux: every row shows its pane, a click switches to it, prefix + J jumps to the session that needs you, and the counts can sit in tmux's status line. More below.
- Click a row to bring that session's terminal forward: the exact tmux pane, and on macOS the exact Terminal tab.
- Fold the list down to a bar of counts with the chevron.
- When a turn finishes, its row washes green and its mark bounces once; then everything holds still.
- Menu bar (or top bar) icon to show or hide CTally. Off stays off across restarts, and the app sits idle with no timers.
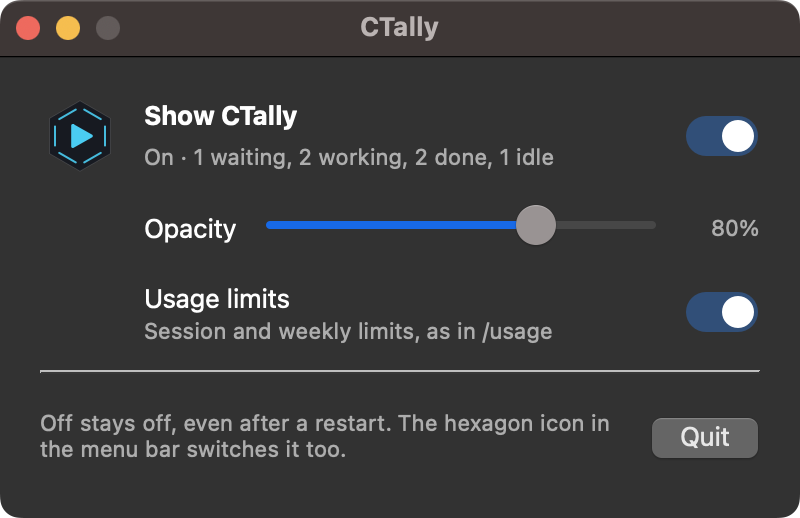
- Settings window with an on/off switch, an opacity slider (80% by default), and a switch for the usage limits.
- Silent: no sounds, no notifications, no Dock icon.
- One Python package, installed with pipx: the same Qt app on macOS and Linux, and a
ctallycommand for the terminal and tmux.
Subagents and workflows
When a session hands work to subagents, or runs a whole workflow of them, CTally follows along:
- The row grows a line about its agents: how many are running, and what they're doing. For a workflow
that's the phase it has reached (
4 agents · Verify), with a progress bar of its agents finished out of those started so far (12/16; the total grows as each phase sets off more). For a single agent it's the task it was given (1 agent · Find callers of parseConfig). - The badge carries the count (
⚙ 4) on its shoulder. - The session stays working until its agents are back. A session that sends agents off in the background finishes its own turn at once, and would otherwise look done for as long as they run, sometimes hours. CTally keeps it cyan until they return and Claude has taken in their results, and prefix + J leaves it alone till then.
- Stopping by hand counts. Press Esc, dismiss a question, or kill agents or a workflow, and Claude Code runs no hook to say so. CTally reads it from the transcripts instead: the session shows done within a couple of seconds, and the agents you stopped leave the agents line.
ctally list shows the count too. This needs the subagent hooks that ctally setup adds; if you set up
CTally before they existed, run ctally setup again and restart your sessions.
Usage limits
CTally shows your plan's usage limits the way Claude Code's /usage does: the current session (the
five-hour window), the week across all models, any per-model weekly limit (Fable, say), and usage credits if
you've switched them on.
- The list gives every limit a line between the sessions and the count bar: a bar, the share used, and
when it resets (
in 1h 48m,Sat 10 pm). - The folded bar and the badges carry two small meters, the session (
5h) and the week (7d). - Hover over any of them for the details, and how fresh they are. The menu bar (top bar) icon's menu lists them too.
- Colours: a bar turns amber at 75% and red at 90%. Numbers more than an hour old are dimmed.
- Hitting a limit shows it at 100% at once, and the sessions it stopped as limit. A prompt you send before it resets doesn't make them look busy, because it can't get through. A limit reset early starts a new window, and the meter follows it from the next reply.
- tmux's status line gets
5h 71% 7d 49%after the counts, coloured the same way, andctally usageprints the lot:
$ ctally usage
Current session            ███████░░░  71%  resets 7:30 pm (in 2h 25m)
Current week (all models)  █████░░░░░  49%  resets Sat Oct 10, 10 pm
Current week (Fable)       ░░░░░░░░░░   0%  resets Sat Oct 10, 10 pm
Updated just now
Where the numbers come from: Claude Code passes the session and week limits to its status line after every
reply, so ctally setup adds a status line that hands them to CTally and shows nothing itself (a status
line you already had keeps showing; CTally's runs it). Everything else comes from the copy of the /usage
numbers Claude Code keeps in ~/.claude.json, which it refreshes only now and then. Limits apply to Pro,
Max and Team plans; with an API key there are none to show.
Turn the limits off with the switch in Settings, or right-click → Hide Usage Limits. That hides them from tmux
too. ctally setup --no-statusline leaves the status line out; the limits then refresh only when Claude Code
refreshes its copy.
Built for tmux
Running a dozen Claude Code sessions across tmux sessions and split panes is exactly what CTally is for.
It knows where each one lives, because tmux leaves TMUX and TMUX_PANE in the environment of everything
started inside it.
- Every row shows its pane.
webapp:0.1is tmux sessionwebapp, window 0, pane 1, and it sits next to the directory, so two sessions in the same folder are easy to tell apart. - Click a row and tmux switches to that exact pane. Then the Terminal tab attached to that tmux session comes forward, or a new Terminal window attaches to it if no tab shows it.
- prefix + J jumps to the session that needs you, without touching the mouse: waiting sessions first, then finished ones, longest-waiting first, passing over those stopped by the usage limit. Press it again for the next one.
- The counts sit in tmux's status line (
!1 ▶2 ✓5: waiting, working, done), and they change the moment a session does. Your plan's session and week usage follow them (5h 71% 7d 49%).
Turn on the key and the status line with:
ctally setup --tmux
This adds a marked block to ~/.tmux.conf and applies it to your running tmux at once. The file is backed
up first, and ctally uninstall takes the block out again. To set it up by hand instead:
bind-key J run-shell -b "'$HOME/.local/bin/ctally' jump '#{pane_id}' '#{client_name}' '#{socket_path}'"
set -ag status-right ' #($HOME/.local/bin/ctally status --tmux)'
set -g status-right-length 80
The same ctally command works in any shell (it's installed to ~/.local/bin):
$ ctally list
waiting  webapp:0.0       -         webapp                   5f3c…
done     webapp:0.1       -         webapp                   9a1e…
working  api:0.0          4 agents  api                      c27d…
$ ctally status
!1 ▶1 ✓1
$ ctally usage         # your plan's usage limits
$ ctally jump          # inside tmux: go to the session that needs you
Requirements
- macOS 12 or later, or Ubuntu 22.04 or later (other Linux desktops should work too; see Ubuntu)
- Python 3.9 or later and pipx
- Claude Code
Install
pipx install ctally
ctally setup            # or: ctally setup --tmux
pipx puts CTally in an environment of its own, with Qt (PySide6, about 100–400 MB depending on the platform),
and the ctally command in ~/.local/bin. Then ctally setup does four things:
- Copies the hook and status line scripts to
~/.claude/hooks/(ctally.sh,ctally-statusline.sh). - Adds the hooks and the status line to
~/.claude/settings.json. It merges with your existing settings and backs the file up first. A status line you already had is kept, and still shows. - Starts CTally at login: a LaunchAgent on macOS, an autostart entry (
~/.config/autostart) on Linux. - Starts CTally now.
Restart any Claude Code sessions that were already running so they pick up the hooks.
| Option | Effect |
|---|---|
--tmux |
also set up tmux: the prefix + J jump key and status-line counts (details) |
--no-hooks |
leave ~/.claude/settings.json alone (add the hooks yourself; see below) |
--no-statusline |
no status line: the usage limits refresh only when Claude Code refreshes them |
--no-autostart |
don't start CTally at login |
--no-launch |
set up without starting CTally now |
To upgrade: pipx upgrade ctally, then ctally setup again. It restarts CTally and keeps your preferences.
For the latest commit, before it's released: pipx install --force git+https://github.com/JinyuJinyuJinyu/ctally.git.
Upgrading from the Swift version (CTally.app, installed with ./install.sh): remove the old ctally
script first, since pipx won't replace a file it didn't put there: rm ~/.local/bin/ctally. Then install as
above. ctally setup quits and removes ~/Applications/CTally.app and its login item, and keeps your opacity,
fold setting and position.
Ubuntu
sudo apt install pipx libxcb-cursor0
pipx ensurepath          # then open a new terminal
pipx install ctally
ctally setup --tmux
libxcb-cursor0 is the one library Qt needs that a desktop install of Ubuntu lacks.
- Wayland (Ubuntu's default) lets no app keep itself on top or choose where its window goes, so CTally runs through XWayland, which allows both. That happens on its own; you don't need to switch sessions.
- The top-bar icon uses Ubuntu's AppIndicator support, which is on by default. On a desktop without a tray, right-click the indicator itself for the menu.
- Clicking a session switches tmux to its pane, and opens a terminal on that tmux session if none shows
it. Raising the terminal's window works on X11 with
xdotoolinstalled (sudo apt install xdotool); under Wayland no app may raise another's window, so bring the terminal up yourself. prefix + J needs neither.
Using it
| To | Do this |
|---|---|
| Move it | Drag it anywhere. It remembers the spot and grows left from there, and away from the nearer screen edge: up from the bottom half of the screen, down from the top half, where the list unfolds downward. |
| Go to a session | Click its row (or its badge). |
| Jump to the session that needs you | In tmux, press prefix + J (set up by ctally setup --tmux). Again for the next one. |
| Fold or unfold the list | Click the chevron on the count bar, or right-click → Fold List. |
| Hide or show it | Use the hexagon in the menu bar (top bar on Ubuntu), or right-click → Hide CTally. |
| Change opacity | Menu bar → Settings…, or right-click → Settings… |
| See your usage limits | Hover over them. Hide them with right-click → Hide Usage Limits, or in Settings. |
| Start or stop it | ctally run starts it; Quit in its menu stops it. |
| Name a session | Run /rename my-name in Claude Code. CTally picks the name up within seconds. |
The first time you click a session on macOS, macOS asks whether CTally (shown as Python, which runs it) may control Terminal. Allow it so CTally can bring the right tab forward. You can change this later in System Settings → Privacy & Security → Automation.
How it works
Claude Code ──hooks──▶ ~/.claude/ctally.d/<session id> ──read 5×/s──▶ ctally run
            ──status line──▶ ~/.claude/ctally.d/.statusline ─┘
Two pieces, connected by a folder:
-
Hooks.
ctally.sh(insrc/ctally/hooks/) runs on Claude Code events and writes one small file per session:working <pid> <project>.Event State written UserPromptSubmitworkingPreToolUseworking(a tool is about to run)PostToolUse/PostToolUseFailureworking(back to work after a permission prompt)PermissionRequestwaiting, the moment a permission, a question or a plan to approve is on screenStopdone, or stillworkingif subagents or a workflow run on in the backgroundStopFailurelimitedwhen the usage limit stopped the turn;waitingfor a login or billing problem; elsedoneNotificationwaiting(a permission prompt still open); idle input after a turn that never ended, as Esc leaves it, meansdoneSessionEndremoves the file SubagentStart/SubagentStopadds / removes a file per agent in ~/.claude/ctally.d/.agents/<session id>/A
waitingnever overwritesdone: Claude Code also sends its idle notification after a turn ends. Nor does the idle notification count while the session's agents are still out. A usage limit hit is also noted in~/.claude/ctally.d/.limit: what Claude Code said, and when the limit resets, from the status line. Until then a new prompt leaves the sessionlimited, and the limit shows as used up. The note goes once a turn gets through, Claude Code says the limit has reset, or the status line shows a new window. Esc and killed agents get no hook, so CTally also reads the end of each busy session's transcript, and of its agents' transcripts: a stop there with nothing after it means the turn is over, and an agent whose transcript ends interrupted (or that Claude Code marksstoppedByUser) is gone. Inside tmux, a change of state also redraws tmux's status lines, so the counts there update at once.The status line.
ctally-statusline.shsaves what Claude Code hands its status line, the latest from any session, to~/.claude/ctally.d/.statuslinewhenever it includes the usage limits. It prints nothing, or runs the status line you had before and prints what that prints. -
The app. It polls the folder five times a second, checking modification times first so unchanged files aren't re-read. Sessions whose process has exited drop off the display. The exception is when nothing else is running: a finished one stays so you can still see it. Leftover files are cleaned up after a day. The usage limits it checks every two seconds, the same way.
To add the hooks by hand, copy src/ctally/hooks/ctally.sh and ctally-statusline.sh to ~/.claude/hooks/
and merge this into ~/.claude/settings.json (to keep a status line you have, put its command after
CTally's as one quoted argument: "\"$HOME/.claude/hooks/ctally-statusline.sh\" 'your command'"):
{
  "statusLine": { "type": "command", "command": "\"$HOME/.claude/hooks/ctally-statusline.sh\"" },
  "hooks": {
    "UserPromptSubmit": [{ "hooks": [{ "type": "command", "command": "\"$HOME/.claude/hooks/ctally.sh\" working" }] }],
    "PreToolUse":       [{ "hooks": [{ "type": "command", "command": "\"$HOME/.claude/hooks/ctally.sh\" working" }] }],
    "PostToolUse":      [{ "hooks": [{ "type": "command", "command": "\"$HOME/.claude/hooks/ctally.sh\" working" }] }],
    "PostToolUseFailure": [{ "hooks": [{ "type": "command", "command": "\"$HOME/.claude/hooks/ctally.sh\" working" }] }],
    "PermissionRequest": [{ "hooks": [{ "type": "command", "command": "\"$HOME/.claude/hooks/ctally.sh\" asking" }] }],
    "Stop":             [{ "hooks": [{ "type": "command", "command": "\"$HOME/.claude/hooks/ctally.sh\" done" }] }],
    "StopFailure":      [{ "hooks": [{ "type": "command", "command": "\"$HOME/.claude/hooks/ctally.sh\" failed" }] }],
    "Notification":     [{ "hooks": [{ "type": "command", "command": "\"$HOME/.claude/hooks/ctally.sh\" waiting" }] }],
    "SessionEnd":       [{ "hooks": [{ "type": "command", "command": "\"$HOME/.claude/hooks/ctally.sh\" end" }] }],
    "SubagentStart":    [{ "hooks": [{ "type": "command", "command": "\"$HOME/.claude/hooks/ctally.sh\" agent-start" }] }],
    "SubagentStop":     [{ "hooks": [{ "type": "command", "command": "\"$HOME/.claude/hooks/ctally.sh\" agent-stop" }] }]
  }
}
Privacy
Everything stays on your machine. The app makes no network requests. To show session names it reads each
transcript in ~/.claude/projects/, but only two parts:
- the last 256 KB, for the
/renamename or the generated title - the first 256 KB, once, for the directory the session started in
While agents run it also reads, beside the transcript, a running workflow's progress journal (for its phase and how many agents are done) and a lone subagent's one-line task description. It never reads your conversations otherwise.
For the usage limits it reads what its status line saved, and from ~/.claude.json only the cached /usage
numbers and your account's id, to check they're yours. It never touches your credentials.
Terminal support
On macOS, clicking a session works best in Terminal.app, with or without tmux: CTally finds the exact tab, or the exact tmux pane and the tab attached to it. In other terminals (iTerm2, VS Code, …) and for sessions in the Claude desktop app, it still switches tmux to the right pane and brings the app forward, but can't pick the tab. On Linux, see Ubuntu. The prefix + J jump key works in any terminal.
Uninstall
ctally uninstall
pipx uninstall ctally
The first removes the hooks and status line in ~/.claude/settings.json (putting back a status line you had)
and the block in your tmux config, both after a backup, then the scripts, starting at login, the state files
and the preferences. Your other Claude Code and
tmux settings are left as they are. The second removes the command and its Qt.
Troubleshooting
- CTally doesn't change state. Restart your Claude Code sessions after installing. Then check that
~/.claude/ctally.d/gets a file when you send a prompt. - Clicking a session does nothing. On macOS, allow Python (which runs CTally) to control Terminal under System Settings → Privacy & Security → Automation.
- prefix + J says "nothing needs you". That means no session is waiting or done;
ctally listshows what CTally sees. A session started outside tmux can't be jumped to. - CTally is gone. Use the hexagon icon in the menu bar → Show CTally. If the icon is gone too, it isn't
running: run
ctally run. Its log is~/Library/Logs/ctally.logon macOS and~/.local/state/ctally/ctally.logon Linux. - No usage limits. They need a Pro, Max or Team plan, and a reply in some session since CTally's setup
(restart sessions that were running then).
ctally usageshows what CTally has. - Ubuntu: "Could not load the Qt platform plugin xcb". Install the library it names, usually
sudo apt install libxcb-cursor0.
Developing
python3 -m venv .venv && .venv/bin/pip install -e . pytest
.venv/bin/ctally run                 # the indicator, from your checkout
.venv/bin/python -m pytest tests     # the tests
.venv/bin/python tools/snapshot.py   # the README's screenshots, from demo data
Set CTALLY_STATE_DIR, CTALLY_PROJECTS_DIR, CTALLY_CONFIG_DIR and CTALLY_CLAUDE_JSON to run it against
other folders than ~/.claude/ctally.d, ~/.claude/projects and its own settings, and another file than
~/.claude.json.
Releasing
Releases go to PyPI from GitHub, by .github/workflows/publish.yml, using PyPI's Trusted Publishing: PyPI
trusts that workflow in this repository, so no token is stored anywhere.
- Bump
__version__insrc/ctally/__init__.py, then commit and push. - Create a release whose tag matches it:
gh release create v0.2.1 --generate-notes, or on GitHub. - The workflow builds the package, checks it and uploads it.
pipx upgrade ctallythen picks it up.
Once, before the first release: on pypi.org → your account → Publishing, add a pending
publisher with PyPI project ctally, owner JinyuJinyuJinyu, repository ctally, workflow publish.yml
and environment pypi.
License
CTally is an independent community project. It is not affiliated with or endorsed by Anthropic.
1 maintainer

Metadata
1 maintainer
Release files for ctally 0.3.1
For a detailed explanation of source distributions (sdists) and built distributions (wheels), please see the package formats documentation.
Source distribution (sdist)
| File | Size | Uploaded | |
|---|---|---|---|
| ctally-0.3.1.tar.gz | 98.6 kB | Details |
Built distribution (wheel)
| File | Interpreter | ABI | Platform | Reset |
|---|---|---|---|---|
| ctally-0.3.1-py3-none-any.whl | Python 3 | none | any | Details |
Total release size: 172.2 kB
Release files / ctally-0.3.1.tar.gz
| Download URL | ctally-0.3.1.tar.gz |
|---|---|
| Size | 98.6 kB |
| Tags | Source |
|
SHA-256 checksum How to use checksums |
a18d133a29cce32235a9929b9c714539fe4e4888088ebf9a1b4ee4e24fb8b9d1
|
|
BLAKE2b-256 checksum How to use checksums |
69694707571a9dd84209d732846abc2ca4a4aa95294da58bc8a1ed1d2dcac5b9
|
| Upload date | |
|
Uploaded using Trusted Publishing? What is trusted publishing? |
Yes |
| Uploaded via |
twine/7.0.0 CPython/3.13.14
|
Provenance
Provenance describes where a file came from. On PyPI, provenance is shared via attestations, which provide a verifiable record of the build or publishing details. View details, limitations and caveats.


PyPI Publish Attestation
PyPI verified that this artifact, at this checksum, originated from the publisher listed below.
Signed by GitHub Actions, verified by PyPI on Oct 7, 2026.
Transparency logRelease files / ctally-0.3.1-py3-none-any.whl
| Download URL | ctally-0.3.1-py3-none-any.whl |
|---|---|
| Size | 73.6 kB |
| Tags | Python 3 |
|
SHA-256 checksum How to use checksums |
4ca75d899c0c0428ad3ead2fe814eb241dd0d9a3b70daa26d253a8738e3c61c7
|
|
BLAKE2b-256 checksum How to use checksums |
616660cb41317a184ec8153b100ef7c722584eb7ca6e8afff0eff30ff44a8912
|
| Upload date | |
|
Uploaded using Trusted Publishing? What is trusted publishing? |
Yes |
| Uploaded via |
twine/7.0.0 CPython/3.13.14
|
Provenance
Provenance describes where a file came from. On PyPI, provenance is shared via attestations, which provide a verifiable record of the build or publishing details. View details, limitations and caveats.
PyPI Publish Attestation
PyPI verified that this artifact, at this checksum, originated from the publisher listed below.
Signed by GitHub Actions, verified by PyPI on Oct 7, 2026.
Transparency log













