Automated pelvimetry and body composition analysis from CT segmentations
Verified details
These details have been verified by PyPIProject links
GitHub Statistics
Maintainers

Project description
📐 ctpelvimetry


The first open-source Python package for fully automated CT pelvimetry and body composition analysis.
ctpelvimetry turns the manual, ~15-minute-per-scan process of measuring mid-pelvic dimensions and body composition into a fully automated 2-minute pipeline. Built for surgical data science, preoperative risk assessment, and large-scale ML training datasets, it integrates with TotalSegmentator to extract anatomical metrics directly from raw CT scans — eliminating inter-observer variability.
📑 Contents
- Quick Start
- Installation
- CLI Usage
- Python API
- Output Structure
- Measured Metrics
- Quality Control
- Hardware Requirements
- Body Composition License (Optional)
- Architecture
- Troubleshooting
- Citation
🚀 Quick Start
# Install
pip install "ctpelvimetry[seg]"

# Process a single DICOM folder
ctpelvimetry pelv \
  --dicom_dir /path/to/Patient_001 \
  --patient Patient_001 \
  --output_root ./output

# Or a directory full of NIfTI files (Medical Decathlon, KiTS, etc.)
ctpelvimetry pelv \
  --nifti_root /path/to/niftis \
  --output_root ./output
You get back a CSV with ISD, inlet/outlet AP, sacral metrics, plus QC images. ~2 minutes per scan on a GPU.
📦 Installation
# Basic — for analysis when you already have segmentations
pip install ctpelvimetry

# Full — includes TotalSegmentator for end-to-end automation
pip install "ctpelvimetry[seg]"
Requires Python 3.10+.
For body composition (VAT/SAT/muscle), one extra step is required — see Body Composition License. Pelvimetry works without it.
🖥️ CLI Usage
ctpelvimetry ships two subcommands:
| Subcommand | Purpose |
|---|---|
pelv |
Pelvimetry: mid-pelvic dimensions (ISD, inlet/outlet AP, sacrum) |
body-comp |
Body composition: VAT, SAT, skeletal muscle area at L3 and ISD levels |
pelv — Pelvimetry
The pelv subcommand has 5 input modes. Pick the one that matches your data layout:
| Mode | Flags | Use when |
|---|---|---|
| 1. Existing seg | --seg_folder (+ --nifti_path) |
You already have TotalSegmentator output |
| 2. Single DICOM | --dicom_dir + --patient |
One patient's DICOM folder on disk |
| 3. Single NIfTI | --nifti_path + --patient |
One NIfTI file |
| 4. DICOM batch | --dicom_root (+ --start / --end) |
Folder of Patient_001/, Patient_002/, ... |
| 5. NIfTI batch | --nifti_root (+ optional --pattern) |
Folder of *.nii.gz files (one per patient) |
Examples
# Mode 1 — analysis only (skip segmentation)
ctpelvimetry pelv \
  --seg_folder /path/to/seg \
  --nifti_path /path/to/ct.nii.gz \
  --patient Patient_001 \
  --output_root ./output

# Mode 2 — single patient, full pipeline from DICOM
ctpelvimetry pelv \
  --dicom_dir /path/to/Patient_001 \
  --patient Patient_001 \
  --output_root ./output

# Mode 3 — single patient, full pipeline from NIfTI
ctpelvimetry pelv \
  --nifti_path /path/to/ct.nii.gz \
  --patient Patient_001 \
  --output_root ./output

# Mode 4 — batch DICOM (expects ./DICOMs/Patient_001/, ./DICOMs/Patient_002/, ...)
ctpelvimetry pelv \
  --dicom_root /path/to/DICOMs \
  --output_root ./output \
  --start 1 --end 250

# Mode 5 — batch NIfTI (expects *.nii.gz directly under nifti_root)
ctpelvimetry pelv \
  --nifti_root /path/to/niftis \
  --output_root ./output

# Custom glob pattern (e.g. uncompressed NIfTI, or non-default naming)
ctpelvimetry pelv \
  --nifti_root /path/to/niftis \
  --pattern "case_*_ct.nii" \
  --output_root ./output
Common flags
| Flag | Default | Description |
|---|---|---|
--output_root |
./pelvimetry_output |
Root directory for all outputs |
--output |
combined_pelvimetry_report.csv |
Output CSV filename |
--fast |
off | Use TotalSegmentator --fast mode (faster, slightly less accurate) |
--no-tissue |
off | Skip the body composition (tissue_types) task |
--qc / --no-qc |
on | Generate QC images |
Run ctpelvimetry pelv --help for the full list.
body-comp — Body Composition
Computes VAT, SAT, and skeletal muscle area at the L3 and mid-ISD levels. Requires pelvimetry to have already run (so it knows where the ISD level is).
# Single patient
ctpelvimetry body-comp \
  --patient Patient_001 \
  --seg_root ./output/Segmentation \
  --nifti_root ./output/NIfTI \
  --pelvimetry_csv ./output/combined_pelvimetry_report.csv \
  --output ./output/body_comp_001.csv \
  --qc

# Batch
ctpelvimetry body-comp \
  --seg_root ./output/Segmentation \
  --nifti_root ./output/NIfTI \
  --pelvimetry_csv ./output/combined_pelvimetry_report.csv \
  --output ./output/body_composition_report.csv \
  --start 1 --end 250 \
  --qc_root ./output/body_comp_qc
Run ctpelvimetry body-comp --help for all flags.
🐍 Python API
For custom pipelines or integration into existing data-science workflows.
Public API surface
| Function | Use case |
|---|---|
run_combined_pelvimetry |
Existing segmentation → measurements |
run_full_pipeline |
DICOM folder → NIfTI → seg → measurements (one patient) |
run_nifti_pipeline |
NIfTI file → seg → measurements (one patient) |
run_pelvimetry_batch |
DICOM batch (parent dir of Patient_xxx/ folders) |
run_pelvimetry_nifti_batch |
NIfTI batch (directory of *.nii.gz) |
process_single_patient |
Body composition for one patient |
PelvicConfig |
Tuneable detection thresholds |
Single-patient examples
from ctpelvimetry import (
    run_combined_pelvimetry,
    run_full_pipeline,
    run_nifti_pipeline,
)

# A. Already have segmentation (fastest path; just measurement + QC)
result = run_combined_pelvimetry(
    patient_id="Patient_001",
    seg_folder="/path/to/segmentation_masks",
    nifti_path="/path/to/ct.nii.gz",
    qc_dir="./output/QC",  # optional
)
print(f"ISD: {result['ISD_mm']} mm")
print(f"Inlet AP: {result['Inlet_AP_mm']} mm")

# B. From a DICOM folder (end-to-end)
result = run_full_pipeline(
    patient_id="Patient_001",
    dicom_path="/path/to/Patient_001",
    output_root="./output",
    use_fast=False,      # set True for quick previews
    skip_tissue=False,   # set True to skip body comp
)

# C. From a NIfTI file (end-to-end, skips DICOM conversion)
result = run_nifti_pipeline(
    patient_id="Patient_001",
    nifti_path="/path/to/ct.nii.gz",
    output_root="./output",
)
Batch examples
from ctpelvimetry.batch import (
    run_pelvimetry_batch,
    run_pelvimetry_nifti_batch,
)

# DICOM batch — expects /data/DICOMs/Patient_001/, /data/DICOMs/Patient_002/, ...
df = run_pelvimetry_batch(
    dicom_root="/data/DICOMs",
    output_root="./output",
    output_csv="./output/results.csv",
    start=1, end=250,
)

# NIfTI batch — expects /data/niftis/case_001.nii.gz, case_002.nii.gz, ...
df = run_pelvimetry_nifti_batch(
    nifti_root="/data/niftis",
    output_root="./output",
    output_csv="./output/results.csv",
    pattern="*.nii.gz",  # default
    use_fast=False,
    skip_tissue=False,
)

# Filter to fully successful patients
success = df[df["Status"] == "Success"]
print(success[["Patient_ID", "ISD_mm", "Inlet_AP_mm"]].describe())
Both batch functions return a pandas.DataFrame and write a CSV to output_csv. Per-patient errors are isolated — one failure won't abort the run.
Body composition
from ctpelvimetry import process_single_patient

body_comp = process_single_patient(
    patient_id="Patient_001",
    seg_root="./output/Segmentation",
    nifti_path="./output/NIfTI/Patient_001/Patient_001.nii.gz",
    pelvimetry_csv="./output/combined_pelvimetry_report.csv",
    qc_dir="./output/body_comp_qc",  # optional
)
print(f"VAT @ L3: {body_comp['L3_VAT_cm2']} cm²")
print(f"V/S ratio @ L3: {body_comp['L3_VS_ratio']}")
print(f"SMA @ L3: {body_comp['L3_SMA_cm2']} cm²")
Custom thresholds
from ctpelvimetry import run_combined_pelvimetry, PelvicConfig

config = PelvicConfig(
    rotation_warn_deg=3.0,    # tighter QA than the default 5°
    tilt_warn_deg=3.0,
    sacrum_offset_warn_mm=3.0,
)

result = run_combined_pelvimetry(
    patient_id="P001",
    seg_folder="./seg",
    nifti_path="./ct.nii.gz",
    config=config,
)
📂 Output Structure
After running the pelvimetry pipeline, --output_root looks like:
output/
├── NIfTI/                       # DICOM → NIfTI conversions (DICOM modes only)
│   └── Patient_001/
│       └── Patient_001.nii.gz
├── Segmentation/                # TotalSegmentator masks
│   └── Patient_001/
│       ├── hip_left.nii.gz
│       ├── hip_right.nii.gz
│       ├── sacrum.nii.gz
│       ├── femur_left.nii.gz
│       ├── femur_right.nii.gz
│       ├── vertebrae_S1.nii.gz
│       ├── ...
│       ├── subcutaneous_fat.nii.gz   # only with TOTALSEG_LICENSE_KEY
│       ├── torso_fat.nii.gz
│       └── skeletal_muscle.nii.gz
├── QC/                          # Visual QC images (PNG)
│   ├── Patient_001_Sagittal_QC.png
│   └── Patient_001_Extended_QC.png
└── combined_pelvimetry_report.csv   # The aggregated results
CSV schema (key columns)
| Column | Type | Description |
|---|---|---|
Patient_ID |
str | Patient identifier |
Status |
str | Success, Partial_N/6, Failure, or Error |
Error_Log |
str | Per-metric error codes (semicolon-separated), if any |
ISD_mm |
float | Inter-Spinous Distance |
Inlet_AP_mm |
float | Pelvic inlet AP diameter |
Outlet_AP_mm |
float | Pelvic outlet AP diameter |
Outlet_Transverse_mm |
float | Intertuberous diameter |
Sacral_Length_mm |
float | Sacral length (promontory → coccygeal apex) |
Sacral_Depth_mm |
float | Maximum sacral concavity depth |
Pelvic_Rotation_deg |
float | Axial rotation (quality flag) |
Pelvic_Tilt_deg |
float | Coronal tilt (quality flag) |
Promontory_x/y/z |
float | RAS world coordinates (mm) of detected landmarks |
Upper_Symphysis_x/y/z |
float | (and similar columns for all detected landmarks) |
CT_NIfTI, Seg_* |
str | File paths to inputs/intermediates for traceability |
Status semantics:
Success— all 6 pelvimetric metrics computedPartial_N/6— N of 6 metrics computed; the rest inError_LogFailure— 0 metrics computed (segmentation produced but unusable)Fail_NIfTI— DICOM → NIfTI conversion failed (DICOM modes only)Fail_Seg— TotalSegmentator failed to produce required masksFail_NIfTI_Missing— input NIfTI file does not exist (NIfTI modes only)Error— uncaught exception during processing (batch mode only); full message inError_Message
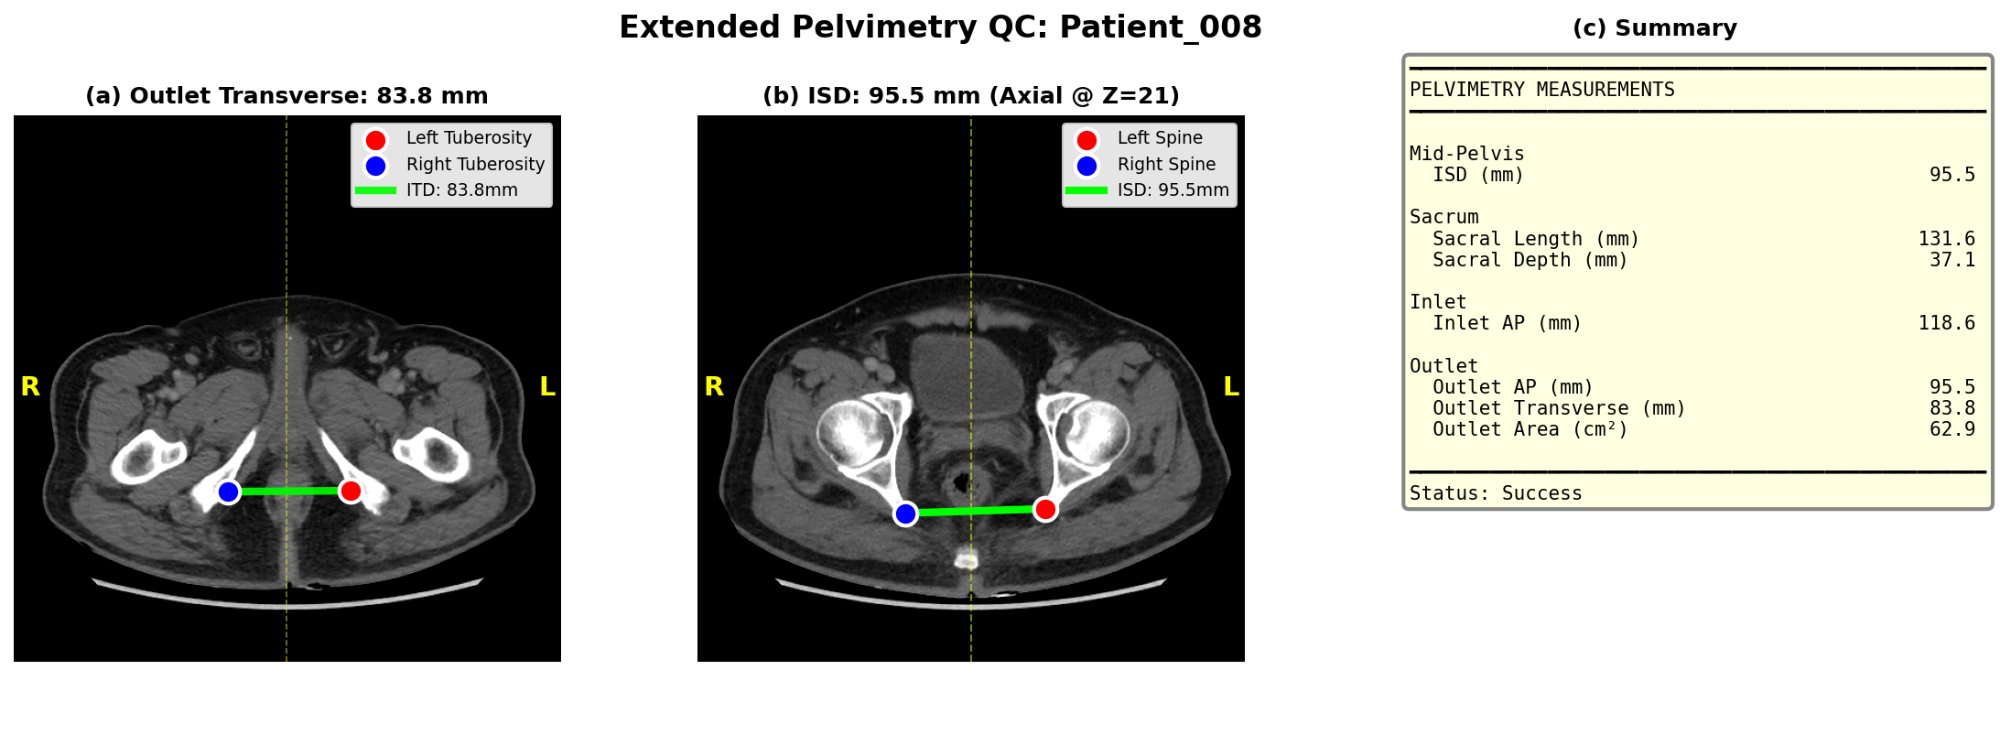
🔬 Measured Metrics
Pelvimetry (Mid-Pelvic Workspace)
| Metric | Description |
|---|---|
| ISD (mm) | Inter-Spinous Distance — narrowest mid-pelvic width, critical for deep pelvic dissection |
| Inlet AP (mm) | Promontory → upper symphysis distance |
| Outlet AP (mm) | Coccygeal apex → lower symphysis distance |
| Outlet Transverse (mm) | Intertuberous diameter (between ischial tuberosities) |
| Sacral Length (mm) | Promontory → coccygeal apex along the sacral curve |
| Sacral Depth (mm) | Maximum concavity depth from the inlet-outlet chord |
Body Composition (requires license)
| Metric | Description |
|---|---|
| VAT / SAT (cm²) | Visceral / subcutaneous adipose tissue area |
| V/S Ratio | VAT / SAT ratio — indicator of visceral obesity |
| SMA (cm²) | Skeletal Muscle Area at L3 and mid-pelvis levels |
👁️ Quality Control
ctpelvimetry generates two QC panels per scan so you can spot-check landmark detection visually before trusting the numbers.
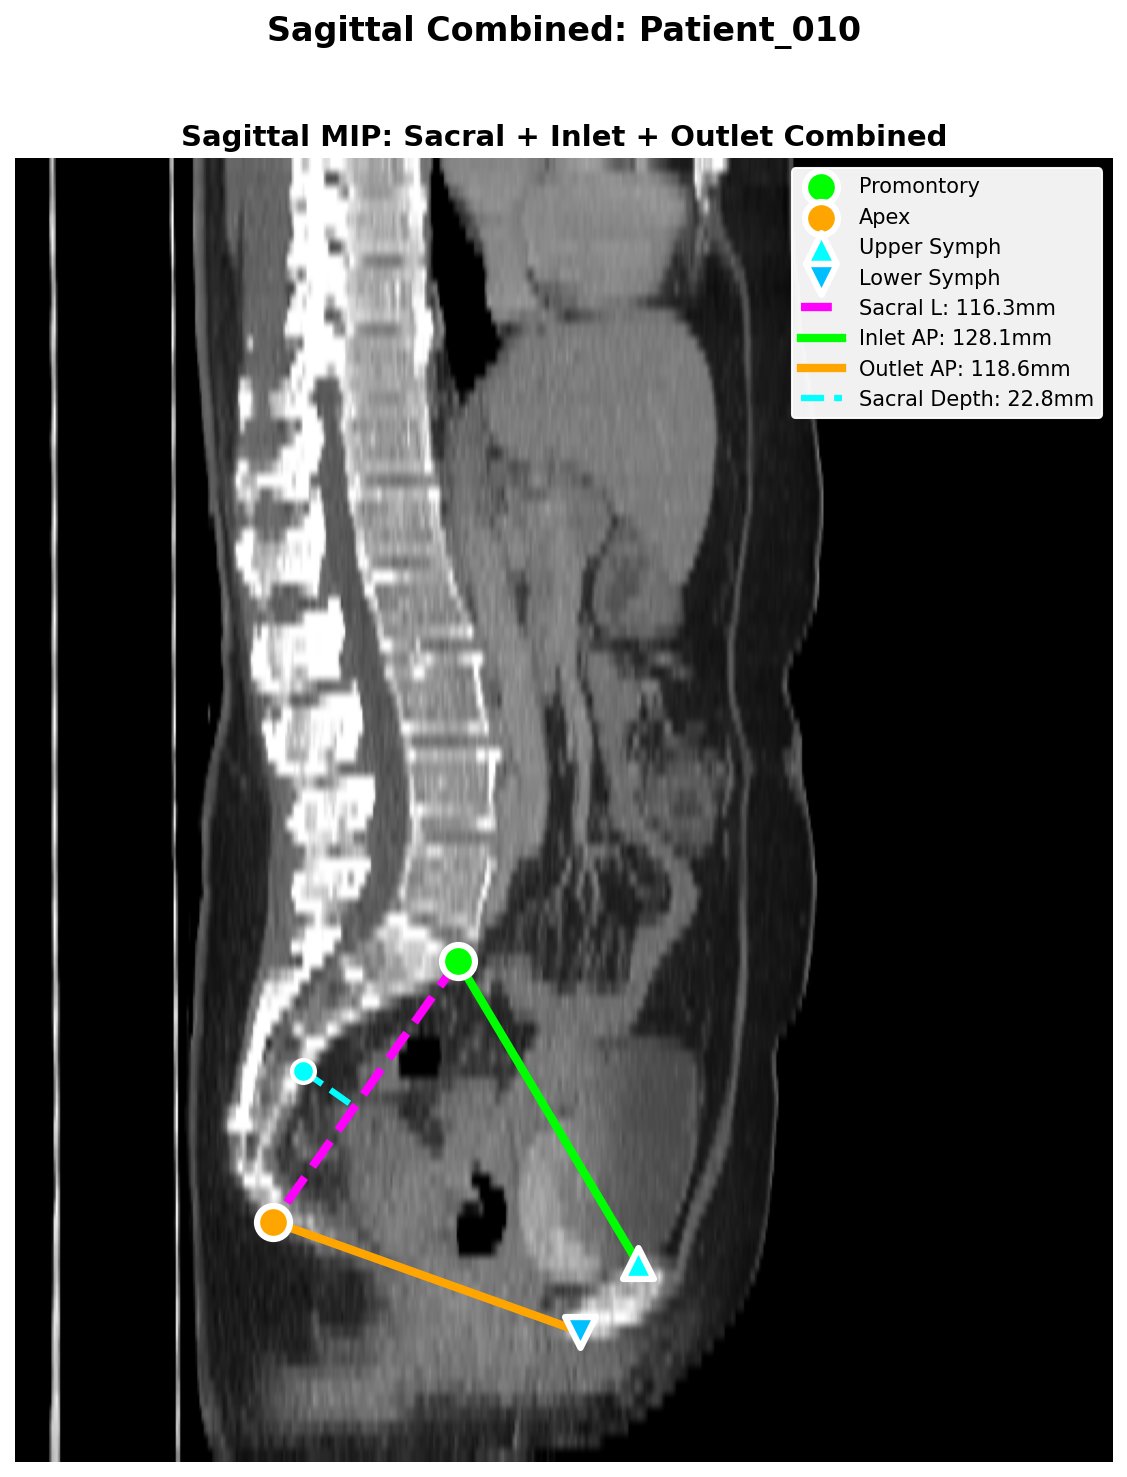
The pipeline also writes quality flags to the CSV:
Pelvic_Rotation_Flag/Pelvic_Tilt_Flag—ok,warn,high(axial rotation and coronal tilt of the patient on the table)Sacrum_Offset_Flag— sacrum-to-symphysis midline offset in mm
These flags don't block measurement but signal when manual review is wise.
⚙️ Hardware Requirements
End-to-end automation runs deep-learning segmentation. A GPU is strongly recommended.
| Setup | Time per scan | Notes |
|---|---|---|
| NVIDIA GPU 8GB+ VRAM (T4, RTX 3060+, A100) | < 2 min | Recommended. 16GB+ for high-res CTs. |
| CPU only | 10–30+ min | Will work but slow; may OOM on large series |
| Google Colab (free T4) | < 2 min | Easy cloud option for clinical researchers |
If you only run analysis on pre-existing segmentations (Mode 1), a standard CPU is fine — no GPU needed.
🔑 Body Composition License (Optional)
Body composition (VAT/SAT/muscle) requires TotalSegmentator's tissue_types task, which needs a free academic license. Pelvimetry works without it.
# 1. Register (free, takes 30 seconds): https://backend.totalsegmentator.com/license-academic/
# 2. Set the env var (add to ~/.bashrc or ~/.zshrc to persist):
export TOTALSEG_LICENSE_KEY=aca_xxxxxxxxxxxx
If TOTALSEG_LICENSE_KEY is unset, the pipeline silently skips body composition and reports pelvimetry only. No errors, no warnings beyond a one-line info message.
Note: Versions ≤ 1.4.1 shipped with a hard-coded license key. That key has been removed (see CHANGELOG); please register your own.
🏗️ Architecture
ctpelvimetry/
├── cli.py               # Unified CLI entry point (pelv + body-comp subcommands)
├── pipeline.py          # End-to-end orchestration:
│                        #   - run_combined_pelvimetry  (seg → measurements)
│                        #   - run_full_pipeline         (DICOM → measurements)
│                        #   - run_nifti_pipeline        (NIfTI → measurements)
├── batch.py             # Batch processors with per-patient error isolation:
│                        #   - run_pelvimetry_batch
│                        #   - run_pelvimetry_nifti_batch
│                        #   - run_body_composition_batch
├── conversion.py        # DICOM → NIfTI conversion
├── segmentation.py      # TotalSegmentator integration wrapper
├── landmarks.py         # 3D geometric landmark detection
├── metrics.py           # Pelvimetric calculations (ISD, AP, sacral, etc.)
├── body_composition.py  # Fat / muscle area quantification
├── qc.py                # QC image generation (matplotlib)
├── io.py                # Mask I/O with canonical (RAS) reorientation
└── config.py            # PelvicConfig dataclass: tuneable thresholds
🛠️ Troubleshooting
Patient_xxx: Status = Failure, Error_Log = ALL: ISD_NO_HIP_MASK
TotalSegmentator didn't produce hip masks. Usually the CT FOV doesn't include the pelvis, or the scan is corrupted. Inspect the input NIfTI in a viewer (3D Slicer, ITK-SNAP).
Tissue Types: Requires license
You're trying to run body composition without a license. Either set TOTALSEG_LICENSE_KEY (see Body Composition License) or pass --no-tissue to skip explicitly.
Segmentation is extremely slow
Either you don't have a GPU or PyTorch isn't seeing it. Verify with:
import torch; print(torch.cuda.is_available())
If False, reinstall PyTorch with the CUDA build for your driver.
Status = Partial_5/6 with Sacral_Depth: SACRAL_NO_LANDMARKS
Promontory or coccygeal apex wasn't detected. The other 5 metrics are still valid. Check the Sagittal QC PNG.
Segmentation results look wrong despite no error
Patient is probably rotated or tilted on the table. Check Pelvic_Rotation_deg and Pelvic_Tilt_deg columns — the pipeline flags values > 5° (default) as warn, and these often indicate unreliable measurement. Tighten the thresholds via PelvicConfig if you want stricter automatic flagging.
CSV Status column is missing or empty
You're probably reading a body-composition CSV (different schema). Pelvimetry results are in combined_pelvimetry_report.csv.
🤝 Contributing
PRs welcome from both the surgical and data-science communities. The package follows semantic versioning; tag pushes (v*) auto-trigger PyPI publishing via GitHub Actions.
git checkout -b feature/your-feature
# ... make changes, add tests in tests/
pytest                            # all should pass
git commit -am "feat: ..."
git push origin feature/your-feature
# Open a PR
📝 Citation
If ctpelvimetry enables your research, please cite:
@software{huang2026ctpelvimetry,
  author    = {Huang, Shih-Feng},
  title     = {ctpelvimetry: Automated CT Pelvimetry and Body Composition Analysis},
  year      = {2026},
  url       = {https://github.com/odafeng/ctpelvimetry},
  version   = {1.6.0},
}
A peer-reviewed manuscript on the clinical validation of this pipeline is in preparation.
License: Apache License 2.0 | Author: Shih-Feng Huang, MD (@odafeng)
Project details
Verified details
These details have been verified by PyPIProject links
GitHub Statistics
Maintainers
Release history Release notifications | RSS feed


Download files
Download the file for your platform. If you're not sure which to choose, learn more about installing packages.
Source Distribution
Built Distribution
Filter files by name, interpreter, ABI, and platform.
If you're not sure about the file name format, learn more about wheel file names.
Copy a direct link to the current filters
File details
Details for the file ctpelvimetry-1.7.0.tar.gz.
File metadata
- Download URL: ctpelvimetry-1.7.0.tar.gz
- Upload date:
- Size: 67.6 kB
- Tags: Source
- Uploaded using Trusted Publishing? Yes
- Uploaded via: twine/6.1.0 CPython/3.13.12
File hashes
| Algorithm | Hash digest | |
|---|---|---|
| SHA256 |
d5810ba73b2b228d71d9a52b752198d6fa60630fdb50b74146d9fed23e218415
|
|
| MD5 |
a4f8efbd44ef100f519177f9871a9ef7
|
|
| BLAKE2b-256 |
45a5f5592cd6df0d11afb79fc251099fbc11b7c5c438739c6282aad1be1e3117
|
Provenance
The following attestation bundles were made for ctpelvimetry-1.7.0.tar.gz:
Publisher:
release.yml on odafeng/ctpelvimetry
-
Statement:
-
Statement type:
https://in-toto.io/Statement/v1 -
Predicate type:
https://docs.pypi.org/attestations/publish/v1 -
Subject name:
ctpelvimetry-1.7.0.tar.gz -
Subject digest:
d5810ba73b2b228d71d9a52b752198d6fa60630fdb50b74146d9fed23e218415 - Sigstore transparency entry: 1583212593
- Sigstore integration time:
-
Permalink:
odafeng/ctpelvimetry@db0b24aa79b086fcdda407ffc058c96121d4bb82 -
Branch / Tag:
refs/tags/v1.7.0 - Owner: https://github.com/odafeng
-
Access:
public
-
Token Issuer:
https://token.actions.githubusercontent.com -
Runner Environment:
github-hosted -
Publication workflow:
release.yml@db0b24aa79b086fcdda407ffc058c96121d4bb82 -
Trigger Event:
push
-
Statement type:
File details
Details for the file ctpelvimetry-1.7.0-py3-none-any.whl.
File metadata
- Download URL: ctpelvimetry-1.7.0-py3-none-any.whl
- Upload date:
- Size: 55.6 kB
- Tags: Python 3
- Uploaded using Trusted Publishing? Yes
- Uploaded via: twine/6.1.0 CPython/3.13.12
File hashes
| Algorithm | Hash digest | |
|---|---|---|
| SHA256 |
725b78b9bb81e43173dad76565cd5ac35e10403a8b62cca1d26373d65eab2bb0
|
|
| MD5 |
92943e97ae72c849a19ecd47ba260b1f
|
|
| BLAKE2b-256 |
d05cc267fa69ee991cbfccb78aba816faaa72590cf06c07beaf21427025ef0d4
|
Provenance
The following attestation bundles were made for ctpelvimetry-1.7.0-py3-none-any.whl:
Publisher:
release.yml on odafeng/ctpelvimetry
-
Statement:
-
Statement type:
https://in-toto.io/Statement/v1 -
Predicate type:
https://docs.pypi.org/attestations/publish/v1 -
Subject name:
ctpelvimetry-1.7.0-py3-none-any.whl -
Subject digest:
725b78b9bb81e43173dad76565cd5ac35e10403a8b62cca1d26373d65eab2bb0 - Sigstore transparency entry: 1583212729
- Sigstore integration time:
-
Permalink:
odafeng/ctpelvimetry@db0b24aa79b086fcdda407ffc058c96121d4bb82 -
Branch / Tag:
refs/tags/v1.7.0 - Owner: https://github.com/odafeng
-
Access:
public
-
Token Issuer:
https://token.actions.githubusercontent.com -
Runner Environment:
github-hosted -
Publication workflow:
release.yml@db0b24aa79b086fcdda407ffc058c96121d4bb82 -
Trigger Event:
push
-
Statement type:


