A Python package

Project description

DAG-based Gradio workflows!
DAG-based Gradio workflows!
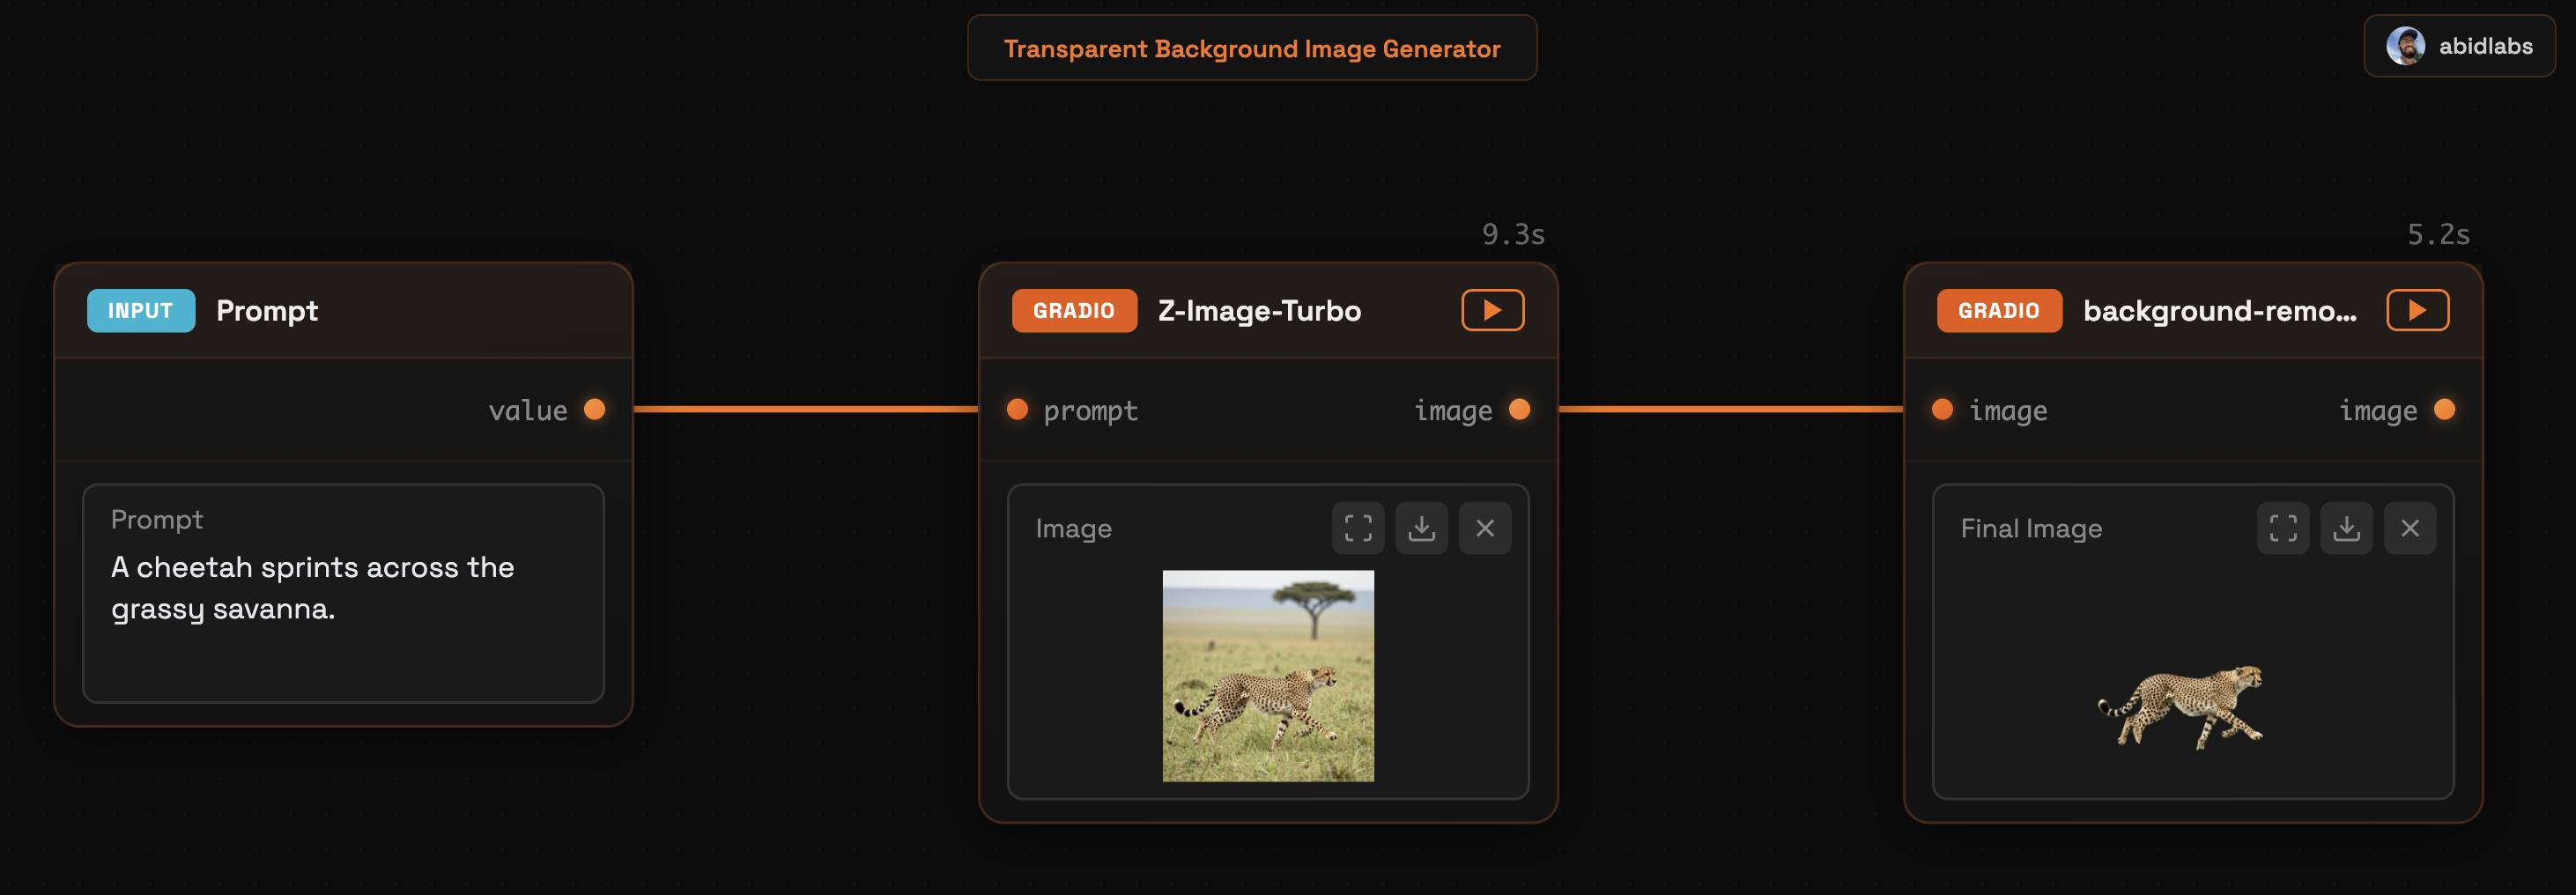
daggr is a Python library for building AI workflows that connect Gradio apps, ML models (through Hugging Face Inference Providers), and custom Python functions. It automatically generates a visual canvas for your workflow allowing you to inspect intermediate outputs, rerun any step any number of times, and also preserves state for complex or long-running workflows.
https://github.com/user-attachments/assets/2cfe49c0-3118-4570-b2bd-f87c333836b5
Installation
pip install daggr
(requires Python 3.10 or higher).
Quick Start
After installing daggr, create a new Python file, say app.py, and paste this code:
import random

import gradio as gr

from daggr import GradioNode, Graph

glm_image = GradioNode(
    "hf-applications/Z-Image-Turbo",
    api_name="/generate_image",
    inputs={
        "prompt": gr.Textbox(  # An input node is created for the prompt
            label="Prompt",
            value="A cheetah sprints across the grassy savanna.",
            lines=3,
        ),
        "height": 1024,  # Fixed value (does not appear in the canvas)
        "width": 1024,  # Fixed value (does not appear in the canvas)
        "seed": random.random,  # Functions are rerun every time the workflow is run (not shown in the canvas)
    },
    outputs={
        "image": gr.Image(
            label="Image"  # Display in an Image component
        ),
    },
)

background_remover = GradioNode(
    "hf-applications/background-removal",
    api_name="/image",
    inputs={
        "image": glm_image.image,  # Connect the output of the GLM Image node to the input of the background remover node
    },
    outputs={
        "original_image": None,  # Original image is returned but not displayed
        "final_image": gr.Image(
            label="Final Image"
        ),  # Transparent bg image is displayed
    },
)

graph = Graph(
    name="Transparent Background Image Generator", nodes=[glm_image, background_remover]
)

graph.launch()
Run python app.py to start the Python file and you should see a Daggr app like this that you can use to generate images with a transparent background!
When to (Not) Use Daggr
Use Daggr when:
- You want to define an AI workflow in Python involving Gradio Spaces, inference providers, or custom functions
- The workflow is complex enough that inspecting intermediate outputs or rerunning individual steps is useful
- You need a fixed pipeline that you or others can run with different inputs
Why not... ComfyUI? ComfyUI is a visual node editor where you build workflows by dragging and connecting nodes. Daggr takes a code-first approach: you define workflows in Python and the visual canvas is generated automatically. If you prefer writing code over visual editing, Daggr may be a better fit. In addition, Daggr works with Gradio Spaces and Hugging Face models directly, no need for specialized nodes.
Why not... Airflow/Prefect? Daggr was inspired by Airflow/Prefect, but whereas the focus of these orchestration platforms is scheduling, monitoring, and managing pipelines at scale, Daggr is built for interactive AI/ML workflows with real-time visual feedback and immediate execution, making it ideal for prototyping, demos, and workflows where you want to inspect intermediate outputs and rerun individual steps on the fly.
Why not... Gradio? Gradio creates web UIs for individual ML models and demos. While complex workflows can be built in Gradio, they often fail in ways that are hard to debug when using the Gradio app. Daggr tries to provide a transparent, easily-inspectable way to chain multiple Gradio apps, custom Python functions, and inference providers through a visual canvas.
Don't use Daggr when:
- You need a simple UI for a single model or function - consider using Gradio directly
- You want a node-based editor for building workflows visually - consider using ComfyUI instead
How It Works
A Daggr workflow consists of nodes connected in a directed graph. Each node represents a computation: a Gradio Space API call, an inference call to a model, or a Python function.
Each node has input ports and output ports, which correspond to the node's parameters and return values. Ports are how data flows between nodes.
Input ports can be connected to:
- A previous node's output port → creates an edge, data flows automatically
- A Gradio component → creates a standalone input in the UI
- A fixed value → passed directly, doesn't appear in UI
- A callable → called each time the node runs (useful for random seeds)
Output ports can be connected to:
- A Gradio component → displays the output in the node's card
None→ output is hidden but can still connect to downstream nodes
Node Types
GradioNode: Calls a Gradio Space API endpointFnNode: Runs a Python functionInferenceNode: Calls a model via Hugging Face Inference Providers
Input Types
Each node's inputs dict accepts four types of values:
| Type | Example | Result |
|---|---|---|
| Gradio component | gr.Textbox(label="Topic") |
Creates UI input |
| Port reference | other_node.output_name |
Connects nodes |
| Fixed value | "Auto" or 42 |
Constant, no UI |
| Callable | random.random |
Called each run, no UI |
Output Types
Each node's outputs dict accepts two types of values:
| Type | Example | Result |
|---|---|---|
| Gradio component | gr.Image(label="Result") |
Displays output in node card |
| None | None |
Hidden, but can connect to downstream nodes |
Scatter / Gather
When a node outputs a list and you want to process each item individually, use .each to scatter and .all() to gather:
script = FnNode(fn=generate_script, inputs={...}, outputs={"lines": gr.JSON()})

tts = FnNode(
    fn=text_to_speech,
    inputs={
        "text": script.lines.each["text"],      # Scatter: run once per item
        "speaker": script.lines.each["speaker"],
    },
    outputs={"audio": gr.Audio()},
)

final = FnNode(
    fn=combine_audio,
    inputs={"audio_files": tts.audio.all()},    # Gather: collect all outputs
    outputs={"audio": gr.Audio()},
)
Putting It Together: A Mock Podcast Generator
import gradio as gr
from daggr import FnNode, GradioNode, Graph

# Generate voice profiles
host_voice = GradioNode(
    space_or_url="abidlabs/tts",
    api_name="/generate_voice_design",
    inputs={
        "voice_description": gr.Textbox(label="Host Voice", value="Deep British voice..."),
        "language": "Auto",
        "text": "Hi! I'm the host.",
    },
    outputs={"audio": gr.Audio(label="Host Voice")},
)

guest_voice = GradioNode(
    space_or_url="abidlabs/tts",
    api_name="/generate_voice_design",
    inputs={
        "voice_description": gr.Textbox(label="Guest Voice", value="Friendly American voice..."),
        "language": "Auto",
        "text": "Hi! I'm the guest.",
    },
    outputs={"audio": gr.Audio(label="Guest Voice")},
)

# Generate dialogue (would be an LLM call in production)
def generate_dialogue(topic: str, host_voice: str, guest_voice: str):
    dialogue = [
        {"voice": host_voice, "text": "Hello, how are you?"},
        {"voice": guest_voice, "text": "I'm great, thanks!"},
    ]
    html = "<b>Host:</b> Hello!<br><b>Guest:</b> I'm great!"
    return dialogue, html

dialogue = FnNode(
    fn=generate_dialogue,
    inputs={
        "topic": gr.Textbox(label="Topic", value="AI"),
        "host_voice": host_voice.audio,
        "guest_voice": guest_voice.audio,
    },
    outputs={
        "json": gr.JSON(visible=False),
        "html": gr.HTML(label="Script"),
    },
)

# Generate audio for each line (scatter)
def text_to_speech(text: str, audio: str) -> str:
    return audio  # Would call TTS model in production

samples = FnNode(
    fn=text_to_speech,
    inputs={
        "text": dialogue.json.each["text"],
        "audio": dialogue.json.each["voice"],
    },
    outputs={"audio": gr.Audio(label="Sample")},
)

# Combine all audio (gather)
def combine_audio(audio_files: list[str]) -> str:
    from pydub import AudioSegment
    combined = AudioSegment.empty()
    for path in audio_files:
        combined += AudioSegment.from_file(path)
    combined.export("output.mp3", format="mp3")
    return "output.mp3"

final = FnNode(
    fn=combine_audio,
    inputs={"audio_files": samples.audio.all()},
    outputs={"audio": gr.Audio(label="Full Podcast")},
)

graph = Graph(name="Podcast Generator", nodes=[host_voice, guest_voice, dialogue, samples, final])
graph.launch()
Sharing and Hosting
Create a public URL to share your workflow with others:
graph.launch(share=True)
This generates a temporary public URL (expires in 1 week) using Gradio's tunneling infrastructure.
For permanent hosting, you can deploy Daggr apps on Hugging Face Spaces using the Gradio SDK. Just create a new Space with the Gradio SDK, add your workflow code to app.py, and include daggr in your requirements.txt.
Persistence and Sheets
Daggr automatically saves your workflow state—input values, node results, and canvas position—so you can pick up where you left off after a page reload.
Sheets
Sheets are like separate workspaces within a single Daggr app. Each sheet has its own:
- Input values for all nodes
- Cached results from previous runs
- Canvas zoom and pan position
Use sheets to work on multiple projects within the same workflow. For example, in a podcast generator app, each sheet could represent a different podcast episode you're working on.
The sheet selector appears in the title bar. Click to switch between sheets, create new ones, rename them (double-click), or delete them.
How Persistence Works
| Environment | User Status | Persistence |
|---|---|---|
| Local | Not logged in | ✅ Saved as "local" user |
| Local | HF logged in | ✅ Saved under your HF username |
When running locally, your data is stored in a SQLite database (.daggr_sessions.db) in the current directory.
The persist_key Parameter
By default, the persist_key is derived from your graph's name:
Graph(name="My Podcast Generator") # persist_key = "my_podcast_generator"
If you later rename your app but want to keep the existing saved data, set persist_key explicitly:
Graph(name="Podcast Generator v2", persist_key="my_podcast_generator")
Disabling Persistence
For scratch workflows or demos where you don't want data saved:
Graph(name="Quick Demo", persist_key=False)
This disables all persistence—no sheets UI, no saved state.
Hugging Face Authentication
Daggr automatically uses your local Hugging Face token for both GradioNode and InferenceNode. This enables:
- ZeroGPU quota tracking: Your HF token is sent to Gradio Spaces running on ZeroGPU, so your usage is tracked against your account's quota
- Private Spaces access: Connect to private Gradio Spaces you have access to
- Gated models: Use gated models on Hugging Face that require accepting terms of service
To log in with your Hugging Face account:
pip install huggingface_hub
hf auth login
You'll be prompted to enter your token, which you can find at https://huggingface.co/settings/tokens.
Once logged in, the token is saved locally and daggr will automatically use it for all GradioNode and InferenceNode calls—no additional configuration needed.
Alternatively, you can set the HF_TOKEN environment variable directly:
export HF_TOKEN=hf_xxxxx
LLM-Friendly Error Messages
Daggr is designed to be LLM-friendly, making it easy for AI coding assistants to generate and debug workflows. When you (or an LLM) make a mistake, Daggr provides detailed, actionable error messages with suggestions:
Invalid API endpoint:
ValueError: API endpoint '/infer' not found in 'hf-applications/background-removal'.
Available endpoints: ['/image', '/text', '/png']. Did you mean '/image'?
Typo in parameter name:
ValueError: Invalid parameter(s) {'promt'} for endpoint '/generate_image' in
'hf-applications/Z-Image-Turbo'. Did you mean: 'promt' -> 'prompt'?
Valid parameters: {'width', 'height', 'seed', 'prompt'}
Missing required parameter:
ValueError: Missing required parameter(s) {'prompt'} for endpoint '/generate_image'
in 'hf-applications/Z-Image-Turbo'. These parameters have no default values.
Invalid output port reference:
ValueError: Output port 'img' not found on node 'Z-Image-Turbo'.
Available outputs: image. Did you mean 'image'?
Invalid function parameter:
ValueError: Invalid input(s) {'toppic'} for function 'generate_dialogue'.
Did you mean: 'toppic' -> 'topic'? Valid parameters: {'topic', 'host_voice', 'guest_voice'}
Invalid model name:
ValueError: Model 'meta-llama/nonexistent-model' not found on Hugging Face Hub.
Please check the model name is correct (format: 'username/model-name').
These errors make it easy for LLMs to understand what went wrong and fix the generated code automatically, enabling a smoother AI-assisted development experience.
Running Locally
While in our examples above, we've seen how Daggr works with remote Gradio Spaces and Hugging Face Inference Providers, it's also well-suited for completely local, offline workflows.
Automatic Local Execution
The easiest way to run a Space locally is to set run_locally=True on any GradioNode. Daggr will automatically clone the Space, install dependencies in an isolated virtual environment, and launch the Gradio app:
from daggr import GradioNode, Graph
import gradio as gr

# Automatically clone and run the Space locally
background_remover = GradioNode(
    "hf-applications/background-removal",
    api_name="/image",
    run_locally=True,  # Run locally instead of calling the remote API
    inputs={"image": gr.Image(label="Input Image")},
    outputs={"final_image": gr.Image(label="Output")},
)

graph = Graph(name="Local Background Removal", nodes=[background_remover])
graph.launch()
On first run, daggr will:
- Clone the Space repository to
~/.cache/huggingface/daggr/spaces/ - Create an isolated virtual environment with the Space's dependencies
- Launch the Gradio app on an available port
- Connect to it automatically
Subsequent runs reuse the cached clone and venv, making startup much faster.
Graceful Fallback
If local execution fails (missing dependencies, GPU requirements, etc.), daggr automatically falls back to the remote API and prints helpful guidance:
⚠️  Local execution failed for 'owner/space-name'
Reason: Failed to install dependencies
Logs: ~/.cache/huggingface/daggr/logs/owner_space-name_pip_install_2026-01-27.log
Falling back to remote API...
To disable fallback and see the full error (useful for debugging):
export DAGGR_LOCAL_NO_FALLBACK=1
Environment Variables
| Variable | Default | Description |
|---|---|---|
DAGGR_LOCAL_TIMEOUT |
120 |
Seconds to wait for the app to start |
DAGGR_LOCAL_VERBOSE |
0 |
Set to 1 to show app stdout/stderr |
DAGGR_LOCAL_NO_FALLBACK |
0 |
Set to 1 to disable fallback to remote |
DAGGR_UPDATE_SPACES |
0 |
Set to 1 to re-clone cached Spaces |
Manual Local URL
You can also run a Gradio app yourself and point to it directly:
from daggr import GradioNode, Graph
import gradio as gr

# Connect to a Gradio app you're running locally
local_model = GradioNode(
    "http://localhost:7860",  # Local URL instead of Space ID
    api_name="/predict",
    inputs={"text": gr.Textbox(label="Input")},
    outputs={"result": gr.Textbox(label="Output")},
)

graph = Graph(name="Local Workflow", nodes=[local_model])
graph.launch()
This approach lets you run your entire workflow offline, use custom or fine-tuned models, and avoid API rate limits.
Hot Reload Mode
During development, you can use the daggr CLI to run your app with automatic hot reloading. When you make changes to your Python file or its dependencies, the app automatically restarts:
daggr examples/01_quickstart.py
This is much faster than manually stopping and restarting your app each time you make a change.
CLI Options
daggr <script> [options]
| Option | Description |
|---|---|
--host |
Host to bind to (default: 127.0.0.1) |
--port |
Port to bind to (default: 7860) |
--no-reload |
Disable auto-reload |
--no-watch-daggr |
Don't watch daggr source for changes |
What Gets Watched
By default, the CLI watches for changes in:
- Your script file and its directory
- Local imports from your script
- The daggr source code itself (useful when developing daggr)
To disable watching the daggr source (e.g., in production-like testing):
daggr examples/01_quickstart.py --no-watch-daggr
API Caching
To speed up reloads, daggr caches Gradio Space API info in ~/.cache/huggingface/daggr/. This means:
- First run: Connects to each Gradio Space to fetch API info (cached to disk)
- Subsequent reloads: Loads from cache, no network calls needed
If you change a Space's API or encounter stale cache issues, clear the cache:
rm -rf ~/.cache/huggingface/daggr
When to Use Hot Reload
Use daggr <script> when you're actively developing and want instant feedback on changes.
Use python <script> when you want the standard behavior (no file watching, direct execution).
Beta Status
[!WARNING] Daggr is in active development. APIs may change between versions, and while we persist workflow state locally, data loss is possible during updates. We recommend not relying on daggr for production-critical workflows yet. Please report issues if you encounter bugs!
Development
pip install -e ".[dev]"
ruff check --fix --select I && ruff format
License
MIT License
Release history Release notifications | RSS feed


Download files
Download the file for your platform. If you're not sure which to choose, learn more about installing packages.
Source Distributions
Built Distribution
Filter files by name, interpreter, ABI, and platform.
If you're not sure about the file name format, learn more about wheel file names.
Copy a direct link to the current filters
File details
Details for the file daggr-0.3.6-py3-none-any.whl.
File metadata
- Download URL: daggr-0.3.6-py3-none-any.whl
- Upload date:
- Size: 289.7 kB
- Tags: Python 3
- Uploaded using Trusted Publishing? Yes
- Uploaded via: twine/6.2.0 CPython/3.10.12
File hashes
| Algorithm | Hash digest | |
|---|---|---|
| SHA256 |
4f84d716345a32f4b654de2e0fe49b2cbeb2b91d565f0e0e22f7b88ab55c3301
|
|
| MD5 |
9b523b3b2d2254a15a43d2a57d65a948
|
|
| BLAKE2b-256 |
af138e9e547ff628287c30ab31e6132a738da647882c608cc840ef5b17576864
|
Provenance
The following attestation bundles were made for daggr-0.3.6-py3-none-any.whl:
Publisher:
publish.yml on gradio-app/daggr
-
Statement:
-
Statement type:
https://in-toto.io/Statement/v1 -
Predicate type:
https://docs.pypi.org/attestations/publish/v1 -
Subject name:
daggr-0.3.6-py3-none-any.whl -
Subject digest:
4f84d716345a32f4b654de2e0fe49b2cbeb2b91d565f0e0e22f7b88ab55c3301 - Sigstore transparency entry: 864384431
- Sigstore integration time:
-
Permalink:
gradio-app/daggr@c080fd58555e4cdd4a142c7b211135b2dbeadda3 -
Branch / Tag:
refs/heads/main - Owner: https://github.com/gradio-app
-
Access:
public
-
Token Issuer:
https://token.actions.githubusercontent.com -
Runner Environment:
github-hosted -
Publication workflow:
publish.yml@c080fd58555e4cdd4a142c7b211135b2dbeadda3 -
Trigger Event:
push
-
Statement type:


