
python-dashio


python-dashio - Create beautiful mobile dashboards for your python project. The python-dashio library allows easy setup of controls such as Dials, Text Boxes, Charts, Graphs, and Notifications. You can define the look and layout of the controls on your phone from your python code. There are three methods to connect to your phone; Bluetooth Low Energy (BLE - on supported platforms), TCP, and MQTT via the dash.dashio.io server.
Getting Started
-
For the big picture on DashIO, take a look at our website: dashio.io
-
Create an account on dash.dashio.io
-
Get the App:
| Apple | Android |
|---|---|
 |
 |
Discord Community
Be a part of the DashIO community by joining our Discord Server
Documentation
For all documentation and software guides: dashio.io/documents
For the DashIO Python guide: dashio.io/guide-python
For the DashIO Python library: dashio.io/python-library
The library reference is in Documents/Documentation.md.
Examples
There are plenty of examples in the github repository under the Examples directory. For complete applications, see Examples/greenhouse and Examples/server_monitor.
Dash IoT Application
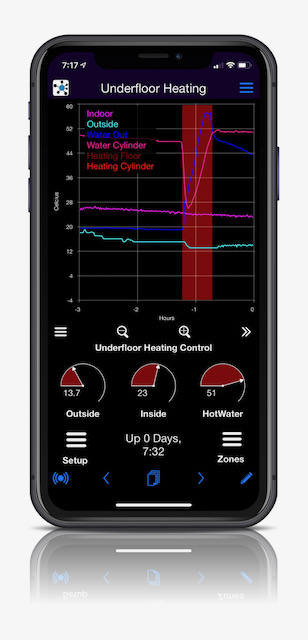
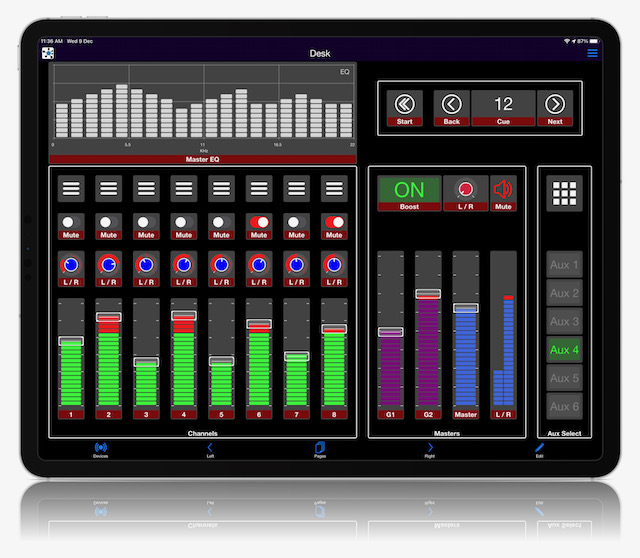
The Dash app is free and available for both Apple and Android devices. Use it to create beautiful and powerful user interfaces to you IoT devices.
| Dashio Phone | Dashio Tablet |
|---|---|
 |
 |
Requirements
- python3.11 and above
- paho-mqtt
- pyzmq
- python-dateutil
- zeroconf
- shortuuid
- pyserial
Install
From PyPI (Recommended)
pip3 install dashio
From Source
For development (editable install):
git clone https://github.com/dashio-connect/python-dashio.git
cd python-dashio
pip3 install -e .
For regular installation:
git clone https://github.com/dashio-connect/python-dashio.git
cd python-dashio
pip3 install .
A Quick Guide
This guide covers the DashIO python library. For information on the Dash phone app please visit the website.
Basics
So what is DashIO? It is a quick effortless way to connect your IoT device to your phone. It allows easy setup of controls such as Dials, Text Boxes, Maps, Graphs, Notifications..., from your Device. You can define the look and layout of the controls on your phone from your IoT device. There are three ways to connect to your phone: TCP on your local network, the Dash MQTT server, and BLE. What's Dash then? Dash is a mqtt server with extra bits added in to allow you to send notifications, share your devices, and save your settings from your phone via the Dash app.
Show me some code.
# Examples/ex01.py
import dashio
import random
import time

device = dashio.Device("aDeviceType", "aDeviceID", "aDeviceName")
tcp_con = dashio.TCPConnection()
tcp_con.add_device(device)
first_dial_control = dashio.Dial("FirstDial")
device.add_control(first_dial_control)

while True:
    first_dial_control.dial_value = random.random() * 100
    time.sleep(5)
This is about the fewest lines of code to get talking to the app. There is a lot happening under the hood to make this work. After the import we create a device with three attributes:
- "aDeviceType": a common name device_type for all IoT devices using this code which is used for device discovery
- "aDeviceID": a device_ID to uniquely identify this device, preferably a UUID.
- "aDeviceName": The name of this device, which can be changed at any time.
These attributes describe the device to the app and allow you to distinguish one of your devices from another.
The next two lines create a TCP connection and then add the device to the connection. This device is discoverable by the Dash app. You can also discover your IoT device using a third party Bonjour/Zeroconf discovery tool. The mDNS service will be "_DashIO._tcp."
Though this device is discoverable by the app it would be nice to have the DashIO app automatically setup a new DeviceView and place your control on the new DeviceView. To do that we need to add a few more lines of code:
# Examples/ex02.py
import dashio
import random
import time

device = dashio.Device("aDeviceType", "aDeviceID", "aDeviceName")
tcp_con = dashio.TCPConnection()
tcp_con.add_device(device)
first_dial_control = dashio.Dial("FirstDial", control_position=dashio.ControlPosition(0.24, 0.36, 0.54, 0.26))
device.add_control(first_dial_control)

dv_dial = dashio.DeviceView("aDeviceViewID", "A Dial")
dv_dial.add_control(first_dial_control)
device.add_control(dv_dial)

while True:
    first_dial_control.dial_value = random.random() * 100
    time.sleep(5)
First we altered the instantiation of a Dial by including a control_position. This allows us to place the control at a set location. The added lines instantiated a DeviceView control, which we than added the dial control. Finally we added the DeviceView to the device.
The next piece of the puzzle to consider is how do we get data from the DashIO app? Lets add a Knob and connect it to the Dial:
# Examples/ex03.py
import dashio
import time

device = dashio.Device("aDeviceType", "aDeviceID", "aDeviceName")
tcp_con = dashio.TCPConnection()
tcp_con.add_device(device)
first_dial_control = dashio.Dial("FirstDial", control_position=dashio.ControlPosition(0.24, 0.36, 0.54, 0.26))
device.add_control(first_dial_control)

dv = dashio.DeviceView("aDeviceViewID", "A Dial")
dv.add_control(first_dial_control)
device.add_control(dv)

def knob_event_handler(msg):
    first_dial_control.dial_value = float(msg[3])

aknob = dashio.Knob("aKNB", control_position=dashio.ControlPosition(0.24, 0.14, 0.54, 0.26))
aknob.add_receive_message_callback(knob_event_handler)
dv.add_control(aknob)
device.add_control(aknob)

while True:
    time.sleep(1)
First we added a function that sets the dial value. Next we added a Knob control and added our new function to be called when it receives data from the DashIO app. We also add it to the DeviceView and to the device. Now when the knob in the DashIO app is moved the dial is set to the same value.
Using the Config64
The Dash app can generate a CFG64 text string that defines the controls, the controls layout, and device parameters for the Device. The CFG64 string can be used in a number of ways. If we run the example above and using the Dash app to export a layout we can use the layout to setup the device and controls.
# Examples/ex04.py
import dashio
import time

cfg64 ="jVTbjpswEP2VlZ9RlWS7qcQbhJCNwiUCN6lU9YEFb7ACdmrMJukq/94xhpCbqr4NZ8bj4zlz+ETOPELmz18GmrgzZH4iVpcO+aAp"\
    "WVGyr5A5NFDWfMdE1jtkImSg9H0TkQ/InQy0CEIbGnyilDMpeDF3oCZZBDbU5YRuchklknJkDr6MxgaSVBZkySsKGINKO8Q49FGb"\
    "AMB6WjD+BkBFWBay4hiyiBQkqSApRU0MVFI4OICCnO99yvzkgMz3pKggJUi2SooaSr+9GGiXCMKkJtS/Cb7hSTQpfJ6pC93Q88I1"\
    "YIeOVk/4q4H2NJP5GXkBZAv8JrzgAg5HJGu7dYitrgdy8tg8Jwgj3/IAON51H0KvUpEfDgYnJYDXKhF7ThtZK0cHvrXUgY1nbeRP"\
    "g+86wtMfWEee7enAWa3WWhUpztTWOZXkKS759pKhbcXziRIVKm0uMiIe128EzSBTlwy2YjQyrgW/mS+FZJCUqn/8uwYdrhR2YF7d"\
    "jdsNy/rZJelWUcvhhL6rE13VYtXA5ofb8sscFgmrGuHTY7Ml56QLdGP6BxgMxxqGzenBEdTC7p9fOLzgd9/0hoGaTcSVXZ5HSkov"\
    "nLWmeo1wJ+oER52GOGhlmlteI9NOkJRWjSUG15N1qahkOzDg90bEhXu8qYsvpFzOp+ifa9+tW2+iHadM9pK321szKivt9QcevnaZ"\
    "Wn6XFuct05b4D5+3j3psu3u7PI8fmfHuJ6DGj2fR8lVN+PQX"

config_dict = dashio.decode_cfg64(cfg64)
device = dashio.Device("aDeviceType", "aDeviceID2", "aDeviceName1", cfg_dict=config_dict)
tcp_con = dashio.TCPConnection()
tcp_con.add_device(device)

aknob: dashio.Knob = device.get_control(dashio.ControlName.KNOB, "aKNB")
first_dial_control: dashio.Dial = device.get_control(dashio.ControlName.DIAL, "FirstDial")

def knob_event_handler(msg):
    aknob.knob_dial_value = float(msg[3])
    first_dial_control.dial_value = float(msg[3])

aknob.add_receive_message_callback(knob_event_handler)

while True:
    time.sleep(1)
We've added the cfg64 string. Then decoded it with dashio.decode_cfg64(cfg64). This function returns a dictionary that we can pass into Device so that it can instantiate and add the controls.
The Dash app reports its screen size in columns: 1 for phones, 2 for fold out phones and 3 for tablets. A device can hold a layout for each, e.g. cfg_dict={1: phone_cfg64, 3: tablet_cfg64}, and layouts can also be built in code with dashio.generate_cfg64(). See Layouts.
The Dash app only fetches a new layout when the device's cfgRev changes, so increase device.config_revision whenever the layout changes.
Included in the library are three commandline utilities to encode and decode cfg64 files, and to export data stored on the DashIO server.
$ c64_decode -h
usage: c64_decode [-h] [-p] [-o OUT_FILE] [-i INDENT] [-c] file

positional arguments:
  file                 Input file name.

options:
  -h, --help           show this help message and exit
  -p, --print          Print output.
  -o, --out OUT_FILE   output filename.
  -i, --indent INDENT  Indent depth (Default 4).
  -c, --compact        Remove empty keys
And
$ c64_encode -h
usage: c64_encode [-h] [-f FORMAT] [-o OUT_FILE] [-w WIDTH] file

positional arguments:
  file                 Input file name.

options:
  -h, --help           show this help message and exit
  -f, --format FORMAT  Format output. Options: 'None', 'C', 'Python' (Default 'None').
  -o, --out OUT_FILE   output filename.
  -w, --width WIDTH    Width of formatted output (Default 80).
And
$ dashio_data_exporter -h
usage: dashio_data_exporter [-h] [-u USERNAME] [-a SHARED_BY_USERNAME] [-p PASSWORD] [-d DEVICE_ID] [-c CONTROL_ID] [-t CONTROL_TYPE] [-n NUM_DAYS] [-f FORMAT] [-s] [-o]

options:
  -h, --help            show this help message and exit
  -u, --username USERNAME
                        DashIO Username
  -a, --shared-username SHARED_BY_USERNAME
                        DashIO Shared By Username
  -p, --password PASSWORD
                        DashIO Password
  -d, --device_id DEVICE_ID
                        The DeviceID of the device to get the data for.
  -c, --control_id CONTROL_ID
                        The ControlID of the control on the device to get the data for.
  -t, --type CONTROL_TYPE
                        Type of control, either 'TGRPH', 'MAP', 'LOG'.
  -n, --number_of_days NUM_DAYS
                        Number of days of data to get up to present time.
  -f, --format FORMAT   Format of the output data, either 'raw' or 'csv'.
  -s, --screen          Write output to stdout
  -o, --outfile         Write output to file(s). The filename(s) are generated from the data.
See Documents/dashio_data_exporter.md for more on the data exporter.
1 maintainer

Metadata
1 maintainer
Release files for dashio 3.7.0
For a detailed explanation of source distributions (sdists) and built distributions (wheels), please see the package formats documentation.
Source distribution (sdist)
| File | Size | Uploaded | |
|---|---|---|---|
| dashio-3.7.0.tar.gz | 133.8 kB | Details |
Built distribution (wheel)
| File | Interpreter | ABI | Platform | Reset |
|---|---|---|---|---|
| dashio-3.7.0-py3-none-any.whl | Python 3 | none | any | Details |
Total release size: 345.9 kB
Release files / dashio-3.7.0.tar.gz
| Download URL | dashio-3.7.0.tar.gz |
|---|---|
| Size | 133.8 kB |
| Tags | Source |
|
SHA-256 checksum How to use checksums |
9ccb4a519561f306593f9a30ccd6a0ca1385d6afc2c813e313178306e7b32ecd
|
|
BLAKE2b-256 checksum How to use checksums |
3272677594a1bea97faff6ef6fd42fd33c84b5a2aa11dca60f456b5242c00b56
|
| Upload date | |
|
Uploaded using Trusted Publishing? What is trusted publishing? |
Yes |
| Uploaded via |
twine/7.0.0 CPython/3.13.14
|
Provenance
Provenance describes where a file came from. On PyPI, provenance is shared via attestations, which provide a verifiable record of the build or publishing details. View details, limitations and caveats.


PyPI Publish Attestation
PyPI verified that this artifact, at this checksum, originated from the publisher listed below.
Signed by GitHub Actions, verified by PyPI on Oct 11, 2026.
Transparency logRelease files / dashio-3.7.0-py3-none-any.whl
| Download URL | dashio-3.7.0-py3-none-any.whl |
|---|---|
| Size | 212.0 kB |
| Tags | Python 3 |
|
SHA-256 checksum How to use checksums |
93426eb998c38829c6f9025dc4b137a9e710259e12442a1b2de23111e3985cae
|
|
BLAKE2b-256 checksum How to use checksums |
b951afdfa531c9b3568ee9c722b8adf09823f86d6d4a445afc370f3b94bf3360
|
| Upload date | |
|
Uploaded using Trusted Publishing? What is trusted publishing? |
Yes |
| Uploaded via |
twine/7.0.0 CPython/3.13.14
|
Provenance
Provenance describes where a file came from. On PyPI, provenance is shared via attestations, which provide a verifiable record of the build or publishing details. View details, limitations and caveats.
PyPI Publish Attestation
PyPI verified that this artifact, at this checksum, originated from the publisher listed below.
Signed by GitHub Actions, verified by PyPI on Oct 11, 2026.
Transparency log













