



Deep Utils
A toolkit for deep-learning practitioners!
This repository contains the most frequently used deep learning models and functions. Deep_Utils is still under heavy development, so take into consideration that many features may change in the future and make sure to install the latest version using pypi.
Table of contents
- About The Project
- Installation
- Vision
- NLP
- Augmentation
- Utils
- Tests
- Contributing
- Licence
- Collaborators
- Contact
- References
- Citation
About the Project
Many deep learning toolkits are available on GitHub; however, we couldn't find one that would suit our needs. So, we created this improved one. This toolkit minimizes the deep learning teams' coding efforts to utilize the functionalities of famous deep learning models such as MTCNN in face detection, yolov5 in object detection, and many other repositories and models in various fields. In addition, it provides functionalities for preprocessing, monitoring, and manipulating datasets that can come in handy in any programming project.
What we have done so far:
- The outputs of all the models are standard numpy
- Single predict and batch predict of all models are ready
- handy functions and tools are tested and ready to use
Installation:
    # pip: recommended
    pip install -U deep-utils

    # repository
    pip install git+https://github.com/pooya-mohammadi/deep_utils.git

    # clone the repo
    git clone https://github.com/pooya-mohammadi/deep_utils.git deep_utils
    pip install -U deep_utils
Installation types:
- minimal installation:
pip install deep-utils
- minial vision installation
pip install deep-utils[cv]
- tensorflow installation:
pip install deep-utils[tf]
- torch installation:
pip install deep-utils[torch]
- torchvision installation:
pip install deep-utils[torchvision]
- torch_transformers installation:
pip install deep-utils[torch_transformers]
Vision
We support two subsets of models in Computer Vision.
- Face Detection
- Object Detection
Face Detection
We have gathered a rich collection of face detection models which are mentioned in the following list. If you notice any model missing, feel free to open an issue or create a pull request.
MTCNN
- After Installing the library, import deep_utils and instantiate the model:
from deep_utils import face_detector_loader, list_face_detection_models

# This line will print all the available models
print(list_face_detection_models())

# Create a face detection model using MTCNN-Torch
face_detector = face_detector_loader('MTCNNTorchFaceDetector')
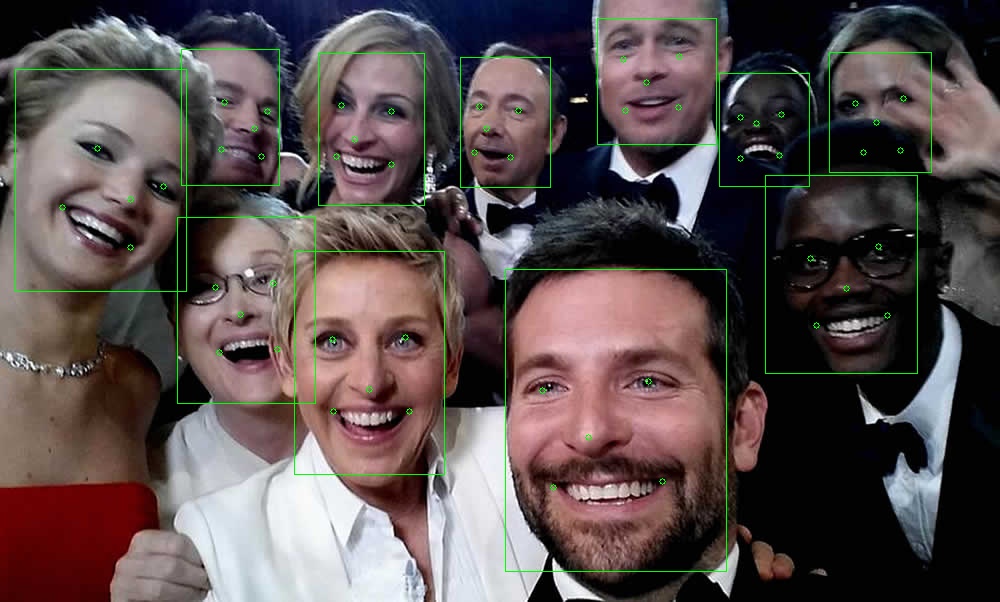
- The model is instantiated, Now let's Detect an image:
import cv2
from deep_utils import show_destroy_cv2, Box, download_file, Point

# Download an image
download_file(
    "https://raw.githubusercontent.com/pooya-mohammadi/deep_utils/master/examples/vision/data/movie-stars.jpg")

# Load an image
img = cv2.imread("movie-stars.jpg")

# show the image. Press a button to proceed
show_destroy_cv2(img)

# Detect the faces
result = face_detector.detect_faces(img, is_rgb=False)

# Draw detected boxes on the image.
img = Box.put_box(img, result.boxes)

# Draw the landmarks
for landmarks in result.landmarks:
    Point.put_point(img, list(landmarks.logs()), radius=3)

# show the results
show_destroy_cv2(img)
The result:
Object Detection
YoloV5
YoloV5 by far is one of the top-5 most used object detection models. The training process is straight forward and the
results
are spectacular. However, using a trained model can be very challenging because of several files that yolov5's model
needs in production.
To tackle this issue we have wrapped yolov5's models in a simple module whose usage will be illustrated in the following
section.
- After Installing the library, import deep_utils and instantiate the model:
# import the model
from deep_utils import YOLOV5TorchObjectDetector

# instantiate with the default parameters
yolov5 = YOLOV5TorchObjectDetector()
# print the parameters
print(yolov5)
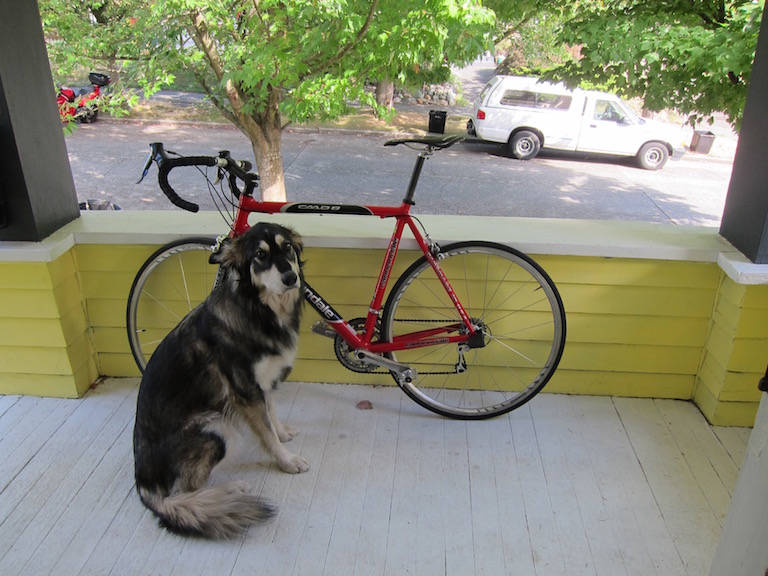
- Download and visualize the test image
import cv2
from deep_utils import Box, download_file, Point, show_destroy_cv2
from PIL import Image

# Download an image
download_file("https://raw.githubusercontent.com/pooya-mohammadi/deep-utils-notebooks/main/vision/images/dog.jpg")

# Load an image
base_image = cv2.imread("dog.jpg")

# pil.Image is used for visualization
Image.fromarray(base_image[..., ::-1])  # convert to rgb
# visualize using oepncv
# show_destroy_cv2(base_image)
The result:
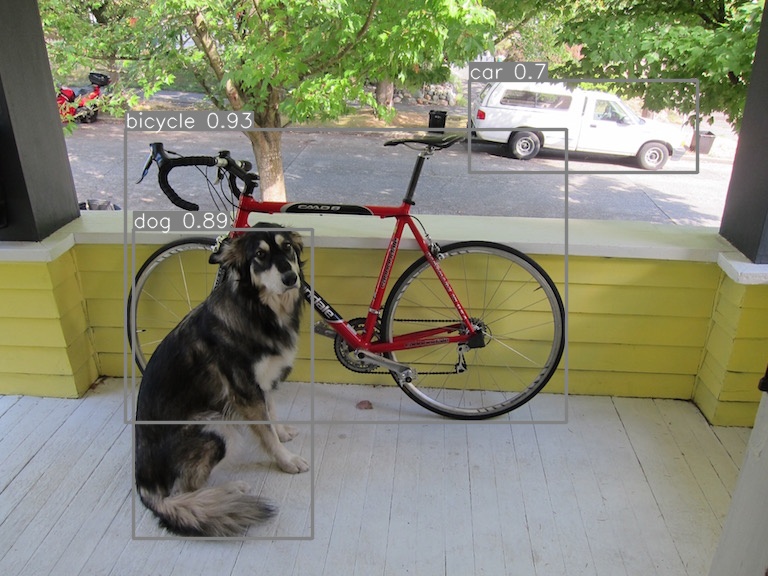
- Detect and visualize Objects
# Detect the objects
# the image is opened by cv2 which results to a BGR image. Therefore the `is_rgb` is set to `False`
result = yolov5.detect_objects(base_image, is_rgb=False, confidence=0.5)

# Draw detected boxes on the image.
img = Box.put_box_text(base_image,
                       box=result.boxes,
                       label=[f"{c_n} {c}" for c_n, c in zip(result.class_names, result.confidences)])

# pil.Image is used for visualization
Image.fromarray(img[..., ::-1])  # convert to rgb
# visualize using oepncv
# show_destroy_cv2(img)
Visual Grounding
Grounding DINO
DINO is a self-supervised learning method for visual grounding. It is a simple and efficient method that can be used for
visual grounding. Let's see how we can use it in deep_utils:
Download a sample image
wget -q https://github.com/pooya-mohammadi/deep_utils/releases/download/1.0.2/golsa_in_garden.jpg
from PIL import Image
from deep_utils import Text2BoxVisualGroundingDino
import numpy as np
import matplotlib.pyplot as plt

model = Text2BoxVisualGroundingDino()

img_path = "golsa_in_garden.jpg"
img = np.asarray(Image.open(img_path))

output = model.text_to_box(text="Hen", img=img)
print(output.boxes, output.scores, output.labels)
annotated_img = model.annotate(img, output)
plt.axis("off")
plt.imshow(annotated_img)
Output Image:

Image Editing
GLIDE
GLIDE is a simple and efficient method for image editing/inpainting. It is developed by OpenAI.
Download a sample image
wget -q https://github.com/pooya-mohammadi/deep_utils/releases/download/1.0.2/golsa_in_garden.jpg
Input Image:

import matplotlib.pyplot as plt
from deep_utils import ImageEditingGLIDE
from PIL import Image

pil_img = Image.open("golsa_in_garden.jpg")
# position of the editing box. Here the hen in the image. The
box = [340.6672668457031, 403.7683410644531, 372.0812072753906, 439.3288879394531]
glide_model = ImageEditingGLIDE()
text = "dead leaves"
edited_image = glide_model.edit_box(pil_img, text=text, box=box)
plt.imshow(edited_image)
Output Image: The hen is removed and replaced with dead leaves as the background

Note: The best way to get the box is to use the Text2BoxVisualGroundingDino model. See the example in the previous
section. Or check the following full sample easy_image_editing
NLP
In this section, models and utilities for nlp projects are provided
NER
Name Entity Recognition
multi-label-stratify
Augmentation
CutMix

CutMix is one of the best augmentation methods that's proven to be very effective in different vision-based project.
Therefore, CutMix is now
available on deep_utils to be used both for segmentation and classification tasks.Let some examples:
Segmentation
import cv2
import numpy as np
from deep_utils import CutMixTF, group_show, repeat_dimension

# creating random images, the code for this section can be found in the colab notebook
image_a = np.zeros((300, 300, 3), np.uint8) * 255
mask_a = np.zeros_like(image_a)
pt1 = (150, 100)
pt2 = (100, 200)
pt3 = (200, 200)

triangle_cnt = np.array([pt1, pt2, pt3])

image_a = cv2.drawContours(image_a, [triangle_cnt], 0, (0, 255, 0), -1)
mask_a = cv2.drawContours(mask_a, [triangle_cnt], 0, (255, 255, 255), -1)

image_b = np.zeros((300, 300, 3), np.uint8) * 255
mask_b = np.zeros_like(image_b)

pt1 = (150, 150)

image_b = cv2.circle(image_b, pt1, 50, (0, 255, 0), -1)
mask_b = cv2.circle(mask_b, pt1, 50, (255, 255, 255), -1)

# CutMix for two individual images:
cutmix_img, cutmix_mask = CutMixTF.seg_cutmix(image_a, mask_a[..., 0], image_b, mask_b[..., 0], beta=1)
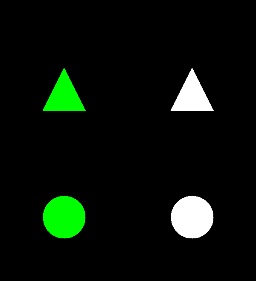
The input and output are as follows:
Input:
Output:

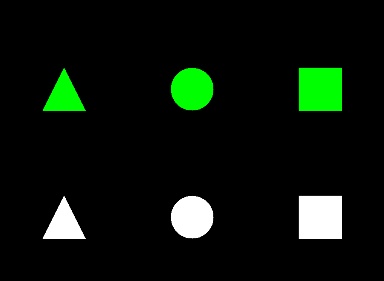
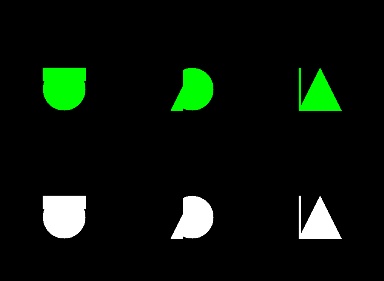
As it illustrated in the above image a section of the triangle and the circle are combined together. By
changing seg_cutmix to seg_cutmix_batch one can use CutMix augmentation for batch of images.
cutmix_img, cutmix_mask = CutMixTF.seg_cutmix_batch(a_images=batch_img, a_masks=batch_mask[..., 0], beta=1)
Input:
Output:
Utils
In this section, various utility functions are provided.
DictNamedTuple
In this custom data type, we have added the methods of the Dict type to the NamedTuple type. You have access to .get(), .values(), .items() alongside all of the functionalities of a NamedTuple. Also, all the outputs of our models are DictNamedTuple, and you can modify and manipulate them easily. Let's see how to use it:
from deep_utils import dictnamedtuple
# create a new object
dict_object = dictnamedtuple(typename='letters', field_names=['firstname', 'lastname'])
# pass the values
instance_dict = dict_object(firstname='pooya', lastname='mohammadi')

# get items and ...
print("items: ", instance_dict.items())
print("keys: ", instance_dict.keys())
print("values: ", instance_dict.values())
print("firstname: ", instance_dict.firstname)
print("firstname: ", instance_dict['firstname'])
print("lastname: ", instance_dict.lastname)
print("lastname: ", instance_dict['lastname'])
# results
items:  [('firstname', 'pooya'), ('lastname', 'mohammadi')]
keys:  ['firstname', 'lastname']
values:  ['pooya', 'mohammadi']
firstname:  pooya
firstname:  pooya
lastname:  mohammadi
lastname:  mohammadi
Multi-Label-Stratify
While splitting a dataset for NER or Object detection tasks, you might have noticed that there is no way to split the
dataset using
stratify functionality of train_test_split of the scikit-learn library because not only does each sample in these
two tasks may
have
more than one tag/object, but also each tag/object of each class may appear more than once. For example, an image/sample
may
contain two dogs and three cats, which means the label/y of that sample would be like [2, 3] in which the index zero
corresponds
to the dog class, and the index one corresponds to the cat class.
To split these types of datasets, the following function is
developed in the deep_utils library which is very easy to use. To use this function, two arrays are needed. The first
is an array
or list containing the input samples. The type of these samples could be anything; they could be a list of sentences, a
list of
paths to input images, or even structured data like the one in the following example. The other array, however, must be
a 2D ndarray whose first dimension is equal to the number of samples, and the second dimension is equal to the number
of the classes. Likewise, each index is correspondent to a class, and each element of this array shows the number of
each sample in a specific class. For example, the element in index [0, 0] of the following array
[[1, 0], [3, 3]], which is equal to 1, shows that the sample 0 contains 1 item of the first class or the class that
corresponds to index zero. Now, let's see an example:
>>> from deep_utils import stratify_train_test_split_multi_label
>>> x = np.array([[1, 2], [3, 4], [1, 2], [3, 4], [1, 2], [3, 4], [1, 2], [3, 4]])
>>> y = np.array([[0, 0], [0, 0], [0, 1], [0, 1], [1, 1], [1, 1], [1, 0], [1, 0]])
>>> x_train, x_test, y_train, y_test = stratify_train_test_split_multi_label(x, y, test_size=0.5, closest_ratio=False)
>>> x_train
    array([[1, 2],
           [3, 4],
           [1, 2],
           [3, 4]])
>>> x_test
array([[1, 2],
       [3, 4],
       [1, 2],
       [3, 4]])
>>> y_train
array([[0, 1],
       [0, 1],
       [1, 0],
       [1, 0]])
>>> y_test
array([[1, 1],
       [1, 1],
       [0, 0],
       [0, 0]])
>>> print("class ratio:", tuple(y_test.sum(0) / y.sum(0)))
class ratio: (0.5, 0.5)
>>> print("sample ratio:", y_test.shape[0] / y.shape[0])
sample ratio: 0.5
As clearly shown in the results, both the sample and the class ratios are preserved. In some datasets, it's impossible to get the exact expected ratio, so the function will split the input dataset in a way that it would be the closest ratio to the expected one. Link to code:
Tests
Tests are done for python 3.8 and 3.9. Deep-Utils will probably run without any errors on lower versions as well.
Note: Model tests are done on CPU devices provided by GitHub Actions. GPU based models are tested manually by the authors.
Contributing
Contributions are what make the open source community such an amazing place to learn, inspire, and create. Any contributions you make are greatly appreciated.
If you have a suggestion that would make this toolkit enhanced, please fork the repo and create a pull request. You can also simply open an issue with the tag "enhancement". Don't forget to give the project a ⭐️! Thanks again!
- Fork the Project
- Create your Feature Branch (
git checkout -b feature/AmazingFeature) - Commit your Changes (
git commit -m 'Add some AmazingFeature') - Push to the Branch (
git push origin feature/AmazingFeature) - Open a Pull Request
🌟 Spread the word!
If you want to say thank you and/or support active development of the repo:
- Add a GitHub Star to the project!
- Join our discord servers Deep Utils .
- Follow my profile pooya-mohammadi
Thanks so much for your interest in growing the reach of the repo!
⚠️ License
Distributed under the MIT License. See LICENSE for more information.
The LICENSE of each model is located inside its corresponding directory.
🤝 Collaborators
 Pooya Mohammadi Kazaj |
 Vargha Khallokhi |
 Zahra Zamanshoar |
 Dorna Sabet |
 Menua Bedrosian |
 Alireza Kazemipour |
 Parnian Nazari |
Contact
Pooya Mohammadi:
- LinkedIn www.linkedin.com/in/pooya-mohammadi
- Email: pooyamohammadikazaj@gmail.com
Project's Link: https://github.com/pooya-mohammadi/deep_utils
References
- Tim Esler's facenet-pytorch repo: https://github.com/timesler/facenet-pytorch
Citation
Please cite deep-utils if it helps your research. You can use the following BibTeX entry:
@misc{deep_utils,
	title = {deep_utils},
	author = {Mohammadi Kazaj, Pooya},
	howpublished = {\url{github.com/pooya-mohammadi/deep_utils}},
	year = {2021}
}
1 maintainer

Metadata
1 maintainer
Release files for deep-utils 1.6.1
For a detailed explanation of source distributions (sdists) and built distributions (wheels), please see the package formats documentation.
Source distribution (sdist)
| File | Size | Uploaded | |
|---|---|---|---|
| deep_utils-1.6.1.tar.gz | 452.8 kB | Details |
Built distribution (wheel)
| File | Interpreter | ABI | Platform | Reset |
|---|---|---|---|---|
| deep_utils-1.6.1-py3-none-any.whl | Python 3 | none | any | Details |
Total release size: 1.0 MB
Release files / deep_utils-1.6.1.tar.gz
| Download URL | deep_utils-1.6.1.tar.gz |
|---|---|
| Size | 452.8 kB |
| Tags | Source |
|
SHA-256 checksum How to use checksums |
18748923ae16e6f3ed84863a2d726b2b332021897b83c46671156d9c7c03fa7f
|
|
BLAKE2b-256 checksum How to use checksums |
92b5c216edd37a67a4d5992fcb44969448b821fc8f203c83eea00b73866dfd9b
|
| Upload date | |
|
Uploaded using Trusted Publishing? What is trusted publishing? |
No |
| Uploaded via |
twine/6.1.0 CPython/3.8.18
|
Release files / deep_utils-1.6.1-py3-none-any.whl
| Download URL | deep_utils-1.6.1-py3-none-any.whl |
|---|---|
| Size | 573.0 kB |
| Tags | Python 3 |
|
SHA-256 checksum How to use checksums |
e817afd6be6621f0ec75b227881b8602c7f8e053b63b338cffc12f31a2151793
|
|
BLAKE2b-256 checksum How to use checksums |
a3d4c9f22094b4f49d71e412d328aad233b17f241cefe636790842be54407f87
|
| Upload date | |
|
Uploaded using Trusted Publishing? What is trusted publishing? |
No |
| Uploaded via |
twine/6.1.0 CPython/3.8.18
|














